

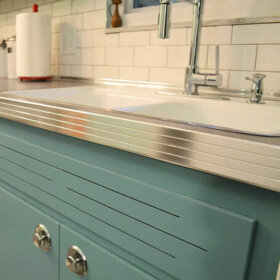
 Several readers have asked me how to install the stainless steel countertop edging from New York Metals. In this post, I’ll take you step-by-step through the process that we used to install the metal edging in my kitchen.
- See all of our Kitchen/Countertops research here — for example, we have research on aluminum (rather than stainless steel) edging, too
- See my overview story on where to buy metal countertop edging — stainless steel, aluminum, even faux
I had my countertops laminated by an outfit recommended by by contractor. They made all the countertops and backsplashes separately, ahead of time, and then, when they came to install them in my kitchen, they put everything together.
To review…The edging is comprised of three different pieces.
This is the little cove molding piece you use to mask where the countertop attaches to the backsplash. The part that “shows” is the 5/16″ part. You shove the 15/16″ part back down behind the main countertop:

This next piece, the 1-5/8″ snap-on molding, goes along the edge of the main countertop.

The question I have been receiving is, how to you handle the corners.
Answers: On the OUTSIDE corners, you snip the the metal lip that sit on top of the countertop and along the underside and miter it; the fat 1.5″ part of the metal bends easily to make the turn:
 On INSIDE corners, you cut the whole piece, also making miters on the lip that sit on the counter and underside.
 Now, somewhere in my stash I saw 50s DIY instructions on how to then weld… spotweld?… sauter? the mitered edges for a clean finish. Who knows which word? Lord knows which of 400 magazines this little article in. But I’ll keep an eye out. In any case, we did NOT weld anything and honestly, it’s fine. It kind of looks worse in the photo above than it is in real life. The miters are just real tight. Hey, if anyone is out on retro recon, with a camera and sees welded corners – grab the shot and send it in.

Finally – the 1″ backsplash…corners, miters…are handled the same way. In spots where the backsplash edges are visible vertically as in the photo below – back by the wallpaper – we made the bend then just secured them with a bead of glue. No screws were used.


Contractor Kevin, along with the countertop guys, were quite trepidatious about the whole thing coming in. This was the first time any of them had done this, their dads had done it 50 years ago! It really was a breeze, though. And as with the rest of my darling beloved kitchen – all the naysayers who thought I was nutso – were totally won over in the end and LOVED IT!

Above – Reader Amy asked you to “end” the countertop against a well. Here’s Option #1 – you run the backsplash all the way around.

Above – Option #1 e.g., where the countertop ends against a fridge, we wrapped the countertop in 1-5/8″ molding there – no backsplash.
Hope this all makes sense.
Note that metal countertop banding is available from a number of companies in a variety of metals. Some are u-shaped, like the kind I used, while others are t-shaped and require routing. Others also may have cute banding. And, there’s shiny and matte finish to decide on. Lots of choices!


Gerry says
I am very excited about impending installation of NYMetal’s edging of these same three types on a new linoleum countertop. Parts are on their way after much discussion leading to color of surface.
Stainless is tough stuff to work with, so I’m a bit nervous about cutting the miters in the outside corners. Pam, you say above “you snip the the metal lip that sit on top of the countertop and along the underside and miter it; the fat 1.5? part of the metal bends easily to make the turn.” What tool are you using to snip the lips that doesn’t deform the lip and cause it to turn up away from or down into the laminate here? My idea was to use an electric compound miter saw to remove the 90 degree vee from both top and bottom lips and then affect the bend to make the outside corners, but I suspect I’m going to cause some roughness and perhaps a sharp edge. Inside corners, where the mitered end protrudes away from the run of edging could perhaps have the same problem. If I can identify what nippers you’re using in these very nice looking examples, I’ll buy them and feel more confident going in.
Thanks!
pam kueber says
Gerry — I am not a hardcore DIY-er. Professionals installed my countertops, including the edging. So, I cannot give you any help here….Consult with a pro — that’s my advice
Gerry says
That which is great about the great state of Alaska is also the cause of some not-so-great stuff: the lack of people also means the absence of professionals to ask.
Thanks, Pam.
Scott Noteboom says
Gerry–
I cut the 90 degree “V” in the NY Metal snap on stainless trim using a dremel tool with a small thin high speed cutting wheel. If you take your time, it’ll cut fine. I do not recommend using any kind of snips, because it will bend the metal.
This, coming from a guy who was an amateur building his counter top, but has experience working with metal….
-scott noteboom
Gerry says
Thanks, Scott:
I’ve purchased a high dollar, many toothed carbide blade for the compound miter box that’s supposed to handle the thin stainless. The span of that channel is an inch and a half, like a two by two. I have enough of the material on its way so I’ll be able to practice removing that V notch from a wood sandwich. I have the dremel tool too. Will compare results and take some pictures to let all know how it goes.
G
Joshua says
Hey Gerry, I’m currently doing my Retro Renovation and using the stainless edging. Just wondering what ended up work best for cutting it. I tried the Mitre saw too but it didn’t leave the best edge.
pam kueber says
Joshua, I’d also recommend talking to the folks at New York Metals (assuming that’s where you got the edging). I bet they could give you advice on how best to cut it… Good luck.
Gerry says
All my stainless steel edging, with the exception of the short piece I repeatedly failed to work with, resides in the 12′ long, cardboard delivery tube it came in. Unused. Granite countertops took the place of my hoped-for retro countertop. The granite looks good. The tube looks expensive. Considering different applications for it.
TomM says
On the outside backsplash picture, where do you find the edging that is seen there between the countertop and the backsplash? It hides the cut edge of the backsplash and keeps stuff from crawling under the back splash. thanks Tom
pam kueber says
TomM, the supplier is listed right in the post. Here’s another post about them: https://retrorenovation.com/2008/05/06/stainless-steel-edging-for-your-laminate-countertop/
tony says
i plan on only capping the front of my counter..not the endcaps so it wouldn’t wrap around any corners. Only one small section opposite to my fridge would show the end and possibly inside of the molding. Do you have any tips on how to close that off? I’m thinking of ordering my cut an extra 9/16in long and cutting the snapping portion off to wrap/bend the remaining front side around to cover the inner workings. It’s either that or come up with a custom cap-off of some sort. I would just wrap around to the wall for this one section but it brings me to 12.4 ft….and it would be stupid to buy an extra 12ft just for .4 inches.
Mid Mod Pam says
Here’s the post on handling a curved countertop edge:
https://retrorenovation.com/2008/10/15/can-i-use-stainless-steel-snap-on-edging-to-make-a-curve-not-easily-use-butcher-block-or-switch-to-aluminum-tee-molding/
CrestwoodsSpringfield1952 says
Hey Pam,
I haven’t called NY Metals, but I did get in touch with someone at Bars and Booths. I don’t think they completely understood what I was asking as their reply was basically that they don’t carry the style of edging I was inquiring about, but offered what they do carry. Wasn’t my question, BUT, I take it they either can’t or don’t want to work with the style from NY Metals. I have someone who still owns one of the counter tops from one of the houses I want, and although the length of the counter/trim was cut down to be re-used in another part of their house, the rounded part is still in tact, and I will just have to seam and extend it further by mating the original with new from NY Metals. I should be ok for my future counter, but I’m sure there are others who would like to use the great NY Metals edging for the same style purpose, so if anyone finds a place that has the tools or experience to round such trim, keep us all posted. I think someone already called NY Metals on this and they basically posted the reply somewhere else on here.
Robyn
Mid Mod Pam says
CrestwoodsSpringfield1952 aka Robyn, have you talked to NY Metals about this question? That’s probably where I would go first. I tend to think that to make the curve, you’re going to need at minimum to go to a professional who works with steel fabrication….Pam
CrestwoodsSpringfield1952 says
Hi everyone. I am so excited about that place in NY still supplying the counter edging. One thing that puzzles me though, is not so much the mitred edges, but how to you get that edge to smoothly form around a semi-circular counter end? In the home I am planning, there will be a “breakfast/snack bar” counter that will have a rounded end to it, with three little half round shelves on the side of the cabinet (under the main counter). With the way the snap on metal is constructed, I can see where it won’t “wrap around” that part of the counter without it buckling due to the stiffness of the part that goes under the counter board as well as the part that goes over the Formica. I figured I would have to notch the part that goes under the counter, but I sure wouldn’t do that to the part that shows on top. My aunt’s kitchen (that I would be re-creating) had this same edge (although I think it was only 3/4″ high), and it wraped right on around her counter edge as smooth as could be. I hope this wasn’t something custom rolled or formed at the factory. Anyone have any ideas of how it’s done?
Thanks,
Robyn
PS: I will post a pic of what this area looks like, when I figure out how to put photos on here. 🙂
Mid Mod Pam says
nancy b – Done! I put two new photos in the post — “inside corner” and “outside backsplash” to show the detail. Goodness, I need to dust!
nancyb says
Thanks for the tutorial, Pam! Can I just press the easy button and “pouf!” have the 50’s kitchen of my dreams? Due to my morbid fear of picking the wrong contractor and wasting time, money, materials and my sanity, I’ve convinced my husband that we can do this ourselves. Luckily, we have simple manageable-sized countertops. One area I’m confused about is highlighted in this picture:
http://i31.photobucket.com/albums/c361/starletstyle/dsc_0958.jpg
Could you take a close-up of this area, pllleeeeaaase?
Thanks!
Elizabeth Mary says
Pam,
I am writing to tell readers that there is another edging made by the same company: aluminum. That is what I decided to use for my countertops, partly because the stainless cove looked confusing and the countertop would have to be the exact right thickness for the snap on to work.
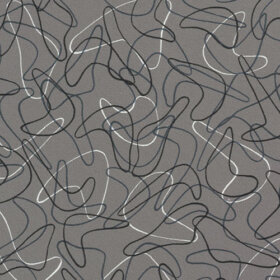
But, the main reason was that when looked at my current/orginal counters I realized that they are edged in aluminum, with holes for screwing the edging in place, and nailing the cove in place. So, being the freak I am about staying original when possible, I decided on the aluminum in the polished finish. The package arrived this week from Astoria, Queens, and it is beautiful and shiny just as the stainless is. Now, I just have to hope that my contractor can get the countertop made soon. It will be the charcoal colored boomerang and I can’t wait to see it in my little 1946 kitchen.
Elizabeth Mary from Hudson NY