


Disclosure: Rust-Oleum paid for my transportation, lodging and food to attend this special event in New Orleans, where I could test this new product and hear directly from their company experts. There was no promise of news coverage. Opinions are my own.
Repainting your kitchen cabinets has historically been one of the most thankless home renovation projects. I say “thankless,” because in my experience, even after cleaning, sanding (argh), priming, then repainting — the doors still get chippy and the cabinets can still look kind of chalky and blah. It’s a lot of work with iffy results. Now, though, it seems like the folks at Rustoleum have come up with a new DIY painting system — Rustoleum Cabinet Transformations — that promises at least four major benefits: (1) No stripping, sanding or priming required, (2) excellent paint adhesion, (3) high-quality looks, and (4) a price tag less than $150. With this product, the company seems to be making a major move on today’s kitchen renovation market — which, in the wake of the Great Recession, is about working with what we have — especially what we have is existing, functional cabinetry. Of course, people still want an updated look, and Rustoleum is aiming to deliver it — in this cabinet-painting kit. My prediction: This product has all the makings of a huge hit.
Last week, I was one of 10 home renovation and design bloggers invited by Rustoleum to see and experience this new product.
")
Another benefit of Rustoleum’s new system is that everything you need comes in one kit, except for brushes and gloves. Before you start, remove and number the doors and set them up “assembly line” fashion for efficiency. If you’re going to change your cabinet pulls, this is also the time to drill new holes and fill the old.
5 steps to repaint your kitchen cabinets
Step #1 is to use their special solution to clean the cabinets. Their cleaner is formulated to remove grease and grime and to bring up the “tooth” of the wood, so that you don’t need sanding. Oh, and let me properly introduce you to Ashley Lehrmann, pictured throughout playing the role of DIY painter. She is Senior Brand Manager, Rustoleum — and this product has been her baby for the past two years.

Steps #2 and #3 — Paint the kitchen cabinets using the tinted “bond coat” paint provided. Two coats, dry between according to instructions. I’ll talk more about colors in a moment. No noxious fumes (read more on the website), in fact, they tell you to close all your windows while painting to avoid dust and such from ruining the finish.

Step #4 — Optional — Add glaze, also provided. You apply the glaze… then wipe it off to get the effect you like. For example, you can only do the beaded areas for slight antiquing. The glaze helps emphasize the wood grain. But, you can leave the glaze off altogether for a solid color look.
![]()
Step #5 — Apply clear top coat (oopsy, no photo)…. and you’re done and ready to reinstall your doors. You’ll be painting both sides of the doors. And, you’re also going to paint the inside of the cabinet (no glaze, typically.) Of course: Read all the instructions on the box — and be sure to check out the Rustoleum Cabinet Transformations website, which should win an award for its presentation and thoroughness in today’s digital age. Nicely done.
Where to buy Rustoleum Cabinet Transformations
Pricing:
- $79.99 for the small kit — enough to cover 100 s.f.
- $149.99 for the large kit — for 200 s.f.
Where to buy:
- Check the website… but retailers include big box stores like Home Depot, Lowes and Menards… and there are smaller, more localized retailers, too.
Etc:
- Good on laminate and melamine, too.
- And yes: It will work on metal cabinets, too. Although you will get a satin finish, not a high-gloss enamel. Plus they said scuff up the metal and prime it, too. (Precautionary Pam reminds: Test for lead paint, consult with pro’s re proper safety and environmental precautions.) That said — they offered to talk to me further about other potential DIY solutions for our beloved steel cabinets. Stay tuned.

If you are super duper cost conscious, I think that you *could* do this project for less money, by using the “tried and trued” tools of sandpaper, primer and paint. But, I was convinced this $80-$150 expenditure looked well worth it, for a number of reasons:
- Rustoleum is a company that is all about “surfaces.” From their presentation it certainly seemed that they recognized the need for a paint system that combined excellent adhesion with professional quality looks. You DON’T want your painted kitchen cabinets to chip! I guess, like a 10-year-old car, we’ll see if their reassurances hold up, but from the look of the finish in person, I’d tend to think it will.
- In the same vein, the quality of the finish appeared to be excellent — the cabinets were beautiful. The two coats of color went on like liquid butter — there was both opacity and smooth flow. No lumps, nothing like that. I’ve spent many hours poking around kitchen stores looking at kitchen doors, and these looked like ringers to high-end painted-glazed kitchen doors to me.
- They had me at “no sanding.”
![]()
Retro kitchen cabinet colors
So now, let’s talk colors — vintage, retro, mid-century colors. There are 35 kitchen cabinet colors in the Transformations line right now, add glaze and they offer 70 looks in all.
![]()
In terms of the solid colors offered, I thought that a few — including a yellow, some of the blues, some of the whites, and even a Brady Bunch orange — had potential for our mid century kitchens. Except for the whites, the blue above, and the avocado green, though, none of them were what I’d call “retro”. Alas.
![]()
They also had a bundle of wood tones. I believe we were told that the Kona was selling like hotcakes. Again, though, nothing jumped out at me a “perfect” retro woodtone. In fact, I thought lots of the colors had a strange orange cast. I believe Rustoleum when they said they had consulted with professional color marketers and forecasters. I admit, I am out of touch with what’s popular “today” — I need to get me to a kitchen store to prowl around. To be sure, Rustoleum is aiming for the heart and soul of the mainstream, and that ain’t us, I guess… although, I certainly see “Retro” as an revival trend right now. Ummm, they had Greige, of course.

Yes, alas, no aquamarine, and wouldn’t it be fabulous to have, say, Mamie pink, sunbeam yellow, maybe a Ming green. The good news, though, is that the paint in the kit is tinted at the store when you buy it. So, it’s not an impossible thought that new color formulations could be developed — and they certainly know that Retro Renovation wants retro colors. I’ll keep in touch with Rustoleum about it… Meanwhile, if you are really hot to trot to freshen your cabinets, I’d for sure to out at look at the options available with this system.

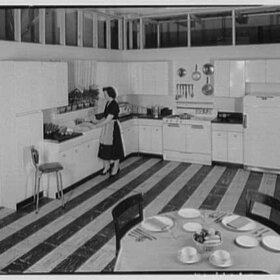
On the use of glazes for mid century kitchen cabinets: Yes, I have seen marketing materials that indicated glazes were used on wood cabinets back in the day:

For example, these 1959 Fashionwood cabinets, above. Okay, maybe this is not “glaze over paint” — this may be a stain — but I think you can get the same basic look with the Rustoleum Transformations. The “avocado” color I mentioned before is achieved with a glaze.

As a reference for midcentury woodtones, here is another post I did about wood stain colors for television cabinetry from 1956.
 And, here is another reference post — color combinations for wood kitchen cabinets from 1953. Of course, we have a gazillion more images all over the site and in the Galleries that show vintage kitchens with their original finishes.
More stories about mid century paint colors and kitchen cabinets
Point is, I have a number of resource references for retro kitchen cabinet colors on the blog:
- All my paint color palettes for mid century homes.
- All my stories about kitchen cabinets for mid century homes.
- And if you’re looking to design a retro kitchen, be sure to read my complete Retro Kitchen “get started” page here!
Many thanks to the team from Rustoleum, along with their media agency, Empower MediaMarketing, for the excellent preview event. Tomorrow: Photos of some of the fun.
![]()


Krystal says
I painted my cabinets & polyeurethaned them 7 years ago and they chipped
& cracked. I wanted to redo them white but after seeing the colors from this new line, I’m debating which color would look good without doing plain white. It’s hard to tell by the box & website. I just don’t want a “pickled” look or a dirty glaze either.
Could you suggest which shade was closest to whit but still looked “trendy” for today’s styles?
(I’m painting to sell, so I need it be neutral without being plain cold white, if that makes sense!)
Thanks!
pam kueber says
Krystal — I believe there are displays in the store, I point you to those. Unfortunately, we did not get painted samples to take with us. There were several whites that I though would work. I tend to prefer creamy … rather than a brite white.
Tikimama says
Krystal – I’m glad I’m not the only one who thinks those glazes just look “dirty”!
Leah says
You know, Pam-I’ve been putting off painting my cabinets for over a year now, because it just seemed like I’d run out of steam (& lets be honest-I’d run out of patience & skip steps), with all of the sanding, cleaning, painting: REPEAT a thousand times. But, this actually seems DO-ABLE for someone like me. Thanks for sharing your info on this product, I glanced at the box at Home Depot last week, but never really checked it out.
Rachel says
This is awesome – thanks so much for reporting back. It looks really interesting, and I’m glad to hear there are no fumes (something the gal at our Home Depot said there was). I’m still wishing it was easier to custom-tint it, but I’m glad to hear they are working on that! And thanks for putting it all fully into the context of retro renovations by supplying such great info on true retro cabinet colors and finishes! 🙂
pam kueber says
Rachel, I would say the smell is Minimal. I’ve asked the folks at Rustoleum to address the various comments. Rustoleum, can you comment on the smells and VOCs? Thanks!
Rust-Oleum Cathy says
Cabinet Transformations is safe to use and has very low odor. The VOC level is < 350 grams per liter.
Stacey says
This looks like a godsend…my wood kitchen and bathroom cabinets could use another coat of paint.
Just out of curiosity has anyone tried Rustoleum’s products for laminate counters?
pam kueber says
Stacey, they also showcased their new Countertop Transformations — a multistep process to create a stone- or granite-like look on your countertops. I will do a short post on this, I think. But, granite is not really my thing. They also have laminate countertop paint. I have no experience with it… Note: I did tell Rustoleum that if they invent us something that looks like the gold-sparkle-on-white, that would be dandy.
Stacey says
I don’t want the granite look, I’m going more for a solid color on my counters. Mine are laminate and about as old as I am and are coming to the end of their useful life, mainly because the chipboard that the laminate is mounted to is starting to crumble. I don’t think painting the counters will really help with that anyway. Maybe I should just save my pennies and have the countertops replaced!
But it would be nice to give them a new look with a nice coat of paint.
When I do replace my counters in my 1957 mostly-original kitchen, it won’t be with granite! Probably laminate, corian, or quartz/silestone.
Adriane says
We used the Rustoleum laminate countertop paint and have LOVED the results. Our 1955 ranch has a horrific 1980’s kitchen complete with white melamine cabinets and green/pink fake marble countertops. We can’t afford to replace it all any time soon, so when we bought our home in October 2010, I purchased the Rustoleum paint in a dark gray (sorry Pam, we needed a neutral color that was dark enough to hide stains) and it really has been great. It stinks for a couple of days and you have to plan to not touch the countertops for a while, but the application itself was pretty easy using a roller and a brush for the edges, and it goes on thick and even. Sometimes it will get rings in it if you leave a wet glass on it for too long (like overnight) but once you pick it up, it dries and disappears in a few hours. I think DH has noticed some teensy chips in a couple of places, but I never have. And at the end of the day, this was a very very affordable solution to a problem we could not afford to tackle any other way. Now I’m thinking about trying some of this new cabinet paint for the melamine cabinets. I’ll be interested to hear of anyone using it for that!
pam kueber says
This is really interesting to hear about, Adriane! And please, don’t apologize for the dark gray color choice! I have decided that I personally have an anti-gray gene — but that doesn’t mean others should not embrace it if that’s the color that works for them! I’d love to see a photo if you can take a moment! We are told the new Rustoleum Cabinet Transformations also works on melamine…
danielle thompson says
Hi! I have a question for you (this sounds fabulous btw!) I have some mid century kitchen cabinets that I did a painted crackle effect and portuguese motif stencil on about 10 years ago (i know, it’s hideous.. i’m not sure what i was thinking!!) We’re wanting to refinish them and paint them white.. just something neutral like that because we’re planning on putting the house on the market. Would a layer of crackle paint and stenciling work with this method? i’m thinking not, but i thought I’d ask anyway. Maybe it’s already built up too thick? We’re paying someone to refinish them and i’d love to cut down on the time he spends doing it (sanding, etc). Thanks for your help!
Rust-Oleum Cathy says
Danielle – Without knowing how thick the crackle finish is, and the make up of the stencils we would suggest that you sand or remove the stencils, and buff down the crackle finish. We would then suggest adding a primer before using the cabinet product to be safe. I hope this helps.
Jeanne says
Can this be done over already-painted cabinets? It looks great, but it looks like they are using a new cabinet door as their sample. What about a grimy old one? 🙂
Rust-Oleum Cathy says
Cabinet Transformations can be applied over previously painted cabinets, that is part of its charm. 🙂
Laura says
This is fantasitc, Pam. Thanks for sharing. I was just thinking how I needed to repaint my kitchen cabinets less than a year after they were professionally painted. Wonder if it is available in Canada? Wasn’t evident from their website.
Rust-Oleum Cathy says
The product will only be available in Home Depot stores in the Toronto area in a few weeks.
Sharon says
It’s really sad that things are only available in Toronto, it’s only one city when there’s a whole country. I guess I’ll have to do it the old fashioned way out here in Calgary.
TerriLynn says
Can you order it online, or have a friend ship it to you?
Gavin Hastings says
I swear by Benjamin Moore Fresh Start and 2 coats of Satin Impervo Alkyd.
Six years, no chips and very durable.
Gavin Hastings says
…and I found that “breaking the job up”- sections 1, 2, 3- over a period of several months forced me to do better quality work.
The task of painting 16 disassembled cupboards, doors and drawers all at once; in my tiny 9×9 kitchen, somewhat insured that I’d be doing a crappy job by the end! Completing it in stages was not so daunting.
Crystal says
Did you seal your cabinets with a top coat?
Marta says
I’m wondering if this product could be appropriate to use on a couple of small projects I have going, a little wooden chest of drawers and a little tool bench. It would be nice to have kitchen cabinet durability.
I’m also wondering if you could have tint added, like you do to regular paint/stain, in order to get the color you really want.
pam kueber says
Yes, Marta, the product can be used on furniture also — Rustoleum show some photos on their website. And, yes, you can have the bonding/paint custom tinted. However, to get the custom tint, you are going to have to buy it from a paint store that will work with you to experiment to get it right. As of now, there are no “formulas” — I am told that different retailers/paint companies have different systems.
Marta says
Call me Mrs. Blandings, but I always take in a sample of the color so they can read it on the spectrophotometer. Scraps of fabric, paint chips, etc.
They can read anything that fits under the machine, but the sample has to be large enough. I was told they needed about a square inch, but you can cobble together smaller samples, like when I cut the little stripe off a wallpaper border and taped the pieces together from the back.
Mark says
Marta,
I pieced together a similar system with off-the-shelf items: a deglosser by Klean Strip, and a primer (bond coat), brand new product by Rustoleum (Bulls Eye Zero) that is custom tintable. We had trouble tinting it to the color I wanted because it is not a standard paint base with a known quantity of white pigment in it. This product has a lot of white in it, and not much room for tint so it ended up lighter than I wanted. I think the product this blog is about will have less white pigment in it, but it will still be guesswork on the part of your paint guy.
The deglosser worked great, and the bond coat went on superbly. When it dries in a few minutes I’m going to top coat it with tinted latex wall paint and then seal it with a water-based polyurethane. The glaze is the only part of the equation I haven’t figured out yet.
pam kueber says
Mark, At the event I went to with Rustoleum, they said that they had taken their glazing queues from a sister company, Modern Masters. (Both companies are owned by the same parent company, RPM, I believe it is called.) Here is the link to Modern Masters’ product page: http://www.modernmastersinc.com/products.asp?mode=category&bid=6
I think you are correct in how you have “reverse engineered” the process. I think you also are correct in identifying a key problem: Getting the primer to tint to the color that you want. For sure, Rustoleum has anticipated the problem with their “secret sauce” tints that go into their kit product. One idea: If you can identify that you want one of the colors in their kit — you could always ask Home Depot or Lowes or whoever to tint the Bulls Eye Zero using that formula. I am going to bet you would get close. I’d love to see how your project turns out — send me a Contact when you’re done and we can connect re photos. Many thanks! Pam
Patty says
While they say it is good on all types of cabinets, did they actually have samples of laminate, etc for you to see/test?
pam kueber says
No samples of laminate there. Do you have laminate cabinets?
sue says
I have laminate!!! Any samples of how it worked? I have laminate woodgrain looking very dark, maybe call it walnut. I was thinking of doing my kitchen in either grays and yellow and doing cupboards white. OR should i just keep the dark cupboards? OH and I have the pink tiled bathroom with the black tirangular trimming or diamonds maybe they are and going to redo that this spring. already got ideas! excited!
sue says
and also in my pink bathroom, i had bought 21 yrs ago a black pedestal sink and toilet. keeping them UNLESS i can afford maybe a white set have you ever seen a pink retro bathroom with this? will it still look kinda modern retro you think? also going chrome or aluminum or polished nickel you get the idea for hardware and mirror and lighting.
pam kueber says
Sue, I think that pink with black is fantastic… very deco, glamorous.
Mary says
I have a pink bathroom with black fixtures and it’s a great combination
Patty says
No, I don’t have laminate cabinets and would never have the confidence to tackle such a big project, but I was thinking this might be a good product for a small piece of furniture. I asked the question because it’s easy to showcase the ideal example, but was wondering about other types of applications. I’m wondering how this would work on a coffee table with a veneer, for example.
When I was redoing my kitchen several years ago, I couldn’t find affordable metal cabinets, and doing it myself was out of the question, so I don’t have a retro kitchen. I do have a ton of retro stuff — family” heirlooms” mostly in my 50s ranch.
It seems the key to achieving good results on these projects, it takes a combination of skill and thoughtful product selection.