From French Provincial to Retro Modern: Mike and Lindsey’s pink bathroom before & after
pam kueber - June 4, 2012, Updated: January 31, 2019
Retro Renovation stopped publishing in 2021; these stories remain for historical information, as potential continued resources, and for archival purposes.
“We went back and forth on just gutting the whole thing, but … [once] I …saw some cool examples of pink bathrooms and ideas from others, a plan started to form on how we could make it our own. Suddenly, pink was kinda cool.”
Lindsey and Mike
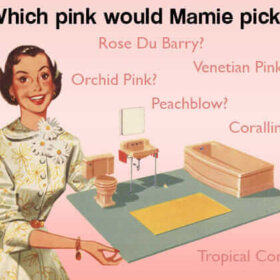
I am going to subtitle this story, “The versatility of midcentury bathrooms.” When Mike first sent me photos of his and wife Lindsey’s 1949 pink bathroom “before”, well, I kind of liked it. Very girly, blingy, French Provincial — a classic, enduring decorating style — the room was nicely done. However, Mike and Lindsey just weren’t feeling the frilly love. But rather than ditch the pink (indeed, Mike admits that at first, before they found our websites, they were in pink-shock), they kept the bones of the bathroom — the gorgeous pink tiles — and focused on making *relatively* easy cosmetic decorating changes that transformed the charming country pink bathroom into a retro modern pink bathroom. Such is the versatility of many midcentury bathrooms: 4″ ceramic tile is about as timeless as you can get in a bathroom. Except for during the 1950s, it’s never been hugely “In”. But, it has never been hugely “Out,” either. As a backdrop for any decorative look, 4″ ceramic bathroom tile is pretty darn versatile. It’s affordable, too — especially if it was there to begin with. Read on for Mike’s excellent story about this bathroom before-and-after transformation. Oh, and guess what? There is a second, even bigger pink bathroom in Mike and Lindsey’s 1949 house… But let’s start at the beginning… –>
Mike writes:
So here is our bathroom story….
The bathroom “before”
We will be completely honest and say that we did not love our pink bathrooms at first. During our house hunt in 2009 we were specifically looking for a mid century ranch. Lindsey and I were both moving from 1920’s era homes and had started to really get into vintage, mid century design and style. We both love original tiled bathrooms, but when we finally settled on this house, the pink bathrooms were not exactly what we were looking for. Pink!?? Green, blue, grey, or even black and white would have been great.. but two completely pink bathrooms…pink?…. not really sure about that…
We decided to leave the bathrooms alone as we tackled the rest of the house. We were just not sure what to do with them. We had no idea how to work with all that pink. But not too long after moving in, a loose piece of wallpaper got the better of me and I just could not resist reaching up and peeling it off… and I was off to the races with no real plan on what to do. We went back and forth on just gutting the whole thing, but I thought there must be a way to work with this all this pink. The tile seemed to be in good shape and I just could not bring myself to tear out one of the only original features left in the house. That was when I came across the “Save The Pink Bathrooms” site and Retrorenovation.com. I quickly saw some cool examples of pink bathrooms, ideas from others, and a plan started to form on how we could make it our own. Suddenly, pink was kinda cool.
I certainly understand what you are saying about the “before”. To each their own. The entire house was similar to the bathroom. I guess what I would call french country cottage? Although not our style, it was very well done and I appreciated all the effort and attention to detail the previous owners put into the house. it was owned by a young couple, similar to us, and they had spent the previous 3-4 years redoing the whole house, and then we went in and re-did it all over again lol…. so this house has gotten a lot of attention the last 10yrs, it probably has an identity crisis at this point :).
By far, the two biggest projects were renovating the floor and the built-in vanity.
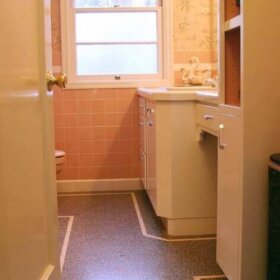
The floor had been completely covered with a faux wood stick down linoleum. Who knows how long it had been there or what I would find under it. It was a painstaking process using a heat gun and putty knife to pull it up inch by inch. Once it was up, the thick glue left behind had to be scrapped off with a razor blade and the tile scrubbed with “goo off” over and over a again. I have well over 50 hours into that floor. Amazingly it turned out great and luckily ran into very few cracks or damaged tiles.
Bathroom floor with the laminate removed
The built in vanity had been given some sort of special paint/epoxy treatment to make it look like old crackled wood.
Not really sure what that was about or what it exactly was, but it definitely could not be painted over.
Hours were spent scraping off of every nook and cranny, filling damaged spots, sanded, and painted.
Then, on to removing the wallpaper…. After it was removed, the walls had to be skim coated, primed, and painted.
Shower door looked to be a replacement from the 80’s and showing signs of rust. Took a while to find a new one in a appropriate style, size, and reasonable price.
The sink and cabinet had seen better days and took up too much floor space in this narrow bathroom. We wanted to do the bathroom in a twist of vintage and new modern, so the wall mount sink from Duravit with the chrome legs was a good fit and a reasonable price. I could also tell a wall-mount sink with legs had been there originally because of the old mounting points on the walls and two spots on the tile floor where the legs would have rested. The chrome legs on the sink led to doing matching finishes in chrome on the boomerang hardware, towel bars, recessed toilet paper holder, recessed soap holder in the shower, and outlet covers.
A few finds from etsy on the vanity stool, art for the wall, and candle holders over the toilet rounded things off.
The light above the sink took forever to decide on. Have had three different lights there and finally rested on what we have now. Really wanted to do sconces on either side of the mirror, but that would have meant bringing in a electrician. In total we spent about $2K.
The pink master bathroom
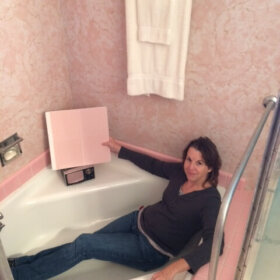
We also have a all pink master bath that is the last room in the house for us to tackle… just started pulling up the same faux wood linoleum floor, oh what joy. (included a pic of the start on the master bath floor)
Prints: Seller/artist on etsy.com — Tonya Newton, Gamma Gamma Hey — that I have bought a few prints from for the house.
Let us know if you need anything else
Thank you!
Mike and Lindsey
What can I say? Not much! Lindsey and Mike, you two did a fantastic job. And you are toooooo cute! Many thanks for so generously sharing your story, your photos and your resource list. Now, can’t wait to see your master bath when it’s done. Two pink bathrooms, happily renovated/renovating. You are a lucky — and smart! — pair. xoxo
What this post shows is how flexible a pink bathroom can be. I really love the restyling of this bathroom because it looks so fresh and clean and has a sense of intelligence about it. A cerebral look, if you will. But, the French Provencial look was well executed and certainly worked well with the pink tile.
I would like to know the brand and name of the paint color, and am curious as to how that color was chosen instead of going with some other color. Also, in that little strip of decorative tile, is there a little black dot, or am I imagining it? What I’m wondering is if the style of the tile strip had anything to do with the choosing of other decorative items that all have a round shape, and all work together so well without looking like they came in a boxed set.
Sorry you have to take up another sticky floor in the master bath. Can’t wait to see the re-do of that room, and would love to see more of your home!
MikeDsays
Thank you all for the kinds words
To answer a few of the questions:
Paint color is “knitting needles” IIRC, from Sherwin Williams. It is a gray with a blue hue, depending on the light. If the window is open and there is natural light, you can definitely see the blue, but if it is just light from the fixtures it has a nice soft gray color. I chose the color because of some pink/gray tile color combo’s I have seen on past blog features. Kinda wanted a pink/gray/black color palate.The towels and rug are a slate gray color.
The detail trim on the tile did indeed impact some choices. One of them was not doing a patterned wall paper, which we almost went with. The cut outs in the light fixture above the sink mimics the pattern in the tile detail.
The curtain is actually made from a shower curtain from Target IIRC. Lindsey has made all the curtains/panels in the house her self (we have a lot, and none are store bought pre-made. Lindsey found fabric and made them all) We have had 3 or 4 different fabrics in that window at one point I think lol
One thing about this redo is that we were in no hurry. It is the guest bath and does not get used a whole lot, so we had time for it to be down for a long time. I changed things several times and had time to hunt around and find just the right items, which took several tries.
We sent Pam other pics of the house, as we have redone every room now except for the master bath. Pam is welcome to share them or I can post a link to photobucket if I can get them all loaded there
-Mike
pam kuebersays
haha, yes, in doing this story, i saw that mike first contacted me in Nov. 2010! mike, hold off on the photo bucket – give me a chance to look at your rest-of-house shots — i may indeed do a follow up. also, what does “IIRC” mean?
MikeDsays
IIRC (if I recall correctly) lol
We have “before” pictures of every room we saved from the realtors listing before we bought the house. Just like that before picture of the bathroom. There seems to be interest in compare and contract on the French Provincial style to ours. Just let me know, I am happy to upload all the before and after.
I have also had the joy of using a heat gun to remove press and stick vinyl tile (off of original wood flooring in over half of my first house) it was tedious, messy, yucky work!
I, too, have had the pleasure of removing a glued down floor except in the opposite way. Years ago, my 11’x22′ kitchen in a 1924 house had 1970’s 1″ square tiles that were laid in a rubber grid. I spent HOURS with heat gun in hand and then glue remover after all pieces were up (the glue was thick and really stuck down) we revealed a maple floor.
The point being, Mike, is that I soooo feel your pain. It’s really back breaking work and I’m so glad you stuck through it because that pink floor is gorgeous.
Beckysays
Fantastic job…though I will admit that I am a girly-girl and I like the before better. ; ) That being said, my mouth is still hanging open at the built-in, tiled vanity…I have never, ever seen that before. Now it is my Holy Grail of pink bathrooms!
Sherreesays
Love it! I even love the little wall heater 🙂 You guys did a great job. So glad you found the original tile under that floor.
MikeDsays
Thank you for featuring our bathroom Pam! Also thanks to all the other pink bathroom renovators from “Save The Pink Bathrooms”


")

 Mike writes:
By far, the two biggest projects were renovating the floor and the built-in vanity.
Not really sure what that was about or what it exactly was, but it definitely could not be painted over.
Shower door looked to be a replacement from the 80’s and showing signs of rust. Took a while to find a new one in a appropriate style, size, and reasonable price.
The sink and cabinet had seen better days and took up too much floor space in this narrow bathroom. We wanted to do the bathroom in a twist of vintage and new modern, so the wall mount sink from Duravit with the chrome legs was a good fit and a reasonable price. I could also tell a wall-mount sink with legs had been there originally because of the old mounting points on the walls and two spots on the tile floor where the legs would have rested. The chrome legs on the sink led to doing matching finishes in chrome on the boomerang hardware, towel bars, recessed toilet paper holder, recessed soap holder in the shower, and outlet covers.


The light above the sink took forever to decide on. Have had three different lights there and finally rested on what we have now. Really wanted to do sconces on either side of the mirror, but that would have meant bringing in a electrician. In total we spent about $2K.
Hardware: Rejuvenation boomerang drawer pulls.
(*affiliate link)


 What can I say? Not much! Lindsey and Mike, you two did a fantastic job. And you are toooooo cute! Many thanks for so generously sharing your story, your photos and your resource list. Now, can’t wait to see your master bath when it’s done. Two pink bathrooms, happily renovated/renovating. You are a lucky — and smart! — pair. xoxo


JKaye says
What this post shows is how flexible a pink bathroom can be. I really love the restyling of this bathroom because it looks so fresh and clean and has a sense of intelligence about it. A cerebral look, if you will. But, the French Provencial look was well executed and certainly worked well with the pink tile.
I would like to know the brand and name of the paint color, and am curious as to how that color was chosen instead of going with some other color. Also, in that little strip of decorative tile, is there a little black dot, or am I imagining it? What I’m wondering is if the style of the tile strip had anything to do with the choosing of other decorative items that all have a round shape, and all work together so well without looking like they came in a boxed set.
Sorry you have to take up another sticky floor in the master bath. Can’t wait to see the re-do of that room, and would love to see more of your home!
MikeD says
Thank you all for the kinds words
To answer a few of the questions:
Paint color is “knitting needles” IIRC, from Sherwin Williams. It is a gray with a blue hue, depending on the light. If the window is open and there is natural light, you can definitely see the blue, but if it is just light from the fixtures it has a nice soft gray color. I chose the color because of some pink/gray tile color combo’s I have seen on past blog features. Kinda wanted a pink/gray/black color palate.The towels and rug are a slate gray color.
The detail trim on the tile did indeed impact some choices. One of them was not doing a patterned wall paper, which we almost went with. The cut outs in the light fixture above the sink mimics the pattern in the tile detail.
The curtain is actually made from a shower curtain from Target IIRC. Lindsey has made all the curtains/panels in the house her self (we have a lot, and none are store bought pre-made. Lindsey found fabric and made them all) We have had 3 or 4 different fabrics in that window at one point I think lol
One thing about this redo is that we were in no hurry. It is the guest bath and does not get used a whole lot, so we had time for it to be down for a long time. I changed things several times and had time to hunt around and find just the right items, which took several tries.
We sent Pam other pics of the house, as we have redone every room now except for the master bath. Pam is welcome to share them or I can post a link to photobucket if I can get them all loaded there
-Mike
pam kueber says
haha, yes, in doing this story, i saw that mike first contacted me in Nov. 2010! mike, hold off on the photo bucket – give me a chance to look at your rest-of-house shots — i may indeed do a follow up. also, what does “IIRC” mean?
MikeD says
IIRC (if I recall correctly) lol
We have “before” pictures of every room we saved from the realtors listing before we bought the house. Just like that before picture of the bathroom. There seems to be interest in compare and contract on the French Provincial style to ours. Just let me know, I am happy to upload all the before and after.
Natalie says
Fantastic! Great job guys and thanks for providing all your resources! I was just about to ask about the shower door. =)
Kate says
Looks great guys!
I have also had the joy of using a heat gun to remove press and stick vinyl tile (off of original wood flooring in over half of my first house) it was tedious, messy, yucky work!
denise says
Looks Great! what a difference.
I, too, have had the pleasure of removing a glued down floor except in the opposite way. Years ago, my 11’x22′ kitchen in a 1924 house had 1970’s 1″ square tiles that were laid in a rubber grid. I spent HOURS with heat gun in hand and then glue remover after all pieces were up (the glue was thick and really stuck down) we revealed a maple floor.
The point being, Mike, is that I soooo feel your pain. It’s really back breaking work and I’m so glad you stuck through it because that pink floor is gorgeous.
Becky says
Fantastic job…though I will admit that I am a girly-girl and I like the before better. ; ) That being said, my mouth is still hanging open at the built-in, tiled vanity…I have never, ever seen that before. Now it is my Holy Grail of pink bathrooms!
Sherree says
Love it! I even love the little wall heater 🙂 You guys did a great job. So glad you found the original tile under that floor.
MikeD says
Thank you for featuring our bathroom Pam! Also thanks to all the other pink bathroom renovators from “Save The Pink Bathrooms”
ChrisH says
Looks great!
j says
Really great! The work and results on the floor blew me away. Congrats on a job well done.
deb says
Wow! Fantastic job!!