


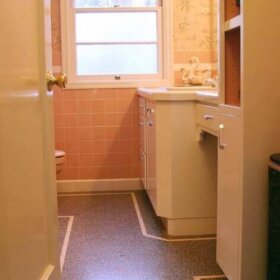
 Monday afternoon felt like Christmas morning at my house. Why, you ask? Because after 90+ hours of work — planning, cutting and adhering — my B&W pink ceramic wall tiles are all finally installed. When the very last tile was put into place, the happy dancing commenced. The pink tile makes it the space “glowy,” as Pam would say. And after having the floor covered up to protect it from mortar spills during the install, it finally came out of hiding to meet the wall tiles. Let me tell you — I am in love.
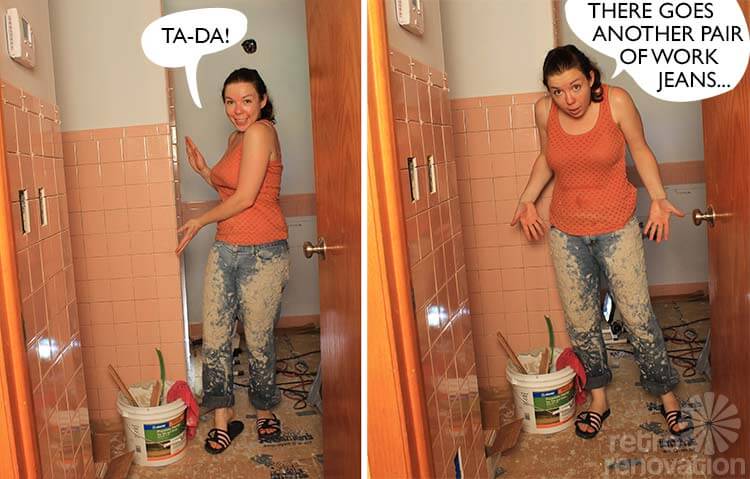 To commemorate the moment, I set up a tripod and snapped a few photos of myself acting like a weirdo. As soon as the photo shoot was over, those pants went in the trash. I have this bad habit from art school of wiping my hands on my pants, which has produced a lot of “designer jeans” over the years. These bad boys were encased in mortar and nearly stood up on their own. Yuck. I had also tossed the drywall jeans. So, better figure a clothing budget into all the 84 costs to consider for a bathroom remodel, if you’re doing it DIY.
 Anyway, back to the bathroom. Prior to this marathon wall tile session, the only vertical tile installations in my repertoire were two, small, one-inch tile back splash jobs in my previous and current kitchen. So, given the size of this job, before beginning I researched tile installation as much as possible — trying to anticipate the unique challenges that may be encountered on my job. In reality, I’ve found that while it is great to do a lot of research to prepare for a job like this, you really do learn the most from actually doing the work. That being said and knowing what I know now, I was an absolute nut bag for attempting this tile job as my first foray into full bathroom tiling.
 While installing wall tile was not as physical a strain lifting heavy pieces of drywall and cement board, figuring out the tile layout took me a day and a half of straight mental work. I’m a very visual person who is not a math expert, so doing the tile layout meant a lot of sketches. I measured and counted tiles, obsessed over the exact size of the grout lines and how their size affects everything, and agonized over how to make the transitions around all the corners in the bathroom. After finally deciding on a pleasing layout and getting the guide lines drawn on the walls, my brain was reduced to mush.
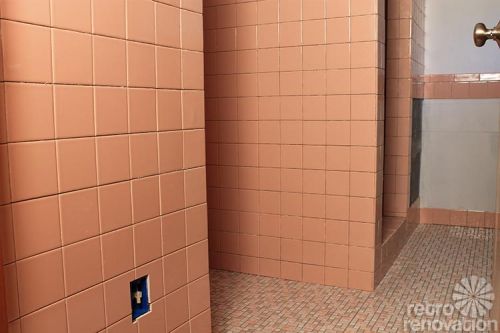
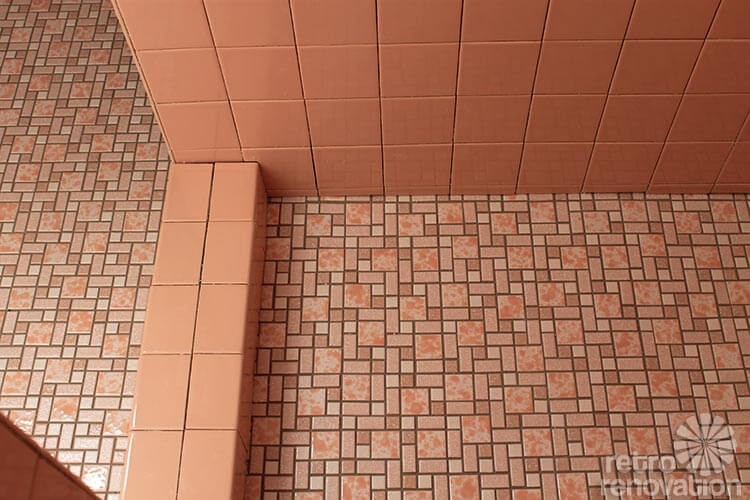
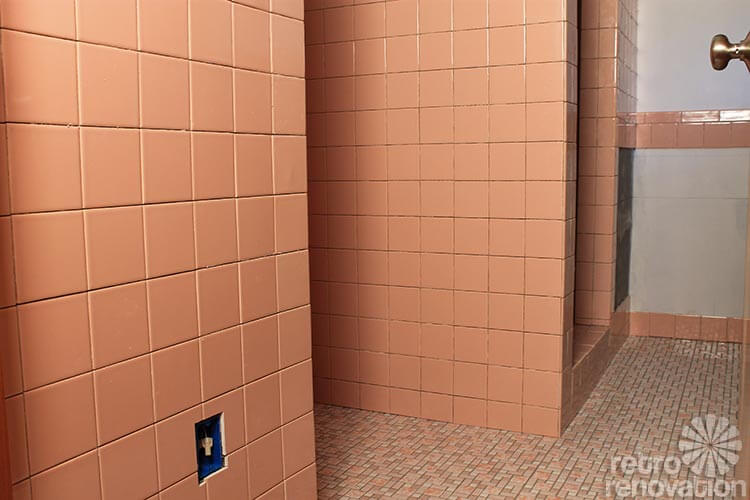 Once the layout was finalized, it was time to start putting up the full tiles. The seven-feet-high walls of of pink tile in the shower felt like an endless job. At one point, I thought I might die in there before all of the tile was installed. Tiling a shower plays games with your head.
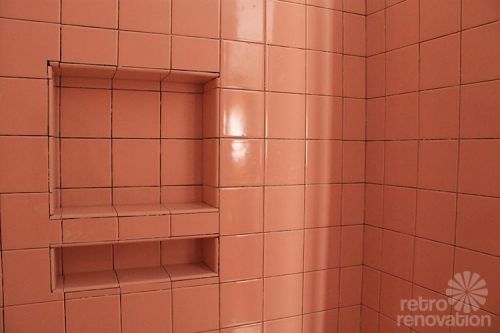 See that niche? It took me a solid six hours to do just this small section of the shower. The inside of the niche was especially difficult. The slightly sloped angle (which allows water to drain out) made for difficult tile cutting. Proudly though, I managed to keep all the grout lines in line. Impressed?
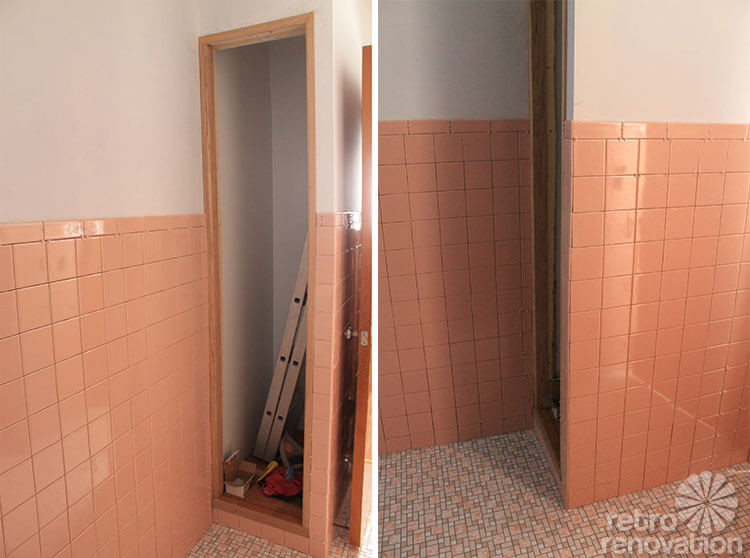 Over Labor Day weekend, when I originally hoped to finish installing the wall tiles, I realized that the wood trim around the windows, door and closet needed to be installed before I could put in the tile near those spots. This necessitated my deciding just how I was going to frame the closet. I then had to take measurements and head off to the store to find acceptable trim for the job. During the trim shenanigans, I also accidentally hit my finger with a hammer, causing another slight delay until the throbbing slowed enough to continue.
 So far, the closet opening is looking pretty good. Making the door for this closet terrifies me, but there is still plenty of time to figure that part out as it is not essential to finish before we can start using the bathroom.
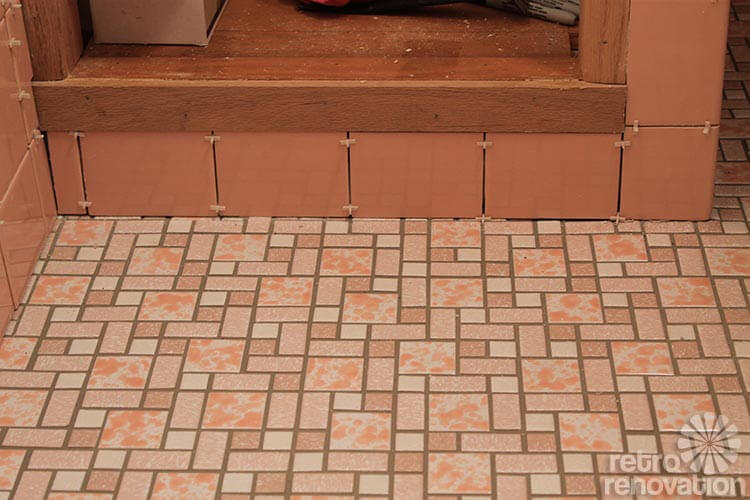
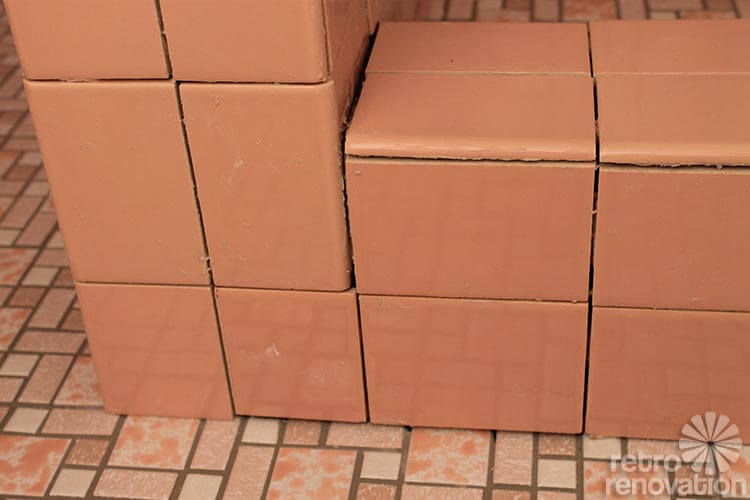
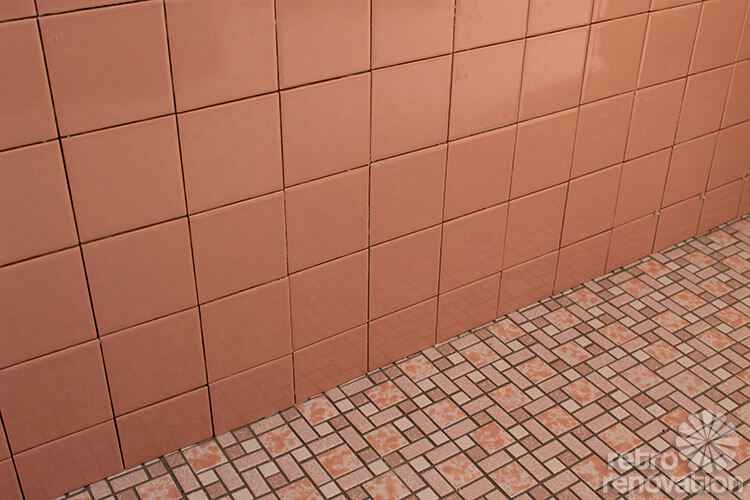
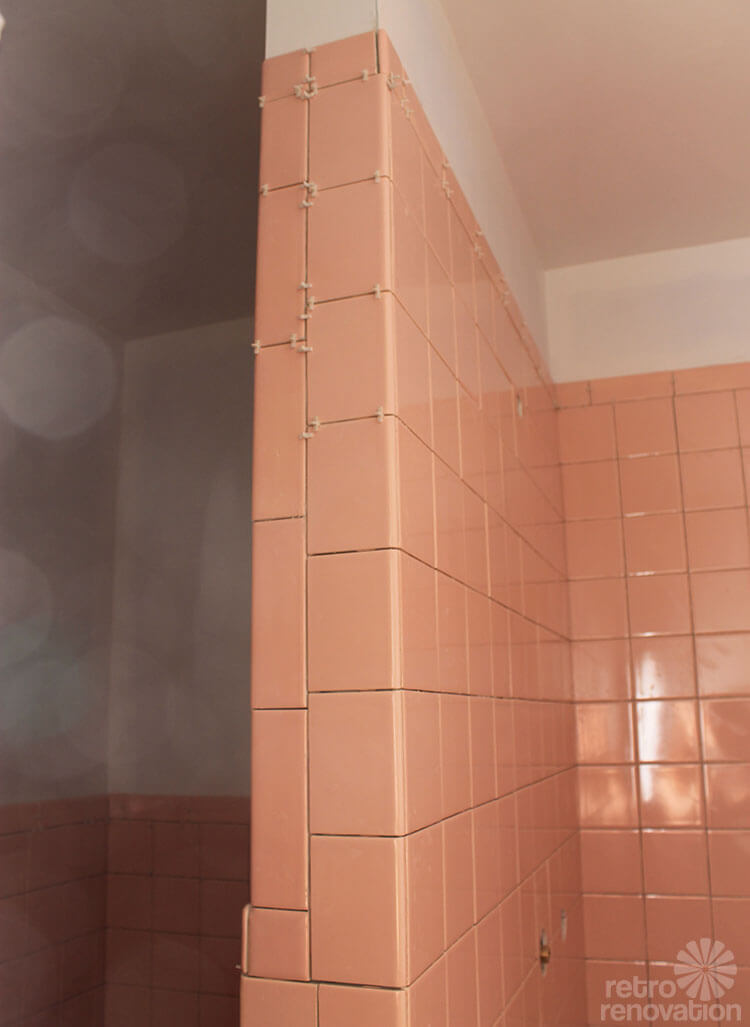 The wall end-caps, the top of the partial wall, and the shower curb were difficult and slow going. It took me another whole day to do these areas. Making sure the everything was straight and that the curb sloped correctly were nerve wracking and very time consuming.
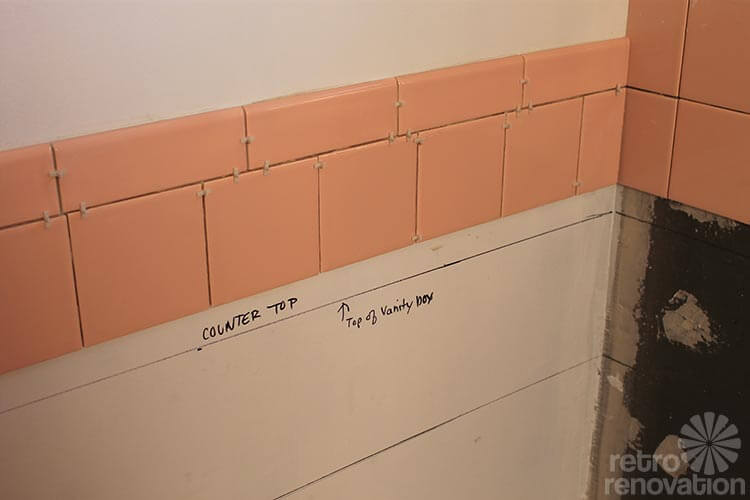 Now the only “hole” in the tile wall is where the vanity will be built. It was helpful both in planning the vanity and for tile layout purposes, to draw the outline of the vanity directly onto the wall. Doing this made it easy for me to see where the tile backsplash should go.
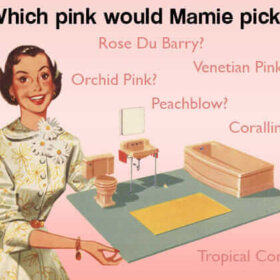
 Here are a few tips that I learned by tackling this project — for anyone thinking about attempting something similar:
- Do spend the time agonizing over the layout. It is a lot easier to redraw lines on the wall than to remove tiles once they are adhered. The layout is, in my opinion, the hardest part of tiling.
- Set a low row or two of tiles for the length of the wall, making sure they are level and then let them dry overnight. This will create a good base for all of the tiles above to sit on.
- As you go, make sure to check that each new row of tile is level and plumb — maybe not every tile, but every row. This helps prevent your suddenly realizing that your whole wall went crooked somewhere.
- Try to make the wall as flat as possible. Lumps and humps where cement board seams meet or drywall bows a bit, happen. Do your best to keep things flush and flat.
- Buy, borrow or rent a tile saw. You will need it.
- Even if your tile has lugs (bumps on the edge that act as spacers), buy and use the plastic “x” spacers anyway. I bought a box of 1,200 spacers for $6. It was money well spent.
- Pre-mixed mortar is more expensive, but saves time — says the girl who spent “only” 90 hours installing wall tile.
- Make sure to buy extra tile. I bought 20% more 4.25″ square wall tiles than I needed, as well as extra specialty pieces like bullnose and cushion edge tiles. Some tiles will be chipped or broken in shipping and mistakes happen. Plus if 20 years down the road you need some replacements, you’ll have spares.
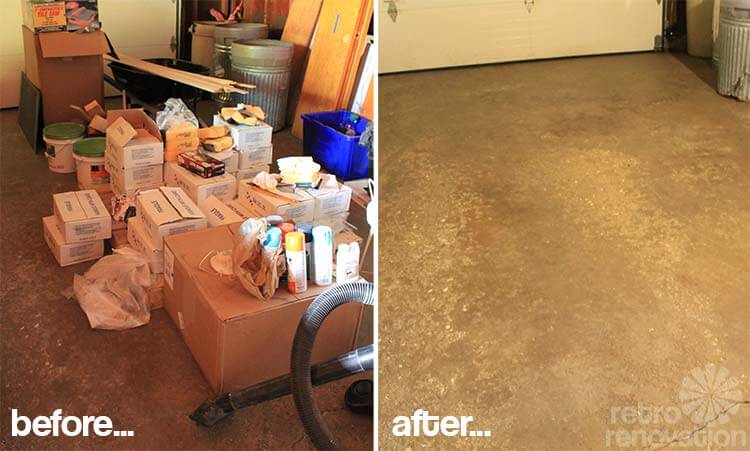 I’m totally jazzed that the tiling portion of this bathroom remodel is over. Since all the tile is on the wall instead of on a palette in the garage, my husband Jim can actually park his car in there again. That makes me months early on my promise to have it cleared out before the snow flies.
Now, on to grouting.


Jennifer Kepesh says
What a labor of love! And thanks for the tips. I would never have thought of drawing on the walls themselves…duh, it will be covered….Reading about all that went into this, I think about when I had my first child, and realized that every mistake I made, every hard thing I went through, made it imperative for me to have more children to put that knowledge to use. So I guess I’m saying, get ready for the aqua-tiled walls of your den…
Kate says
You make a good point Jennifer…
We have a full basement that is completely unfinished that we may want to finish at some point in the future…perhaps by then I could be convinced to tile another bathroom…
MCM is Grand says
Hello, can someone help me with this tile question? (Beautiful job, Kate, by the way)…we have some 1955 bullnose tile that is cracked. Some pieces can be pulled off, others are just fractures…I have found replacements from B & W..how difficult will it be to remove and replace these? I am fearful of destroying the neighboring tiles. Has anyone done this? I think the tiles are mud set ???
Douglas Camin @ House on Rynkus Hill says
Pulling tile usually isn’t too difficult to do – the biggest issue I usually have is trying not to damage (too much) what the tile is attached to. If you have original tile it is possible that you don’t have cement board underneath it and the underlying sheeterock can come off in chunks.
When I remove tile, I take a grout saw and clear the grout from around the tile in question, then carefully pry it up (screwdriver or other appropriate small tool), being careful not to exert too much pressure on the neighboring tile to not damage it, even putting something soft under it. Depending on the space it can be helpful to get something wider behind the tile like a putty knife, but sometimes that’s not possible.
MCM is Grand says
Douglas – many thanks!
Kelly Wittenauer says
Douglas makes a good point about damage to the underlying substrate. I remember arriving at my brother’s first house one day, before he got home from work. His wife greeted me with, “Your brother’s gona kill me, look at this wall.” Dad had loaned her one of those big suction cups used for pulling dents out of cars – to remove a wall of mirror tiles in their living room. Pulled the tiles right off, along with a big chunk of drywall behind each one where the glue was!
pam kueber says
Precautionary Pam is gonna jump in: Remember, peoples: Vintage nastiness can be anywhere in the layers of your house. Get your own properly licensed professional help to help you assess what’s in the layers of your house before you go ripping stuff out and having particles fly everywhere. Renovate Safe.
MCM is Grand says
Pam, thanks for reminding me of this just moments before I get carried away with a project…
LoquaciousLaura says
Hi MCM is Grand —
I have experience with removing bullnose and field mud-set tile. I would say that popping off bullnose was the easiest part — we were trying to keep everything we removed intact — and the way I did this was to chip out the grout, then put a screwdriver behind and tap lightly with a hammer on the screwdriver. Easy does it. Removing field tile is much more difficult.
You are likely to damage the substrate no matter what you do. In my 1953 bathroom, I discovered that all the wall tile was adhered to plywood and that when I pulled off some tiles, a little plywood might splinter/come off. But if you’re just replacing a few, if you properly grout and then caulk the top of the tile, it shouldn’t be a big deal.
If you remove field tile, getting a sharp-pointed tool against the center of the tile and intentionally fracturing the tile might be a good idea. Removing smaller chunks was easier for me (surprisingly).
MCM is Grand says
Thanks very much !
Jenny A. says
That is super impressive! It looks fantastic and I’m very proud of you!! I bet you did the happy dance to end all happy dances when you finished. 😉 I can’t wait to see the next step.
Kate says
I happy danced all the way to the garage — that I then started to clean while dancing…. 😉
JP says
Perfect example of love the house your in! http://www.dailymail.co.uk/news/article-2416637/Retro-house-1960s-fridge-wind-gramophone-WWII-shelter-pensioner-garden.html
pam kueber says
Love it!!
miya says
As Pam would say “Woot Woot”! Great job says this tile-laying mama. Every time I do another tile project I learn a new trick, but gotta say those niches are one of the most difficult installs you will encounter. I still see little ‘mistakes’ in some of my jobs – small bump in the floor, a crooked grout line, mosaic design a little off, but no one else ever notices. Your patience really paid off cuz your room looks perfect!!!!
I live near you- maybe we should quit our day jobs and start our own business – “Tile Laying Chicks” or “Mortor Mama’s” …..
Kate says
Thanks miya,
Yes, there are mistakes in my job too. I am trying to not beat myself up too much about them, and think once everything is grouted they will be less obvious.
Thanks for the offer to go into business, but I think I’m ok with taking a break from tiling. Plus I work too slowly, I would never make any money! 😉
Doug Camin @ House on Rynkus Hill says
I can’t believe you attacked this job all on your own, that’s a ridiculous amount of tile. It looks great! Looking forward to seeing it all grouted, then you’ll really be in the home stretch.
I have some grouting repair\replacement to do on the tile in my bathroom (Stylon brown square tile) that I keep putting off because I’m afraid it will be a bigger job than I anticipate. I need to suck it up and do it.
Kate says
Thanks Doug,
It was an unreal amount of tile. I was in the shower working for DAYS…
I too, have some grout repairs to make in my other bathroom. The tile is in pretty good shape in there, and besides the fact that I am starting to be sick of working in the bathroom all weekend, I also am nervous that it will turn into a bigger job too. At least I discovered that B&W’s white salt and pepper tile is a near exact match for the original salt & pepper tiles in that bathroom, so if something breaks while I’m trying to scrape out the old grout, I can call up B&W. I LOVE THEM. 🙂
JKaye says
Seeing this project makes me think you could build an entire house on your own. Amazing.
Kate says
Hmmm I don’t know about that JKaye…I would need some help for sure. Maybe I could restore an entire home on my own over the course of 10 years…hehehehehe
deb says
Kate, what a fantastic job! It’s really gorgeous and you should be incredibly proud of yourself!
lynda says
Wow! Kate you are the ultimate DIY home owner. I see a perfect job. All those hours of agonizing paid off. I wonder how much it would have cost to have the job done? The pinks go together perfectly. You should list your sources again in the post in case someone stumbles on this post and does not know the back stories. Perfection pays off when doing tile work. Just imagine how you will feel when you actually get to use this beautiful space!
pam kueber says
click on the little logo at the top — the “kate builds a pink bathroom” — and it will take you to all of Kate’s previous stories
Kate says
Thanks Lynda,
I’m not sure how much it would have cost to hire someone else to put in the tile, since this is a complex job, but I know someone who paid about $4,000 for a tile job in their bathroom a few years back. I’m guessing I saved at least that much…
Chris says
Girl! That is a LOT of tile! Are your fingertips totally dried out and sore?
The bathroom is going to be wonderful! Yay for you and all your hard work! I can’t believe you did all that! Impressed! Impressed!
🙂
Kate says
I’ve been buying hand lotion, advil and Icy Hot in bulk during this project. 😉
Adrian says
and a 24 pack beer is required to celebrate!