

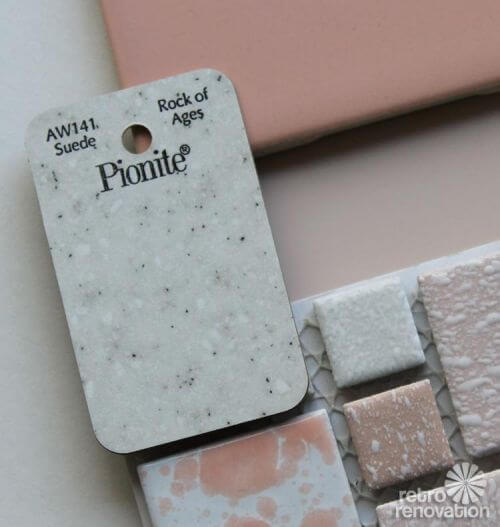
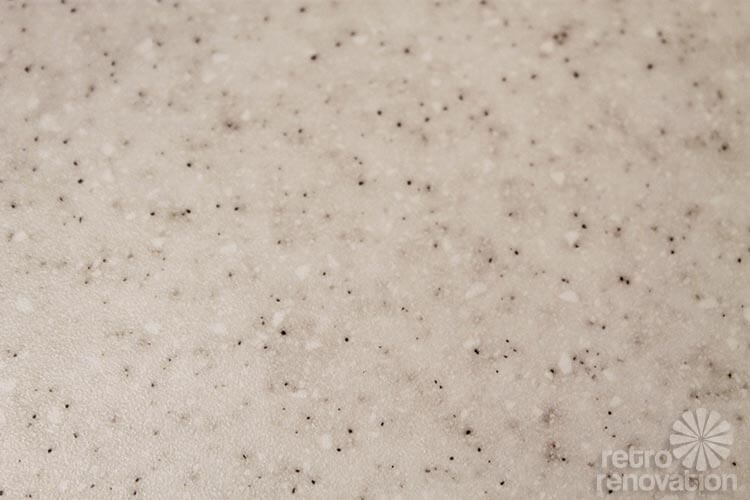
 I visited my local Habitat for Humanity ReStore 12 times looking for a reclaimed piece of vintage sparkle laminate. But boo hoo, no can do, so it was time to start looking for alternatives. Pam’s story about all the places to find laminate was the next place to search, but none of the patterns or colorways seemed right for my bathroom. Feeling discouraged, it was time to search the rest of the laminate world — where I found exactly one laminate selection from Pionite, called “Rock of Ages” that appealed to me for my pink bathroom gut remodel. This particular style reminded me of a sparkle laminate without the sparkle. With my laminate selection made, it was time to get serious about the building and installation process. Laminating a counter top didn’t look too complicated to me — heck, I just built the vanity from scratch — so I decided to do it myself. Now that the project has been completed my verdict is: Laminating a counter top is easy when you have the right tools.
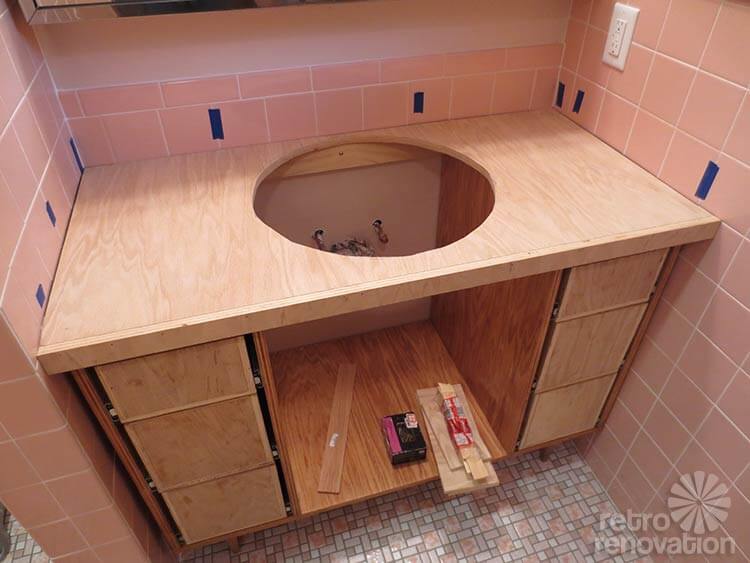 When making your own custom laminate counter top, the first step is building the base — the part the laminate will be adhered to. Using a spare piece of 3/4 inch plywood left over from building the vanity box, I cut the plywood top to size and tested the fit. After making a few adjustments (cutting off a little material in one spot to ensure a better fit), the next step was to cut a 1.5″ strip for the face of the counter top overhang and attach it to the front edge of the plywood using glue and finish nails.
 Important — when deciding how thick to make the overhang, remember to allow plenty of space for drawer and door clearance. Next, position and cut the hole for the sink, using a jig saw. Another option is to cut the hole after the laminate is applied, but I wanted to make sure the hole was correct before going to all the trouble of gluing the laminate.
If you don’t have the tools required to build a laminate counter top, this is where you will incur most of the cost.
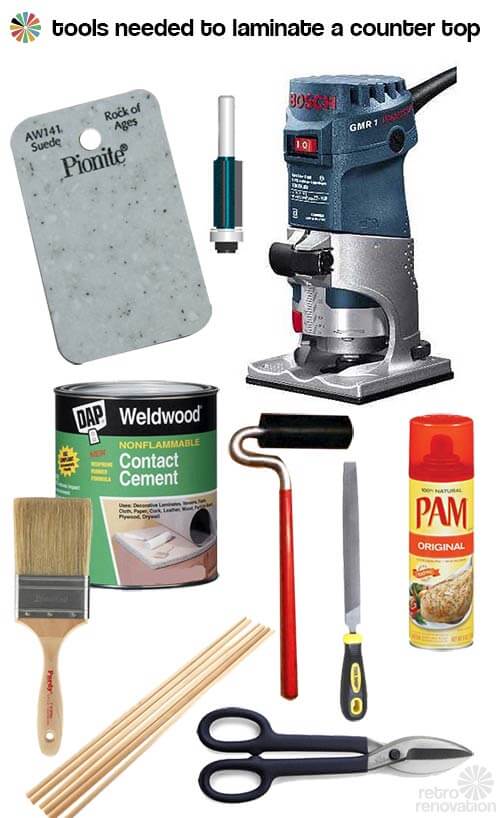
Tools needed to laminate a counter top:
- Laminate sheet that is at least 1 inch larger on all sides than your finished counter top, plus extra for the front strip. I used Pionite Rock of Ages, which was special ordered through my local Menards and arrived at my house in less than four business days.
- Clean wooden dowels or sticks used in laminate positioning
- Contact adhesive — I chose the non-flammable, low odor, water clean up variety
- Router, I purchased this one at Menards, but we also found it on Amazon: Bosch PR20EVSK Colt Palm Grip 5.6 Amp 1-Horsepower Fixed-Base Variable-Speed Router with Edge Guide (affiliate link)
- Router bit — also purchased at Menards but available at Amazon: Bosch 85216MC 1/2-Inch Diameter 1-Inch Cut Triple Flute Laminate Flush Trim Router Bit 1/4-Inch Shank With Ball Bearing (affiliate link) — a MUST for this project
- Paint brush to apply adhesive
- J-roller
- Smooth file, single cut variety for fine work
- Shears to trim laminate into rough sized pieces prior to gluing
- Cooking spray (yes, I chose Pam, tee hee hee) to lubricate router bit
 So why is the flush cut router bit a must have for making your own laminate counter top? It is the only router bit (to my knowledge) that can glide along the front of a soft surface, like laminate, and cut the overhanging piece without damaging the front finished piece at the same time. When this bit is put into the router and set so that just a small amount of the cutting surface is exposed, you will easily be able to trim the thin, overhanging piece of laminate while the rolling guide helps move the router along the counter top edge. The cooking spray helps keep the rolling guide moving smoothly, so it doesn’t catch or become clogged with the debris coming off the cut and also prevents scuffing.
 The laminating process was so quick and easy, that there are no photos to document my process. Just follow the instructions — my Menards had a rack of free how-to brochures near the laminating supplies — to create a custom laminate counter top.
- Cut laminate strips with snips so they are roughly 1″ larger on all sides than the surface they are being mounted to. Make sure the surface is clean and free of debris.
- Begin with the front strip. Brush on a thin layer of contact cement both on the back of the laminate strip and the surface it will be bonded to. Let the contact cement dry completely.
- Apply the thin strip to the front edge of the counter top, making sure to carefully line up the position, then press the laminate onto the counter top edge. Use the J-roller to ensure good contact is made between the pieces.
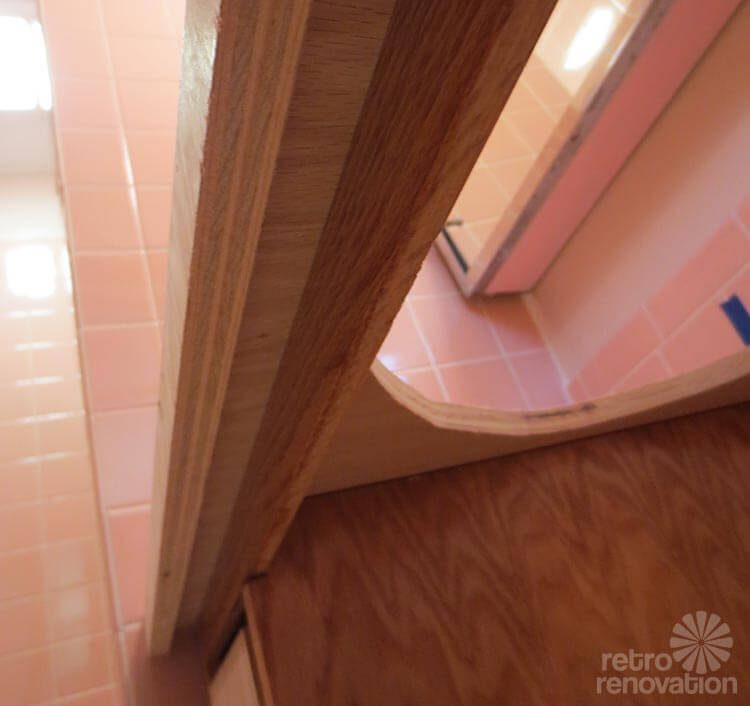
- Use the router with flush cut bit to trim the excess laminate on all four edges, then use the file to smooth the trimmed edge using only inward motions to avoid cracking.
- Next, laminate the top of the counter. Make sure the surface is clean and free of debris. Apply contact cement to both pieces and let dry completely.
- Place the dowel rods on the glued, dried counter top surface to act as spacers when positioning the large laminate piece. Lay the laminate on top of the sticks and get it into the correct position.
- Starting at one side, remove the sticks one at a time pressing the laminate down as each stick is removed. Then roll the laminate with the J-roller using even pressure to the entire surface.
- Use the router and flush trim bit to trim all edges of the counter top as well as cutting out the sink hole. Spraying cooking spray on the front of the counter, where the router will cut against the finished edge, will help the router move smoothly and prevent scuffing.
- File the edges of the top, always filing towards the material, then wipe off any excess glue.
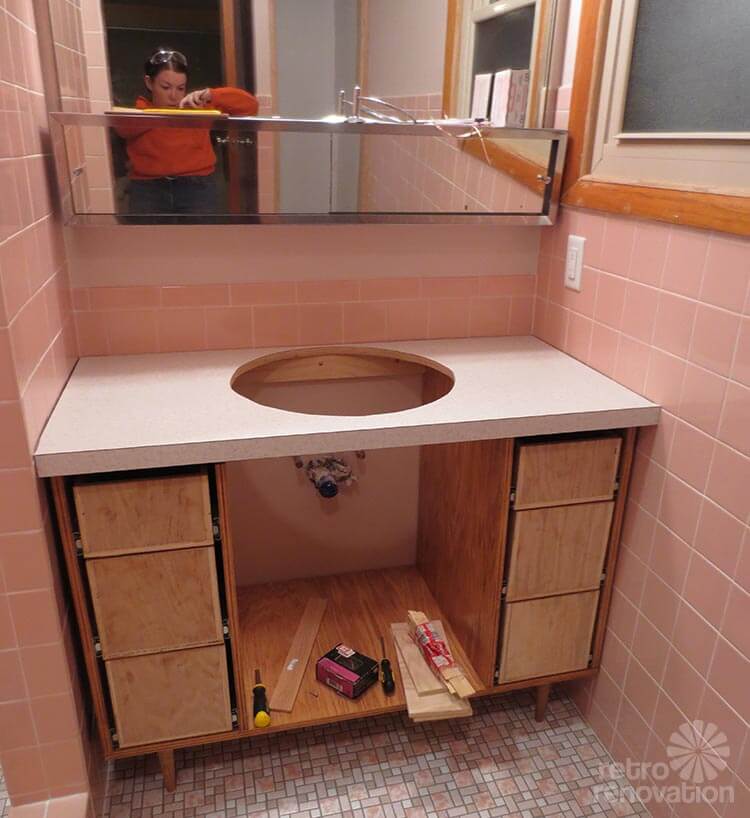 All that was left was to install the new counter top and caulk around the edges where the counter meets the wall. Easy peasy.
 The only tip left to add is this — make a practice counter top with scraps. My lack of expertise with a router made me nervous. Using a small 14 inch by 8 inch piece of leftover plywood and similar sized bits of laminate to practice on first was a good idea. It allowed me to perfect my router skills, adjust the flush cut router bit to the correct depth, test the cooking spray lubrication process and effectiveness and even make sure the filing was going well before attempting anything on my actual counter top.
The longest part of the whole process was waiting for the contact cement to dry. It really was an easy project. The 30″ x 4′ piece of laminate I ordered cost about $46 total, half of which was the shipping and handling cost to get it to my house. Had I chosen a style that was in stock, it would have cost much less. The plywood was left over from another part of the project, so no extra cost there and for tools (including the router) and contact adhesive, another $160 was spent.
Bottom line, if you have most of the tools or plan to do this project (and other DIY projects using a router, file, etc) again in the future, it is inexpensive and easy to make your own custom laminate counter top. On the other hand, if DIY/projects/tool collecting is not your thing, save the money you would otherwise spend on tools and have someone else make the counter top for you. Either way, adding a laminate counter top to your bathroom remodel is an easy, low maintenance and inexpensive.


Carol says
Pam and Kate on the “This Old MCM House” would never have a missed episode by me!!! I was collecting this stuff before it was popular and I am so in love with this website. Thank you so much for the countless hours of pure entertainment and eye candy.
pam kueber says
Well howdy thank you!!!
Dani in Portland says
Kate, I’m so impressed by this and your ENTIRE pink bathroom project. The tiles look professionally installed (no uneven surfaces) and you did everything yourself!
It’s encouraging to see that you laminated this yourself, because so many websites will tell you that unless the countertop is post-formed, you need a contractor. I have the Ryobi 1+ cordless set of tools, and the laminate trimmer within that set is something like $50, so not too bad of an investment for something that I’ll probably use again.
About a year ago, I bought a 5×8 sheet of aqua boomerang Formica off craigslist, and I’ve been itching to install it in the kitchen. The fact that you just did your bathroom gives me oomph. Thanks. 🙂
Mary Elizabeth says
Aqua boomerang? Wow, you are lucky. Good luck with your project.
Anne-Marie says
Kate, you are such an inspiration. Thanks for sharing your DIY wisdom.
We are slowly working on our bathroom which is a complete re-muddle. Our house was built in 69 and every decade is represented. There are at least 5 layers of vinyl on the floor It is basically an archeological dig site. Anyhow, reading of your successes gives us hope.
Kate says
My goodness! Sounds like quite the project. Good luck!
Gus says
Question – did you remove the plywood countertop when you added the laminate, or did you laminate it while it was attached to the vanity?
Kate says
I laminated it in the garage, then attached it after it was complete. It would be too hard to laminate/trim it while attached to the vanity.
Mary Elizabeth says
Yes, it’s easier to do the laminating when the counter is detached. However, we were able to do it over an L-shaped kitchen countertop that was nailed, not screwed in place from underneath, so it wasn’t going anywhere without destroying the cabinets. And it was harder. For one thing, the glue had to be applied to the countertop indoors, and it did stink a bit. (Windows were open for ventilation.) The laminate was spread with glue in the garage, and I had to help my husband carry it in through the kitchen door carefully, being careful not to bump into anything or crack the huge sheet of plywood. Then I worked the dowels and helped keep it in position while he used the roller. Luckily, this was not his first laminate project, so it worked out well.
Robin, NV says
From watching laminate installation on This Old House, I think I can say that following the directions on the glue is key. If you don’t let it dry long enough, you end up with strips that come loose.
My local Ace Hardware has all kinds of tools for rent by the way. DIYers could save a little by renting a tool for a few hours rather than buying. That is if you don’t want the tool for other projects.
Kate says
Yes — make sure the glue is COMPLETELY dry before sticking the laminate to your surface. Very important!
And yes, renting tools is a great option for those DIYers with limited tool storage space or those who only want to do one project. For me — the girl who is always working on a project — buying the tools usually ends up to be the best option. I usually only rent large, very expensive tools that I only plan to use for one project — like post hole diggers and floor sanders.
Robin, NV says
Hah! A post hold digger is one of the few tools I own. Along with pickaxes, tampers, shovels, etc. Yard work is my forte. Plus I’m an archaeologist, so the dirt digging tools are right up my alley. 🙂
Kate says
one of the big, gas powered post hole diggers that looks like a giant drill bit??? Woah! Those things take some real muscle to control!
Robin, NV says
No, no. One of the clamshell post hole diggers.
Mary Elizabeth says
I think all your readers really “dig this site.” Sorry, a little archeology humor for Robin.
Barbara says
My brother used to do that when Formica was pretty much your only option. Apparently, Kate has a steady hand with a router – a skill in itself. Congratulations!
Kate says
I credit my ability to work with my hands to my time spent in art school… and the years beforehand when I was always making things… 🙂 A steady hand is important!
lynda says
Brave and very clever! Maybe you should become a contractor! You know so much about building projects.
Kate says
Thanks Lynda, but no contracting for me! I know some, but not nearly enough!
Jay says
Well I certainly envision you as the hands on host pf PBS’ new show “This Old MCM House. Sharing your experience with counter laminating will no doubt provide a great helping hand to those who encounter this post in the future.
Kate says
Those who “en-counter” tee hee…
Sorry, couldn’t resist. That would be an awesome show!
Roundhouse Sarah says
Yes! I’ve been waiting for this tutorial. I have left over laminate from my kitchen re-do and some NOS aqua laminate in my garage that’s begging to be put on something. Thanks for the info, Kate!
‘Things are easy when you have the right tools”. This is the number one lesson I took away from art school. It’s worth the investment.
Kate says
Exactly Sarah! I learned that in art school too — and also from my Dad and other handy friends. I’ve found it is best to invest in the right tool for the job instead of trying to make do with what you have on hand. Saves time and frustration!
Mary Elizabeth says
You described the process exactly, Kate! The only thing that was new to me was the cooking spray for the router bit. I’ll have to ask my DH what he used instead. I loved your idea about practicing on a scrap piece first. With the mini countertop you practiced on, you could make a small table, child’s kitchen, or any number of things.
You didn’t mention that you can mark the laminate with a carpenter’s pencil and then erase the marks if any remain. This is how we mark our sink cuts.
Laminate often comes in sheets that are too large for your project. With one huge sheet, we did our kitchen counter, then did the laundry room counter. When we did our bathroom vanity, we had enough left over to line a niche under our custom recessed medicine cabinet and also the open shelf in a hanging cabinet.
ChrisH says
Good job. Good how to article.