

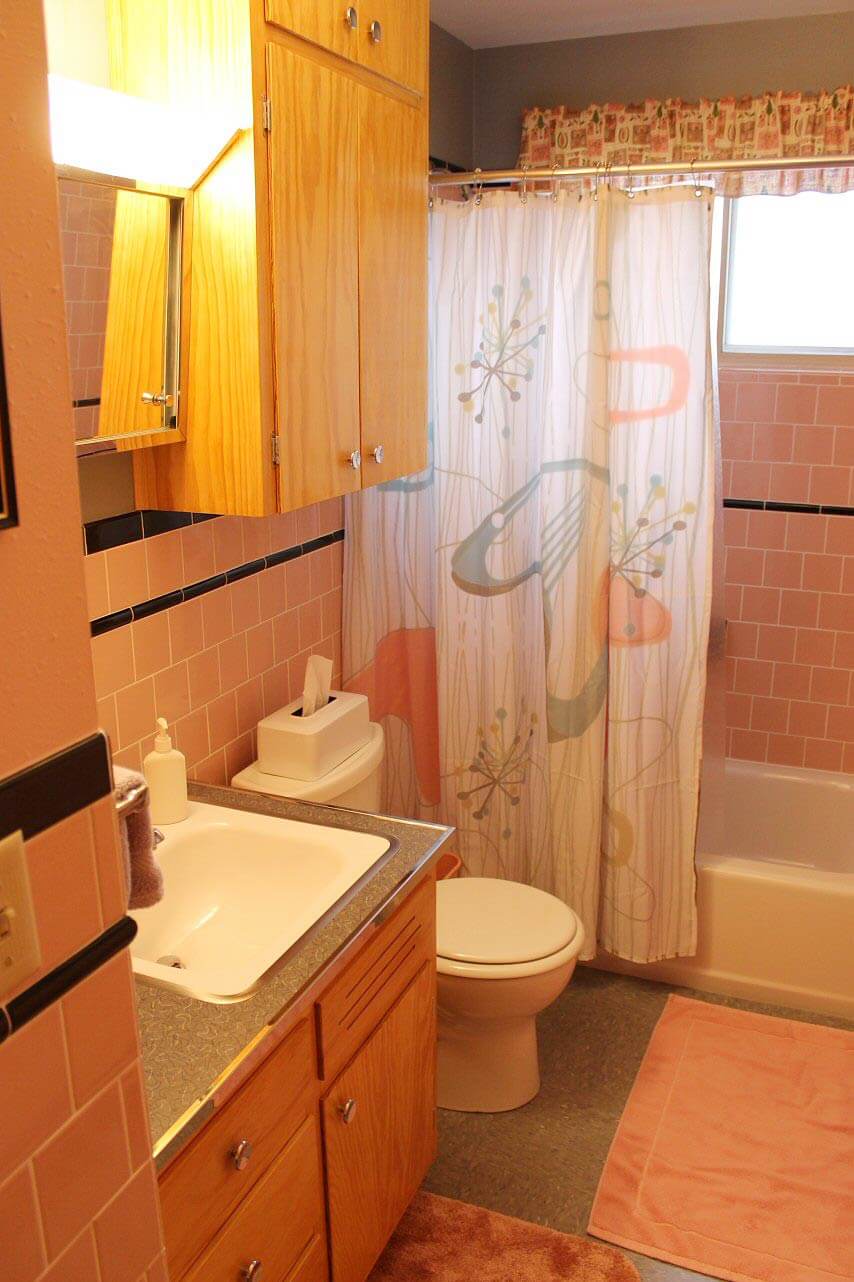
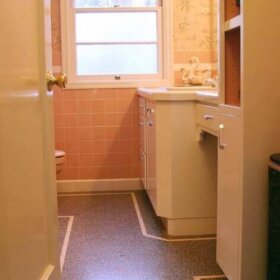
 Taking inspiration from his grandmother’s vintage pink bathroom along with the help and resources he found on Retro Renovation, Jim used his mad DIY stills to tackle a complete gut remodel of the main bathroom in his 1961 midcentury modest home. The results are fabulous — a black and pink bathroom that looks like it has always been there — but brand new!
 Jim writes:
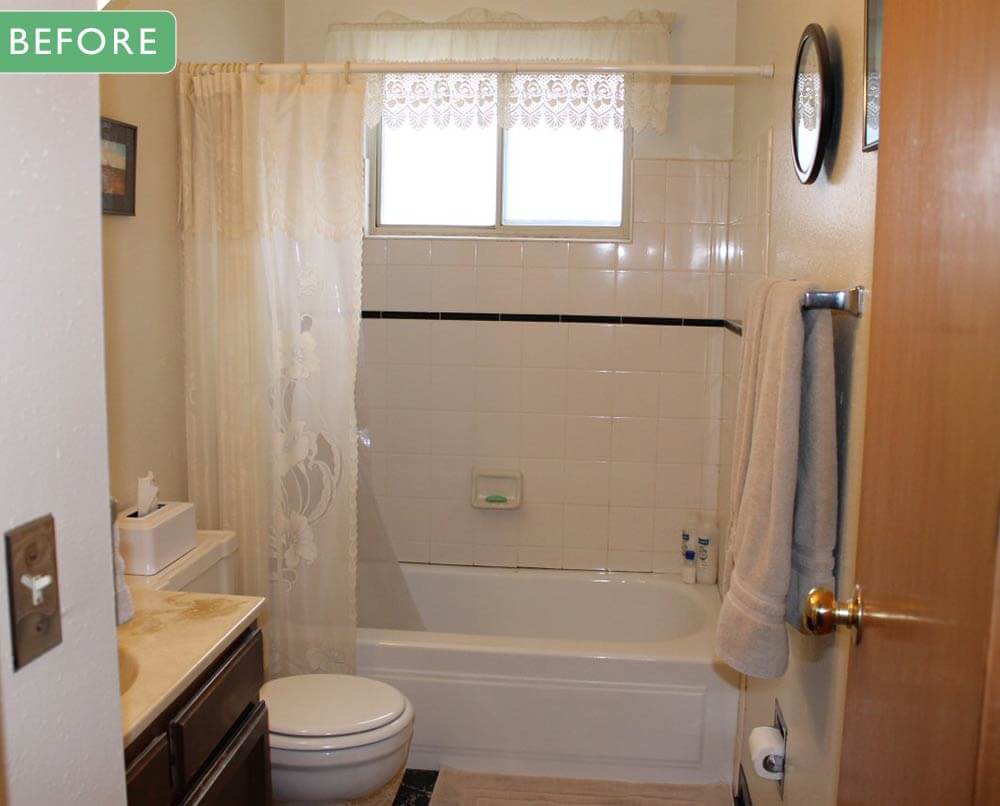
I recently finished a remodel of the bathroom in my 1961 house. Any mid-century charm that it may have had originally had been lost many years ago. It was plain and worn-out.

I put off remodeling it for many years, because I just couldn’t get excited about any of the new materials I saw in stores. Then, I had the idea of restoring it to a style appropriate for a house of this age. My grandmother’s 1956 bathroom came to mind as the ideal look that I was going for. As I started trying to source the correct materials, I kept coming across your websites. The resources listed there were extremely helpful.
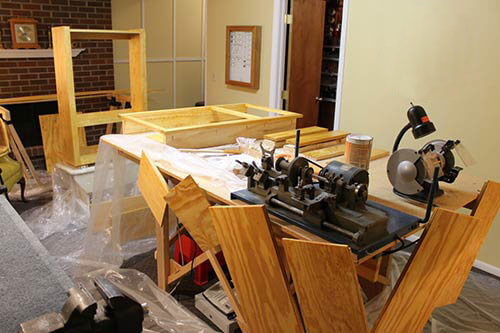

Kate’s pink bathroom project made me realize that there was no reason I couldn’t build my own cabinets from scratch. I built three of them, copying the ones that were in my grandparents’ house.
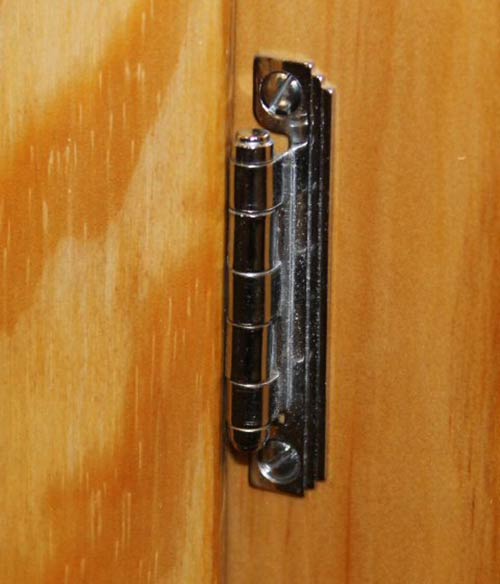
I even found new-old-stock hinges from the 1950s.
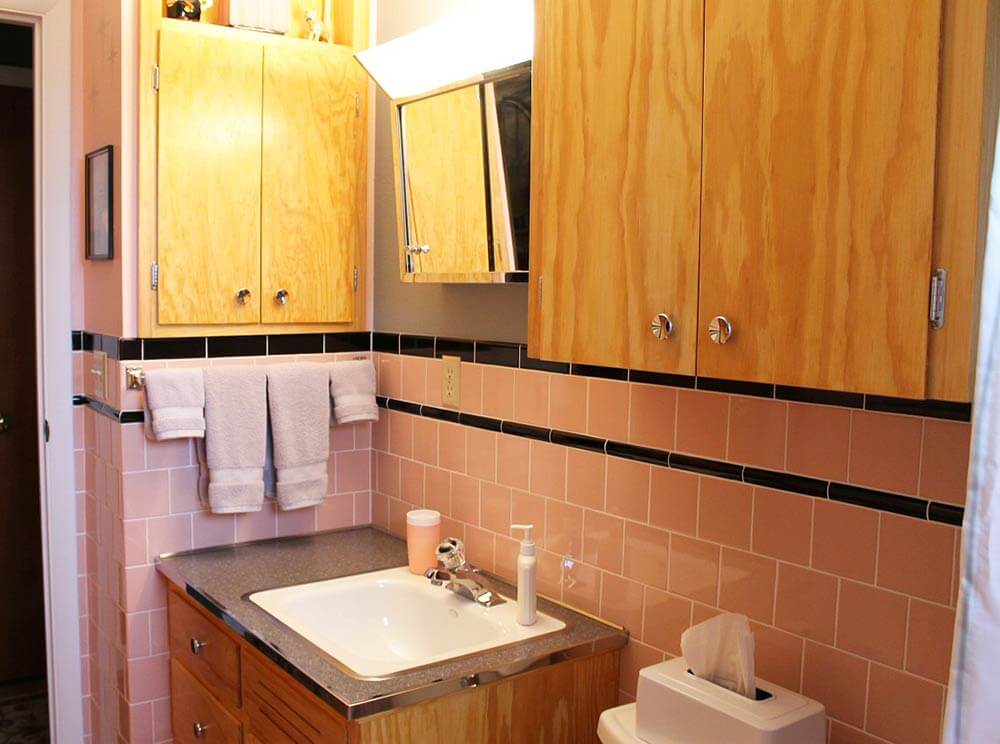

Other than the installation of the flooring, I did everything myself. I spent five months planning and gathering materials. Once I started demolition on January 1st, it took five weeks to complete the room (with very little sleep). I used 1,101 tiles on the walls.
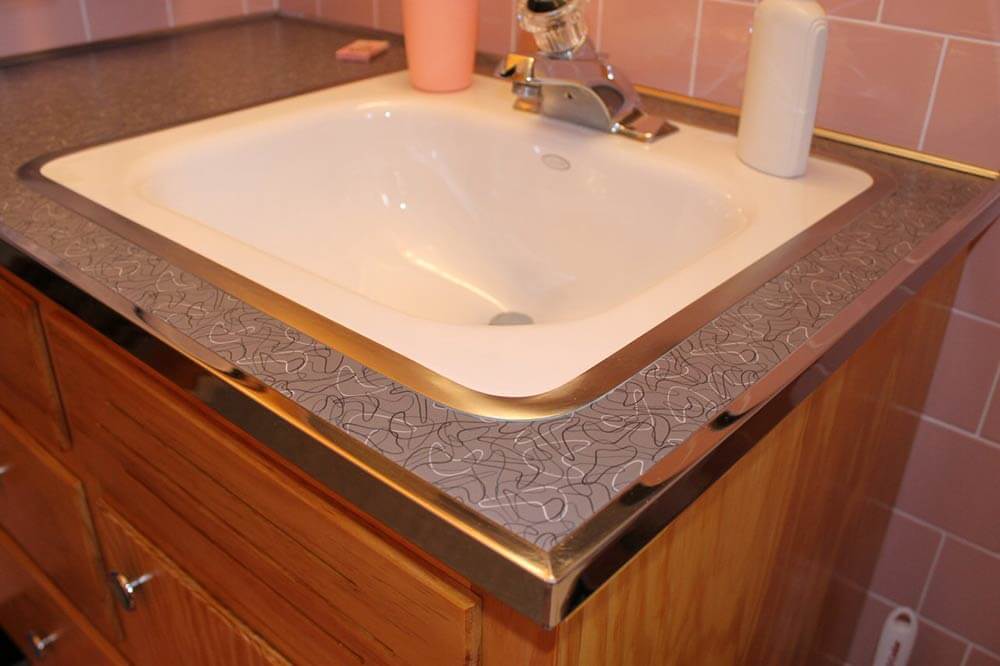
I used B&W pink & black tile and chrome countertop edging from New York Metal. The laminate is Formica Charcoal Boomerang. That was all I was able to find six months ago when I bought it. (Unfortunately, the new Wilsonart boomerang patterns were unveiled a bit too late for my project).
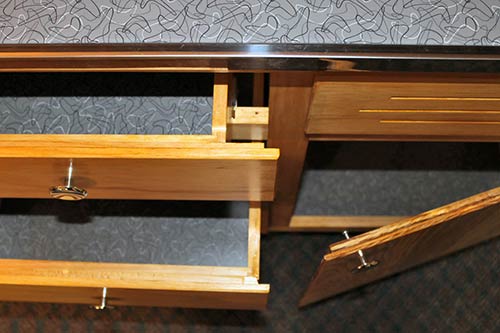
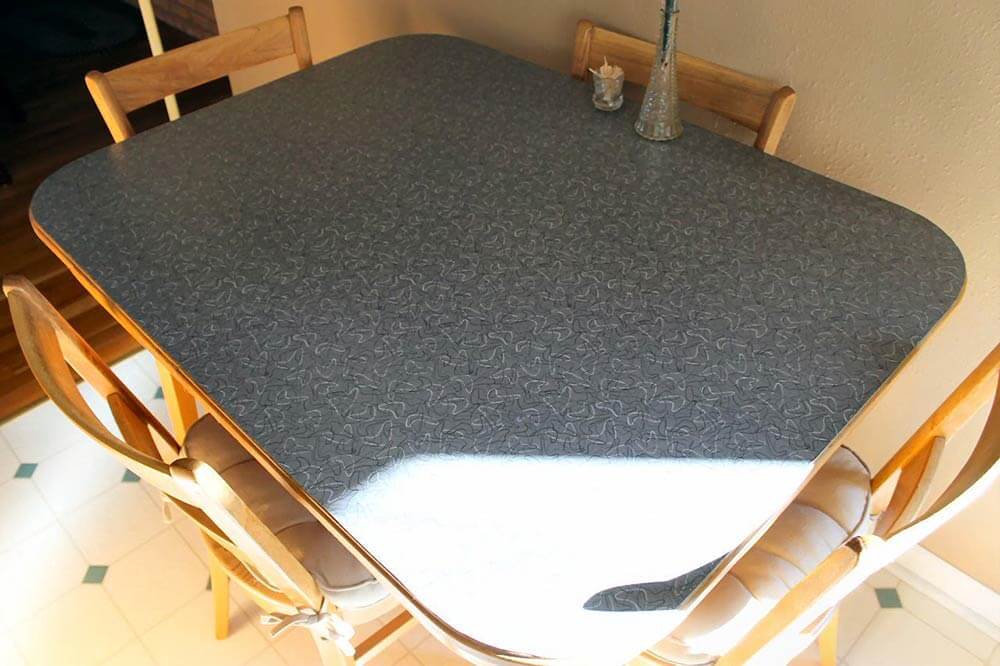
It’s a small bathroom, only about 45 square feet. Since the vanity top was so small, I had a lot of extra laminate from the 4×8 sheet that I bought. I used some of the rest to laminate the drawer bottoms and shelves. Even then, I still had a large sheet left. I decided to use it on my kitchen table (my grandparents’ kitchen table from the 1950s). I cut it to fit, but it’s not glued down. It just sits there as a replacement for a tablecloth, to protect the wooden table top. I’ll attach a picture of that, too. It’s a good use for leftover laminate.
Anyway, I just wanted to thank you for the resources that your websites directed me to. I also thought that your audience would enjoy seeing my bathroom project.
Aww, Jim, I am especially pleased that reading about how I built my own bathroom vanity made you realize that you could also build your own vanity and bathroom cabinets! They turned out wonderful — now friends and family will be asking you to build cabinets and vanities for their bathrooms — just you wait and see!
 Resource list:
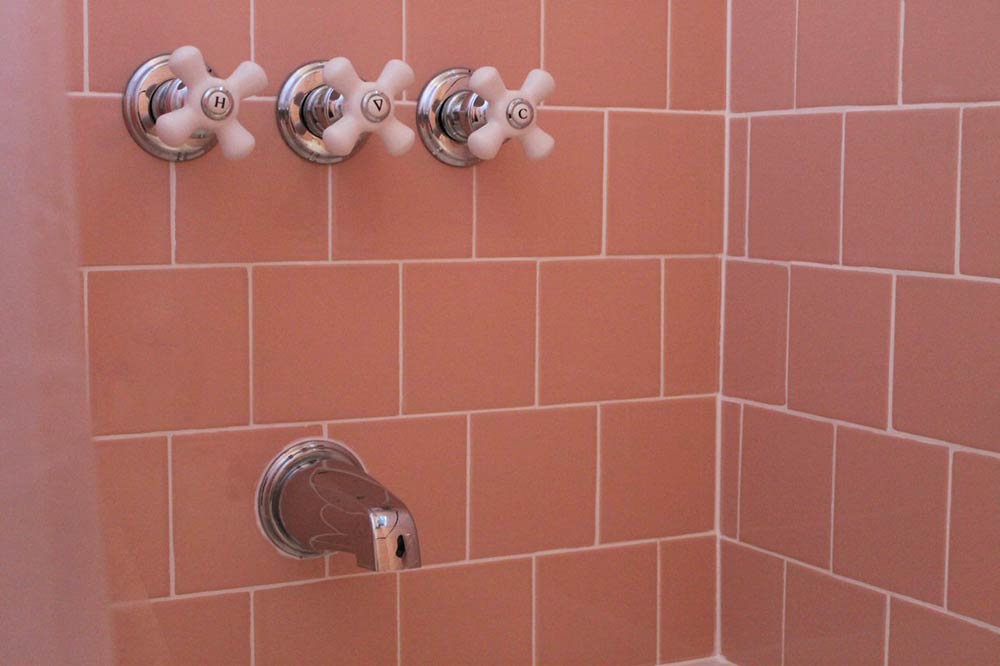
- Tile – B&W Tile 70W Pink & 92W Black
- Sink – Kohler Tahoe with trim ring
- Laminate – Formica Charcoal Boomerang
- Chrome Edging – New York Metal
- Cabinets – Homemade from pine & fir with 1 coat each of clear & amber shellac**
- Cabinet Hinges – Vintage new old stock Stanley 1530 Semi-Concealed Hinges
- Cabinet Knobs – Liberty P65015H-CHR-C 1-1/2″ Concave Round Knobs
- Cabinet Catches – Stanley 71-0100
- Bathtub – American Standard Princeton 30″ White
- Toilet – American Standard Cadet 3 White
**Pam notes: In the comments of this story about amber shellac, readers posted that amber shellac may not hold up well if exposed to water and other chemicals. Pam = not an expert on this question. Readers: When researching what finishes to put on your woods, do your own research, including contacting the manufacturers, to determine what applications are appropriate for a given product.

- Flooring – Mannington Essentials Pewter VCT
- Black Soap Dish – Clay Squared
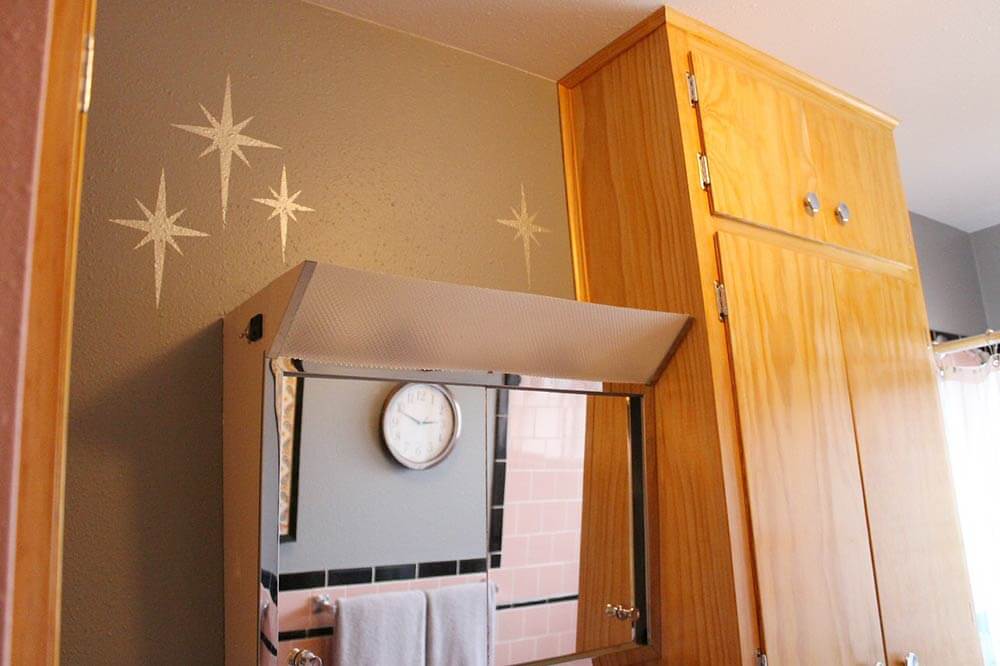
- Mirrored Medicine Cabinet – “Satin Glide” by Williams Products (Came with House)
- Wall Doorstop – Stanley 75-0161
- Towel Bar – 1 original to house, 1 vintage from Ebay
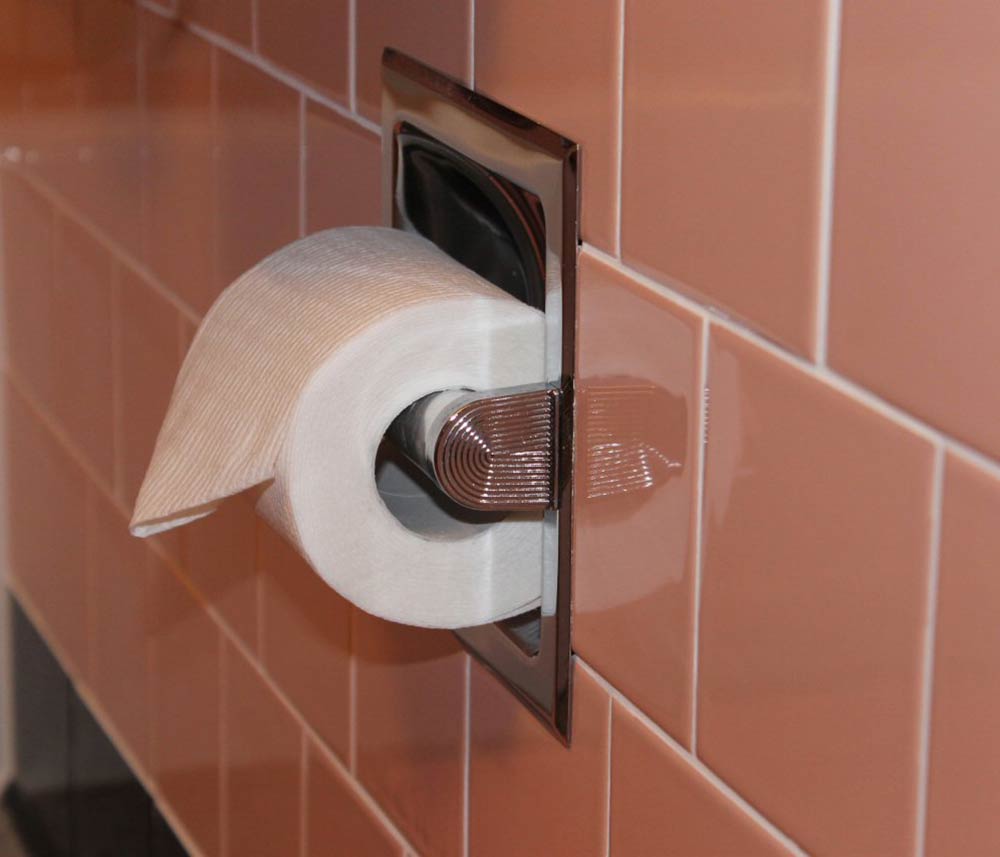
- Toilet Paper Dispenser – Original to house
- Window Valance – Vintage late 1950s from my grandparents’ house
- Shower Curtain – Cafepress through Amazon (turned backwards for more subdued colors)
- Towels – Bed Bath & Beyond Wamsutta Duet in Chrome and Dusty Rose
- Wall Stencils – Homemade from pattern found on Retro Renovation
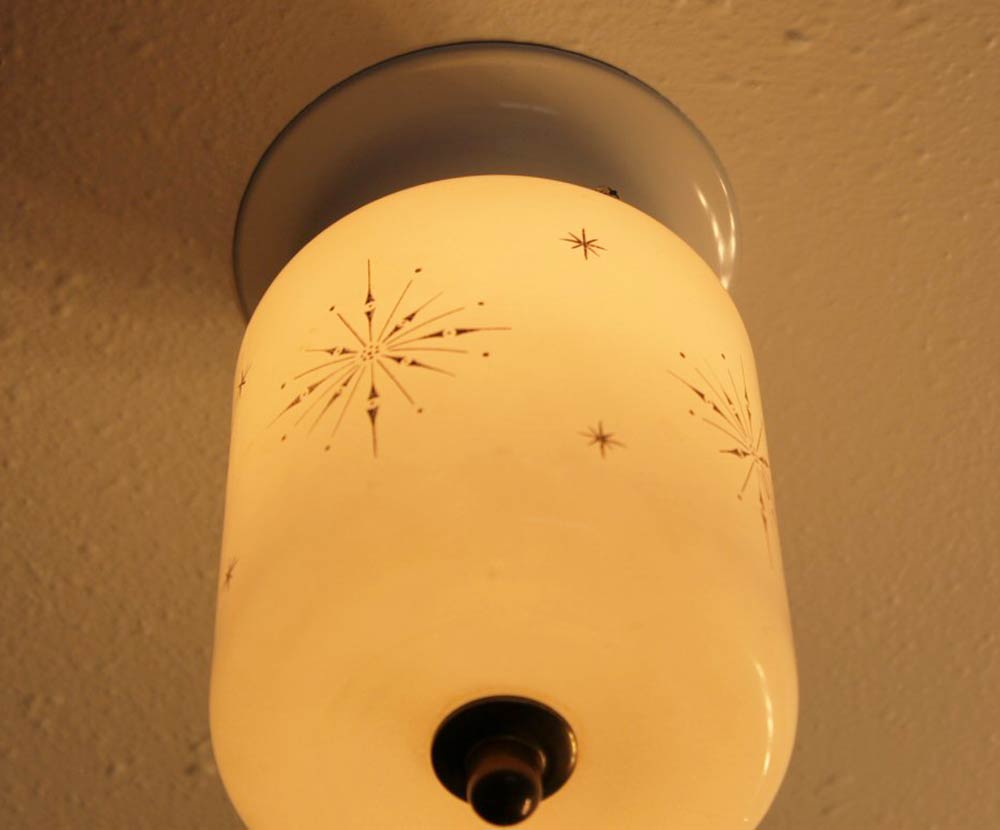
- Ceiling Light Fixture – Habitat for Humanity ReStore
- Light Switch Plates – Vintage 1950s from Ebay
- Gray Wall Paint – Ace Hardware Clark + Kensington “Fog Rolls In”
- Pink Wall Paint – Ace Hardware Clark + Kensington “Rosy Cheeks”
- Sink Faucet – Moen – Came with house, replacement handle from Ace Hardware
- Shower Faucet – Price Pfister – existing from 2003 repair project
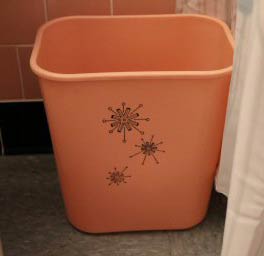
 Trash Can – Vintage Rubbermaid 2955 from my grandparents’ house
- Drinking Cup – Vintage Bolero Therm-O-Ware tumbler
- Medicine cabinet and toilet paper holder – both came with the house
Link Love:


Carolyn says
Give yourself a big pat on the back – well done!
Counting tiles – is that sorta like 99 bottles of beer on the wall?!
Old vanity vs. new – I had that old vanity and talk about useless! There were 2 fake drawers and the cupboard had no shelves. Replaced it with a display model ($50 = install which still isn’t right!) that has really big drawer fronts – and still limited storage!
I lived in a farmhouse that had a little bigger vanity than Jim’s – cupboard had plenty of room for hygiene products and cleansers. The drawers had so much space that by the time you got to the bottom drawer, you were at a loss as to what to put in it!
Since you’re done with that and have these new-found skills…about that basement rumpus room…
Jim says
When I originally tried shopping for a new vanity cabinet, I was really disappointed. They all seem to have a lot of wasted space. Some of that is to allow for mounting sinks in varying positions, but I think they’re mostly just being cheap.
What about the basement room?
Carolyn says
Jim, of course I’ve got to start telling you what to do (the wife and mother in me!) BEFORE I viewed your website to discover you’re already in your basement, so while I go wipe the egg off my face, read on.
I’ve been going to estate sales in ranch houses and been flabbergasted by what is downstairs! My expectation was cement floor and block walls, washer/dryer, furnace (“That ’70’s Show”) only to discover tiled floors, wet bars, fireplaces, pool/ping-pong tables, small kitchenettes for entertaining – like entering a whole new hidden world!
One had a shuffleboard court and ice cream fountain (!) and recently saw a little “plainer” one with an accent tile of 4 playing cards: Hearts, Clubs, Diamonds, Spades.
Search retro rumpus room (I think ‘rec’ room came a little later) to see examples. I thought I’d seen something with basement rooms on this site, probably to do with something else.
But if you were looking for a new project now that you’ve dipped your toes in with the bathroom re-do, I’d suggest moving your workshop to another area, and continue fleshing out your little Coolonial (someone else put that term on here!) corner.
Kristen says
Such a great job! So glad you included the video… It shows just how much work and attention to detail you put towards making this bathroom perfectly vintage! Every detail is spot on…. I love the wastebasket and the shower curtain!
Tom says
Great Job! Looks perfect!
Melinda says
Fantastic job, Jim! Looks great and I love that you did it yourself.
Gretchen in Greenwood says
I checked out the pictures of Jim’s house via the link- it is a jewel of mid- century modest taste . I have the some of the same furniture and lamps in my own house. Maybe he was my brother in an earlier life!! 😉 His basement bath has green fixtures, so now I am hoping he’s going to show us what he does with that. I love the pink and black and I think he is a genius at design.
Ken Borne says
He did a fantastic job, love it!!!
Andi says
Wow! What a fabulous job with a fabulous result! I LOVE the pink-and-black, and the entire space definitely passes the “looks like it has always been there” test with flying colors!
Congratulations on a huge job well done! Bet you just want to go hang out in there now!
I love the shower curtain choice, also, by the way.
LT says
Wow! It’s so great…every detail is perfect!
Chris says
First, I hope it isn’t bad form to say I am DROOLING over the tiles in Grandma’s bathroom!!!!!! Are they opalescent? Gorgeous!
Moving on to the main attraction, your remodel is just wonderful! It makes my heart happy to read about someone who appreciates the past enough to recreate it. Applause, applause!
pam kueber says
I tend to believe that the tiles in Grandma’s bathroom are plastic. See: https://retrorenovation.com/2013/04/04/where-to-find-plastic-wall-tile/
Mary Elizabeth says
I think you may be right, Pam. They remind me of the plastic tiles in my 1959 bath. Comment, Jim?
Jim says
Yes, my grandmother’s bathroom had plastic tiles from 1956. Her bathtub did not have a shower in it, so it was acceptable for the walls to not be completely waterproof.
My house originally had gray plastic tile in the shower. The adhesive had turned yellow and actually showed through the thin semi-translucent plastic. The drywall was soggy, and tiles kept falling off. I put in the white ceramic tile 14 years ago, as a quick cheap fix for the water problems. That got me by for a few years until I was ready to completely remodel.
Mary Elizabeth says
Jim, see “Mary Elizabeth’s pink bathroom” on this site. I think you will enjoy the story. I still have the plastic tiles that the builder/owner put in my bath in 1959! There is a shower, too. Perhaps they were better quality than yours. Several tiles had loosened and had to be replaced, and part of one wall had been destroyed because the loose tiles were not fixed right away when the owners got to be too old to do it themselves. But it was the work of two “snow days” to redo that wall, and it is fine. I think some years down the road I will replace it with ceramic tile, but for now it is resplendent in its mid-century plastic glory. 🙂
Christy says
Jim, I’m ***DAZZLED*** by your sparkling, gleaming remodel job! Your details caused me to drool: Boomerang lam inside the drawers? Custom-fit TP shelves? Sigh…and your atmospheric music score for the video took me from tears to triumph. A “Hard Way” contender, for sure!!!
Jim says
The laminate in the drawers makes me much more comfortable about putting things in there, without worrying about leaving water rings or scratches.
One of the advantages to building my own cabinets was that I could maximize the storage for the exact uses I had planned. I’m really enjoying the cabinet above the toilet. It’s just the right depth for boxes of tissue, and one shelf can hold 24 rolls of paper. Before, I only had room for a couple rolls of paper at a time, and everything else was stuck on a shelf in the guest room closet. Once I had the dimensions figured for the cabinet above the toilet, I made a cardboard box of the same size and pinned it up on the wall, just to make sure that it wasn’t going to stick out too far or make the space feel cramped or awkward. It came out just right.
I actually composed the unpleasant-sounding music that was used in the “before” portion of the video. The other pieces were from old records of background music that would have been played in stores, etc…
Mary Elizabeth says
The music reminded me of background music in an early sitcom, like “Father Knows Best” or “The Mary Tyler Moore Show.”