

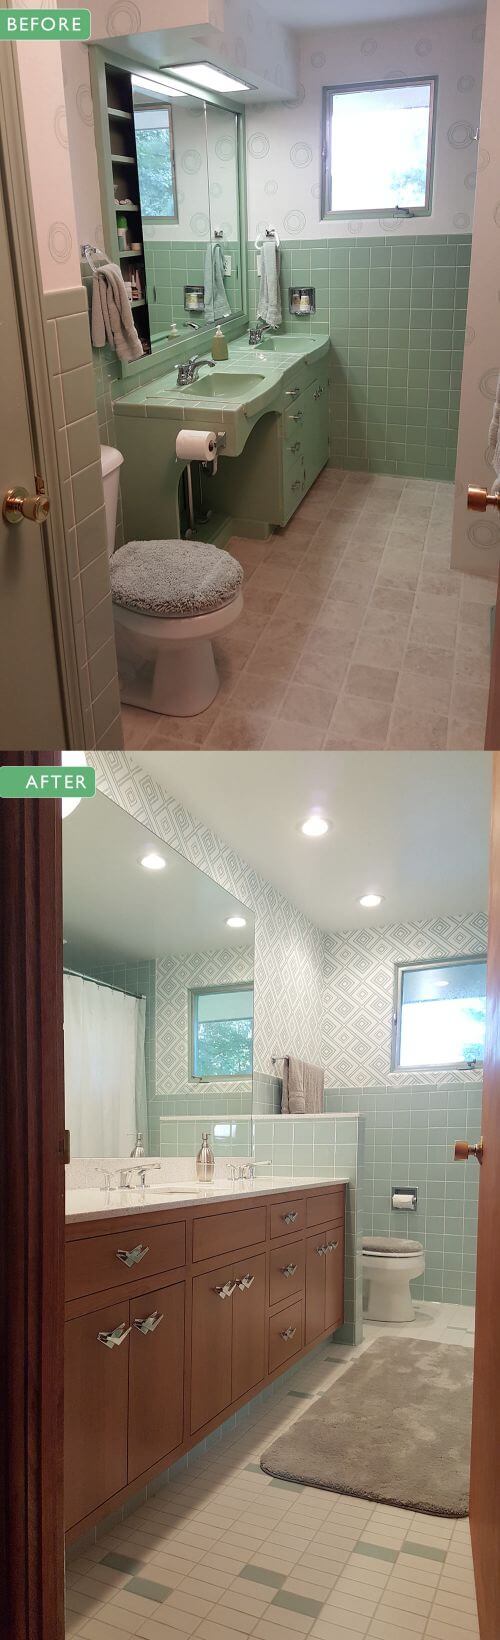
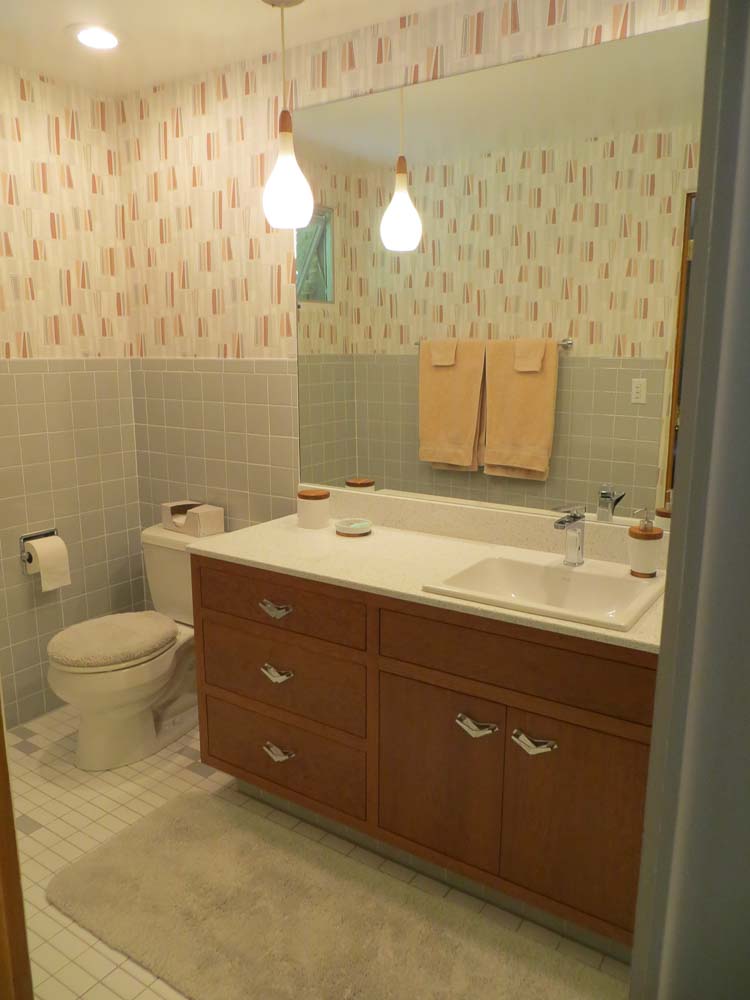
 Lynne and Bob loved the green bathroom original to their 1955 ranch house, but it was riddled with problems that necessitated a complete remodel. Wanting to keep as much midcentury charm as possible, the couple created a detailed plan to renovate the space. The new bathroom, shown above, is gorgeous — and suits the original architecture of the home beautifully. But… read on… and you will see that this lovely result came after more than a few *hiccups*. How about: Termites and squirrels and mold — Oh My!
 Lynne writes:
My house is a long sprawling rancher built in 1955. There was an addition added in the 1960s, but it was so well done, one would never know it.
There were multiple reasons why we decided to remodel our original green bathroom, and it wasn’t an easy decision. We’re vintage lovers, obviously, and tearing out an original bathroom seemed very wrong. The original green tile was in perfect condition. The twin green sinks were also near perfect.
But: There were problems.
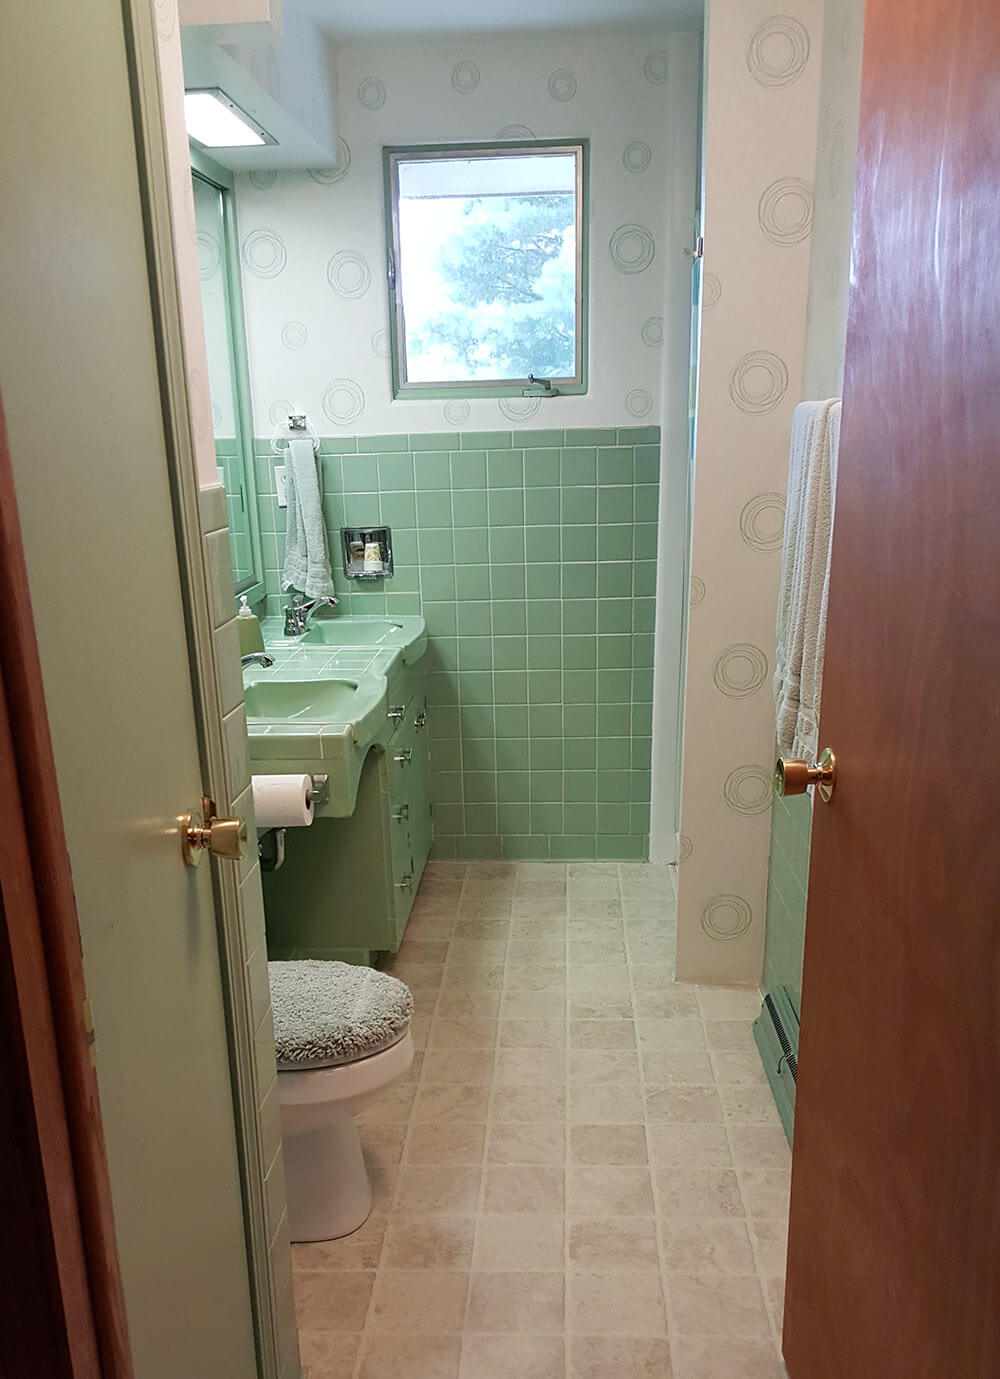
First, there was the small telephone booth sized shower in the corner. We were told the original had been a metal one that had rusted and leaked. It was replaced with a cheap, not quite the right size, molded, plastic deal, probably from a big box store. It was installed badly and I couldn’t keep it clean and mold free.
The floor wasn’t original — it was a cheap piece of vinyl that had developed an odd stain across it. The stain will be important later. I also started noticing that the window crank was loose and jiggly………hmmmm.
That loose window and the odd stain on the floor? Turns out that leaky old shower had been a dark, warm, paradise for termites. Almost the entire window wall was…eaten. The wood was just flaking away. That’s why the window was loose. There was nothing of substance holding it in. It was old damage, we knew the house had been treated before we bought it, but we had no idea of the damage within the wall.
Then on the other walls and the floor was old, black mold that extended three feet up the wall and onto the floor (hence the stain) even into the adjoining room, which then also had to be redone. There had also apparently been squirrels in the ceiling. We found that mess when the ceiling came down. All of a sudden, we didn’t feel so bad about tearing out that bathroom.
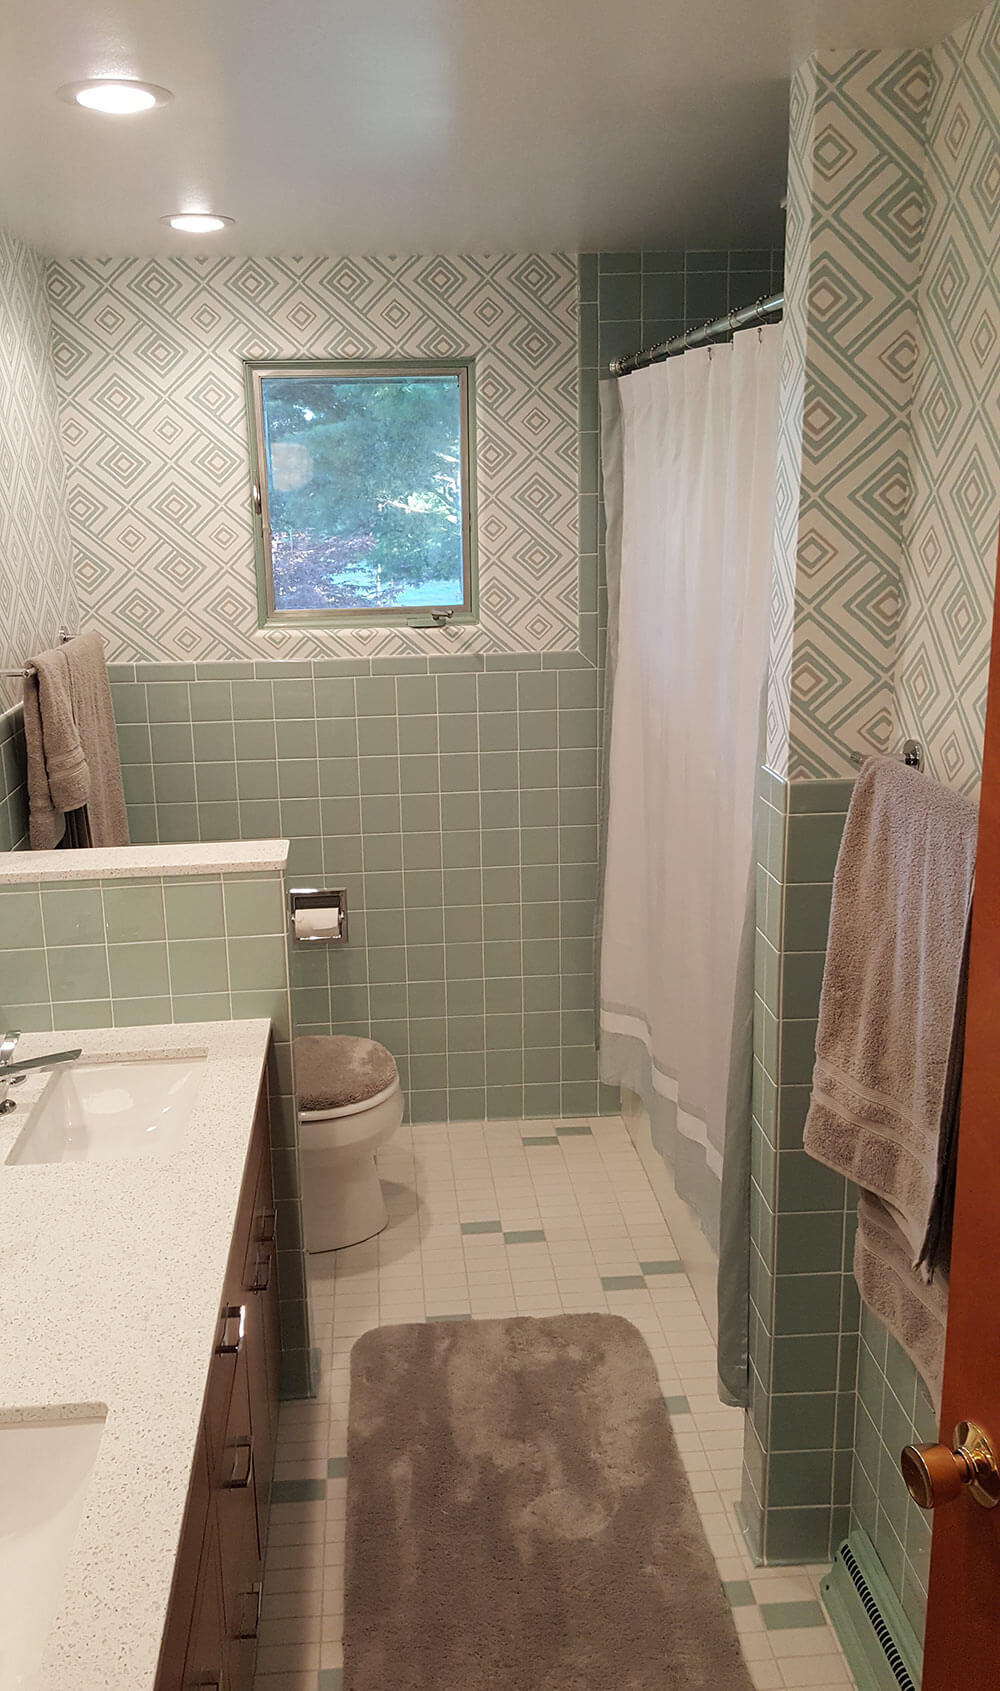
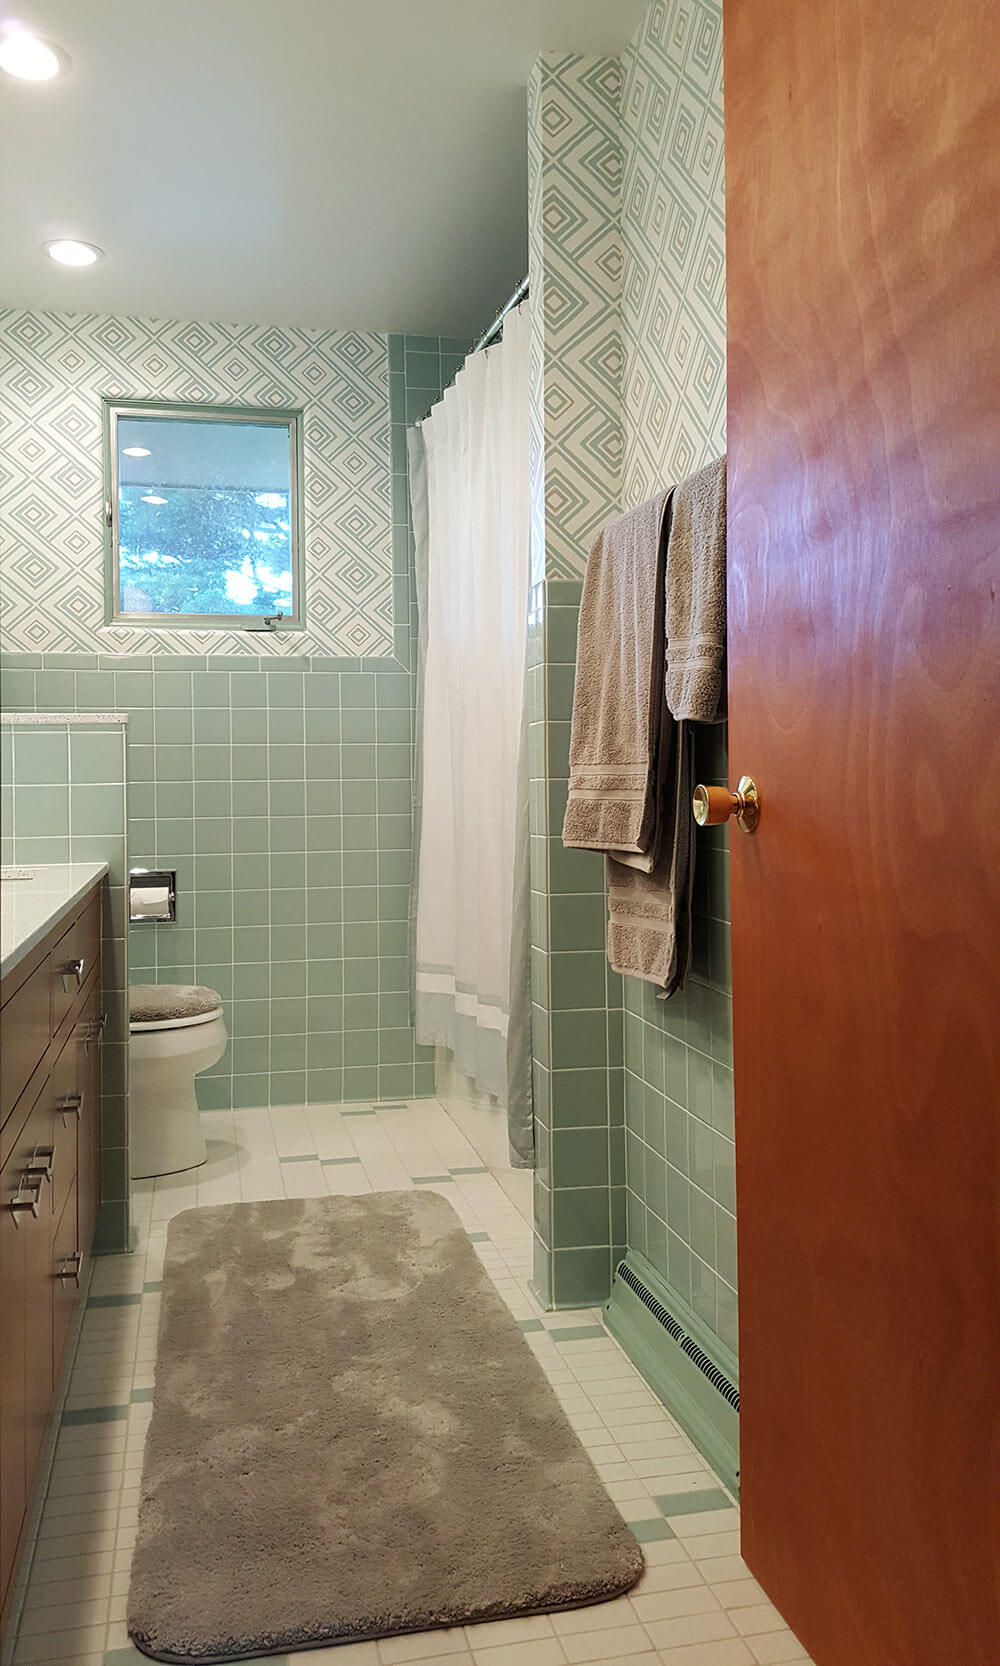
The toilet was oddly placed, and right inside the door. Not very private. We found out later that the reason for the constant unpleasant odor — even though it was all sparkly clean — was that is had been installed improperly. Just plunked down on a pipe out of the floor. No gasket or wax ring, and the gasses were coming through. We removed the closet, and pushed the toilet way down into the far corner with a half wall to give more privacy. The new placement of the toilet put it right smack on top of a floor joist, which then necessitated a 14″ rough in toilet instead of the planned upon 12″.
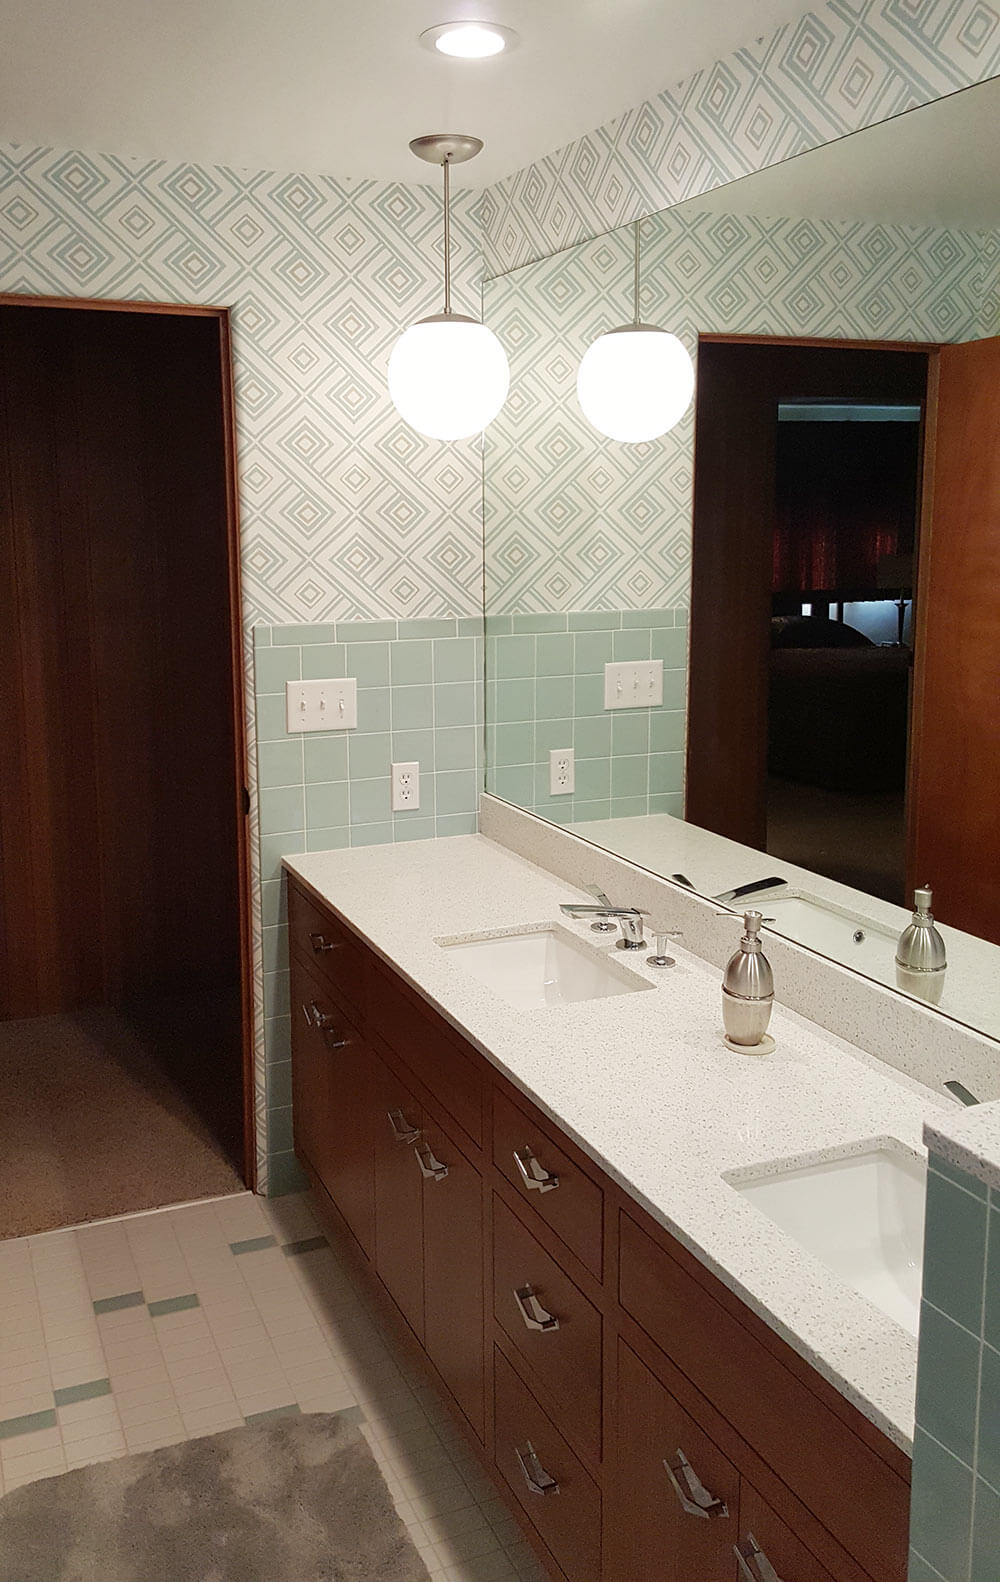
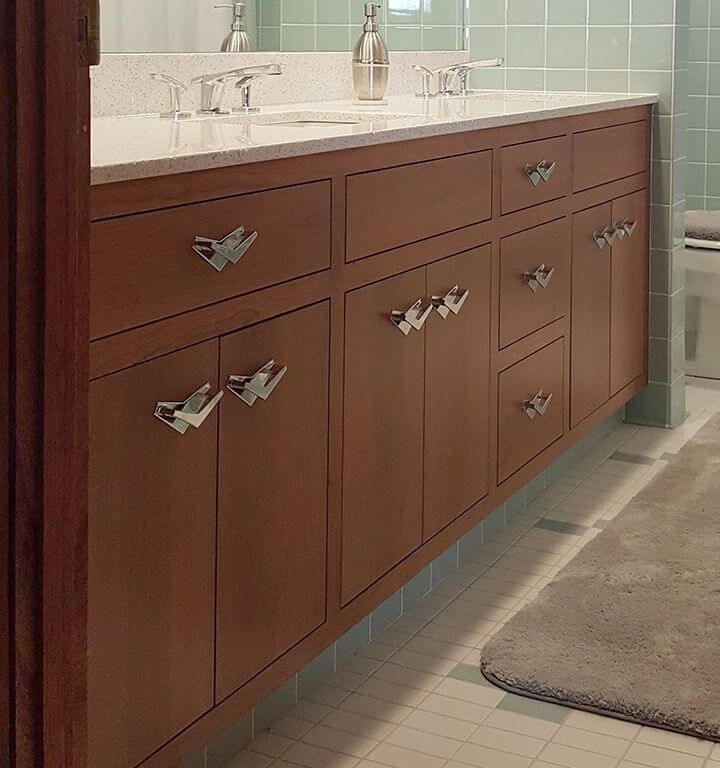
From the doorway on down to the half wall would be a 7′ long vanity with two sinks. But then we discovered that the space was not deep enough for the standard vanity I had chosen. A standard vanity is at least 22″ deep, which would have extended into the doorway! We had to totally regroup. The drop-in sinks I wanted so badly were too deep as well.
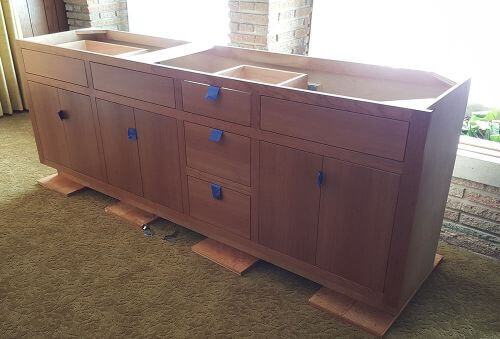
We had to go custom. We found a kitchen/bath place that would build exactly the odd depth and length we needed — for a price and many weeks in the making of course, but we had no choice. We chose a cherry wood because with the proper stain it matched our existing mahogany paneling in the rest of the house and the doors. We also had the doors inset just like the old original green vanity, plus not having slab overlay doors we bought another inch for the vanity.
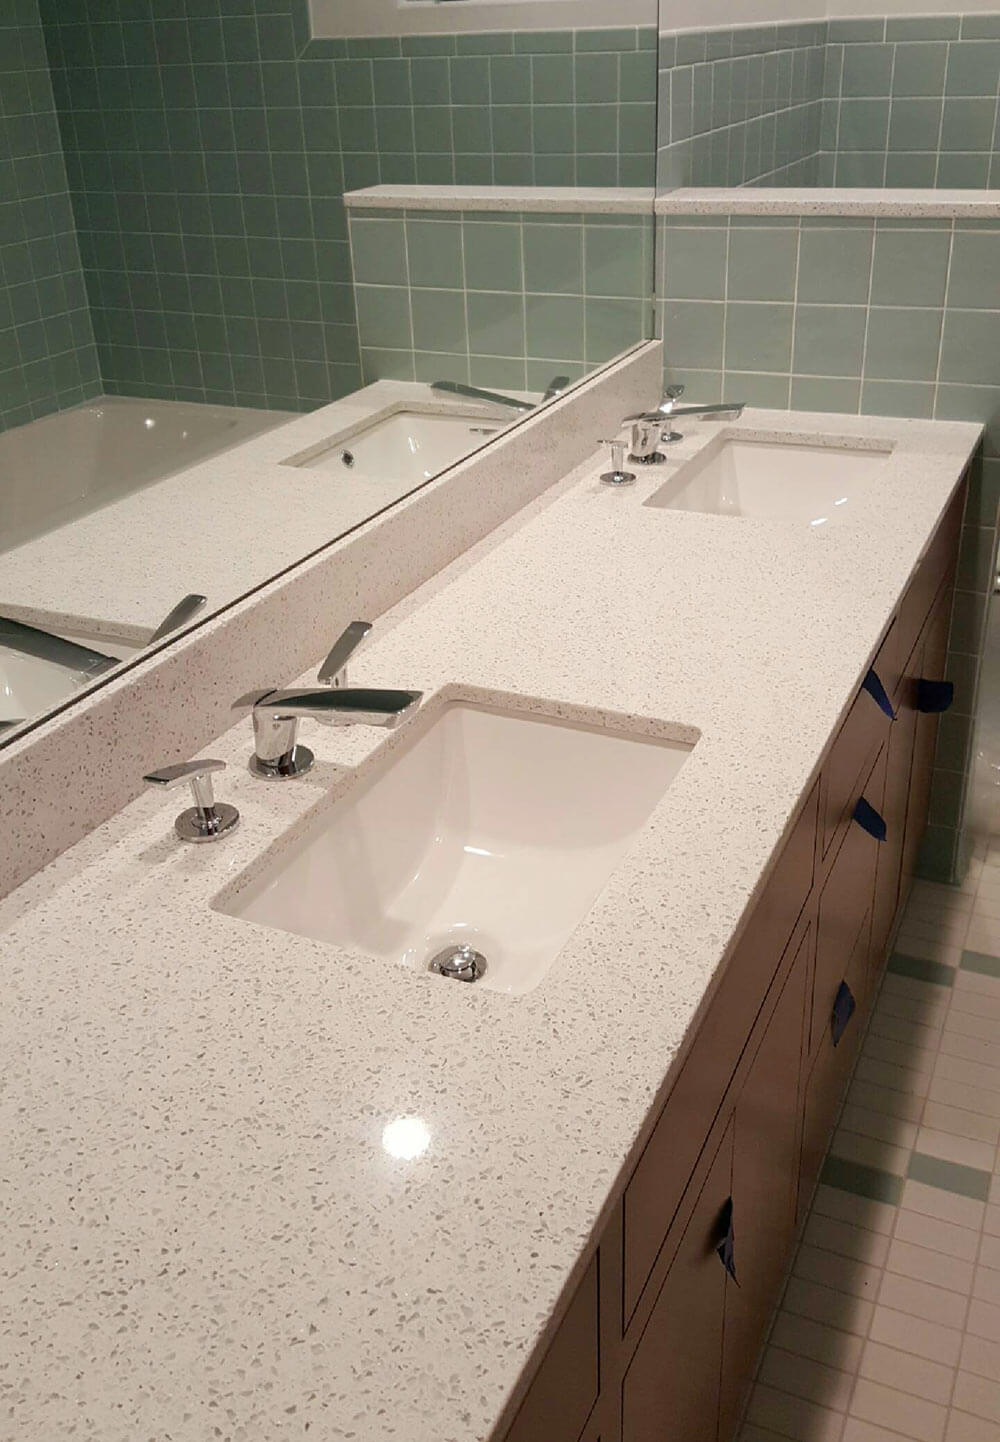
During this time, I had to find new sinks to fit an awkward depth vanity. I wanted drop-in basins, but they were too big and ate up the entire countertop surface. I’m not a fan of the undermount thing, but I had no choice. A small undermount sink was the only thing that would fit.
Then, in the middle of the job, my tile setter had a herniated disc and was out for weeks.
All of this being said, despite all of the angst, inconvenience, and frustration, it paid off. The bathroom looks great. It functions well, its sleek and easy to clean. I actually gained more storage than I had in the tiny closet. While not totally midcentury, I think we combined the best of the past and the present.
Lynne shares the resources for her blue bathroom:
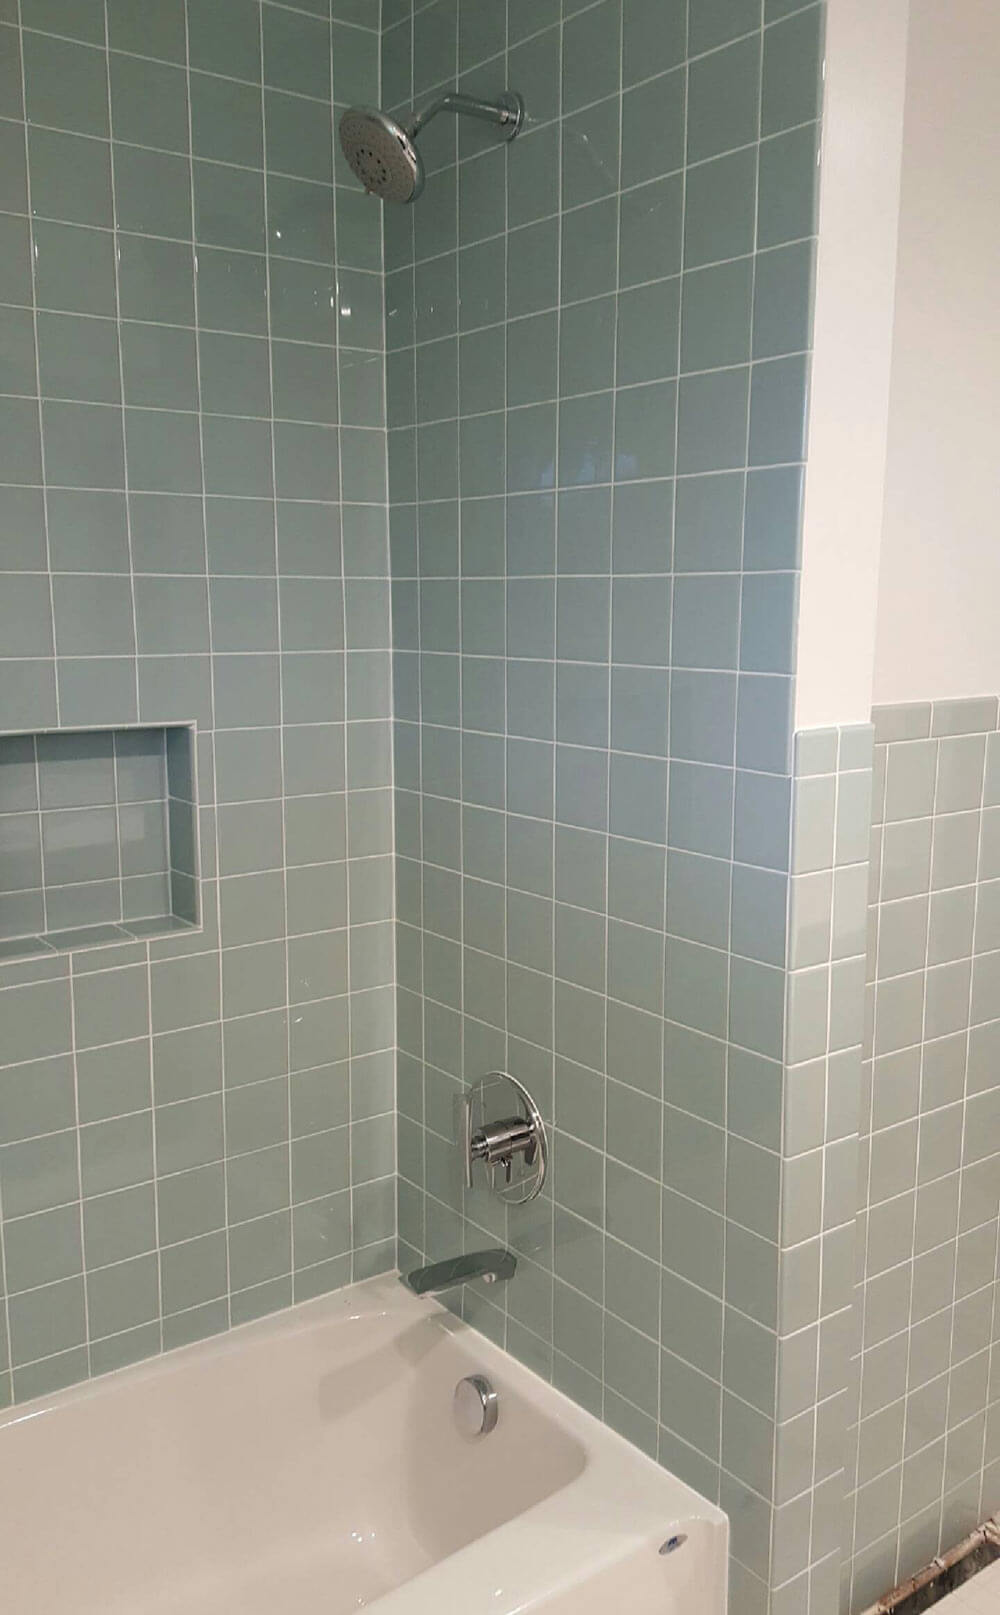
- Wall and floor tile: Field tile is Dal Tile Spa 4×4, semi-gloss. The floor is Keystones Arctic White with Spa sprinkled about. I think the grout was called….moonlight?? It’s a very pale grey.
- Vanity: The vanity is custom, from Creative Kitchens and Baths in Bloomington, IL.
- Countertop: White Diamond by ECO. It is made of all recycled material, nothing was mined, which was important to me. It is made of crushed cups, plates, glass and mirrors, etc. I loved the fresh, icy look of it, and the tiny mirror chips were the closest I could find to “glitter”.
- Sinks: The sinks are Highpoint Collection Petite from Overstock.
- Faucets: The faucets and tub fixtures are Naru by Symmons.
- Bathtub: Aker. It was supplied by my plumber, sight unseen.
- Toilet: Kohler Wellworth.

- Cabinet hardware: The chevron handles are vintage Weslock. We got an entire box of 40 or so sets, on eBay if I recall. These were the same as the original on the green vanity.
- Lighting: The hanging globe light is also vintage. It was $2.50 at a flea market I cleaned it up and spray painted the old rusted, pitted brass silver. This one is 10″, but we also grabbed the 8″ one for another $2.50.
- Wallpaper: The wild wallpaper was a gamble and I believe from York. The book name escapes me for the moment.
- Shower curtain: The shower curtain is temporary from the clearance bin at Bed Bath and Beyond for $12.99. I always make my own shower curtains and I will do the same here as soon as I find the right fabric. But, this works fine for now.
Building a new bathroom can be one of the most complicated interior designs project there is — because of the need to fit so much function into a small space. This story proves it — not to mention, that as much as we may love old houses, the “surprises” that come with them are not always good ones.
- See our story: Bathroom remodeling — a checklist of 84 decisions to consider (plus read the comments, readers have piped in with more!)
Great job, Lynne & Bob. The bathroom is gorgeous — you deserve to be very proud of your tenacity in pulling it off. Thank you so much for sharing your story — and enjoy!


Margie C. says
I’ve heard that before, about contractors not “getting” it and found it hard to believe, but lately I’ve run into it myself with plumbers. I have had the same issue with cabinet depth. I love your globe light! And the heater and the half wall. I wish you could have reinstalled the cup holder, but since you saved everything, it’ll make a nice addition to whomever buys the sink & tiles for their retro-remodel.Since you lost storage space removing the closet and there’s no longer a medicine chest behind the mirror, did you add storage anywhere else besides the vanity cabinet? My bathroom closet door and entry door were in the same conflict until I realized I could make my bathroom door open out: I have a little cove off the hall where there’s a linen closet, allowing plenty of room for the door to open out without it opening into the main hall. Now if I could just get the trim repainted where I patched the old hinge holes…
Lynne says
Nope, didn’t loose an ounce of storage space. I transferred a few tings to the big hallway linen closet, but mostly it made me pare down and reevaluate some of the “junk” that had been stashed in there.
I had one contractor who insisted on replacing my original Andersen window, and wanted to just put another layer of wall board over the ceiling instead of cleaning up the mess.
Another had no idea of how to recreate our curved molding and wanted to just put up conventional trim, even tho it wouldn’t match the rest of the house.
Uhhhh…….NO.
Margie C. says
Wow! You were smart to stick to your principles and not let them do those horrible things. Good for you! It’s a great looking room.
lynda says
This bathroom is lovely. I think it would appeal to the retro purist and people who like contemporary. I think you managed to remodel the bath with a nod to the history of the bath, and yet totally modernize the space. Thank goodness you got rid of all the lurking problems under in the walls and floors. We are remodeling an old house for my daughter and there always seems to be a problem in every single room we have renovated. Your patience and hard work certainly shows in every detail of this new bath. Love the counters–I like the nothing mined comment.
tammyCA says
Very nice retro reno..it looks sleek atomic! Great that you were able to save the original sinks & tiles..contractors just want to hurry & smash it down. Ugh & so true, you never know what lurks beneath or what a shoddy job was done previously.
Nikki says
Wow! I rarely see a lot of bathroom renovations on the popular decorating blog sites that pay homage to the style of the house as perfectly this one does! Job well done; you are an awesome decorator/project manager!
Lynne says
Thanks Linda. Our goal was to do a “sensitive remodel”. We saved the sinks and the tile. There was nothing wrong with them at all. It was the room deteriorating around them that was the problem. We ran into so many problems, we began referring to it as “our special needs bathroom”.
Christopher says
Did you guys take 4×4 tiles, and cut them in half for the floor? They look like they are 2×4. I would appreciate the help! Thank you!
pam kueber says
I believe these may be available from Daltile as 2×4. Check the Daltile website for sizes.
Christopher says
Thanks, Pam! I will give them a call.
Linda says
Gorgeous bathroom, and the wallpaper was a great touch. What happened to the lovely green sinks that had been there? You did a great job keeping the flavor of the original while updating for your own needs.
Retroski says
Great remodel! It’s so fresh, mod and clean. Also love the tile pattern of the floor. I hope no one got sick during the redo process. Black mold is serious stuff, and that’s pretty freaky it was behind your walls and floor. Did you have to remediate before the remodel?
Lynne says
No, no one was ill, but no matter what I did, that bathroom never smelled “fresh”. But once I saw what sort of disgusting cooties were hiding in the floor, walls and ceiling, I felt less remorse in tearing out what was still a functioning bathroom with original 50’s charm. All surfaces were replaced, wall board, sub floor, ceiling, insulation and plumbing.
sherree says
What a great job you have done! Your custom vanity is gorgeous and the hardware is to die for. And I love the floor tiles. Lynne, I had a question: was there originally a divider between the toilet and the vanity? In the “before” photos it looks like the bulkhead juts out above the sink area.
Lynne says
Wow , good eye, and thank you for the compliments. Yes, we think there was some sort of spindle type divider going from the surface of the counter up to the soffit at some point. There are filled holes on the surface tiles.
Diane says
This bathroom is just beautiful. The attention to every detail is wonderful. I especially like the wallpaper and that you painted the radiator cover to match the tile.
Lynne says
Thank you Carol. The original vanity was cut away so the original owner could get his wheelchair up to the sink.
The narrow linen closet was removed not only to open up the space a little bit, but the door knobs of the closet and the main entry door clanked into each other. If the linen closet wasn’t totally shut, the doors just banged into each other.