

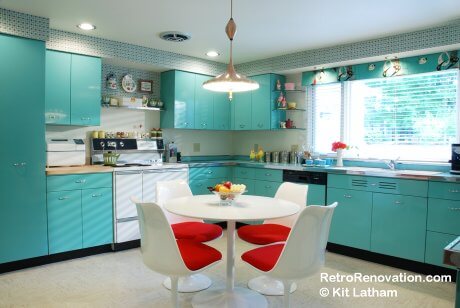
Custom size glass what-not shelves
I wanted to use this photo to point out the glass corner shelves — you can see one to the left of the window. To make my what-not shelves, I started by using cabinet doors as the ‘sides’ of the shelves — then attaching glass with hardware used for shower shelving:
- Create your side piece — I first took two doors off of a 24″ wide wall cabinet — we used this as the “side” of each what-not shelf and as the structure for the glass to attach to. This was important in particular because on one side, I had only a dead gaping hole corner filler-piece frame to attach to, no cabinet. The doors were each 12″ wide, a bit less than the side of the cabinet — so I set them back a smidgen, it looks fine. If you have full wood cabinets on both sides of your window, you could just attach directly to them and save this doors-from-a wall-cabinet-turn-into-sides-to-set-the-corner-shelves-step. However, if you are doing this with steel cabinets, I think that the extra structural support for the glass shelves is a smart idea no matter what.
- Find brackets to hold the shelves — To hold the glass shelving, we found shiny chrome brackets from the glass shop used for showers. We attached these to doors that now comprised the side of the what-not, and to the back wall.
- Install the shelves — We installed the glass shelves. I think we used 1/4 inch but it may have been 3/8. There are lots of choices, we used an aqua glass which is perfect for our cabinets. A honed and polished edge. We cut our glass to size — had to, because one shelf (the one above) is actually 1″ narrower along the wall width than the other, to fill the space. Remember, we were retrofitting someone else’s kitchen into ours. Things were off by only 1″, a miracle — and even more so after you consider we put in the new big picture window and casements including fitting into the front brick configuration. Welcome to another episode of this old house anxiety. These shelves were actually a great solution to optically managing the difference. You’d never ever notice. The glass was wicked expensive. Like, $800 total. But it looks fabulous, makes a huge difference. Wood shelves would have been cheaper, but then I would have wanted them edged in stainless steel. Money one way or another. The glass is light and bright – better – especially in my steel kitchen. And remember, all my cabinetry was salvaged — quite inexpensive considering the number and quality of cabinets I used, so I felt like I had the wiggle room to “spend too much” in a few other places.
If you have wood cabinets, on the other hand, wood cubbies would be fine, I think, you can do this for $60 or less – with 12″ x 12″ wood quarter-round shelves widely available from Home Depot, Wal-Mart etc. Or, make them yourself – from extra cabinet doors would be great because then the thickness would be the same.
I love my what-not shelves. They make the kitchen feel more spacious — the window is further visually expanded and in fact, there IS more space for light to come in. Also, when you are at the sink, in particular, it’s nice not to have a big block of honkin’ wood cabinet on top of you. If you’ve got the space, I think it’s best to see if the full “quarter” 12 x 12 or 13 x 13 will work – more space for cute things, more open. But if you’ve got a smaller kitchen, smaller shelves as in the top photo may be better. This is another decision to make based on scale.


FGL says
Glad I came across this old post! I’d like to install “corner cubbies” either side of the window when I retro-renovate my 1948 kitchen. Would love to perhaps see another post all about these shelves, in terms of their popularity and authentic ways to style them (plants and teapots seem to be common in old ads).
They seem to me to be an iconic element of mid-century modest kitchens. One spot of openness among all the fitted cabinetry. Stark contrast to the no-uppers-all-open-shelving trend we see today!
Maurice says
I saw 12″ quarter round glass shelves at Lowe’s last week for under $18. ea. The hardware- mounting brackets didn’t look 50’s that much. Brushed nickle- 2″ roundish. I think I’d just buy some different squarish chrome ones for a few more bucks.
pam kueber says
Thanks, Maurice — sounds like a great resource! No Lowe’s near me here, but next time I’m visiting family in KY, I’ll go looksee.
Rebecca Prichard says
Thanks!! Oh goodie, I am learning-that is what I thought. 🙂 I was just at Lowe’s last night and looked at some Formica samples. (They still use the same awesome logo, btw!)
I have another question for those with laminate countertops if you don’t mind. We have white now from the last owners. They put it in to sell the house and it already has scratches -we have only been here since July. My question is- is it all the same? Or are there different levels of scratch-resistance?
Rebecca Prichard says
Question for Pam.
As a newer retro renovator, is the Micarta countertop you speak of a laminate? You say it;s the standard and cheapest way to go, do you mean laminate?
pam kueber says
Hi Rebecca, Micarta was a brand of laminate sold back in the 50s and 60s (I am not sure of the history). Laminate is the generic name for: Wilsonart, Pionite, Formica, Arpa… all the brands out there today. I do believe it is generally the least expensive countertop selection, however, it pays to shop around to assess relative value. The price for a lot of “high end” stuff has really come down, I think, in this recession.
Brenny says
Does anyone know why the glass is so darned expensive? I would love to do this, but 800??????? Oh my!
Mid Mod Pam says
Hi Brenny, These were expensive in particular because I needed to have the pieces custom-cut. They aren’t the same size, I had to “fudge” one by making it one inch wider to fit the space that I was working with. Actually, it was a godsend to have the solution otherwise I would have lost symmetry; now, you cannot see the difference one white.
Cost also increased because I specified a hefty glass, I think it’s 3/8″. Well worth it for something so visible within the kitchen design.
Also regarding cost: I do not live in an area where there is a ton of competition. If you really want glass, I’d definitely suggest shopping around to see who will give you the best deal. And, if it suits your design, you can use wood, and that’s a lot cheaper. You can even go to places like Wal-Mart for wood in a 12×12 quarter-moon shape that might sock right into place – just re-paint.
Finally, I will say: in the grand scheme of things, I spent peanuts on my kitchen fixtures – my cabinets were $3,000 and I put in laminate countertops, VCT flooring and an inexpensive vintage stove. The $800 on my glass edging – still fit my budget in the end.
Ronn Ives/FUTURES Antiques says
P.S. – I LOVE rounded corner shelves. They’re an Ultimate of some sort.
Ronn.