

Custom size glass what-not shelves
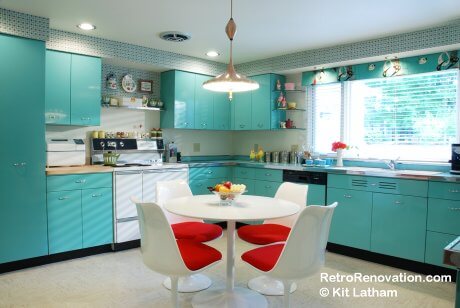
I wanted to use this photo to point out the glass corner shelves — you can see one to the left of the window. To make my what-not shelves, I started by using cabinet doors as the ‘sides’ of the shelves — then attaching glass with hardware used for shower shelving:
- Create your side piece — I first took two doors off of a 24″ wide wall cabinet — we used this as the “side” of each what-not shelf and as the structure for the glass to attach to. This was important in particular because on one side, I had only a dead gaping hole corner filler-piece frame to attach to, no cabinet. The doors were each 12″ wide, a bit less than the side of the cabinet — so I set them back a smidgen, it looks fine. If you have full wood cabinets on both sides of your window, you could just attach directly to them and save this doors-from-a wall-cabinet-turn-into-sides-to-set-the-corner-shelves-step. However, if you are doing this with steel cabinets, I think that the extra structural support for the glass shelves is a smart idea no matter what.
- Find brackets to hold the shelves — To hold the glass shelving, we found shiny chrome brackets from the glass shop used for showers. We attached these to doors that now comprised the side of the what-not, and to the back wall.
- Install the shelves — We installed the glass shelves. I think we used 1/4 inch but it may have been 3/8. There are lots of choices, we used an aqua glass which is perfect for our cabinets. A honed and polished edge. We cut our glass to size — had to, because one shelf (the one above) is actually 1″ narrower along the wall width than the other, to fill the space. Remember, we were retrofitting someone else’s kitchen into ours. Things were off by only 1″, a miracle — and even more so after you consider we put in the new big picture window and casements including fitting into the front brick configuration. Welcome to another episode of this old house anxiety. These shelves were actually a great solution to optically managing the difference. You’d never ever notice. The glass was wicked expensive. Like, $800 total. But it looks fabulous, makes a huge difference. Wood shelves would have been cheaper, but then I would have wanted them edged in stainless steel. Money one way or another. The glass is light and bright – better – especially in my steel kitchen. And remember, all my cabinetry was salvaged — quite inexpensive considering the number and quality of cabinets I used, so I felt like I had the wiggle room to “spend too much” in a few other places.
If you have wood cabinets, on the other hand, wood cubbies would be fine, I think, you can do this for $60 or less – with 12″ x 12″ wood quarter-round shelves widely available from Home Depot, Wal-Mart etc. Or, make them yourself – from extra cabinet doors would be great because then the thickness would be the same.
I love my what-not shelves. They make the kitchen feel more spacious — the window is further visually expanded and in fact, there IS more space for light to come in. Also, when you are at the sink, in particular, it’s nice not to have a big block of honkin’ wood cabinet on top of you. If you’ve got the space, I think it’s best to see if the full “quarter” 12 x 12 or 13 x 13 will work – more space for cute things, more open. But if you’ve got a smaller kitchen, smaller shelves as in the top photo may be better. This is another decision to make based on scale.

