Several readers have asked me how to install the stainless steel countertop edging from New York Metals. In this post, I’ll take you step-by-step through the process that we used to install the metal edging in my kitchen.
- See all of our Kitchen/Countertops research here — for example, we have research on aluminum (rather than stainless steel) edging, too
- See my overview story on where to buy metal countertop edging — stainless steel, aluminum, even faux
I had my countertops laminated by an outfit recommended by by contractor. They made all the countertops and backsplashes separately, ahead of time, and then, when they came to install them in my kitchen, they put everything together.
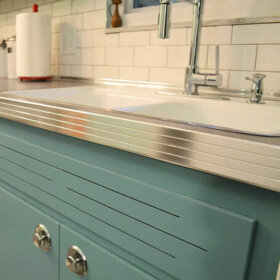
To review…The edging is comprised of three different pieces.
This is the little cove molding piece you use to mask where the countertop attaches to the backsplash. The part that “shows” is the 5/16″ part. You shove the 15/16″ part back down behind the main countertop:

This next piece, the 1-5/8″ snap-on molding, goes along the edge of the main countertop.

The question I have been receiving is, how to you handle the corners.
Answers: On the OUTSIDE corners, you snip the the metal lip that sit on top of the countertop and along the underside and miter it; the fat 1.5″ part of the metal bends easily to make the turn:
 On INSIDE corners, you cut the whole piece, also making miters on the lip that sit on the counter and underside.
 Now, somewhere in my stash I saw 50s DIY instructions on how to then weld… spotweld?… sauter? the mitered edges for a clean finish. Who knows which word? Lord knows which of 400 magazines this little article in. But I’ll keep an eye out. In any case, we did NOT weld anything and honestly, it’s fine. It kind of looks worse in the photo above than it is in real life. The miters are just real tight. Hey, if anyone is out on retro recon, with a camera and sees welded corners – grab the shot and send it in.

Finally – the 1″ backsplash…corners, miters…are handled the same way. In spots where the backsplash edges are visible vertically as in the photo below – back by the wallpaper – we made the bend then just secured them with a bead of glue. No screws were used.


Contractor Kevin, along with the countertop guys, were quite trepidatious about the whole thing coming in. This was the first time any of them had done this, their dads had done it 50 years ago! It really was a breeze, though. And as with the rest of my darling beloved kitchen – all the naysayers who thought I was nutso – were totally won over in the end and LOVED IT!

Above – Reader Amy asked you to “end” the countertop against a well. Here’s Option #1 – you run the backsplash all the way around.

Above – Option #1 e.g., where the countertop ends against a fridge, we wrapped the countertop in 1-5/8″ molding there – no backsplash.
Hope this all makes sense.
Note that metal countertop banding is available from a number of companies in a variety of metals. Some are u-shaped, like the kind I used, while others are t-shaped and require routing. Others also may have cute banding. And, there’s shiny and matte finish to decide on. Lots of choices!