

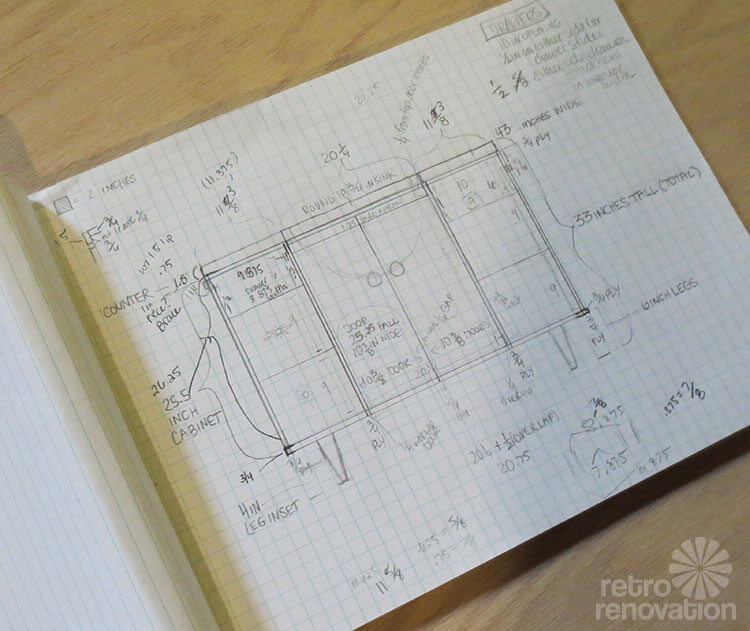
 Back in the early planning stages of my retro pink bathroom, I knew one of the biggest hurdles would be finding, modifying or making a vanity that both met my storage needs and fit with the mid-century design of the bathroom. Thus began the extensive search for a pre-made vanity that was both affordable (under $1,000) and would work in the space. But alas, I could find no vanity meeting these criteria. Next, I toyed with the idea of converting a mid-century dresser into a vanity, and even found a good candidate to start with. But ultimately, the space restrictions ruled out this option. All that remained was for me to either hire a carpenter to build a custom vanity for me, or to attempt this feat myself. Not one to shy away from a challenge, I began the research, drew up the plans, and built my own custom bathroom vanity. Here’s my epic story — and tips –>
 I am not a carpenter, but I do enjoy a challenge, can learn on the fly, work well with my hands, have patience and am just stubborn enough to not give up. So how did I teach myself to build a mid-century modern style bathroom vanity? Like any new project, the first step was soaking up some knowledge. Here’s how I prepared:
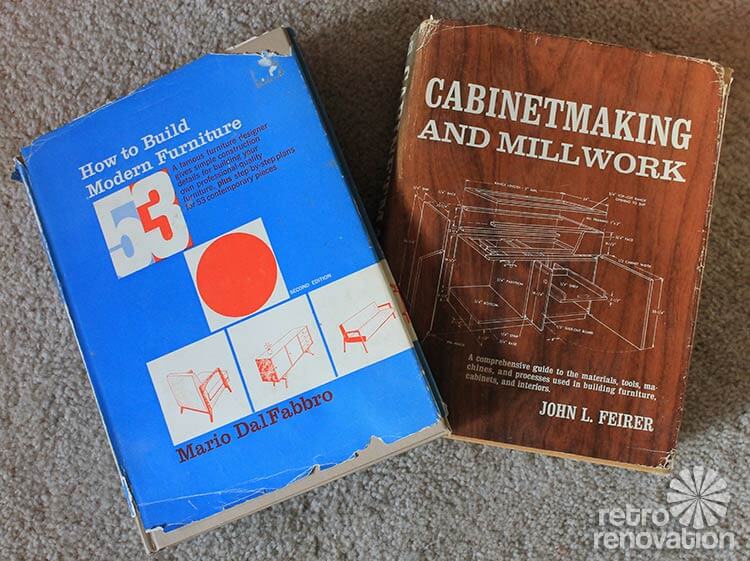
- I found and referred to the two vintage carpentry books shown above: How to Build Modern Furniture by Mario DalFabbro and Cabinetmaking and Millwork by John L. Feirer. Of the two books, Cabinetmaking and Millwork was much more informative and useful. It is set up textbook style and has loads of helpful information about everything from tools to types of wood.
- I watched woodworking shows on weekend mornings on PBS (no cable in this household). I picked up lots of tips from two of my favorite shows Woodwrights Shop and Rough Cut. Neither show actually made a vanity, but seeing them use different methods of construction really helped me understand good woodworking techniques.

- I spent hours analyzing the laminate vanity in my hall bathroom — how it was constructed, the use of drawer glides and hinges, the measurements. For design consistency throughout my small house, I decided to use the hall bathroom vanity as a starting point to make the new vanity for my master bathroom.
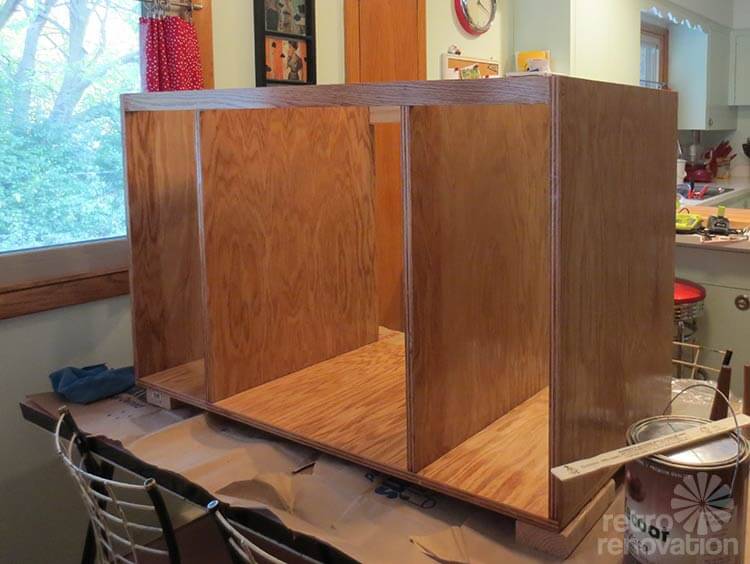
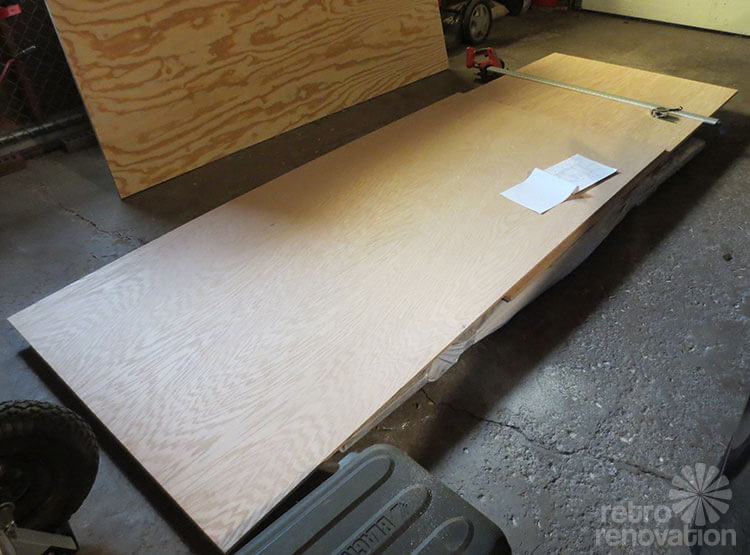 Next it was time to find the wood. The original vanity in this bathroom was made completely of oak, and all of the trim is oak, so I decided to use oak for the entirety of the new vanity. Yes, I could have used cheaper materials to construct the main box and drawer boxes. But part of my overall goal was staying as true to the original bathroom as possible. And, I found that the cost difference for the amount of materials needed was not great enough to make me opt for different materials. In total, I used three 4’x8′ pieces of plywood (with some scraps): I used one 3/4-inch thick B grade sheet to make the cabinet box, one 1/2-inch thick B grade sheet to construct the drawer boxes and one 3/4-inch thick A grade sheet for the doors and drawer fronts (also used for the closet door).
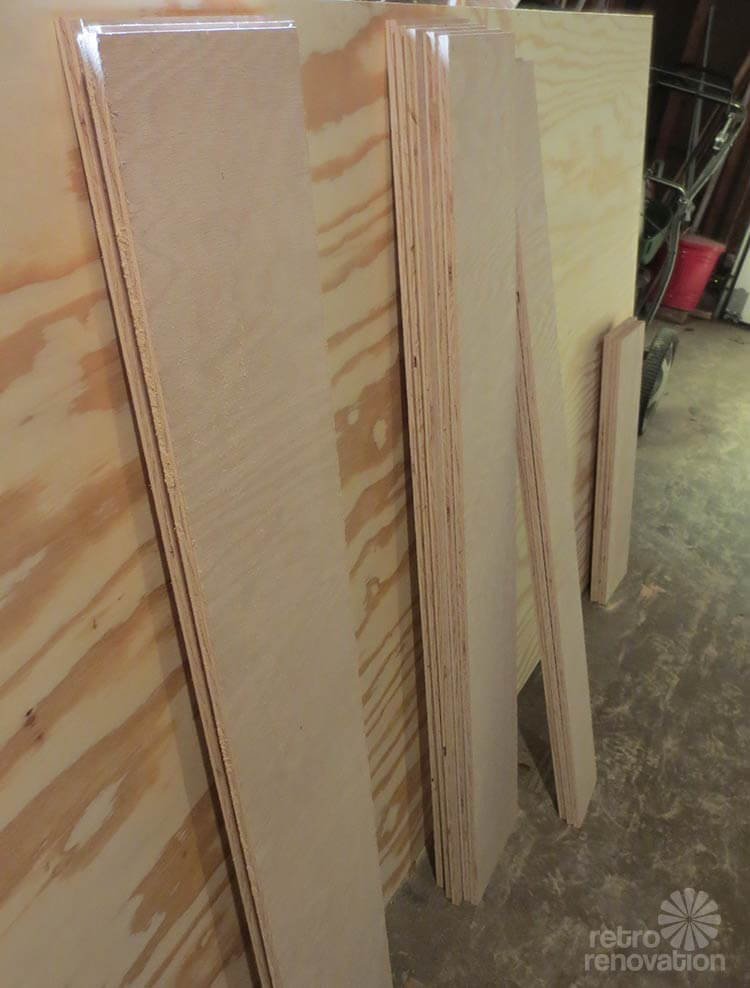
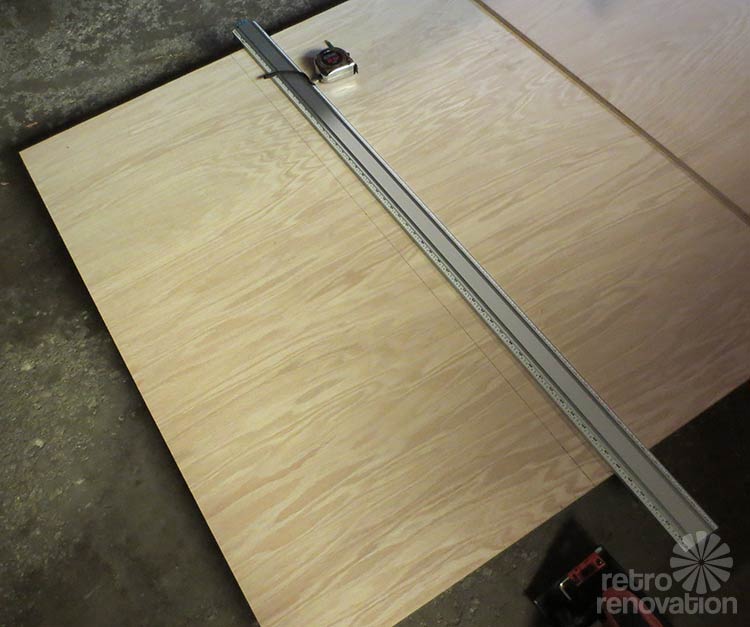 I own a table saw, but running a 4’x8′ sheet of plywood through it is not my idea of a good time. My Dad suggested using a skill saw instead, making sure to support the plywood and keep it off the ground with 2×4 boards when making cuts. This method made me feel much more comfortable but, one thing worried me — how to make sure the cuts were straight. Fear not, for there is a tool for that — called a straight edge clamp.
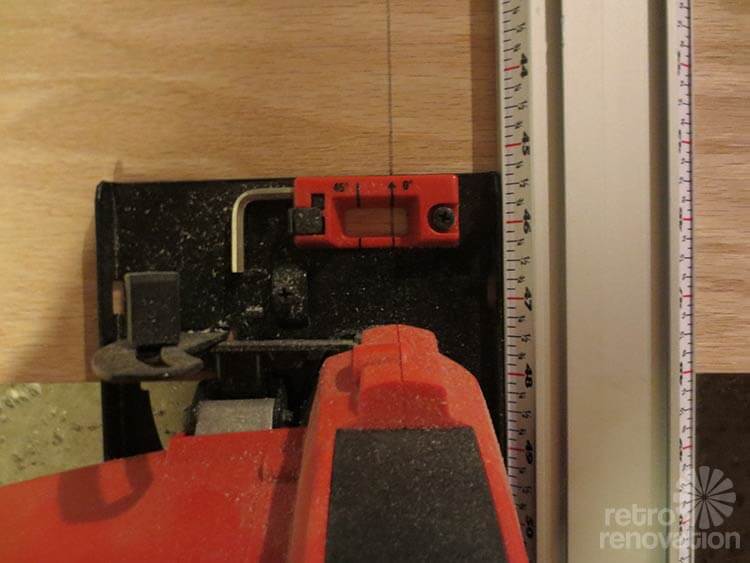 The clamp allowed me to make super straight cuts every time. With careful measuring, every piece came out perfect. It was one of the most valuable tool purchases I made for this project.
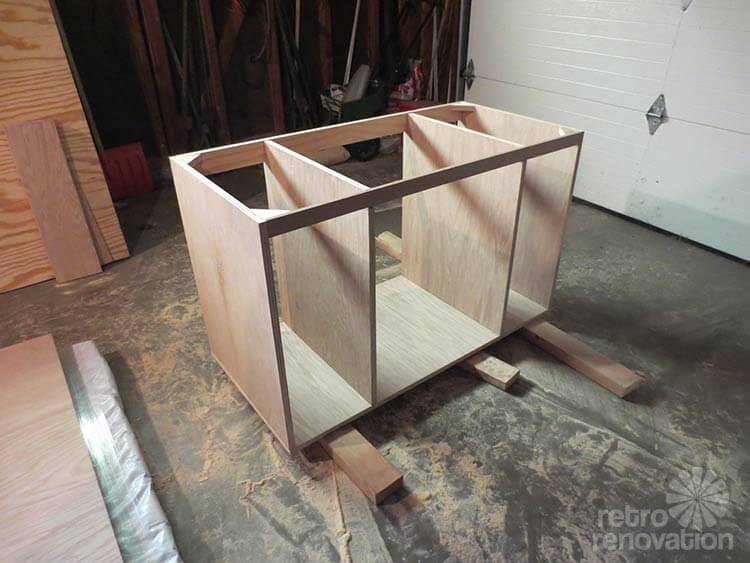 After cutting out the pieces of the vanity and gluing/nailing the box together, it was time to think about stain and sealer.
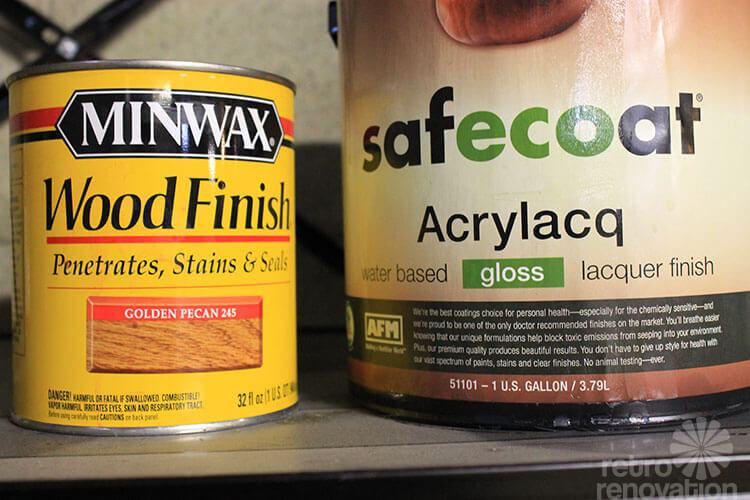 Since all of the oak trim in my 1962 ranch is the same color, it made sense not to deviate from this constant. Previously, when fixing and touching up the home’s original trim, I used Minwax Golden Pecan stain with great results, so it made sense to use the same color for the vanity.
At this point in the project, temperatures outside were starting to dip below acceptable painting/staining levels. I was working in the garage, so I applied the stain and then let it slowly dry over several days. Once dry, I brought the vanity box inside to apply Acrylacq Safecoat lacquer finish, which is very low VOC.
 Following the directions on the can, I applied three coats to the vanity box and legs.
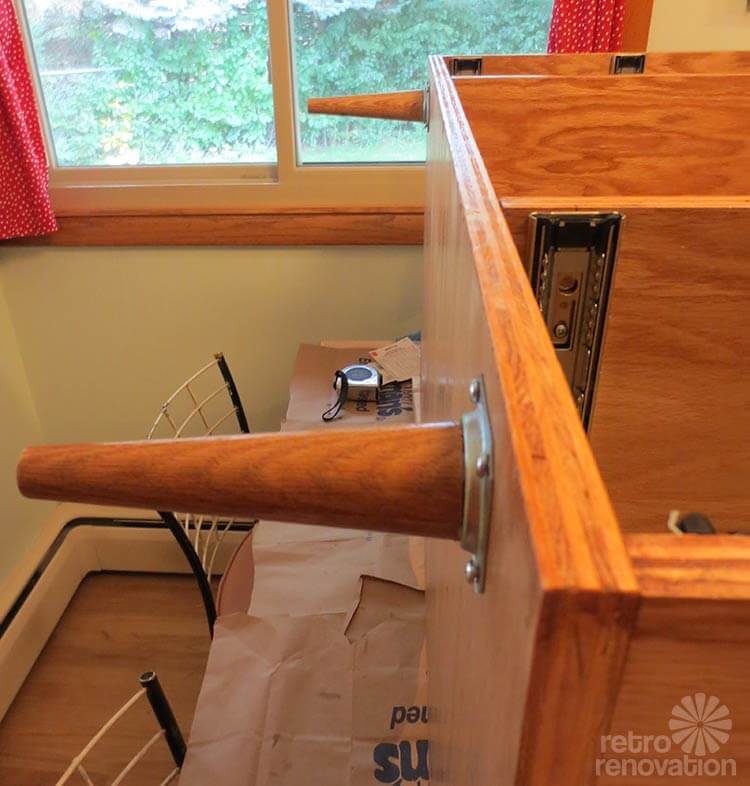 Speaking of legs, while the vanity in my hall bathroom continues to the floor, I decided to give my master bathroom vanity a little mid-century modern sex appeal with six inch tapered mid-century legs. I purchased the legs at TableLegs.com, which Pam has featured before as a source for retro styled furniture legs. I only used two legs for this project, since putting fancy legs in the back where they are not visible would be a waste. The legs arrived quickly, were very well made, and were easy to attach with the correct hardware.
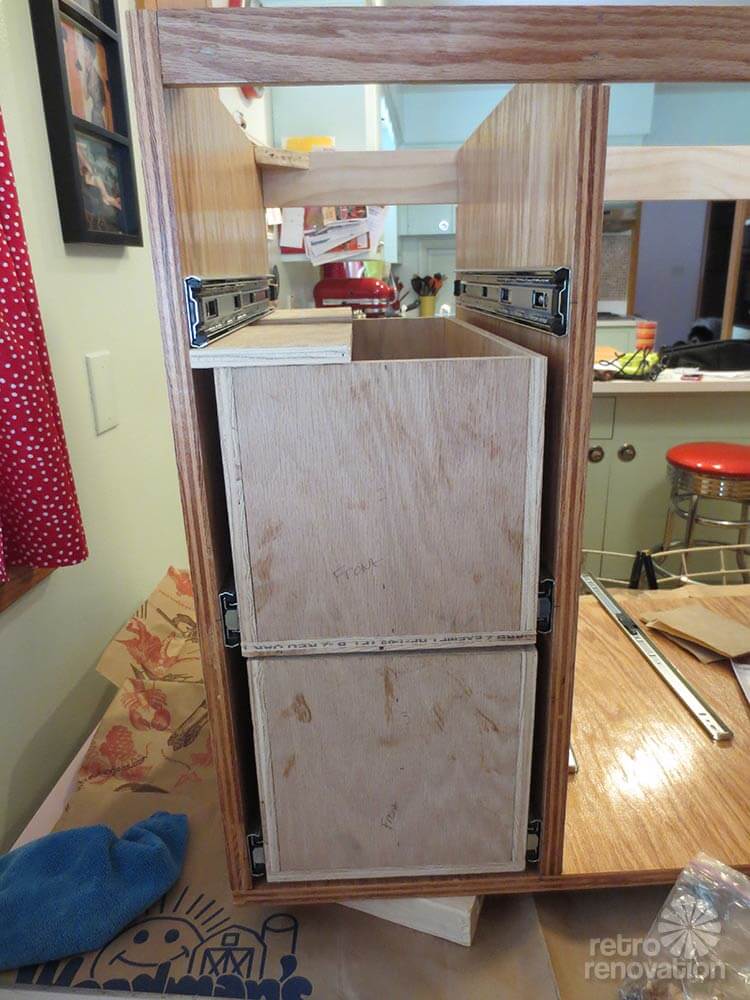
 Now that the vanity box was complete, the next step was building all six of the drawers. At first I contemplated ordering pre-made drawers from Barker Door, which would have been a much easier way to get six drawers constructed. Ultimately, the cost, lead time and my fear of accidentally ordering the wrong sized drawer box made me decide to build my own instead. This is where the project got a little un-fun — not difficult — just very repetitious and mind numbing. Part way through the seemingly millions of cuts to make the drawer boxes, one begins to question if six drawers are really necessary. Of course, now having six drawers is awesome, but building and installing them seemed to take forever.
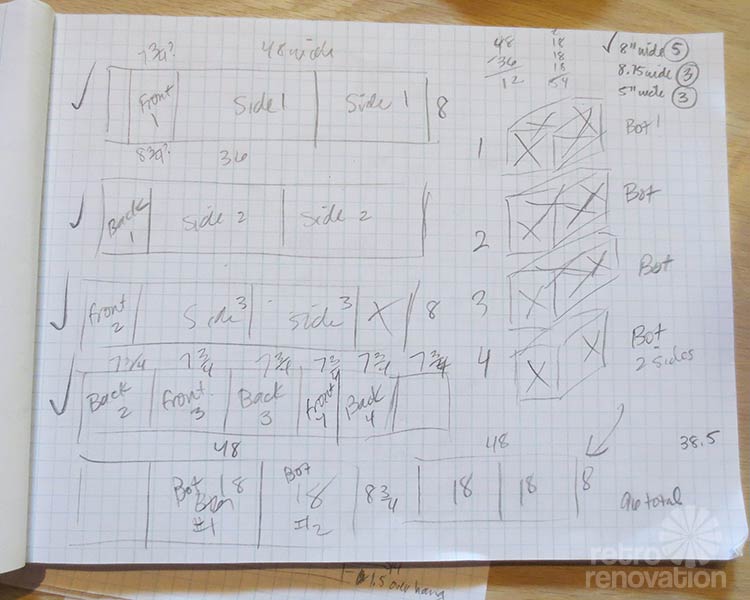
 My design plan called for four drawers with eight-inch high sides and two with five-inch high sides. Each drawer box would be 18 inches front-to-back. I found that the easiest way to make all the sides, bottoms, fronts and backs of the drawers out of the 1/2-inch plywood sheet was to cut the sheet into 48-inch long strips that were the height of each drawer, plus strips that were the width of the drawer — 8.75 inches — for the bottoms. Drawing a little diagram was helpful to determine how many strips of each size I needed. After all the strips were cut, I cut each strip again into smaller pieces to make all the sides and bottoms needed for the drawers. Once I made all the cuts, I carefully assembled the drawers with wood glue and nails, making sure to keep everything straight and square.
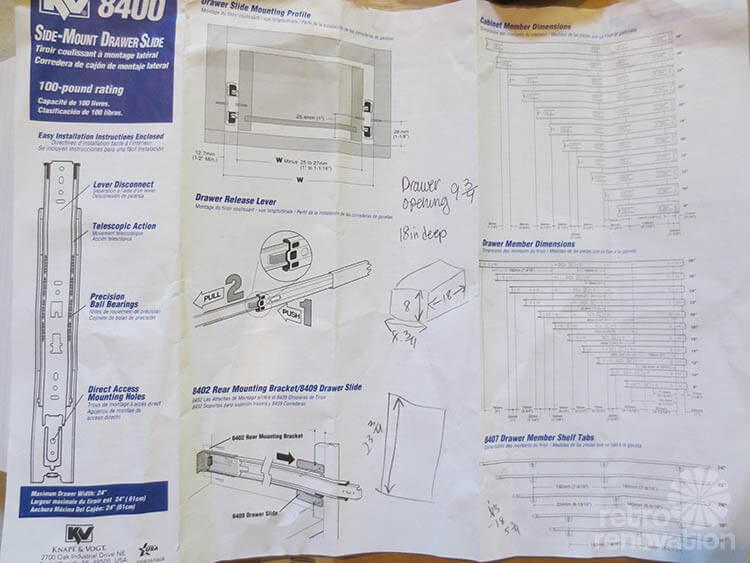
Next came the drawer glides. The drawer glides on the vanity in my hall bath — KV side-mount glides — had really held up well over the years, though I wished that they were full extension. Full extension drawer glides allow the drawer box to be pulled all the way out of the cabinet, making it much harder to lose objects in the back of the drawers. Since my drawers were 18 inches front-to-back, I needed 18-inch drawer glides. The glides I chose for this project are 18″ KV full extension drawer glides, purchased through Ace Hardware’s online site, and shipped to my local store for no extra charge.
 Installing the drawer glides was not difficult, so long as I (1) paid attention to placing the glides in the recommended location (2 mm from the front of the frame), and (2) made sure the glides were level and even from front to back.
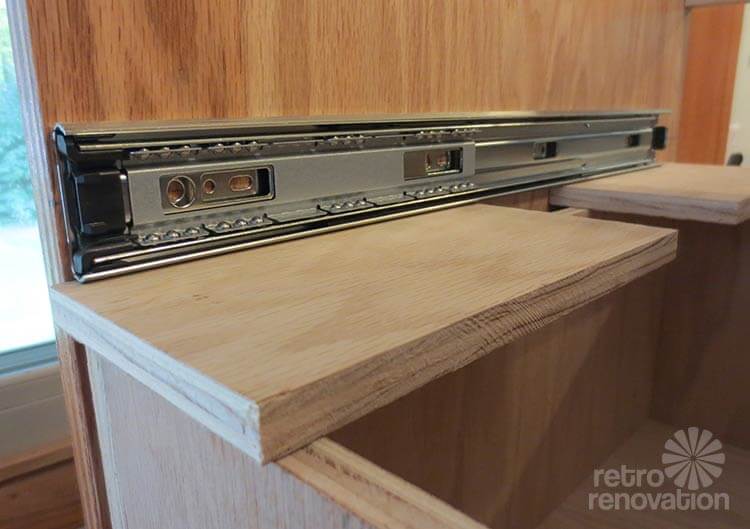 To aid in ease of installation and consistent spacing, I rested the glides on used a few pieces of scrap lumber while I attached the glides to the cabinet.
 As I installed each set of glides, I also installed the corresponding glide piece on the drawer boxes per the instructions and tested for smooth operation. Call it careful measuring — or luck — but all six drawers worked perfectly on the first attempt. My theory is that since the cabinet and drawers were perfectly square, and the glides were measured with exactness during installation, everything came together well. If anything was out of square, it would have made the whole process much more difficult. This project — from building the drawers to installing them in the cabinet — took me the greater part of two weekends. Make sure to take your time and measure carefully.
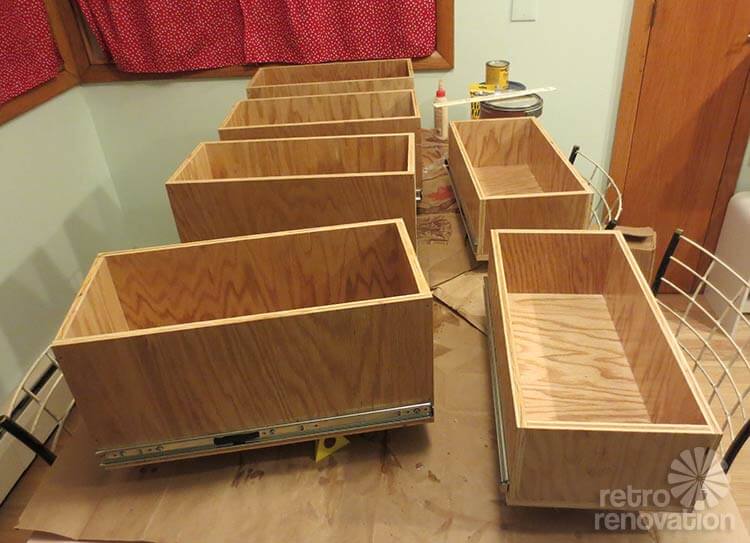 Next, it was time to give all six drawers the triple coat of Acrylaq treatment to seal the wood and protect it from moisture. Note: I did not seal the fronts of each drawer box, because I read that leaving the wood uncoated allows for a more porous surface for the glue to bond to when attaching the decorative drawer fronts.
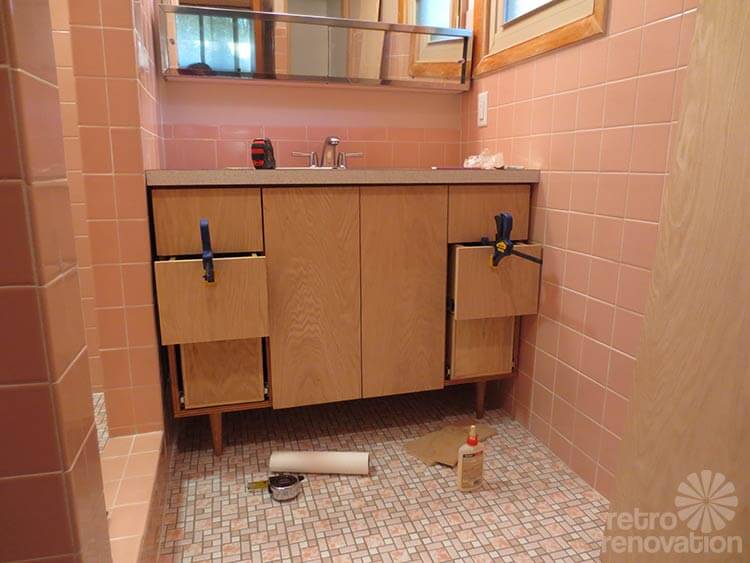
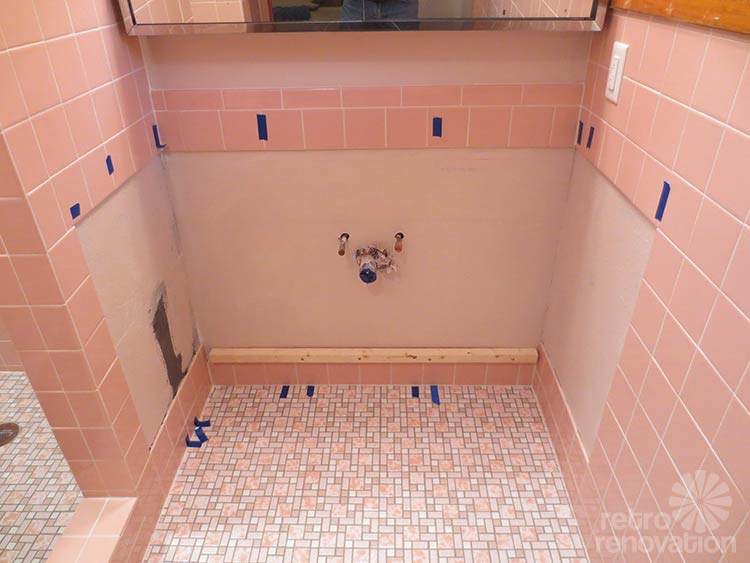 Finally, it was time to install the cabinet in the bathroom. The blue tape in the photo above shows where all the studs are located. To mount the vanity, I first attached a scrap piece of wood to the wall (sorry, no photo of this), making sure to hit studs. Since the vanity doesn’t have any back legs, I mounted a board at the height needed to hold the back of the vanity up and be level.
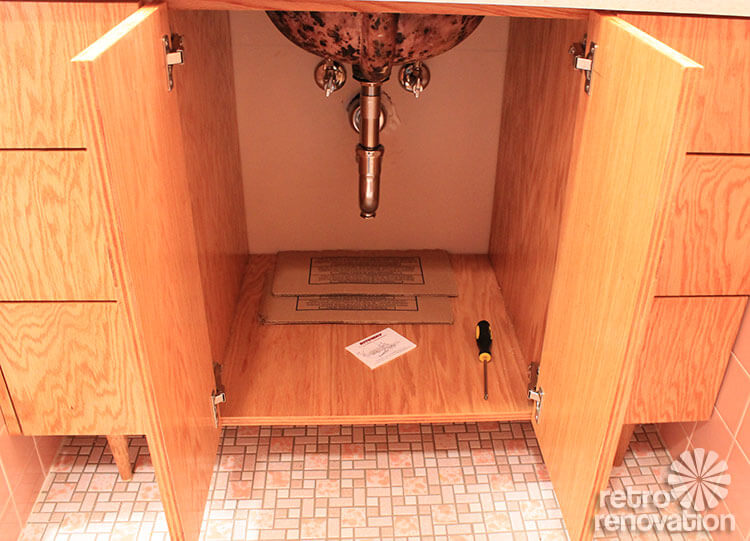
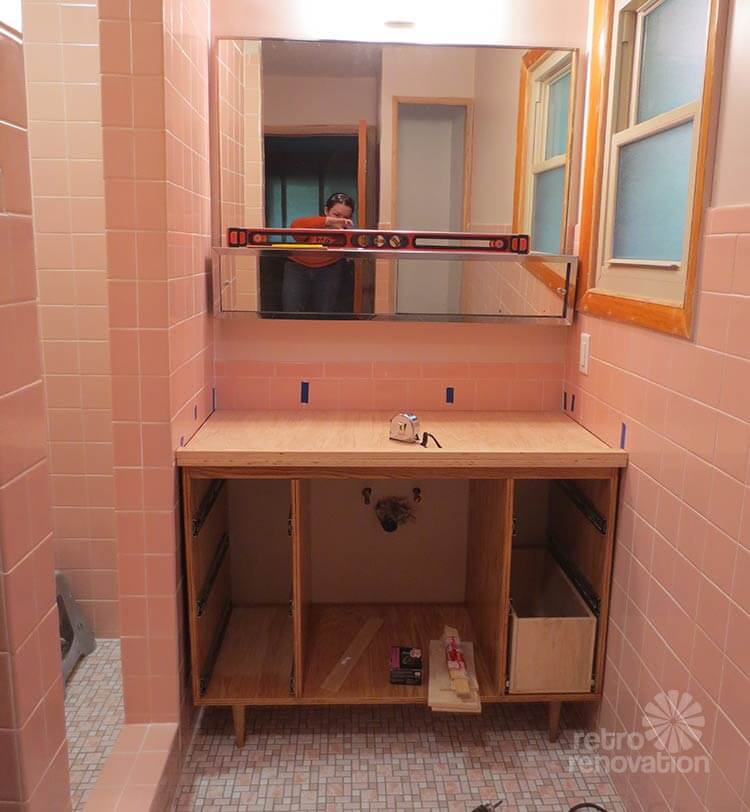 After positioning the vanity so that it was level and even, I used screws through the board that runs along the top back of the vanity box to secure the vanity in place. At this point I also cut some scrap plywood to use as a base for the laminate counter top — separate story on the vanity top to come.
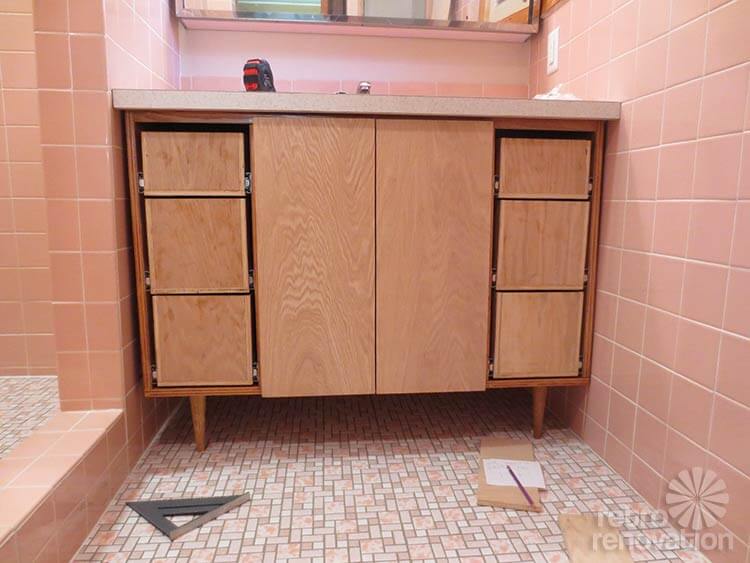 With the vanity, counter top and drawer boxes in place, it was time to add the finishing touches — drawer fronts and cabinet doors. For this part of the project, I used “A” grade 3/4″ thick plywood due to its high quality and two “good” sides. The plan was for each door to overlap half of the 3/4″ cabinet frame edge, plus have a small gap between the doors in the center — about 1/8″. I determined the height of the doors by lining the bottom of each door up with the bottom of the cabinet frame and then measuring up to about half an inch below the counter top overhang to allow plenty of clearance for the doors to open and close. First, I cut one piece of plywood at the correct height for the doors, then I cut each door width from that piece. When installing the doors, I kept the cuts in order so the wood grain pattern would line up. This is not necessary, but it does look nice.
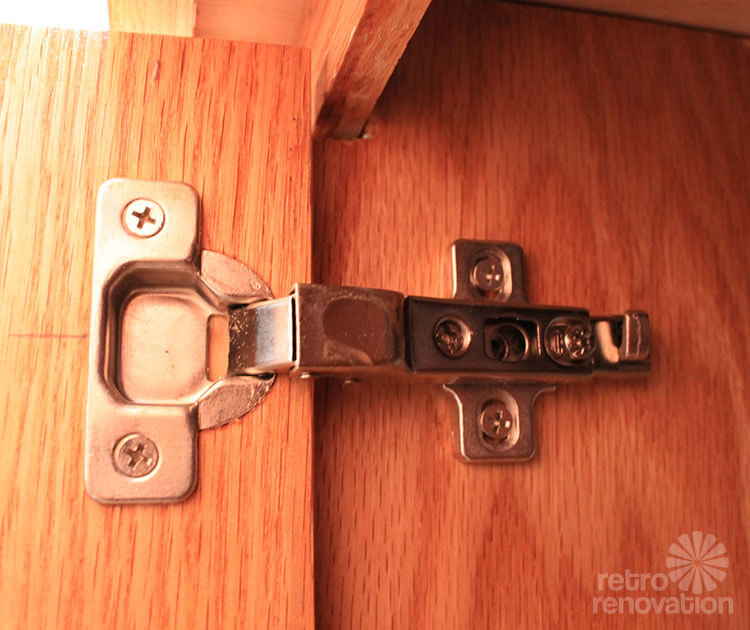 What is necessary however, is getting the right kind of hinges for your cabinet doors. My cabinet box is frameless, making European hinges a popular choice. This style of hinge is commonly found on modern style doors and on most of the furniture at IKEA. The key to using these hinges successfully is making sure to get the right kind. For my vanity, half overlay hinges fit the bill. This is because my plan was to have the cabinet door to cover up half of the exposed cabinet frame end (the other half will be covered by drawers on either side). This helpful explanation of the different kinds of hinges from Rockler Woodworking & Hardware helped me figure out which type of hinges would work best for my situation.
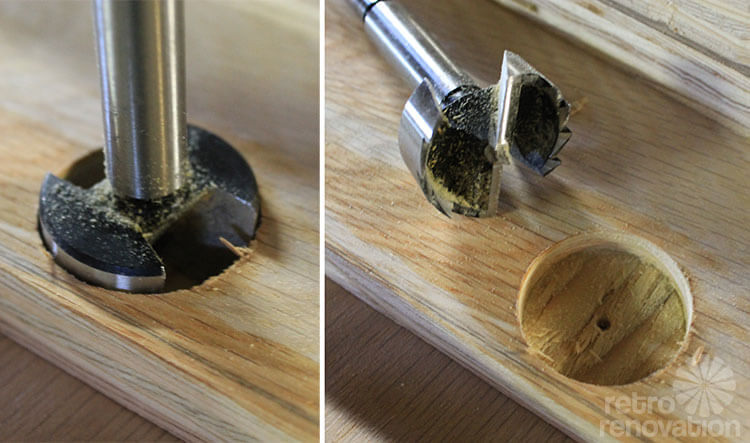 Installing the hinges seemed scary at first, but like most jobs, careful measurements and the correct tool made it go smoothly. I used Forstner drill bit in the correct diameter as specified by the hinge installation instructions — this was easy to use and helped me to drill the perfect sized hole for the job.
 Since my vanity doors were not very large or heavy, I needed only two hinges per door. Euro style hinges are easy to adjust — by loosening or tightening screws, you can tinker with the gap between the doors until it is even.
 Next, it was on to the drawer fronts. The first step was to determine the width needed to cover the rest of the cabinet frame. Once I figured out that measurement, I cut long strips to width and then cut again to the height of each drawer front. Again, I cut and installed fronts one-by-one, in order, to keep the wood grain aligned among the three drawers on each side. If I were a master wood worker, cutting out the whole front so that all the wood grain lined up to look like one solid piece would have been even better, but for my first attempt, lining up grain between the sets of drawers and doors worked for me.
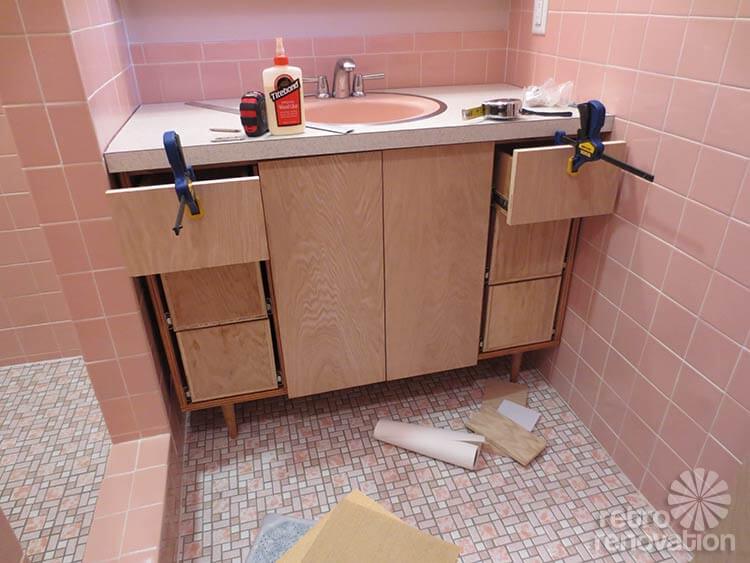
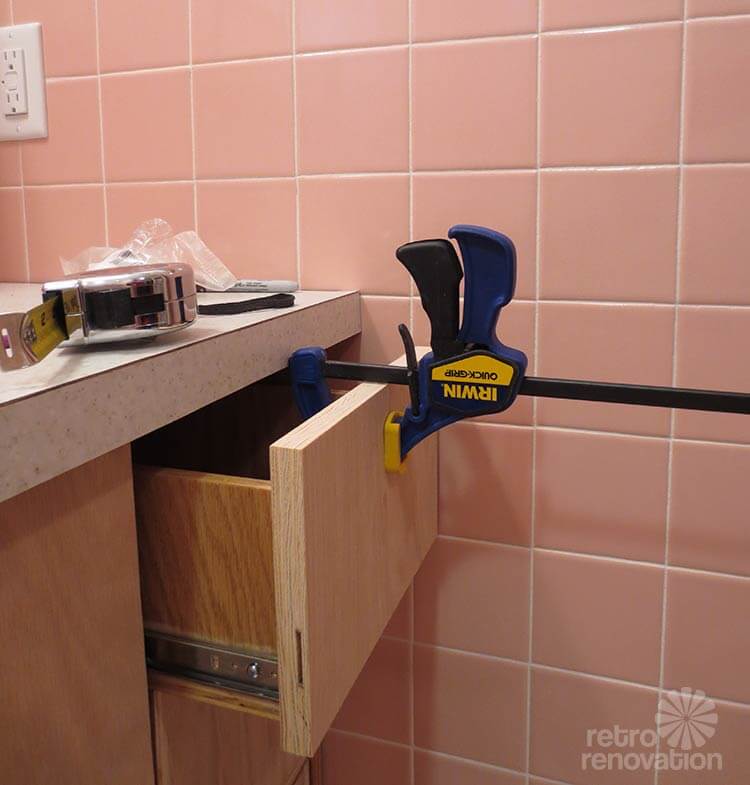 To make sure the spacing for each drawer was right, and that everything lined up as planned, I first glued each drawer front to the drawer box, holding it for a while with my bare hands. I then clamped it to allow it to finish drying. Probably not a professional technique, but it worked well enough for this beginner.
 Once the glue was completely dry, I removed the drawers from the vanity box so that I could add screws on the inside to reinforce the glue. I also stained and sealed each drawer front.
 With everything stained, sealed and installed all that was left to do was put on the knobs. Of all of the steps to build the vanity, this last one was by far the most terrifying. The thought of drilling holes in my beautiful vanity was enough to send chills down my spine. 45 minutes of measuring and remeasuring ensued before I finally found the courage to drill the holes for my knobs.
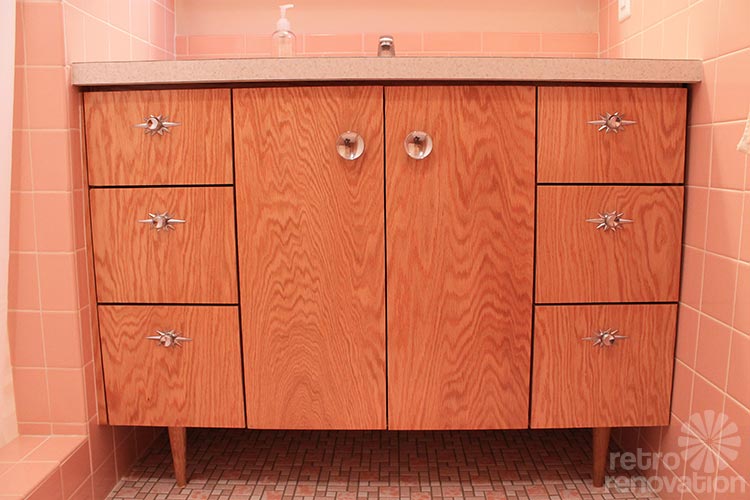
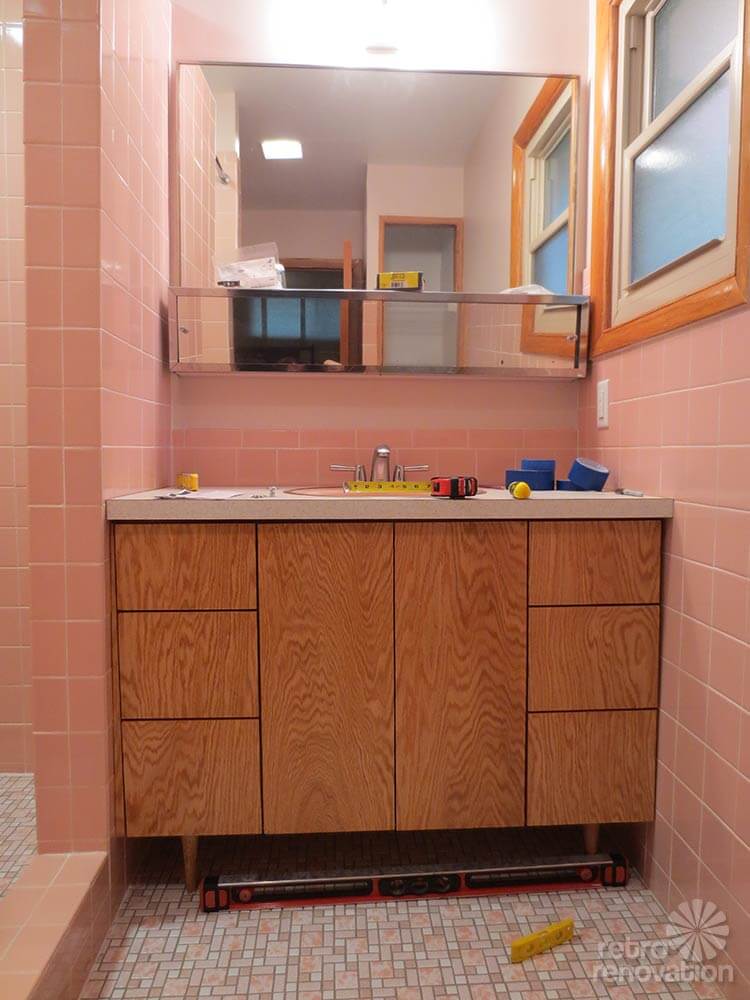
In the end, all of the hard work was completely worth it. I absolutely love the finished result. It is hard to estimate how many hours I spent working on this project. Certainly, a trained carpenter would be able to build a vanity much faster, but the finished result of my hard work is exactly what I would have wanted a carpenter to make for me.
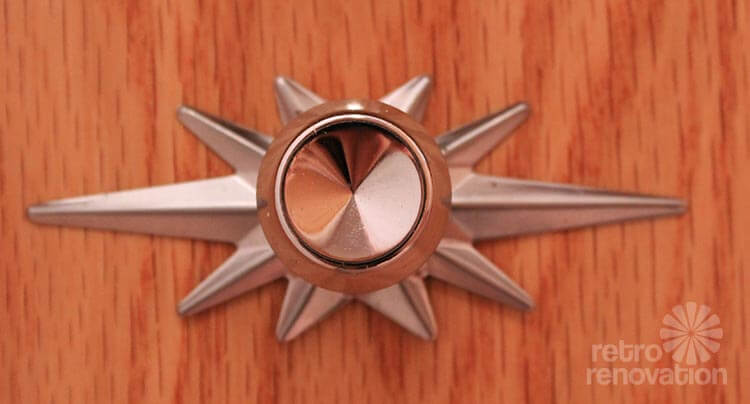 The finished vanity is exciting, but what is perhaps the most exciting of all is finally being able to install my chrome starburst knob and backplates that were lovingly spiffed up back in February of last year. Note: Even though I had secured eight matching sets of these knobs/backplates, I decided to use some different round dish knobs for the vanity doors — I think that this adds a nice variety to the look.
The total cost for me to build this vanity and countertop — including the vintage starburst knobs, which didn’t come cheap on Ebay — was $583.09 — well within the budget I had set for myself. (My total doesn’t reflect the additional tools needed for the job since they can be used for other projects in the future. Also, I had the stain and sealer already on hand.) For the money spent, the result is a 100% custom piece that is all wood with mid-century legs, full extension drawers and fancy vintage hardware.
I’m so excited that this vanity turned out so well. It just proves the point — if you really want to do something and you have the willingness to learn and the time to spend, you can do anything you put your mind to. I’ve also carried on the tradition of custom cabinetry in my 1962 ranch: the old bathroom cabinet, the kitchen cabinets, the living room built-ins, the laundry room cabinets, are all custom made to fit the space using oak plywood — most likely by the first owner of my home, who also was a home builder. He likely built those cabinets himself and it makes me proud to continue the tradition and keep in mind the original intent of the person who built my house.


Stef says
I just came across this and I love it! Nice work! I have an oak Mid Century Desk that I took apart and I think you have inspired me to turn it into a vanity. The drawers are intact I just have to get new glides and then make the cabinet box. I have the tools but out of anything the Kreg perplexes me. I’m not using it right. Advice?
Wendellyn says
Wow! I just finished reading about your project. You are definitely talented! We have a 1965 built tri-level. The hall bath is not original, but I am slowly getting it there. Thank you for your inspiration.
Judith says
Thank you
I am trying to do my retro pink bathroom I do not want to remove it as the tiling is amazing
If you have anymore ideas about the shower hardware, bathtub hardware
Paint colours etc
I would be greatful
Fran says
I just came across this today . I am so impressed with your work, you did a fabulous job . I always wanted to take a woodworking class but never got around to it . I am remodeling a bathroom from the 60s. It has square blue tiles and blue bathtub . I will be leaving the tiles but looking for a new sink vanity to upgrade it a bit.
Rudy Martinez says
Looks fantastic. Down to the smallest detail.
Halle says
Kate:
If you are not a carpenter, what are you!? An architect, interior designer, or just all-around brilliant person. I would hire you for my mid-century bathroom redesign efforts.
Love your thinking—and, your dad, for suggesting what saw you might use.
Kate says
Thanks Halle!
I come from a long line of ‘handy’ people who are good at fixing and building things with their hands (my dad, my grandpa, etc.). On the other side of the family, there are a lot of artists (my mom, my great aunt, etc). I think I got my ability to work with my hands from both sides of the family, plus I’m good at teaching myself how to figure things out by reading about them, taking them apart or looking at their construction methods (reverse engineering? 🙂 ). Add in 4 years in art school where I did everything from painting to welding, plus my stubborn independent streak and you get a girl who isn’t afraid to build a bathroom from scratch — in pink of course. 😉
Jill Walker says
I am completely amazed that you built this yourself! You are awesome and inspiring!!! I am so impressed and inspired to try something like this now because of you! Thank you!!!