


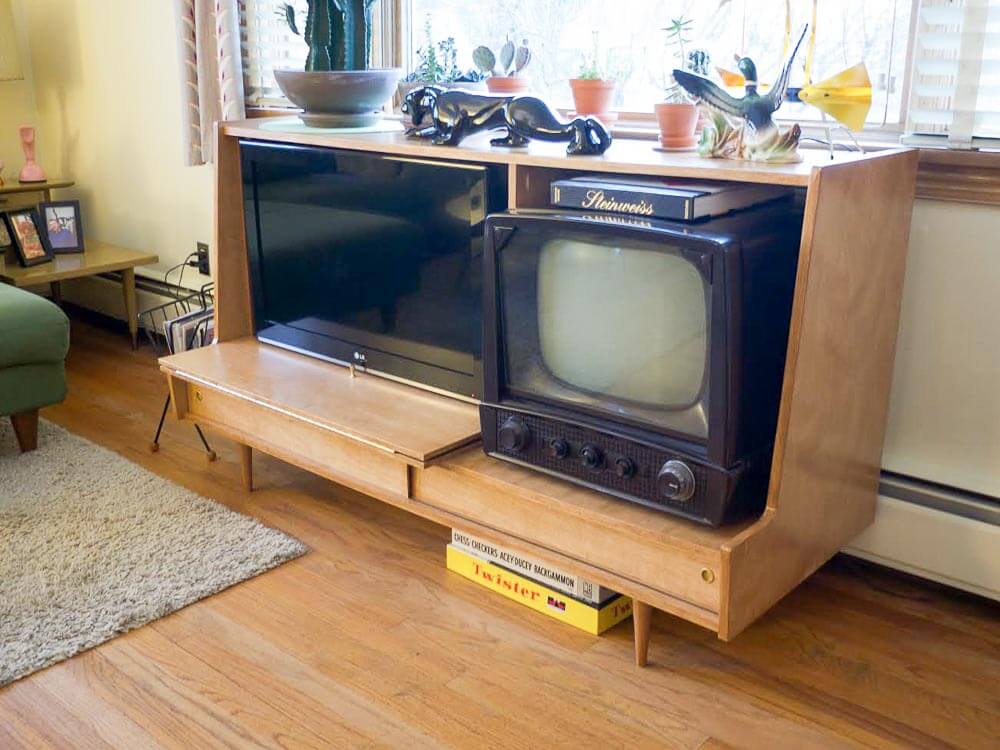
 After I wrote about Jeff’s DIY mid-century modern TV cabinet, I heard from other readers who had completed similar projects. Chris’s design is super ingenious: A professional at a architectural firm and with serious design skills, he created a curvalicious cabinet that would hold both a vintage 1955 television and a new flat-screen TV. The flat screen TV can be hidden behind a fold-down panel when it’s not in use (as shown above). Chris spent a year researching and planning his project, and then, two months to build the unit. The effort shows — it’s gorgeous!
 (Edited to combine several emails) Chris writes:
Hi Pam!
I recently read your story on Jeff’s mid-century modern TV cabinet he made for his flat screen TV and was inspired to write you about a similar experience — I also tackled the issue of how to hide a modern flat-screen TV in a mid century living room.
Almost two years ago, my partner and I were lucky to purchase a 1955 modest mid-century time capsule ranch complete with original furniture, pink bathroom, circa-60’s remodeled kitchen, and even a Tretchikoff print (!) in the living room. Being our first home, this worked out great because we didn’t have a lot of our own furniture. It was perfect for us and we were very lucky to find it.
Though one item we did have, a 1955 GE TV, we knew definitely needed to be displayed in the living room of our 1955 ranch. But this caused an issue, how do you have a vintage TV for when you’re in the mood for the Twilight Zone, and also have a flat screen TV for when you’d like to watch Netflix? This sent me on my adventure into woodworking and furniture building.
With my problem in mind, I designed and built a cabinet [not the one shown in these photos] that concealed the flat screen TV behind doors when not in use and looked good next to the 1955 TV. Long story short, it worked, but I wasn’t in love with the results. I decided I could do better and that this served as a great learning experience, being my first real exercise in building a piece of furniture.
So, for the next year, I scoured the internet for images of mid-century credenzas and cabinets for inspiration and slowly accumulating a Pinterest page of different possibilities. I was inspired by the simplicity of Paul McCobb’s furniture and used it as a jumping off point. I knew I needed to design something that would discreetly hide the flat screen without it being obvious what was behind its doors, so the doors couldn’t be too big, and they needed to fold away so they wouldn’t impede the view of the flat screen TV.
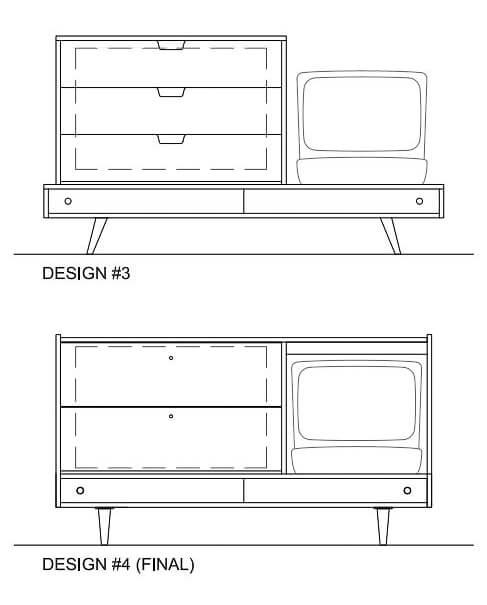
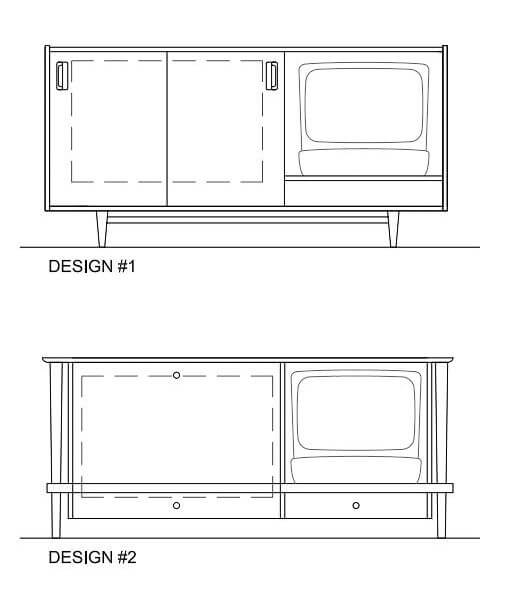
I work as a project manager for a local architecture firm so I drew up multiple options in AutoCAD looking at different designs and playing with the proportions to see what size flat-screen TV looked best and worked within the design. The flat screen needed to be discreetly hid without it being obvious what was behind its closed doors so the doors couldn’t be too big. Another lesson I learned from building the first TV stand was that the doors needed to operate easily and fold away so they wouldn’t impede the view of the flat screen TV.
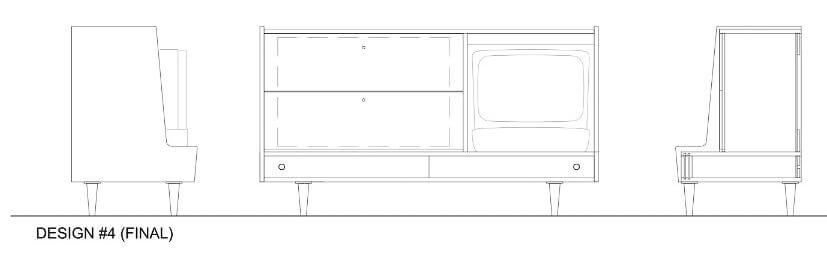
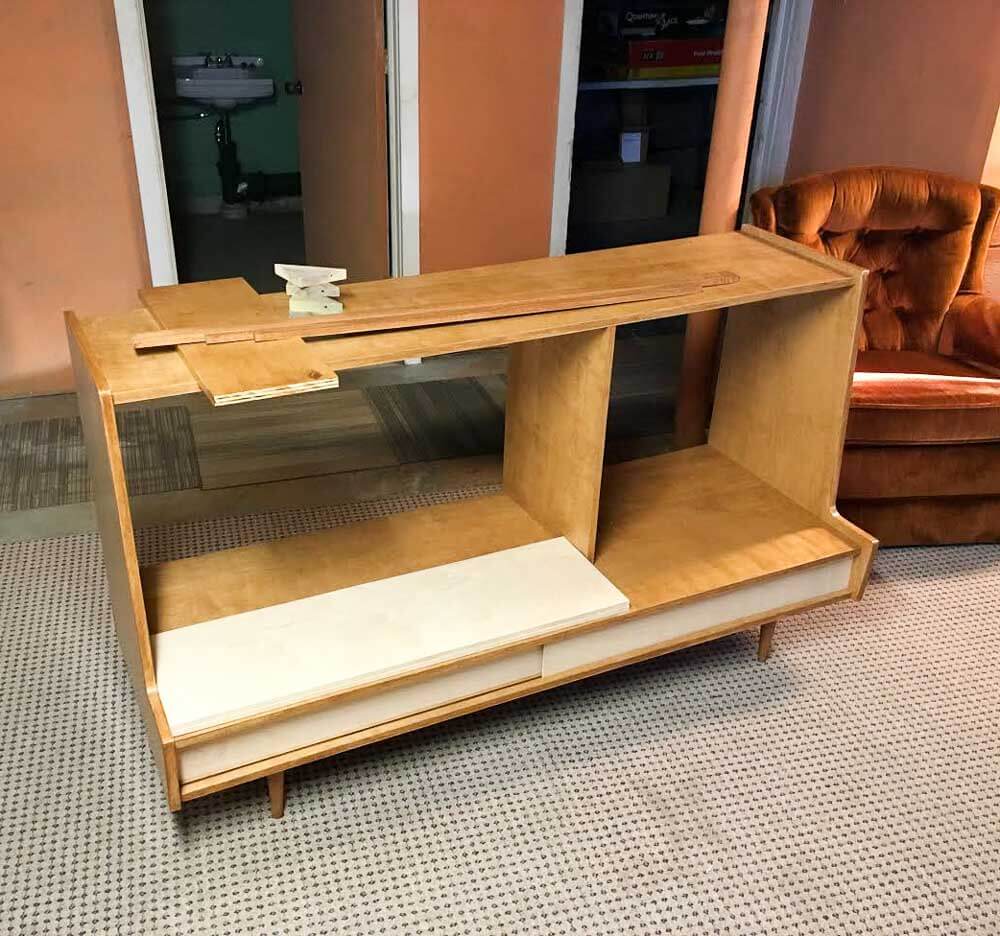
When I thought I was happy with the design, I even built a full size card-board mock-up of the TV stand, because I knew I wanted to be sure this would work and I’d be happy with it knowing how much time, energy, and money I’ll be putting into it. After months of planning I was ready to get down and dirty and start building. This inspired me even more and the design changed further. I made more tweaks in AutoCAD and finally felt I was happy with the design. It was time to get down and dirty with construction.

Two months later I finished the project and I loved the results! I designed and built it myself – it was a great experience!
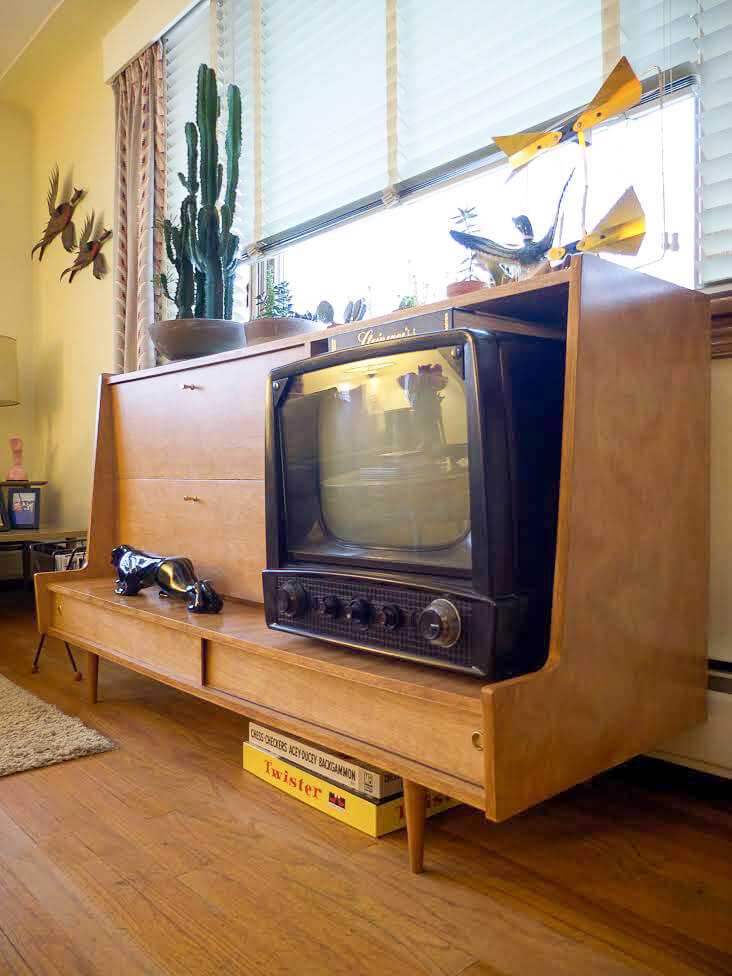
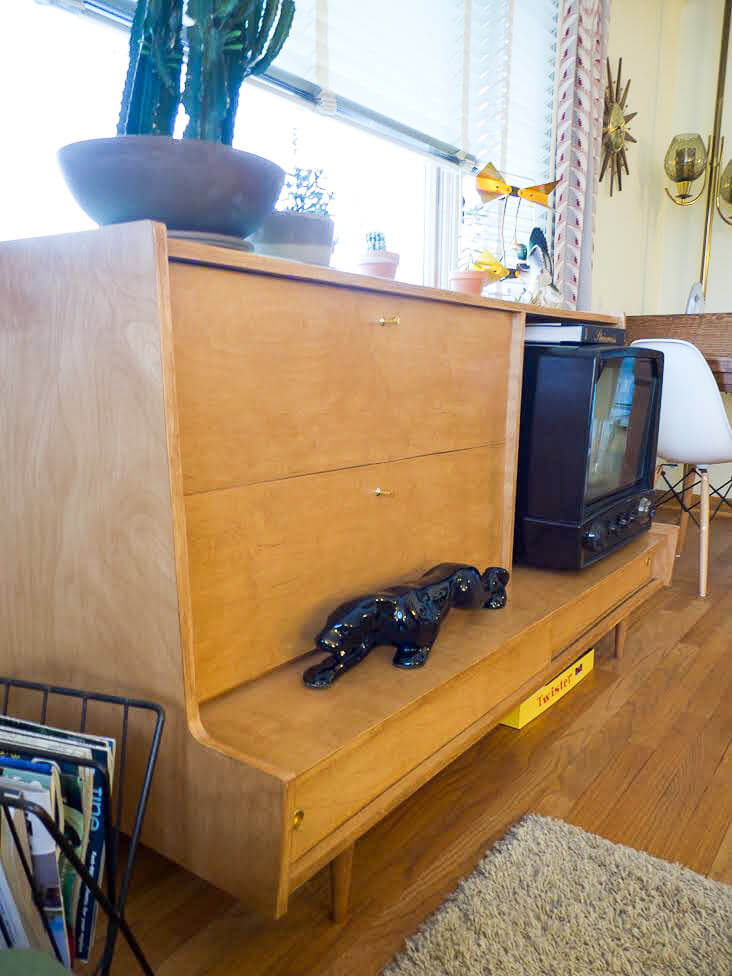
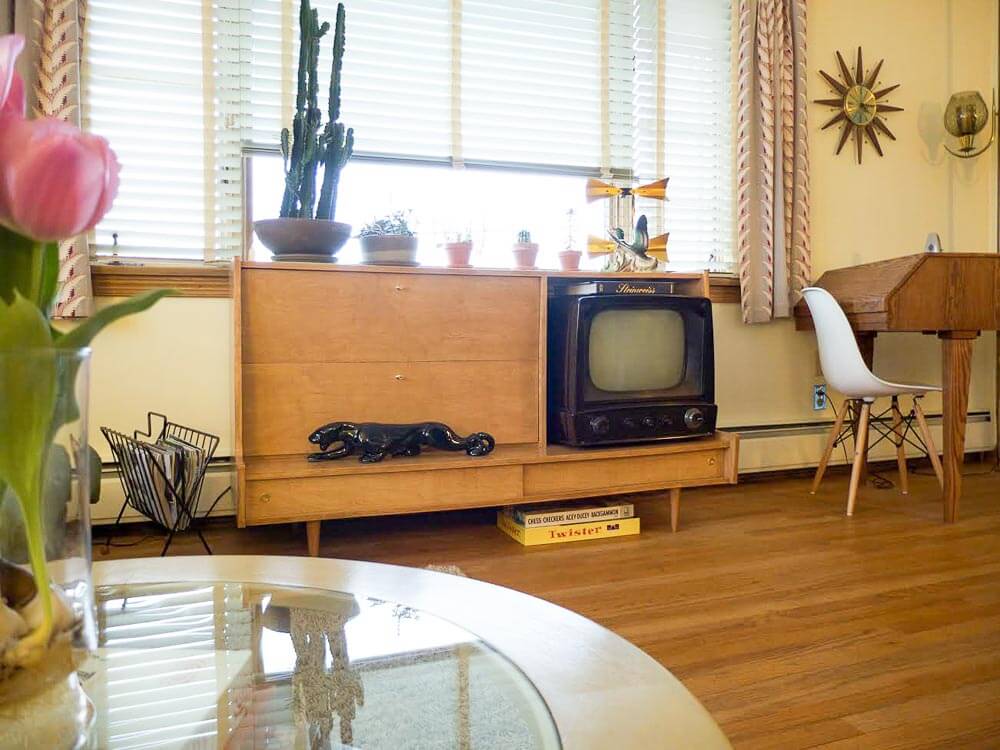
The design features a spot for our 1955 TV and conceals the flat-screen TV behind two folding doors that are disguised as drawers. Because the old TV was so deep, and the flat screen so shallow, the design features a shelf that perfectly fit one of our ceramic panthers which further helped disguise the flat screen TV when not in use. Below the shelf in the lower section of the cabinet is two sliding doors that we use to hide all the TV equipment for both TVs. One side of the cabinet has the equipment for the flat screen TV (Bluray player and Ninetendo Wii) and the other side has the equipment for the 1955 TV (RF modulator and DvD player).
The cabinetry is actually built very similarly to how Jeff built his TV cabinet. I used birch plywood, edge banding and the Kreg jig (affiliate link) (I actually fell in love with the Kreg jig and highly recommend it!). You can see the MccCobb inspiration in the legs, which areMcCobb furniture legs from tablelegs.com, and the hardware, which is from myknobs.com.
It definitely isn’t easy, but well worth it in the end! This was a great experience for me, and as Jeff mentioned, if you’d like to share it to inspire others with their mid-century projects, that would be great!Thanks!Chris
Thank YOU, Chris, for sharing all your work. This is really inspiring — I’d say your design is ready for Design Within Reach! I’m taking a weeklong Woodworking 101 class in April, this is definitely getting my juices going, although I am not sure I should be trusted around power saws.


Scott says
That’s jaw-droppingly perfect. You are a mad genius with the skills to back it up. Well done!
The best I could come up with was to put mine on a vintage bi-level coffee table with the lower section holding the blu-ray, etc. It’s not horrible but the complete concealment idea is much better.
Joe Felice says
I see they have the ubiquitous crouching black panther, which was the first vintage piece I ever acquired several years ago when I got the kick.
J D Log says
You have done a great job Chris it blends right in to your decor, and your 1st piece of furniture.
I dare say you will be making some more items for your new old house
Frank S. says
Absolutely gorgeous, Chris! Maybe your side profession should be furniture design.
tammyCA says
Oh wow, that’s very nice..so talented! If there’s one thing I’d love to hide (but can’t live without) it’s the big, black, boring flat screens.
Cloudy says
Love this project. I have a question about your bow tie antenna: How is it working for ya’ll? Does it get good range and can you also use it for your more modern tv? I’m thinking about buying one, but really want to hear from those who are already using one.
Thanks and job well done!
Chris says
Hi Cloudy! The bow tie antenna is just for decoration. I have the old TV hooked up to a DVD player that I watch everything through. I actually don’t think you would be able to use one ever since they stopped broadcasting analog and have gone digital – at least that’s the case in my area.
Jason says
This is gorgeous! What a wonderful job and something that you will be proud of always! PS on the old antenna question… I run my whole house on one small outdoor antenna, it is a new “HD” antenna with a plug in booster, but any old VHF/UHF antenna can receive HD signals just as well. You will need your tv to have an HD tuner or use the converter box for an older TV. I could have used the old antenna that was in the attic, but it was in bad shape and I get better signal outside of the house and a bit higher up. I’ve never had cable since I bought my ’56 ranch and although the cable company may not like it, I’m very happy and have tons of HD channels! You have to get an antenna with a range you need depending on where you live, etc.
Donna in SC says
THAT is a stunning piece of furniture! I am gobsmacked – although I am handy, and an engineer, I would never be able to get the proportions correct and have it come out looking so authentic. probably the left-brain right-brain differences between a doer and a designer. Well done, sir!
Mary Elizabeth says
Great job! We have done something similar –designed and built a stereo cabinet that looks like the 1960s but hides modern radio tuner and CD player.
Barbara says
The greatest things happen when you decide to make a piece of furniture. First, you get what you pay for! Literally!!
Then, don’t forget the years…of repeated joy, happiness and smiles to come every time you see what you made. Try and put a price on that! Oops, it’s priceless!
Fellows, not only is that a piece of work, and spectacular, so is that TV.
And, so these great stories continue. Thanks fellows for sharing!
Pamela, coming from a family that fixed over-and-over again broken equipment and furniture, I decided to take a woodshop 101 class at my old high school. Teaching my daughter, while she stood on a chair, at my adult sized work bench drove me crazy. So…I made her a child size work bench equipped with all child size tools. Then, came the children toys. And so on. If she needs to fix anything today, not only does she have plentiful tools, but also the knowledge.
Look out workshop 101, hear comes Pamela! You’ll get a lot of bang for your buck!
Thanks!
Barbara
p.s. My first time using a power saw, I had my buddies walking me threw it several times until I became comfortable. You will do great Pamela. Best of luck!
Barb says
Ingenious and beautiful!