A knotty pine kitchen — respectfully retained and revived
pam kueber - Updated: August 28, 2021
Retro Renovation stopped publishing in 2021; these stories remain for historical information, as potential continued resources, and for archival purposes.
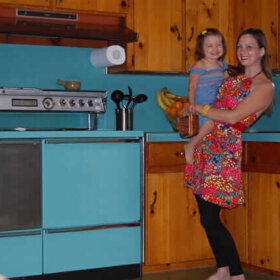
A recent surge of animosity on some other blogs aimed at knotty pine kitchens has been upsetting my karmic balance. However, the retro decorating gods have made it all better (for now) by delivering flickr friend Eartha Kitsch, who just last week finished freshening up the knotty pine kitchen in her 1956 new-old house. Today, she shares her secret to reviving the cabinets, tells about her stove quest, and shares lots of photos. That’s her with DH (dear husband).
EK writes:
Hey Pam,
Thanks for asking about the fancying up of the knotty pine kitchen in our 1956 ranch. : )
For years, my husband and I passed by this house every day, each time saying that if it ever went up for sale, we had to try to make it ours. We had no clue whatsoever about what the inside of the home looked like but of course, when we saw it in our minds, we pictured it with the original kitchen and baths and other period details still intact. When we finally did get the word that the house would be for sale, we anxiously awaited the day that we could see inside. Once inside the home, we were super excited to see that our mind’s eyes had been correct in that not only were the original baths intact – but the kitchen too…and it was so much better than we’d imagined – knotty pine from top to bottom with flagstone wall and lighted niches. We instantly fell in love and knew that we were home. We both admit now that it was the kitchen that sealed the deal. In July of last year, our dream came true and we closed on the house.
the kitchen “before”
The work in the kitchen has focused on cosmetic as well as more serious issues. Cosmetically, we set to work straight away sprucing up the woodwork in the kitchen. The walls, ceiling and cabinets are all knotty pine and they’d seen some years of dust, cooking grease and nicks and scratches. I know that there are a lot of different opinions on how to clean knotty pine but in our case, we mixed a tiny bit of Murphy’s oil soap in with hot water and gave all of the wood a wash with a slightly damp rag. Then we buffed it all with a clean cloth.
This took off so much of the grime from the years. I used a small bit of Simple Green mixed with water on some of the areas that were coated with cooking grease. The final touch was to use Old English to remove all of the scratches. A simple buffing with Old English made them look brand new. We were amazed at how well it worked and with just a small amount of the product too. A toothbrush was used on the hardware.
We removed some of the upper cabinet doors and put them in storage so that we could have more display space for a lot of the dishes and kitchen kitsch that we like to collect. The dishes added a nice splash of color to a room that is mostly wood. We found the original kitchen windows from above the sink in storage and after a good cleaning, we put them back up. It took a good deal of searching but we finally found the push bar hardware to match the rest of the windows in the house to go on them from a company called Blaine Window Hardware in Maryland that fabricates upon order. They matched perfectly.
We had an additional light put in on the ceiling because the corner at the stove was quite dark. Luckily, Home Depot still sells the fixture that matches so it looks like it has always been there.
When we moved into the house, we found that the stove didn’t work and learned more than we ever expected to know about 40″ ovens. We could either buy a new one for around a thousand bucks or search for a used one. We decided to look for a used one that would match the age of the house. That was quite the search! It took us to some very interesting places to say the least…
In the end, we found a beautiful old stove that was being sold from the sad gutting of a 50’s ranch across town. It looked showroom new inside and out and we were told that the lady who owned it never really cooked. Score! For a couple of hundred bucks, we took it home. It’s got all of the bells and whistles and some pretty snazzy lights on it too. Sometimes, I like to light it up and just look at it. Crazy but true. It’s my dream to have all vintage aqua appliances one day but we’ll see how long the current ones last for us.
We had some hardwired florescent lights removed from over the sink and a good deal of the budget was spent updating the breaker box and wiring. There were some pretty scary electrical issues in this house. There was also an unnerving issue with the kitchen switches sizzling when we flipped them. Eep! We also had some major plumbing issues in the kitchen. When we moved in, we learned that we could use neither the sink nor the dishwasher without water backing up into other places. After a lot of time and money spent with plumbers, we finally found out that the problem was inside of the wall pipes. Squirrels had been dropping walnuts into the plumbing exhaust vent pipes on our roof! (Note: We learned that it’s a good idea to cover these with strong wire mesh if you have squirrels in the area or live under trees) We had to remove our countertops and have the wall opened up to access the pipes so that the walnuts could be removed. What a mess! I love squirrels but not so much that day.
We just finished painting the kitchen a light mossy green and I think that it looks great with the pine details. I love old Western and woodsy memorabilia so it’s all seemed to fall together so sweetly.
One entire wall of the kitchen is a flagstone wall with niches that light up and I’ve enjoyed decorating those.
Along that wall is a long countertop and cabinet that according to the original blueprints, used to be a breakfast bar.
It’s great as a bar and buffet at parties. We hope to one day replace the ceramic tile flooring with a checkerboard pattern in VCT tiles but I think that will be several years down the line, probably after some other rooms have been tackled. On a side note, the Sellers of the house told us that when they bought the house, they were about to put down that very tile in the kitchen but their realtor told them that nobody wanted that style anymore and that it would be a horrible idea. Huh! I think that just goes to show that we should always do what makes US happy when decorating our houses and not worry about what “other people” like. I hope that we are in this house a long, long time but if for some reason we aren’t, I hope that the next folks down the line will also appreciate this knotty pine kitchen and keep it going. It’s easy to see that it’s got many more decades of service and charm left in it.
Thanks again, Pam!
Sincerely,
Eartha
Thank you, EK, for a wonderful, wonderful story. I also really appreciate your trials and tribulations regarding the electrical, plumbing and vent pipe issues — these are all the kinds of things prospective homeowners need to be very aware of, along with safety and environmental issues related to vintage homes. It’s good to budget for just these kinds of surprises — so that you can get to that good feeling of security that all your home’s basic maintenance issues are intact. Decorating is the icing on the cake. Your kitchen is just gorgeous — proof that knotty pine can definitely be worth preserving and maintaining.
So happy to see this site. We have an older house with pine cabinets in kitchen exactly like kitchen pictured above, and pine paneling in many rooms. Our house is on the market, we are hoping to move to warmer climate. Our problem has been that real estate agent wants us to paint over pine but I love the Pine and feel we should keep it and if someone else wants to paint it they can. So frustrating when they want to change your house before it is sold. I will be using the above advice to clean and refurbish the pine. Thanks.
Wilma Mooresays
I bet SOMEBODY in this group knows what I’m talking about. We have a 1955 era kitchen with knotty pine cabinets. What do you call the board that is on the cabinet in front of the sink. Ours has intentional “slits” in it, for decoration or venting or who knows what. Help, please.
THANKS YOU!
Wilma
pam kuebersays
Hmmm… I don’t know what this is called. We see it on all varieties of wood and metal cabinets. I am pretty durn sure it’s intended for ventilation. I’d call it the … sink ventilation panel. But, I’ll look in some catalogs and see if there was an “official” name for this.
Wilma Mooresays
Thank you so much, Pam!
Pat Denneysays
Ours has it too. Like you, have never figured out why.
Adriansays
I believe the Sink Ventilation Panel was intended to release the heat from the kitchen sink when doing the dishes or maybe for venting out the smell from garbage that we mostly keep in the cupboard.
sandybsays
has any one seen a knotty pine kictchen with a black and white checkerboard floor? I want to put this in my k pine kitchen with black granite countertops.
We too have a retro kitchen and are seeking some strap hinges to repair our missing ones.
We didn’t quite have the luck you did with murphy’s oil soap and old english, but it gives us hope.
Denisesays
Hello. We are remodeling some knotty pine cabinets from 1948 and are looking for some 9″ and 7″ black heart strap hinges and 5″ black metal pulls. I noticed your comment and wondered if you ever found yours, and if so, where? Thanks
pam kuebersays
Hi Denise, I would probably start stalking ebay searches all the ways you can figure to write them. These things do show up, I think…. Good luck!
Wilma Mooresays
Hi Denise. We redid our 1955-ish knotty pine kitchen cabinets and changed out the hinges. (Shameful, I know.) We still have the old hinges and pulls, but not sure how many. I’d have to count. ANYWAY, the hinges actually measure 6-1/2″ and the pulls are 5″. Let me know if you’re interested.
Barbarasays
I’m so glad I found this site tonight! I just started cleaning our knotty pine walls in our log cabin that was built in the early 60’s, at least that’s the story. We have ceilings and walls, as well as a full kitchen of knotty pine. I started cleaning with the spray on Murphy’s Oil Soap, but was wondering what else to use to brighten them, and Old English seems to be my answer. We also have log walls which I started cleaning with the Murphy’s as well. I’m tired tonight! We have the same stove, in a lovely harvest gold! Still works fine and I love having the extra space on top for plating the food. Nice big oven too.
Beth Fsays
At first glance, I thought these were pictures of my kitchen, right down to the hardware and corner shelves on either side of the sink! Found this page doing a search for how to refurbish knotty pine cabinets. Definitely having second thoughts now. Thanks for sharing.
Sandy E.says
I just found this site and am totally thrilled…Our home was built in 1926 but was “updated” in 1952 with knotty pine in the kitchen, breakfast room, one wall in living room..and in our bedroom, we have real beadboard on top and knotty pine on lower walls. I have always wanted to paint it all but never did….now I know how to clean well and make it look new again and I am so excited…I love my bungalow and now everything will look as I envision it did in early years…thank you so much for the blog, the pictures, the comments, and the encouragements….
pam kuebersays
You’re welcome — and welcome! Your bungalow sounds just lovely… perfect!
Julie Bsays
I came across your site because I was googling knotty pine for an article that I was researching. Anyway, strolling through your pics, I realized I have the EXACT same stove you do. It’s a vintage GE electric that was in our home when we bought it. It has always worked great and I love the look of it so I have never replaced it. Hope you have enjoyed your stove as well~!
dianesays
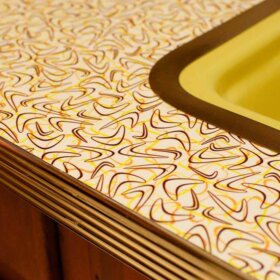
Such a beautiful kitchen! I too have a 1950’s home. My kitchen still has the original boomerang countertops but the notty pine cabinets have been painted an eggshell color. At one time the kitchen had turquoise green ceiling and window trim with the notty pine but, it had all been painted eggshell – ceiling, walls, cabinets…. I have thought about stripping the cabinets but, it seems like a huge ordeal. After seeing your kitchen….it just might be worth the effort!
Kathiesays
Can you tell us what color the paint is that she used on her kitchen walls.


 A recent surge of animosity on some other blogs aimed at knotty pine kitchens has been upsetting my karmic balance. However, the retro decorating gods have made it all better (for now) by delivering flickr friend Eartha Kitsch, who just last week finished freshening up the knotty pine kitchen in her 1956 new-old house. Today, she shares her secret to reviving the cabinets, tells about her stove quest, and shares lots of photos. That’s her with DH (dear husband).
 EK writes:


Cheryle Francis says
So happy to see this site. We have an older house with pine cabinets in kitchen exactly like kitchen pictured above, and pine paneling in many rooms. Our house is on the market, we are hoping to move to warmer climate. Our problem has been that real estate agent wants us to paint over pine but I love the Pine and feel we should keep it and if someone else wants to paint it they can. So frustrating when they want to change your house before it is sold. I will be using the above advice to clean and refurbish the pine. Thanks.
Wilma Moore says
I bet SOMEBODY in this group knows what I’m talking about. We have a 1955 era kitchen with knotty pine cabinets. What do you call the board that is on the cabinet in front of the sink. Ours has intentional “slits” in it, for decoration or venting or who knows what. Help, please.
THANKS YOU!
Wilma
pam kueber says
Hmmm… I don’t know what this is called. We see it on all varieties of wood and metal cabinets. I am pretty durn sure it’s intended for ventilation. I’d call it the … sink ventilation panel. But, I’ll look in some catalogs and see if there was an “official” name for this.
Wilma Moore says
Thank you so much, Pam!
Pat Denney says
Ours has it too. Like you, have never figured out why.
Adrian says
I believe the Sink Ventilation Panel was intended to release the heat from the kitchen sink when doing the dishes or maybe for venting out the smell from garbage that we mostly keep in the cupboard.
sandyb says
has any one seen a knotty pine kictchen with a black and white checkerboard floor? I want to put this in my k pine kitchen with black granite countertops.
Samantha Evans says
We too have a retro kitchen and are seeking some strap hinges to repair our missing ones.
We didn’t quite have the luck you did with murphy’s oil soap and old english, but it gives us hope.
Denise says
Hello. We are remodeling some knotty pine cabinets from 1948 and are looking for some 9″ and 7″ black heart strap hinges and 5″ black metal pulls. I noticed your comment and wondered if you ever found yours, and if so, where? Thanks
pam kueber says
Hi Denise, I would probably start stalking ebay searches all the ways you can figure to write them. These things do show up, I think…. Good luck!
Wilma Moore says
Hi Denise. We redid our 1955-ish knotty pine kitchen cabinets and changed out the hinges. (Shameful, I know.) We still have the old hinges and pulls, but not sure how many. I’d have to count. ANYWAY, the hinges actually measure 6-1/2″ and the pulls are 5″. Let me know if you’re interested.
Barbara says
I’m so glad I found this site tonight! I just started cleaning our knotty pine walls in our log cabin that was built in the early 60’s, at least that’s the story. We have ceilings and walls, as well as a full kitchen of knotty pine. I started cleaning with the spray on Murphy’s Oil Soap, but was wondering what else to use to brighten them, and Old English seems to be my answer. We also have log walls which I started cleaning with the Murphy’s as well. I’m tired tonight! We have the same stove, in a lovely harvest gold! Still works fine and I love having the extra space on top for plating the food. Nice big oven too.
Beth F says
At first glance, I thought these were pictures of my kitchen, right down to the hardware and corner shelves on either side of the sink! Found this page doing a search for how to refurbish knotty pine cabinets. Definitely having second thoughts now. Thanks for sharing.
Sandy E. says
I just found this site and am totally thrilled…Our home was built in 1926 but was “updated” in 1952 with knotty pine in the kitchen, breakfast room, one wall in living room..and in our bedroom, we have real beadboard on top and knotty pine on lower walls. I have always wanted to paint it all but never did….now I know how to clean well and make it look new again and I am so excited…I love my bungalow and now everything will look as I envision it did in early years…thank you so much for the blog, the pictures, the comments, and the encouragements….
pam kueber says
You’re welcome — and welcome! Your bungalow sounds just lovely… perfect!
Julie B says
I came across your site because I was googling knotty pine for an article that I was researching. Anyway, strolling through your pics, I realized I have the EXACT same stove you do. It’s a vintage GE electric that was in our home when we bought it. It has always worked great and I love the look of it so I have never replaced it. Hope you have enjoyed your stove as well~!
diane says
Such a beautiful kitchen! I too have a 1950’s home. My kitchen still has the original boomerang countertops but the notty pine cabinets have been painted an eggshell color. At one time the kitchen had turquoise green ceiling and window trim with the notty pine but, it had all been painted eggshell – ceiling, walls, cabinets…. I have thought about stripping the cabinets but, it seems like a huge ordeal. After seeing your kitchen….it just might be worth the effort!
Kathie says
Can you tell us what color the paint is that she used on her kitchen walls.