During the holiday season, making decorations is loads of fun. And, it is a great way to decorate your house on the cheap — just like Mom or Grandma did in the good old days. Our holiday retro crafty series started with the putz ranch house patterns — and now thanks to a suggestion from reader Janet — we’ve added a retro modern holiday yule log centerpiece to the list. This retro crafty edition also has a special holiday treat — my first video on Retro Renovation! Leo makes an appearance, too, of course.
If you (or a neighbor) have a birch log hanging out on the wood pile — as well as a few candles and some old Christmas decor laying around — this could be a holiday project completed without spending an additional penny.
 Material and tools list to make a holiday yule log:
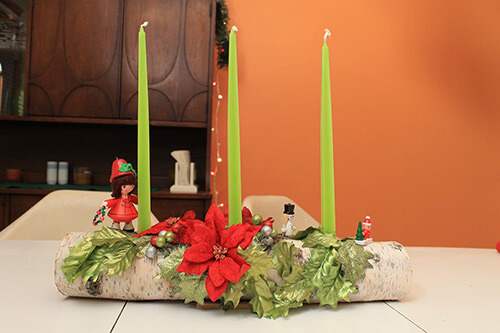
- A small log — mine is from a birch tree and is about 15 inches long and three or four inches in diameter
- Candles — size and color of your choice
- Greenery — I got my garland at Michael’s with a 50% off coupon for about $3.50 but you could use whatever you have around the house
- Poinsettias — again, use what you have or go to the craft store
- Retro wooden ornaments or other small holiday decorations to add
- Drill and drill bit to match the diameter of your candles — I whittled my candles a bit with a box cutter to ensure they fit the holes snugly
- Hot glue gun and glue sticks
- Scissors
- Optional — wood sticks to stabilize the log. I used some small scrap wood pieces. If you are handy with a table saw, you could also cut off a thin piece of the bottom of the log to make a flat, steady surface for the log to rest on.
BE SAFE! It is important, if you are going to light the candles, to ensure your base is steady… and remember, a solid safety practice is to never leave lighted candles unattended. Reader/Scout Leader Marta also adds below, to be very cautious/attentive if you plan to lighting candles near artificial stuff — it may ignite if too near to a flame — plus, you can add a bobeche/drip holder to catch hot wax drips and to further dial up the safety quotient. But again: Don’t leave unattended!
Further — Nowadays, you can find electric candles that are pretty darn realistic looking.
Back to Kate’s story
Instead of the usual photo step by step, I’ve created a video to show you how to construct your own retro modern holiday yule log centerpiece. It’s easy!
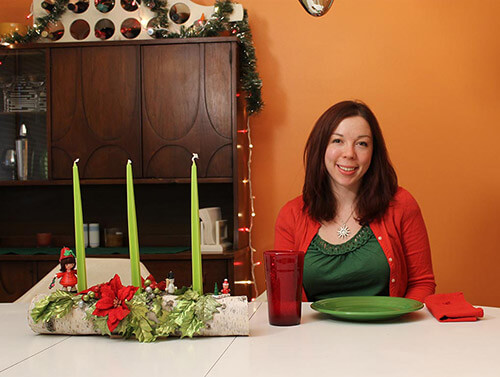
My centerpiece — which starts with a totally retro idea and adds a sprinkle of lime green — for a modern twist — turned into a fun and festive holiday centerpiece, don’t you think? Now, who is going to make a yule log centerpiece this holiday season?







Mary Elizabeth says
Years and years ago, our now 39-year-old son did this project in his cub scout troop. We still treasure the “Yule log.”
Jan says
I am going to make this into kits for clients who I look after. We are all going to make one for centrepieces at our decorating committee night for this years christmas party. I am sure each one will be different. I will add a bow and use battery operated candles because of hall stipulations. We will also chop our birch logs and predrill ahead of time. someone suggested we glue a burlap strip on the bottom so we won’t have sap seeping onto the table. I love this natural look with a touch of bling!
pam kueber says
Great! Be sure to send us photos of the completed projects!!
Marion Powell says
Caught a glimpse of your Brasilia china cabinet. Love it..
My husband says our Brasilia has to go.
RetroSandie says
Great video Kate!!! I had to smile at your facial expressions as you went along – very cute indeed! And loved Leo, of course! LOL Yes, I remember that my candles always had to be burned at the tip too. That was from my Mom-in-law, so I always did it. Burned a candle just long enough for a black wick, then put it out. And I used bobeches on the tall candles I burned. After having a fire on Christmas day back in the 90’s, IF I use real candles now , my rule is they must be in a glass container. That fateful day, I had put a fat candle on a dish with a candle wreath around it and the candle burned down to a point, then SPLIT OPEN and poured hot wax onto everything which ignited the candle ring and the table cloth!!! Thank goodness I was sitting close by and a REALLY dangerous condition was averted!! So, thereafter I always place the candle in glass and we all know the other rule – NEVER LEAVE LIT CANDLES UNATTENDED!!! If I hadn’t been right there, it could have turned into a disaster quickly. I also go with the LED candles. In fact, I just posted a little craft on my blog about making a “candle” arrangement using stiffened felt and an LED tea light candle. I would put a link to it, but I don’t know if Pam allows that. Pam???
Anyway, I love this Retro craft with Kate. The videos are a cool idea!!! I’m going to join the Google+!!!!
pam kueber says
Sure you can add your link. I’m fine with it — especially for regular readers. No so much for guerrilla link bombers…
RetroSandie says
Thanks Pam!!! Here is the link to my “fake” candle on my blog:
http://retrosandie.blogspot.com/
And thanks again to Pam, Kate, and Leo for a great video!!!
Rebecca@MidcenturyModernRemodel says
Nicely done. I think the video went really smoothly. I like the fact you used a voice over rather than trying to craft and narrate. Very challenging! You made it look really easy. I like the way you get Leo to look at it. Then he looks back at you like, “REALLY?” Made me laugh.
Kate says
Thanks Rebecca!
Leo wasn’t sure why I didn’t let him play with the log. He loves dragging logs around the back yard. 🙂
Corrie Varga says
best kate b”log” post yet! love love love!
tammyCA says
Love the centerpiece…the lime square-ish candles are very cool. My mom always had tapered candles for the holidays. There’s only been one time I used candles (cheap red ones) at the table and I have to mention that my sister-in-law blew them out forcefully and wax went flying on my vintage tablecloth! Which then left permanent redish/pink stains. Ack. So be careful of that.
I really like the video take, too. Had to laugh when your Leo looked quizzical.
tammyCA says
Speaking of candles…I had some cute vintage Choir boy candles from a friend’s estate and not thinking stored them with the Christmas stuff in the attic. Big Mistake in So Cal….the next year I saw mishapened blobs and realized it was the candles melted! Btw, you can find reproductions of these choir boy candles in the Vermont Country Store catalog.
Marta says
Oh, THANK YOU, tammyCA! I have this plastic church with ‘stained glass’ windows that lights up and also has a wind-up music box inside that plays Silent Night. When we were kids, it always sat on angel hair with those choir boy candles lined up on either side. The candles were lost somewhere along the line, and I’ve never been able to replace them. Thank you, thank you, thank you!!!!
Jay says
OHHH! Marta your lit church is a fine piece of vintage Christmas goodness from the golden era of Christmas Decorations 40s to 60s. Take good care of it.
Janet in CT says
I must have been half asleep this morning when I first watched the video! I did realize later Kate didn’t cut her log and little wood shims will do to keep it on the level if necessary if not cut flat at the bottom. Also, little wooden candle cups are around if one want to take the trouble to paint or stain them, rather than drilling holes. I found some on ebay and I am sure you can get them in craft stores cheap too. They are really pretty painted red or black or green and just screw them in.
http://www.ebay.com/itm/LOT-Of-12-5-8-Wooden-CANDLE-CUP-craft-wood-holder-Bean-Pot-NEW-/150952146469?pt=LH_DefaultDomain_0&hash=item232572f625