

 Are you ready to read the epic tale of a modern girl trying to build a vintage dollhouse from an original pattern? You can take the trip in warp speed — in comparison to the 70+ hours it took me to construct this 1955 McCall’s Do-It-Yourself Dollhouse. Yes, 70 hours. This one was not a walk in the park. My journey was filled with frustration and required loads of patience, but the end result: nothing short of amazing, if I do say so myself!
Step #1: Decoding the dollhouse pattern — what a headache
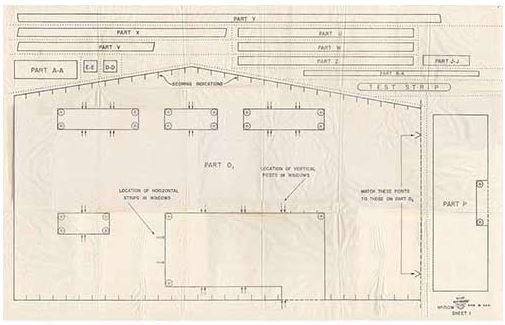
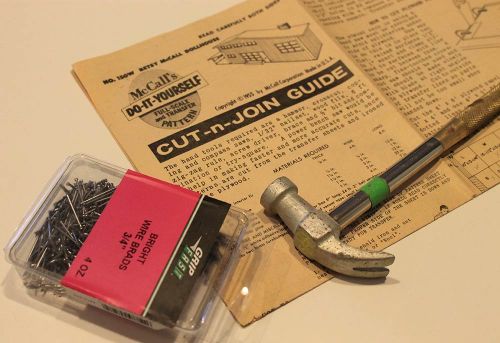
When the vintage 1955 McCall’s Do-It-Yourself Dollhouse pattern arrived in the mail, I excitedly looked at it right away. My excitement soon faded when I realized just how much work building the dollhouse would entail. The kit included multiple pattern pieces embossed on to four sheets of thin tracing paper and one instruction sheet. There were so many different pieces to be transferred from pattern to plywood, cut out, sanded, assembled, etc. and the instructions themselves were not terribly clear. But, the urge to build a miniature house was strong, so I took a big deep breath, and started trying to figure out my plan of attack.
Making sense of the four large iron-on transfer sheets was not only confusing enough — but also:
- Not marked on the sheets but in the instructions, it said I needed to draw several other large, rectangular pattern pieces for the base of the house and the roof onto the plywood.
- I had to carefully read the instructions to gather several different sizes of dimensional scrap lumber and square dowel for parts like the fireplace, chimney and stairs.
- I had to sort through all of the pattern pieces to understand each and every one, because I did not need all of them — I opted not to make a “front” to the dollhouse that would have completely enclosed the house.
- There were several long, skinny strips on the pattern sheets that were supposed to be cut from the plywood and used as an edge for the dollhouse’s roof. Because I was using power tools — and value my fingers — I opted not to try ripping these tiny pieces from my large sheets of plywood. Instead, I found some leftover thin wood lattice scraps that I had laying around from a different project to use. Fingers saved…
- … but ouch, my headache making it through all this … minutiae.
And this was just start…
Step #2: Iron the pattern on to the plywood
My original 1955 Betsy McCall dollhouse pattern featured tissue paper-like sheets with embossing that was supposed to be ironed directly on to plywood. 60 years later: Would the iron-on still work? Time to see if the (expensive) pattern that Pam purchased for me on etsy.com would work.
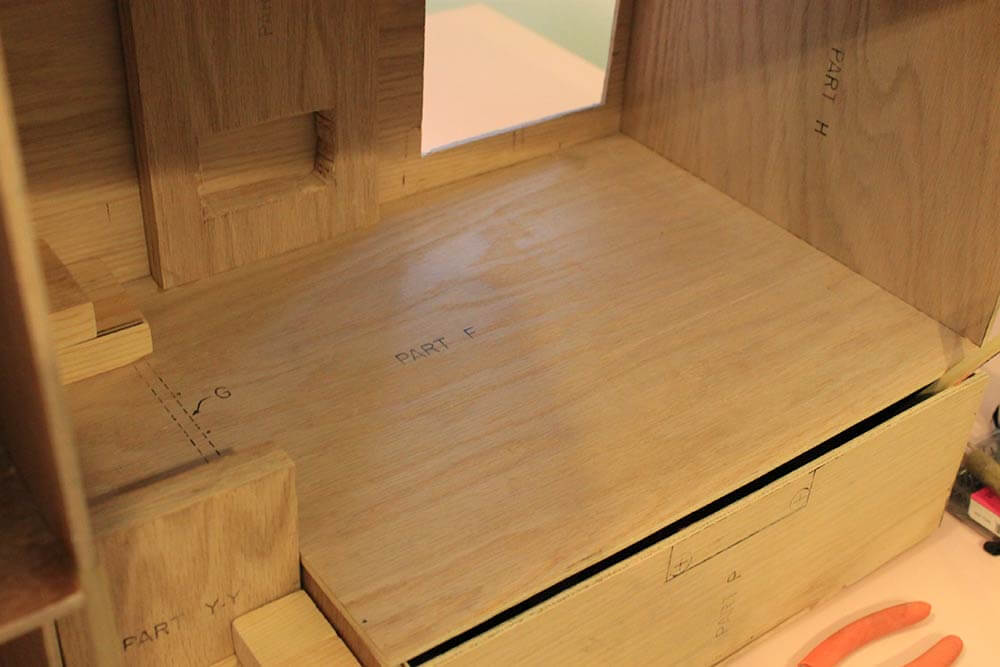
Once I figured out exactly which pattern pieces were needed, I set to work transferring the pattern onto my plywood using my iron. I also marked the additional large rectangular pieces from the instructions and tried to find lumber scraps around the house to make the rest of the parts, like the stairs and chimney. Hurray: Yes: For a 60-year-old pattern, the iron-on transfer ink still worked fairly well, much to my relief, though I had to be very careful not to tear the fragile pattern.
Step #3: Cut out the wood pieces
I managed to cut out all of the parts with my power saw and other various power and hand tools in about 6 hours. The instructions say that power tools can be helpful in speeding along the construction process and they aren’t kidding. I can’t imagine trying to cut every single piece carefully with a hand saw — it would take forever.
 Step #4: Assembling the house

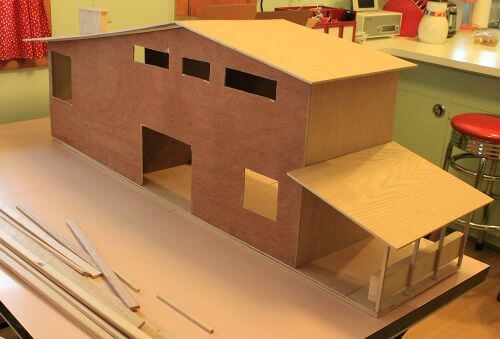
I’m not going to lie — assembling the house was one of the most difficult, frustrating projects I’ve done thus far for Retro Renovation. Pam asked me if building this dollhouse was more frustrating that gut remodeling my retro pink master bathroom. “After doing your bathroom,” she asked all nonchalant like, “how frustrating can a little dollhouse be?” Well, a dollhouse is tiny, which means there is a tiny margin for error. Every millimeter counts, which makes it frustrating in a totally different way than say, tackling a bathroom remodel. Trying to hold one piece of 1/8″ thick plywood straight… while holding a second piece perpendicular to it… and then connecting the two by hammering a 3/4″ wire brad nail in straight without popping through the plywood… was very challenging, to say the least.
 I did not take any photos from the assembly because I was so frustrated. At one point, I thought that the house simply would not come together. The directions do not tell you which way is up for each piece, so you kind of have to guess. Many times
 I decided to kick the whole thing out into the back yard I had to take two pieces apart because I had mistakenly put something on upside down or backwards. $%&!!!!
 There were some choice words and expletives flying around, but in the end, I am quite stubborn and managed to buckle down and get the house together. Phew.
I would like to give mad props to any mom or dad or grandparent or relative from 1955 who single-handedly attempted to make one of these houses for their child at all — but especially in time for the holidays. I hope they started months ahead of time — and had the help of a power saw.
 Step #4: Trim and siding

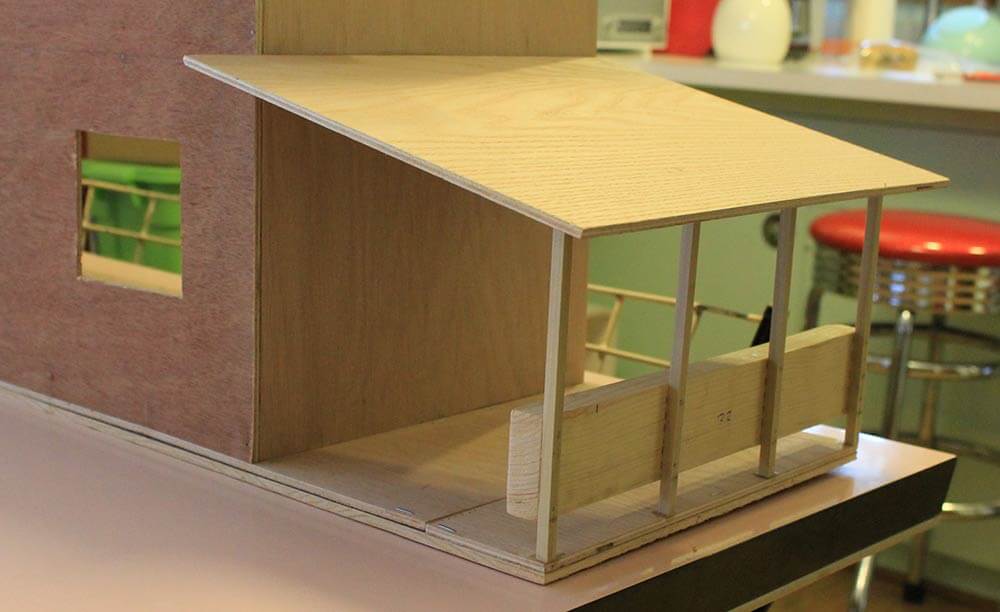
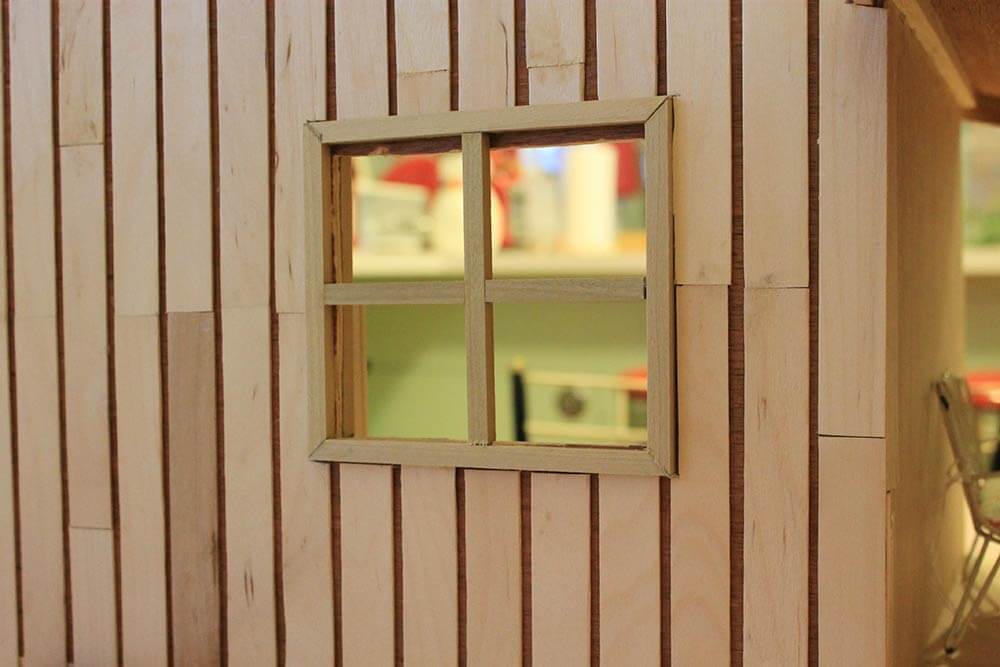
The directions said to use the same size square dowel rod from the carport posts to trim out the windows. Since my window openings were far from perfect and square, I decided to put trim on both the outside and inside of each window — instead of just the outside like the instructions suggested — to give the house a more finished look. Thankfully, the trim was attached with wood glue, not brad nails.
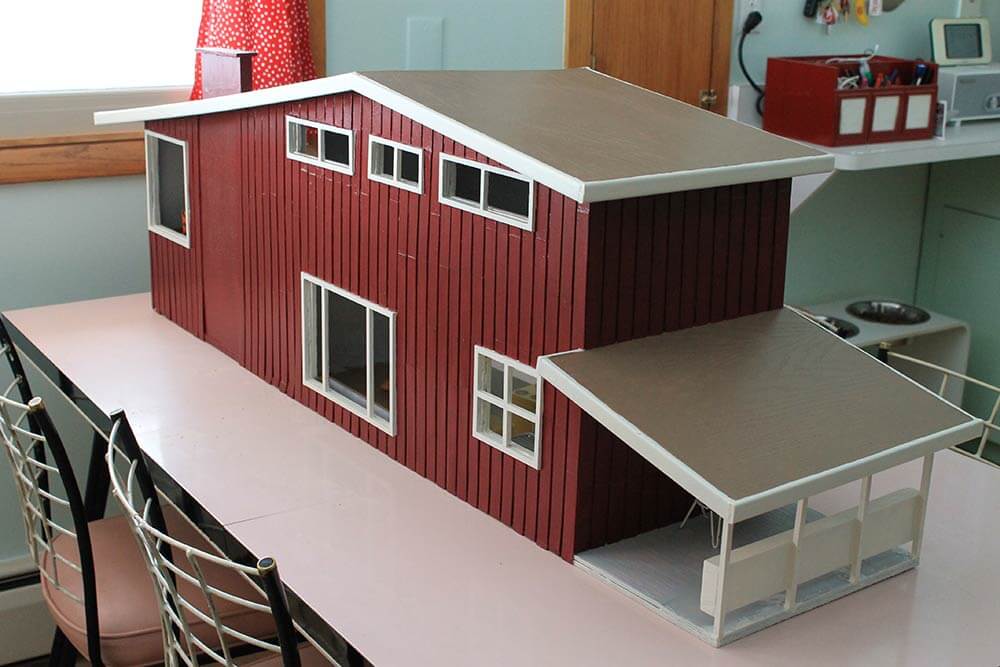
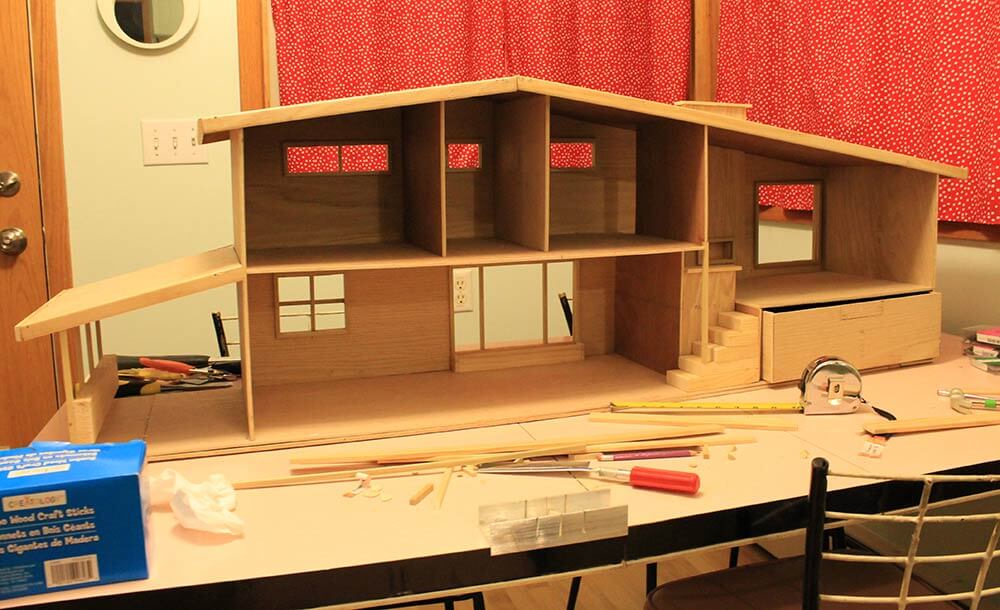 Next, I cut and applied the roof edging, which immediately gave the house a much heftier feeling. Hey, this might turn out all right after all!
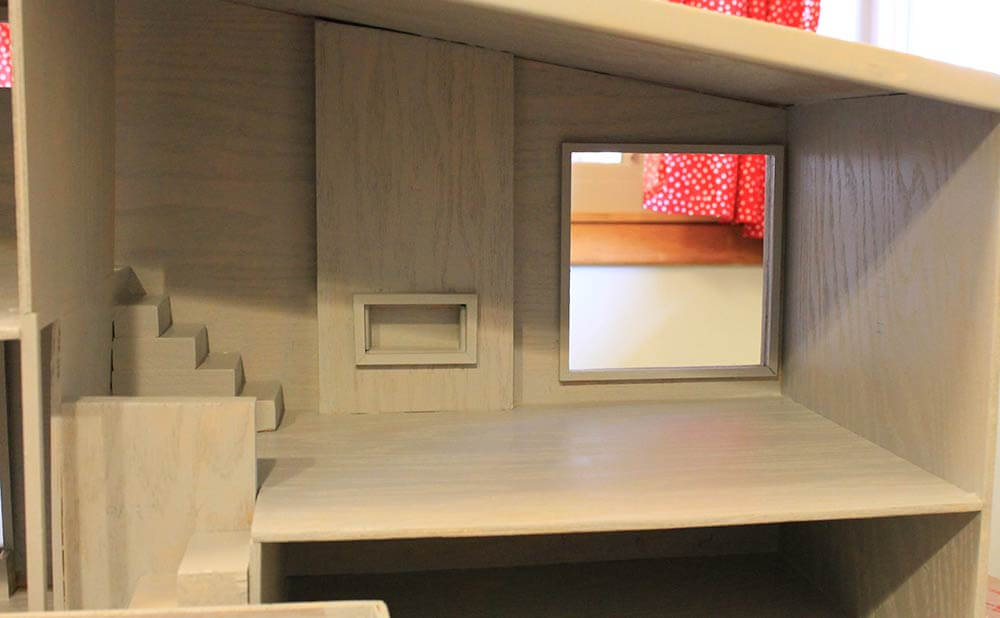
 I also added a common midcentury home feature — a built in planter — on the inside of the dining room window, which I will later be filling with miniature greenery.
Step #5 — Add siding
It was at this point that Pam asked me how the dollhouse construction was progressing. I shared the whole long ordeal with her and instead of showing me too much pity for the epic and frustrating journey I had just completed, she said, “So what are you going to make the siding out of?”
Siding? Wait a minute, I was just going to paint it.
The instructions said to create siding by making lightly scratched indentations along the exterior of the house with a nail, which didn’t sound like it would be very easy or end up looking that great, so I was planning on skipping it all together until Pam asked about it.
Uh oh — the Pam idea machine had kicked into high gear. “Why not use popsicle sticks?” she said, even though that would require me to cut both of the the curved ends off of each stick before applying it to the house. Initially, I scoffed at her idea. But she encouraged me to go an expedition to Michaels et.al. to see what I could come up with. Soon enough, I was out the side door, in my car, then home again from the craft store with a box of 200 jumbo popsicle sticks (think tongue depressor sized) to use for the siding. Just. Shoot. Me. Now.
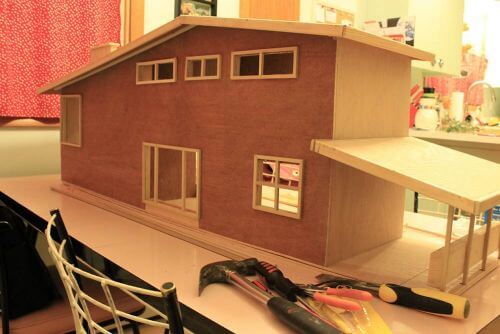
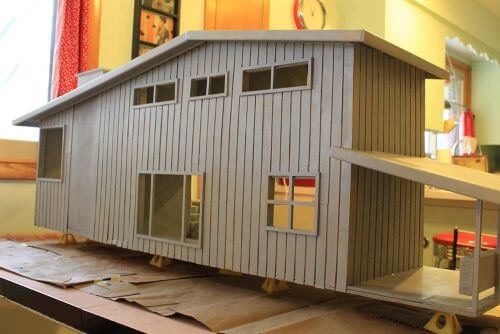
 Using the popsicle sticks meant that I had to cut the curved ends off of each stick before applying them one at a time to the dollhouse. Thankfully, with the help of my trusty mini mitre box and mitre saw — a tool I had begrudgingly purchased in art school thinking I would never use it again, but which I now use constantly — I managed to cut five sticks at a time to make the process go a little faster.
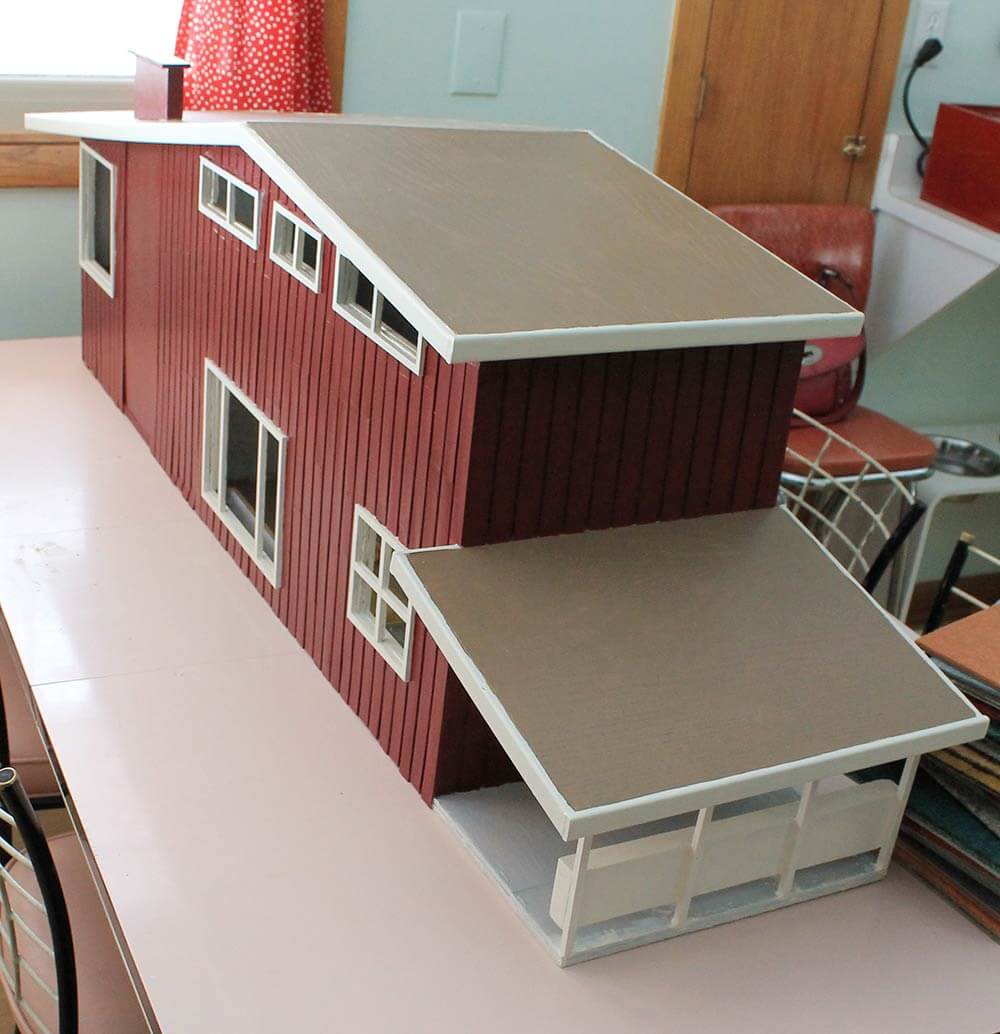
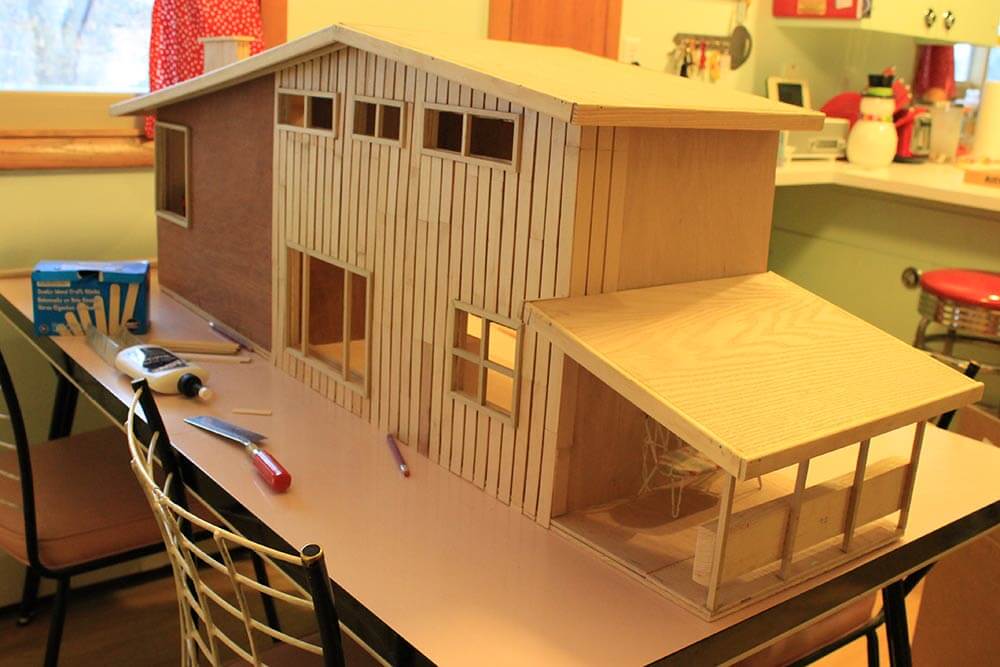 It was difficult to trim the sticks around the windows, but I managed — slowly. Then several days later, Pam again was eager to see my progress. I hesitantly sent her the photo above — which she loved — but of course, she had more ideas. This time she suggested that I apply some of the siding horizontally or apply stonework to create some interest and contrast on the exterior of the house where I had not yet finished siding. I knew what she was getting at, but couldn’t really envision suddenly changing the direction of the siding without changing the material I was using, nor did I want to add a second material that was noticeably thicker than the tongue depressor board and battenish.
 While I continued my siding application therapy, I tried to think of a way to add more visual interest. It wasn’t until my husband suggested “bricking” the chimney with stone piano tile commonly used for modern day backsplashes, that the lightbulb went off. Yes, that was it!
 I left a gap in the siding the width of the chimney for stone installation at a later date.
 Step #6 — Priming and painting the dollhouse

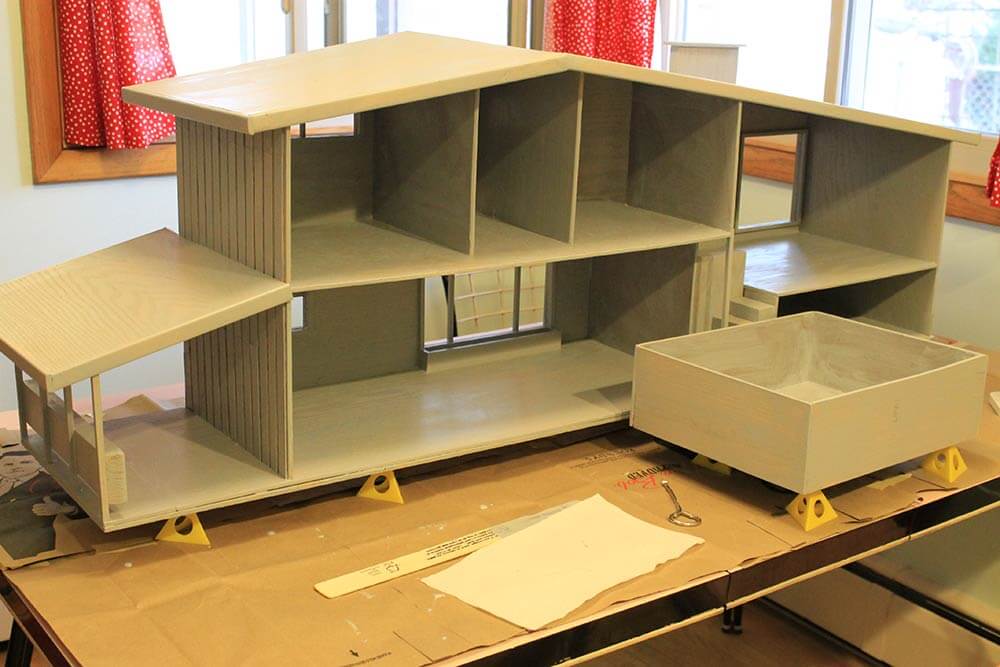
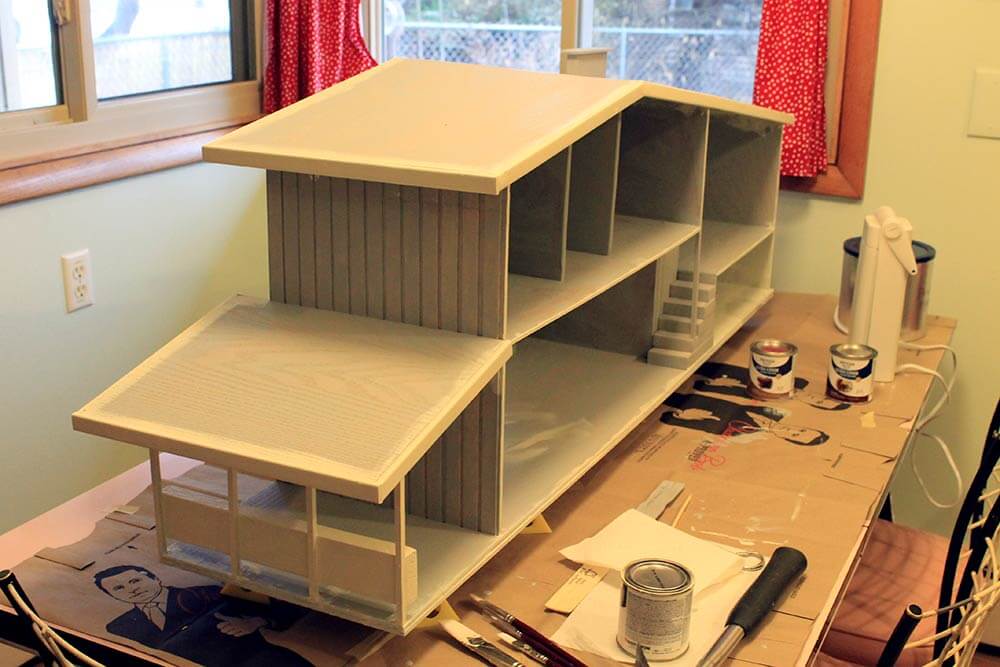
When it comes to painting a house, there’s no color to choose beside grey, right? I kid, I kid. The blah paint job (above) is actually just the primer. Even I was shocked, because I though I bought white primer — oops. Don’t worry, I would never dream of making the inhabitants of this doll house live inside a storm cloud.
 I primed every surface with the grey primer, inside and out, which took another several hours.
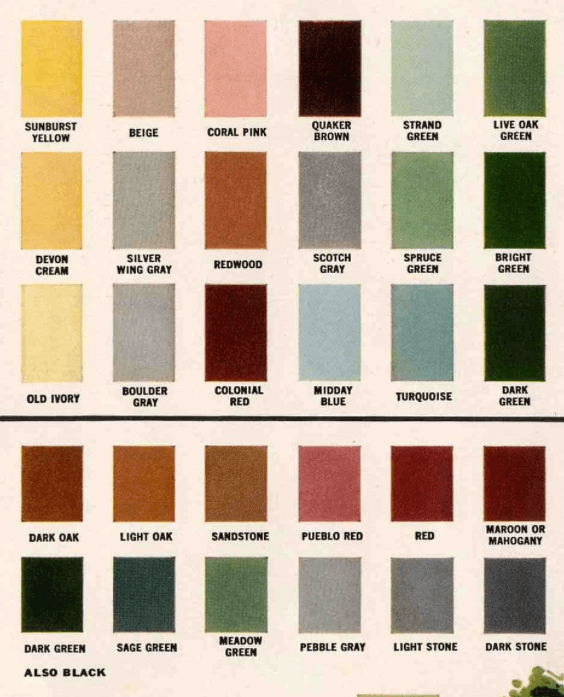 While the primer dried, I tried to figure out what color scheme to use on the exterior of the house. Typically, I love pinks and pastels, but I didn’t want the dollhouse to feel overly girly. Remember, I’m making this for grown up Kate, not six-year-old Kate. I also needed something to go with the “bricks” aka tiles that I would be using on the chimney. I perused our archive of midcentury paint colors, and landed on Pam’s story: exterior colors for 1960 houses, where I found the color sheet above. Ultimately the red/colonial red color jumped out at me for the siding, and I decided on ivory for the trim. I picked a sandstone color for the roof. This paint scheme will make the house have high contrast, and the colors are bold enough so that the house feels like a miniature instead of a little girl’s toy — call it the grown-up’s dollhouse.
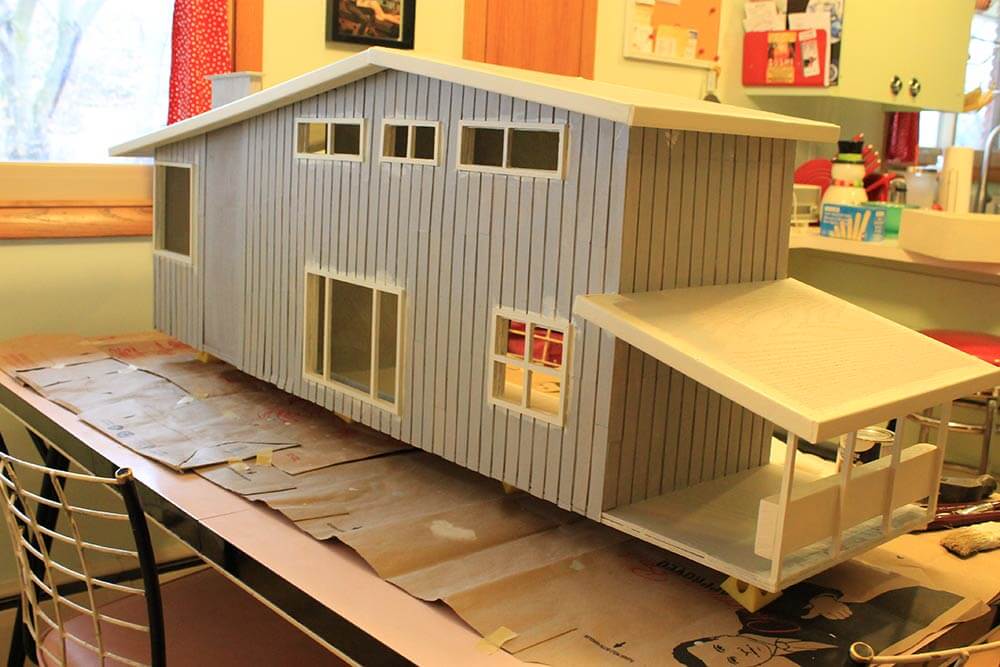 I saved some time by not-so-carefully painting the the ivory first, since I would cutting in around the windows when painting the siding with a deep red, thus covering any outside-the-lines ivory paint.
 I also used the ivory color paint for all of the ceilings and the carport.
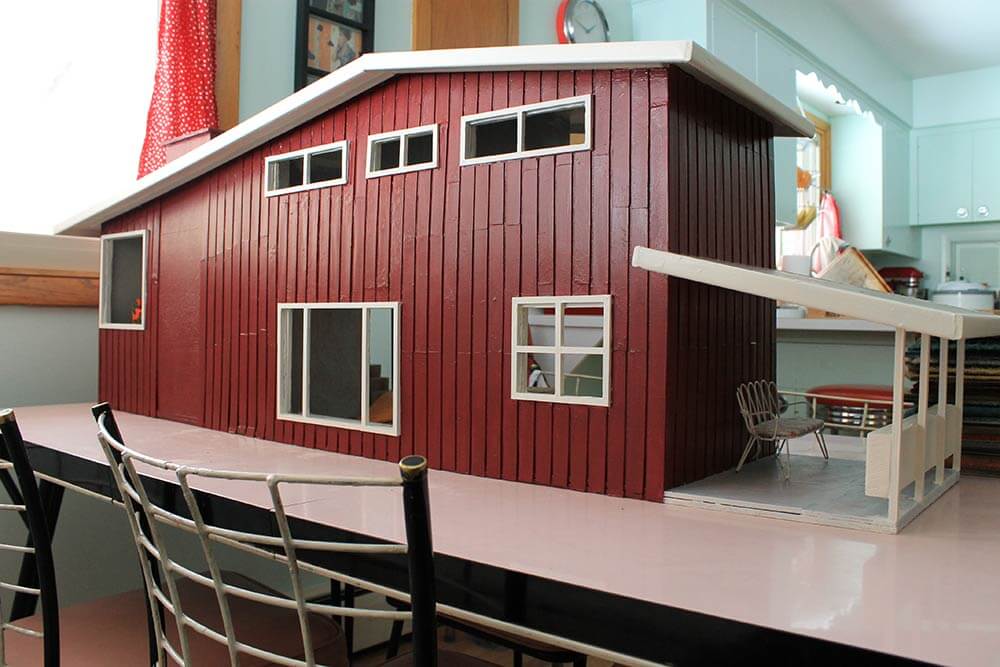 The red did not cover well… it took time to cut in around the windows… and the grooved siding took extra effort to paint… so painting the exterior siding was a four-coat, time consuming job. Difficult paint job aside, I absolutely love the way it turned out, so it was worth the effort.
 Finally, I carefully painted the roof the sandstone color.
 Final step: “Bricking” the chimney
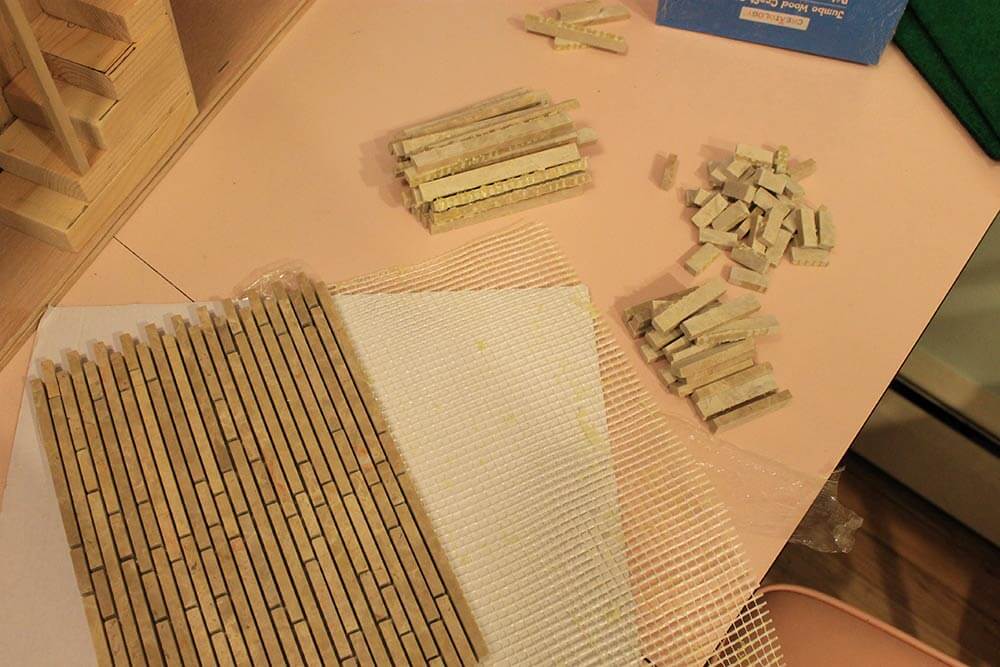
Finally, it was on to “bricking” the chimney. First, I needed to remove scores of itsy mosaic stone tiles from their mesh backing. I found these honed marble mosaic tiles at Home Depot. They were not cheap at $14.99 per sheet, but I only needed one sheet to complete the chimney, and they were perfect for the “Roman Brick” look I was trying to achieve.
 I attached the tiles to the dollhouse with some leftover tile mastic from my bathroom project.

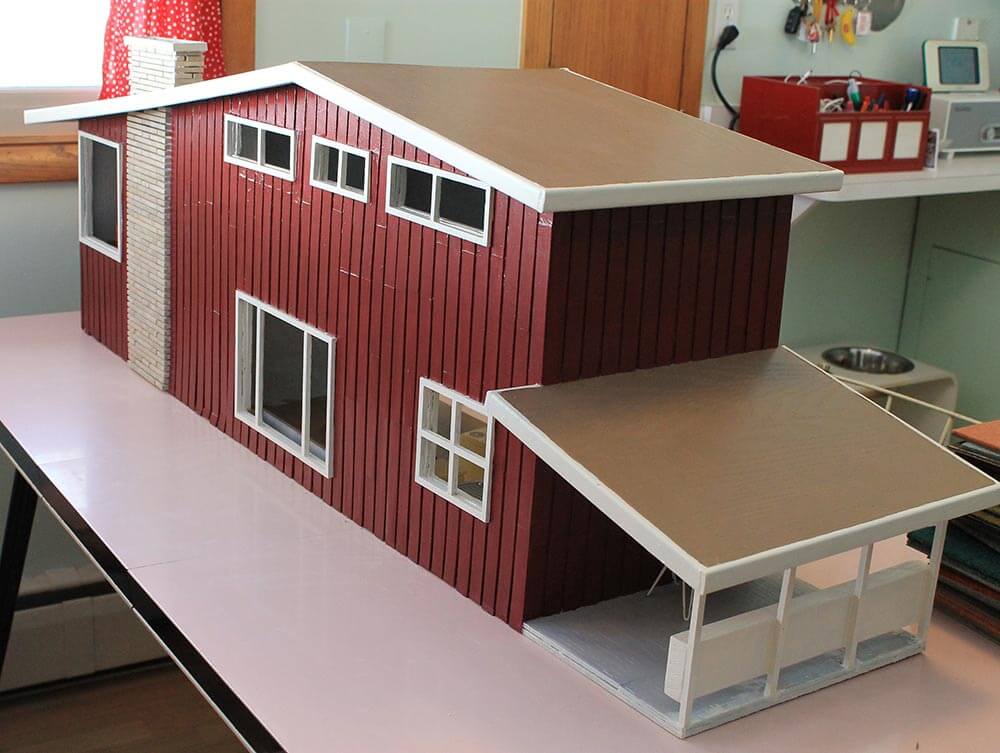 The “brick” really ties the whole look together, doesn’t it? Okay, Pam, you get props for pushing me on the whole ‘balanced asymmetry’-add-another-material-to break-up-that-long-run-o-siding thing. And on the popsicle stick board and batten, too!
 I even added a small cap on the chimney using the same tiles standing up on end. It was difficult to trim the tiles at an angle, but despite the chimney not being perfect, I still think it turned out very well.
Constructing this dollhouse: How long did it take? How much did it cost?
Surviving, intact, iron-on patterns from 1955 are not easy to find and therefore, expensive. Pam shelled out a whopping $73 to buy the pattern itself — a far cry from the days that they sold for 60 cents as printed on the pattern sleeve. Pam said she later chased the same pattern on ebay, for her hoard collection, but let it go once it passed $20. It sold for just over $20, but who knows how high it would have gone and/or how long you’d have to wait for one.
The cost to construct the basic dollhouse — not including the interior decoration yet to come — thus far is $80. That includes plywood, paint, primer, nails, trim, wood glue, tile for the chimney and the popsicle sticks for the siding. It also takes into account that I had some wood scraps and mastic on hand to use, as well as tools and sandpaper.
This brings the total cost for pattern and basic construction supplies to $153. Cost to decorate: Yet to come. Pam has given me $100 budget, with the stipulation that I cannot buy anything new. All must be vintage or homemade.
Most of the “cost” of this dollhouse was in the form of time. From the moment I first unfolded at the dollhouse plans until I laid the final brick on the chimney, I estimate I invested a good 70+ hours into the dollhouse’s construction. 70 hours for: reading and understanding directions, transferring pattern, cutting it out, sanding all pieces, putting all pieces together, light sanding, attaching siding, putting on trim, prime, paint, and finally, bricking chimney. Phew.
With the outside of the dollhouse finally complete, now I can move to the fun part — decorating the inside rooms. I’ve already started trying to find vintage furniture that is the right scale within my $100 budget, and Pam has sent me a box of goodies — vintage wallpapers, cork and small tiles she bought from the World of Tile liquidation sale. Let the decorating begin!
Read the entire series —
Kate builds and decorates a 1955 Betsy McCall DIY Dollhouse
.


Vickie Williams says
OMG!!! OMG!!! I am amazed at your tenacity & your vision!! I am in LOVE with this doll house! Kudo’s to you Kate for an awesome job!
tammyCA says
You’ve done an amazing job, Kate! The siding, red paint and brick really make it special & midcentury..definitely an adult’s dollhouse. I’ve never built a dollhouse but have made tiny things so I know about frustrating..our fingers feel like giant logs working with the tinys.
There used to be a miniature and dollhouse museum here that had the most incredible creations by artists..miniature treehouses, dioramas in antique divers helmets, etc. And, even tinier scale dioramas than the 1:12! The museum moved to Florida years ago.. it was extraordinary, I wonder if it still exists.
Kate says
When I was a kid, I used to go visit a dollhouse museum in Mississippi with my grandparents who lived nearby. It was so cool. I don’t remember the name of the place or where it was exactly…somewhere along the coast, possibly near Biloxi?
Kim Lynch says
Wow! Just Wow! That is the coolest thing! Great Job!! You have a lot of patience.
Lynne says
Make sure you get a model car for that car port!
Scott says
EXACTLY what I was thinking, and wondering what scale the house is.
pam kueber says
It’s 1:12 (or is it 12:1 ?) – as mentioned in the original story. One inch = one foot
Kate says
yes, it is 1:12 scale — meaning every 1 inch on the dollhouse is 12 inches in real life.
Anna K. says
If you can’t find a 1:12 car for the carport, lots of miniaturists use die-cast 1:18 vehicles (which are fairly common and cheaper). Very few people notice the difference in scale.
Call of the Small says
You may want to try to get your hands on a Lundby car — it’s from the 60s-70s, but has a strong retro vibe. It’s 1:16 scale, but works great in this house. I have it in mine 😉 There’s two up on eBay now: http://www.ebay.com/itm/Lundby-Wooden-Car-With-Grandmother-Doll-Vintage-For-Lundby-Dollhouse-/231474089739 and http://www.ebay.com/itm/RARE-Vintage-Lundby-Miniature-Wooden-Family-Car-/291367904035?pt=US_Dollhouse_Miniatures&hash=item43d6e16323
Carole says
Kate, I realize that building this was a huge headache, but it’s absolutely gorgeous! I could move in right now. You did a beautiful job. 🙂
The color is very similar to what my own house is painted, and the fireplace is reminiscent of what we have (although our bricks currently have a horrible faded pinkish colored mortar that squishes out between them – I guess that was a ‘thing’ at some point). Perhaps that’s why it feels so ‘comfortable’ to me.
I hope you’ll keep us up-to-date on how you decorate the interior. 🙂
Diane in CO says
I believe that is called an “extruded mortar” brick joint. Artfully done it is “a look.” Messily done, with mortar that is too weepy, it can look very very bad.
Kate says
I’m not planning on “grouting” the chimney bricks… 🙂
Susie Q. says
I have a question: What is that box that you primed? It’s sitting next to the house in one of the photos.
I know what you mean about small handwork. I’ve sewn a lot of Barbie clothes in my time, and they’re ridiculously labor-intensive.
I used to want my own wooden dollhouse (part of me still does). I remember a book I checked out in the 70’s–in those plans, slots were cut halfway through the floors and walls, so those parts just slid together (does that make sense?). I wonder if that might make construction easier. Or, it might create its own set of problems… 😛
pam kueber says
The dollhouse has a drawer (underneath the living room) for holding stuff.
You can see it in other photos in this story and in the first story here https://retrorenovation.com/2015/01/12/betsy-mccall-dollhouse-diy/
Jan says
I was wondering the same thing when I saw it. What a really cool design for all the little pieces-parts that will fill the house!
Roundhouse Sarah says
I find it amazing that after all this work a parent or grandparent would even think to let a small child play with this! ; )
Great job Kate! Such patience and determination!
Annio says
Are you going to “grout” the chimney so it will have “mortar” between the “stones?”
pam kueber says
I think Kate’s brain will explode when she read this idea, Annio!
Kate says
BOOM!
ElectraChime says
Fabulous Job Kate!
I love this project so much I am ready to start playing with dolls, if only I had the time!
Home made miniature siding is going to be labor intensive no matter what you do.
An alternative to Popsicle sticks for the siding would be to run a series of equally spaced saw kerfs with a table saw on the plywood you use to build the walls. I’d make all the plywood stock before cutting out the individual pieces for the walls.
It’s much more difficult to describe this technique than to actually do it, but here goes:
First, mount a thin kerf finishing blade on a table saw. Suitable circular blades can be had with blades as thin as 1/16 inch.
Raise the blade about 1/16 inch above the table or so it cuts less than half way through the plywood.
Next, set the rip fence so the first kerf is the desired width from the edge of the plywood and run the plywood through. Then move the fence a precise increment toward the blade and do it again. Keep moving the fence toward the blade in this same increment until the last cut. For the last, raise the blade and cut all the way through the plywood.
The smaller the increment, the tighter the spacing will be on the finished siding.
This is just another way to go about making the siding and a router tabl could also be similarly employed. My hat is off to you and Pam for your own, less tool intensive, solution. It looks terrific!
Kate says
I understand what you are saying, but I would worry that since this plywood was only 1/8 thick, that adding too many kerfs would cause the whole piece of wood to become unstable, bendy even — or easily broken. Still, this would be a great idea if the exterior walls were constructed with a thicker plywood.
Beth says
Hmmm, maybe you can do a second series to build the front — just so we can vote on a front door color! 😀
And should you decide to build one again, you can make quite effective architectural details (like your siding) using mat board and card stock. When you find yourself with curves or funny angles, that can be easier to deal with than wood. Just seal it with a little shellac before painting.
The chimney is spectacular!
ElectraChime says
Consider priming and painting the pieces before assembly. You may need to touch up the final job however this is easier than trying to reach all the nooks and crannies, particularly in a small job.
In my book the most important part of the magnificent job you did on this dollhouse is that you DID it. As Teddy Roosevelt so eloquently said:
It is not the critic who counts; not the man who points out how the strong man stumbles, or where the doer of deeds could have done them better. The credit belongs to the (wo)man who is actually in the arena, whose face is marred by dust and sweat and blood;
pam kueber says
I have never heard that quote — and I LOVE it! Thank you!!
Kate says
What a great quote — thanks!
David says
Or in this case, “…whose face is marred by dust and sweat and colonial red house paint…”
Anna K. says
Having built a few dollhouses from scratch, I can tell you priming and painting before assembly has a fatal flaw – assembly after painting can cause glue, wood splinters, etc. to get into your interior and make a mess. Lea Frisoni warns against this in “The Big Book of a Miniature House” (she’s built 10+ dollhouses).