

 If you enjoyed the vibrant illustrations of Starlight Village’s midcentury home models in our recent story, get ready to drool some more. I recently had the opportunity to work with illustrator Christian Musselman, artist behind the Starlight Village renderings, to create a custom portrait of my very own 1962 retro ranch home. I was thrilled because — like many retro renovators — I absolutely love my house! Working with Christian was so much fun, too — he’s the kind of guy who gets super excited about his work, which in turn makes me even more excited. I’m not even kidding when I say our emails back and forth were littered with exclamation marks! When it was done: I was absolutely thrilled with how it turned out!
Pam here with this Disclosure:
After our story about Starlight Village, Christian reached out to us to let us know he did these portraits. I suggested that, to do a story, he work with Kate on a portrait for her house — free of charge — so she could document the process for readers who might be interested in ordering one. Christian eagerly agreed. And coming tomorrow: A giveaway — so you can win one too!
Creating a custom home portrait — the process
 From the moment I started conversing with Christian, you can sense his enthusiasm about his work and passion for architecture — especially all the little details that help make a home unique. I initially sent him a few photos of my house for him to get a basic idea of what it looked like and instantly he was pumped up about beginning the process of creating an illustration of my home.
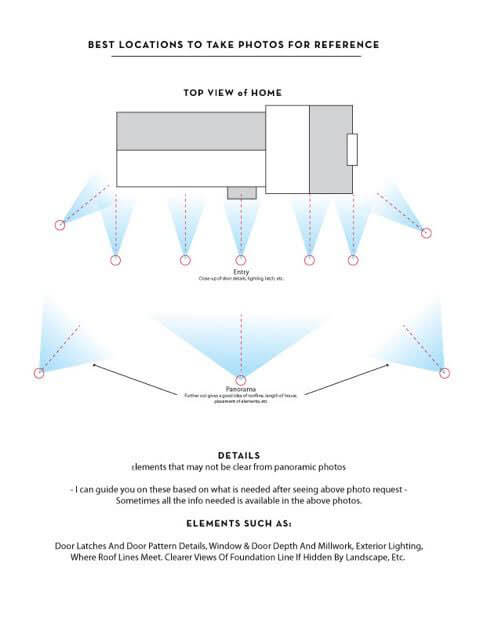 Next, Christian sent me the above graphic to help me better understand how to take successful photos of my home with all the visual information he needed to create my custom illustration.
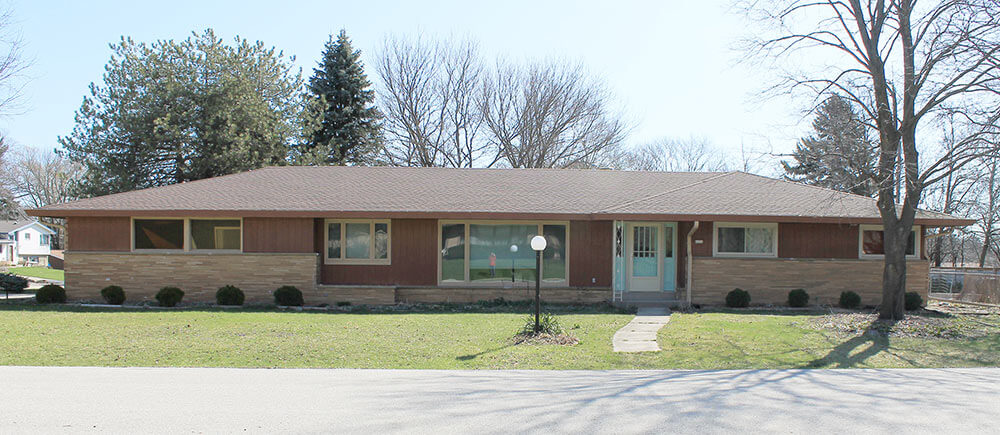
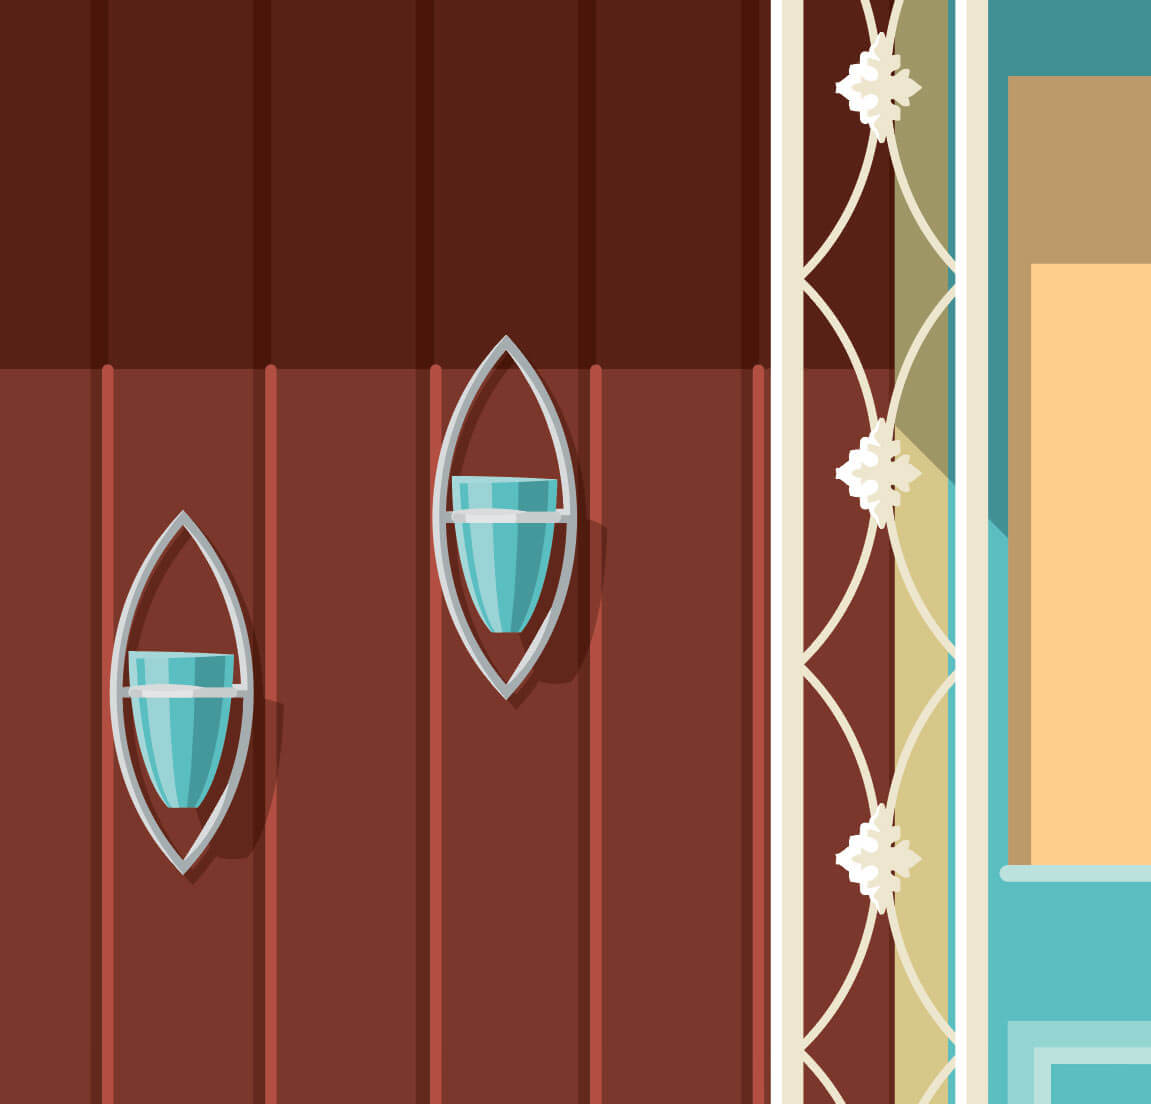
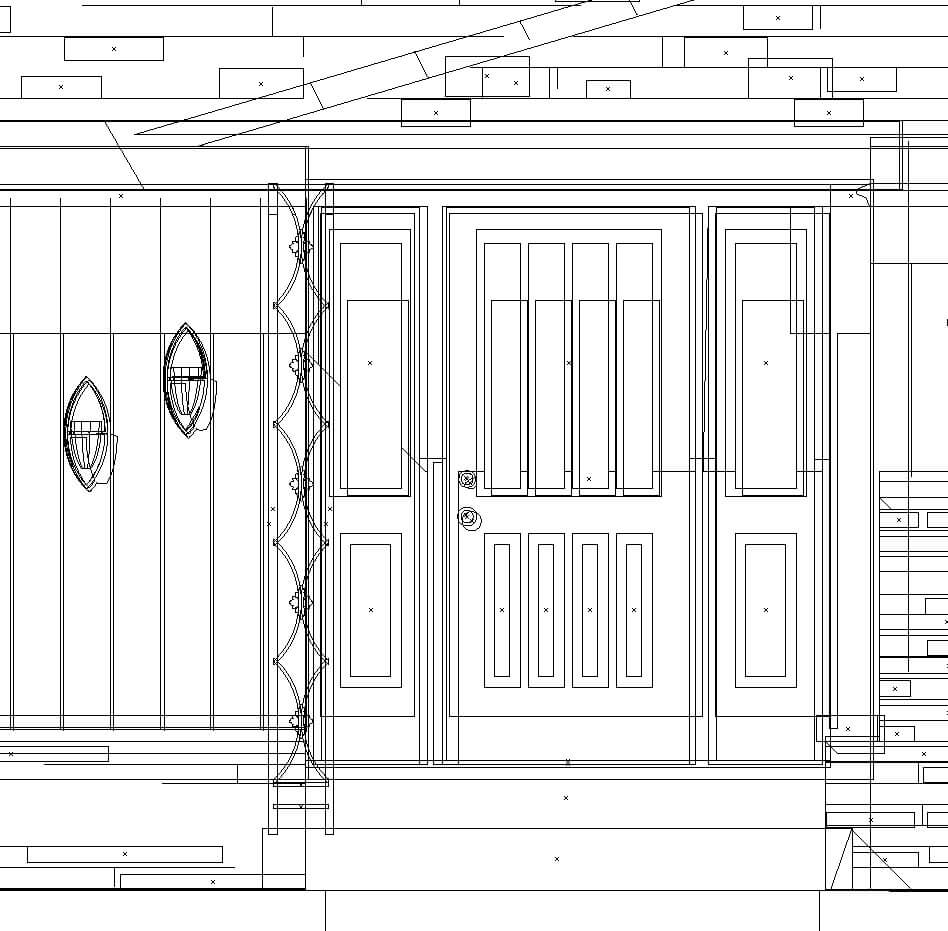
 I made sure to take close-up photos of all of my favorite details — the coke bottle glass garage windows, the brick and the front porch iron work — to ensure that Christian could see those important features clearly.
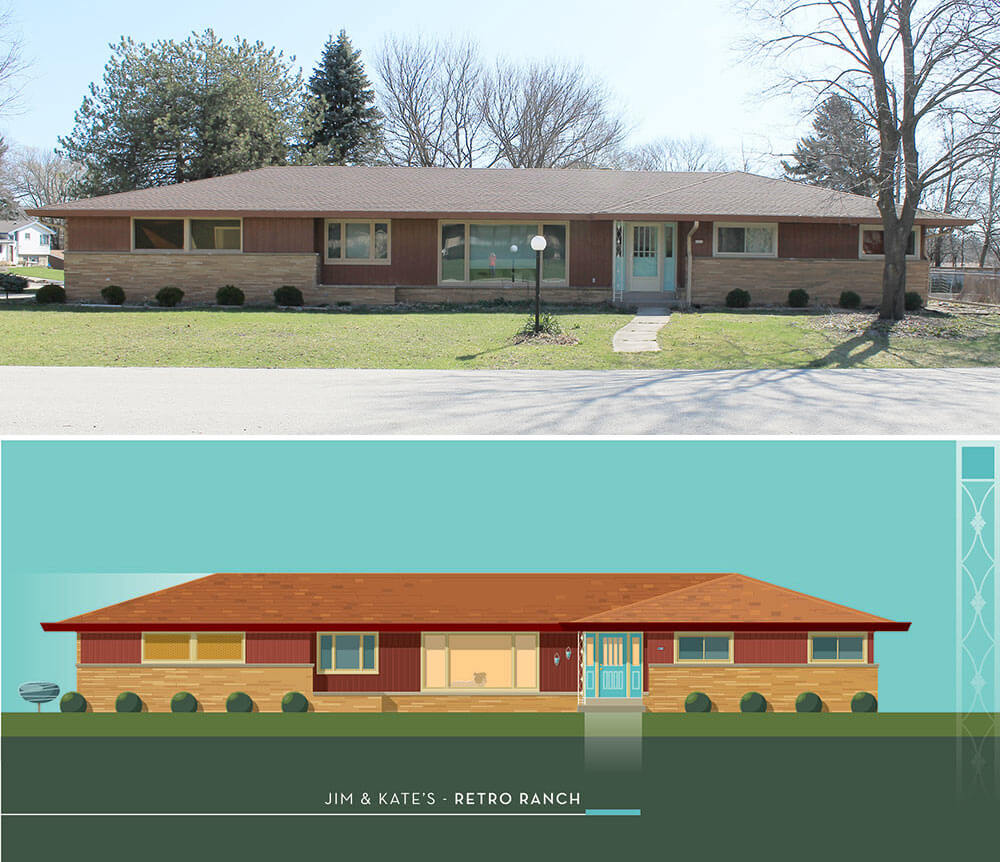
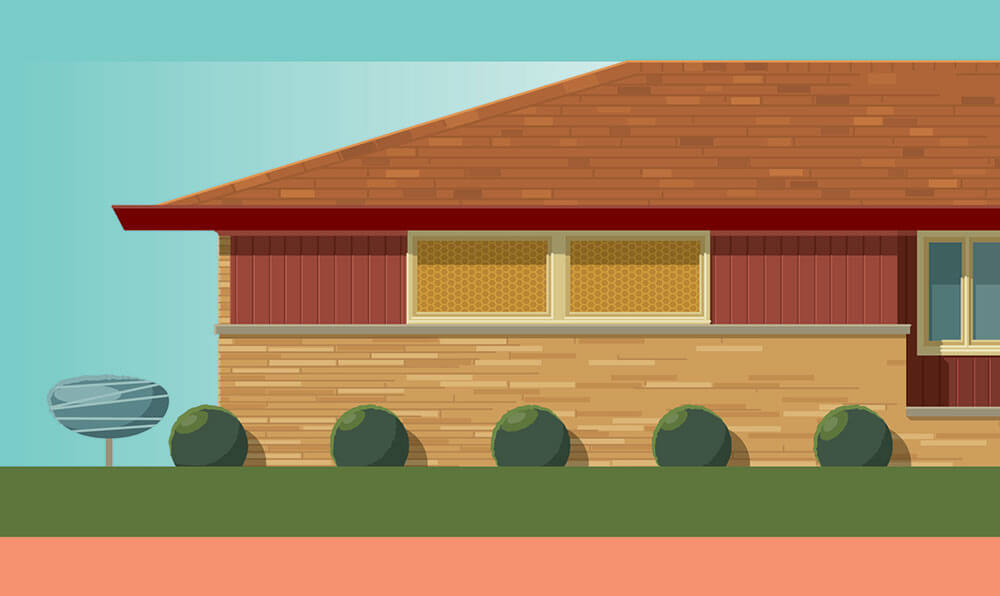
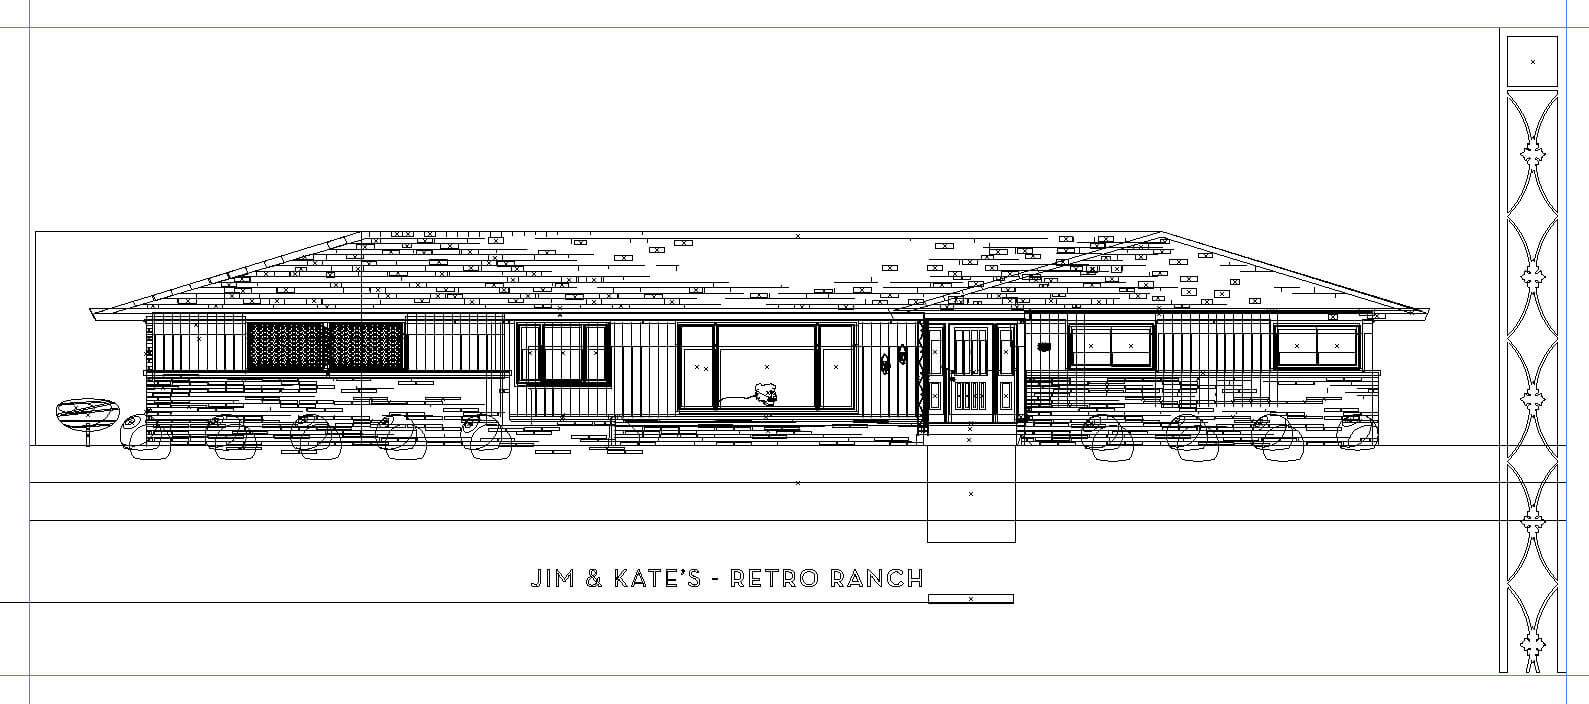
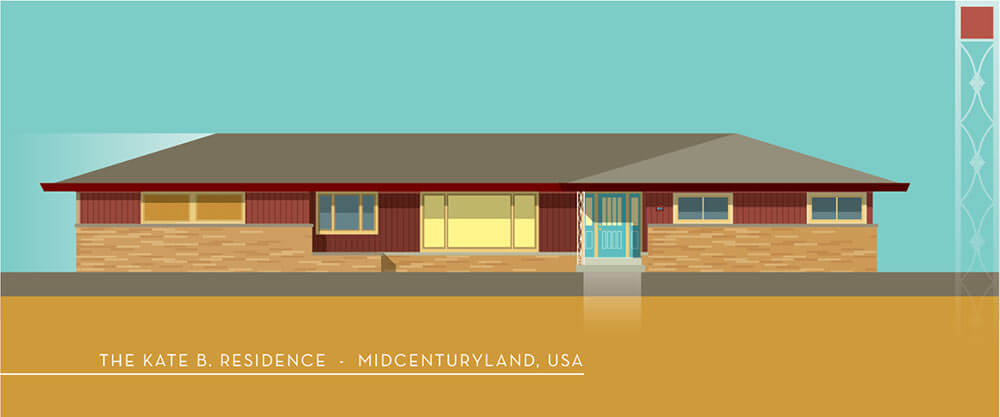 In a few short days, Christian had already created a first draft of my home illustration. At this point he paused and sent it to me to ensure that he had all of the basic parts of my home correct before he got too far into creating all of the wonderful details that make his work so wonderful. He also asked how I felt about the color of the sky, horizon and ground (he calls them the color bars) and for suggestions to improve them if they were not to my liking. I noted a few things for Christian to change — such as making my roof redder and changing the colors of the windows and the color bars. I also asked if he could add a few details to the house such as my hanging bullet planters, which Christian was happy to do.
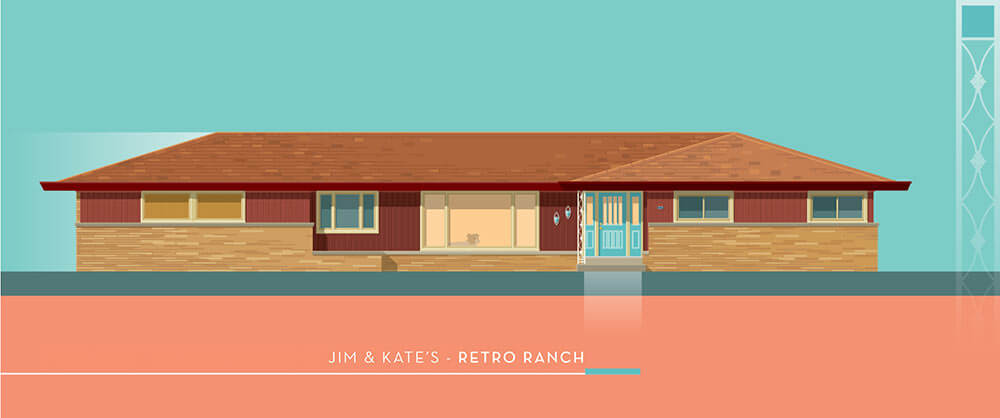 When Christian sent me the second draft of the home illustration with all of the fine details and shadows added in, I was so delighted that giggled with delight.
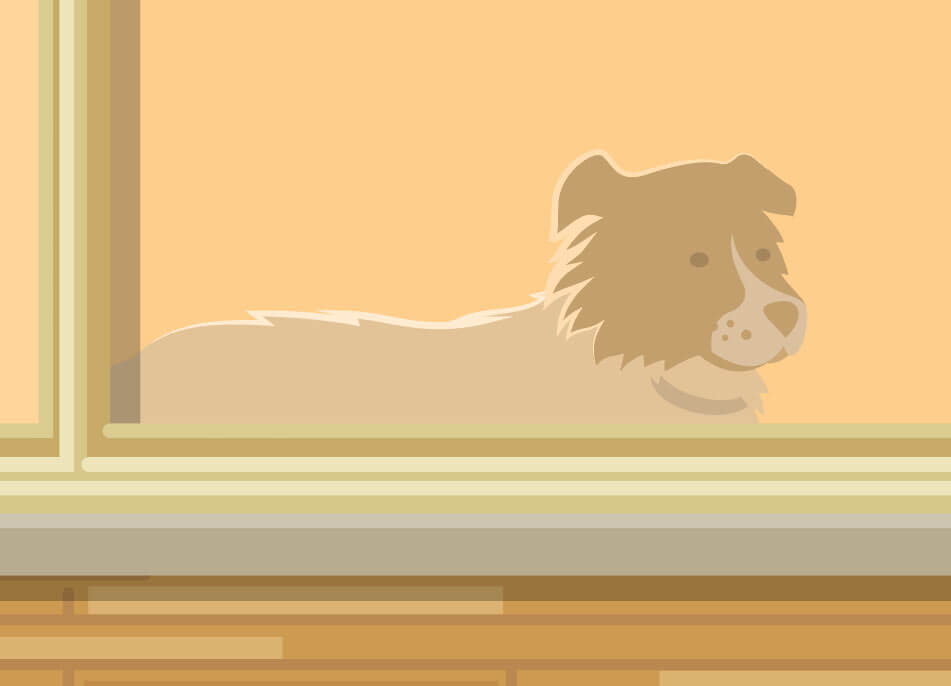
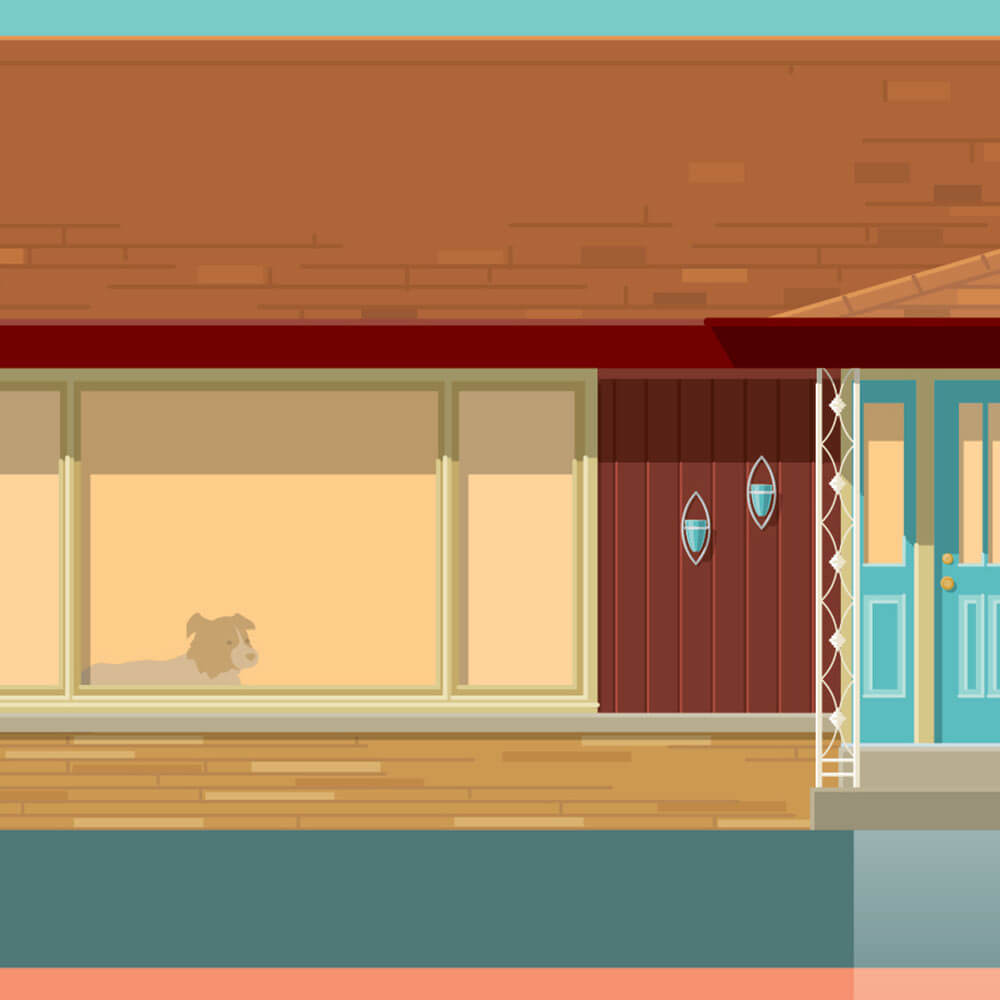 Not only had he remedied the roof and window colors and added my hanging bullet planters, but he also added an portrait of my dog Leo sitting in the front window.
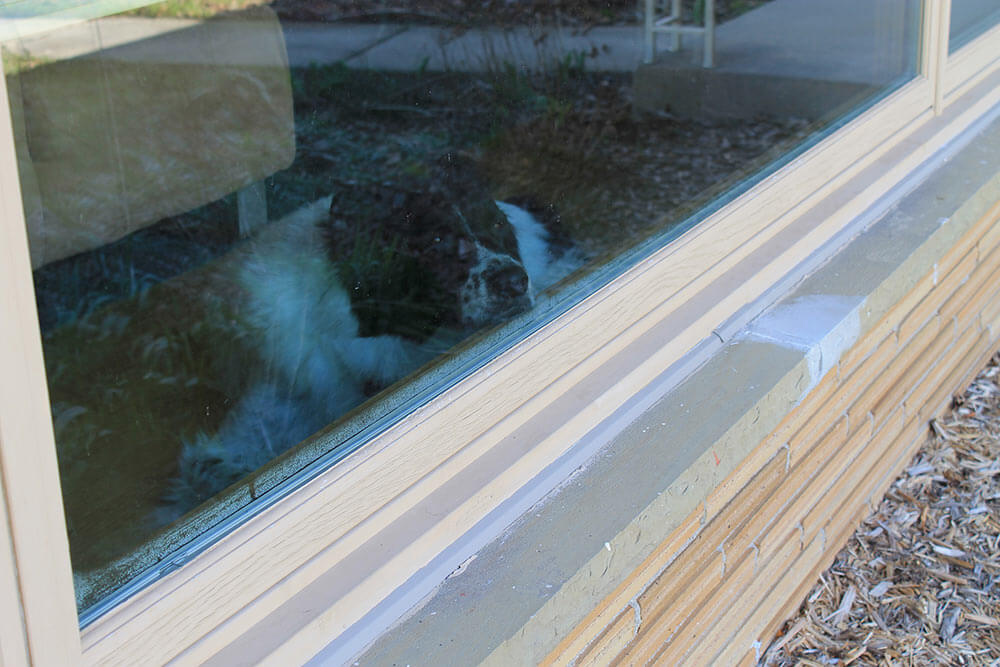 I had sent him a few close up pictures where Leo was visible through the open front window and I was so tickled to see him as part of the illustration because Leo is a nearly permanent fixture in our front window, so much so that he almost seems like a part of the architecture!
 This special touch made our home illustration feel like ‘our house’ right away.


 At this point, we were very close completion. Christian asked if there were any final details he could add that would make the house illustration feel more ‘homey’ and I suggested including the shrubs. I also sent him an up close photo of Leo so that he could ensure that Leo’s markings and expression were correct. Then all that remained was to adjust the coloring on the color bars since I felt that the deep blue and coral combination was still not quite right.
When I saw the house illustration with shrubs, I knew it was perfect. Then it was just a matter of deciding which color bar color combinations I liked best.
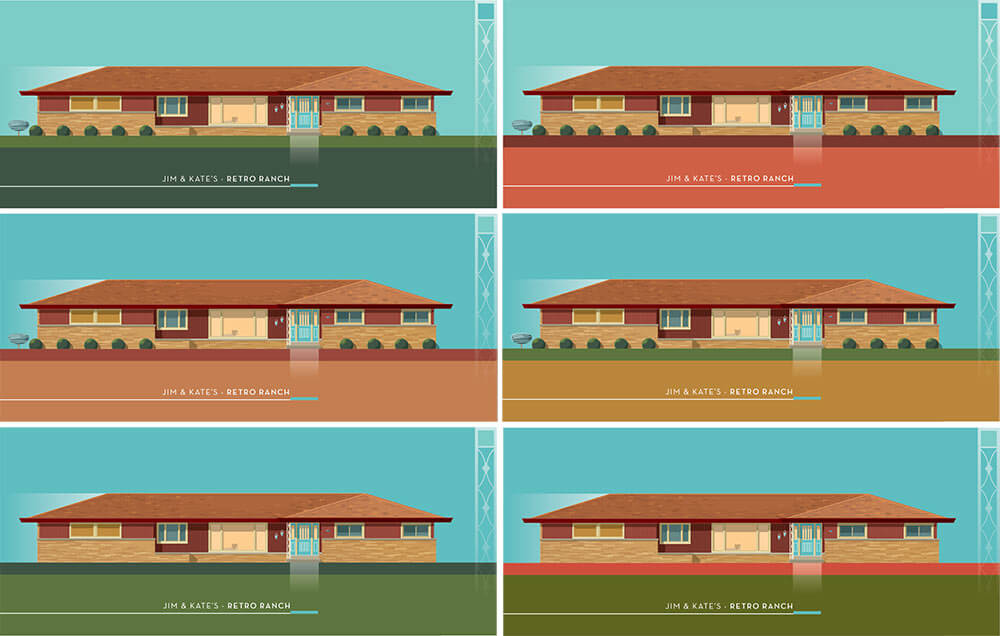
 Christian sent me six different color combination options, and I ended up choosing the two tone green option that looked like grass as the winner. With my final approval, Christian was speedy to make a test print for my final approval and then get my custom house portrait to the printer before shipping it out to me carefully packed into a mailing tube.
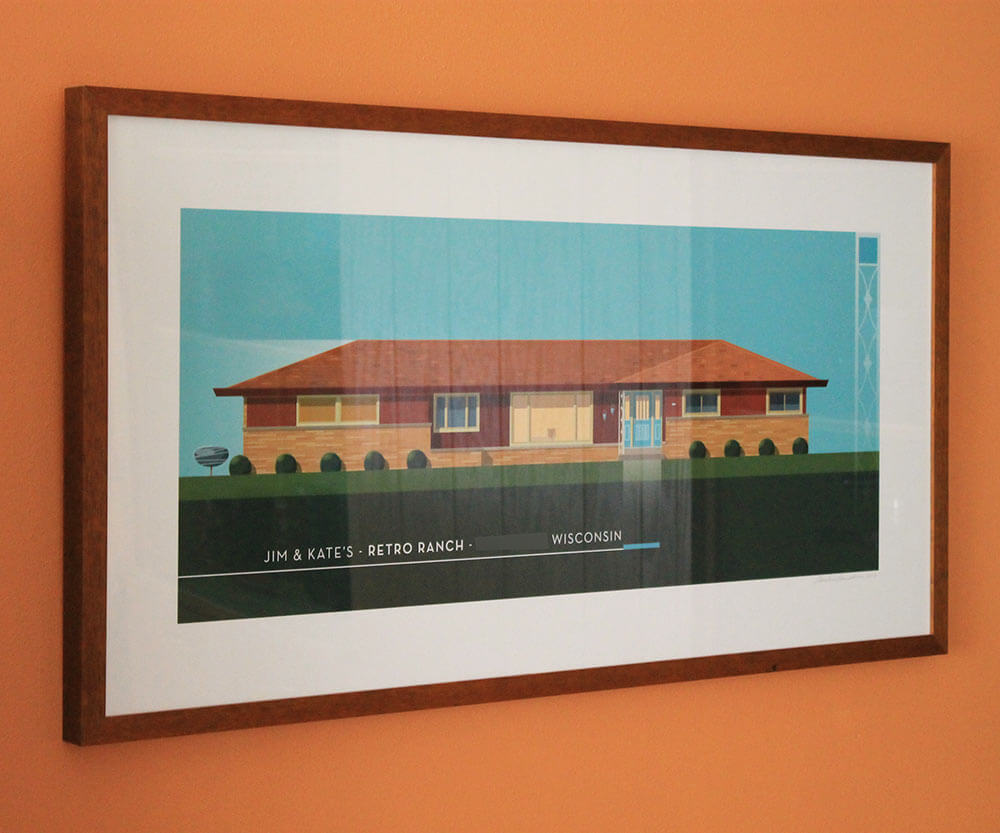 When the print arrived I was so excited that I ordered a frame right away so I could get it up on my wall.

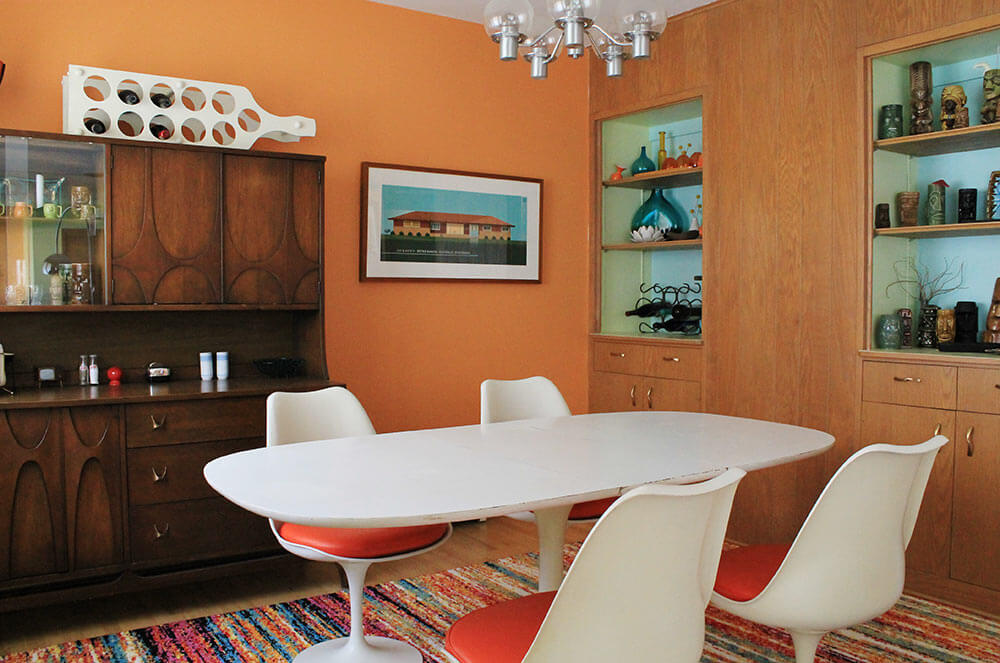
 I think it looks fabulous in my dining room! Don’t you?

Tips for ordering a custom home portrait:
- Fun — Christian is very enthusiastic and passionate about his work — it shows not only in his illustrations but in his communication with clients during the creative process. He’s a joy to work with!
- Send good photos — Sending plenty of high quality photos of your home including straight on views of the entire front of the house and close ups of important details like the front door, window frames, brick and siding and any other special traits your home possesses — like your doggy peeking out the front window — will speed up the portrait creation process. Be sure to write a few notes mentioning your favorite parts of the house to ensure Christian has all the information he needs to create a successful portrait.
- Color preferences — The background color bars in the illustration can be any color you want. If you have something in mind or a fondness or aversion to a particular hue, be sure to let Christian know. This helps narrow down the field of possibilities and gets you to your final portrait faster and easier.
- Framing — Think about framing ahead of time. I bought a new, custom made frame for my print, which is quite large at 38″ x 19.5″ and cost me about $137 delivered. If you have a smaller budget for framing, you may want to seek out a frame ahead of time, either at your local home store or the thrift store to reduce framing expenses. Just keep in mind that the proportions of the frame should be similar to the shape of your house. Then you can give Christian your framing dimensions and have him create your illustration to fit in the frame you have selected.
Interview with Christian Musselman, professional Illustrator
Of course I couldn’t finish this story without learning a little more about Christian and his artwork — and thankfully he agreed to answer all of my burning questions:
Q. Were you trained in illustration or self taught?
I’ve taking art classes since I was a kid (thanks Mom and Dad!). I attended the American Academy of Art in Chicago, primarily to hone my skills and to get a feel for what it took to be a professional illustrator. Okay…I must admit…I’m an art school drop-out! Luckily I landed an apprenticeship with a Chicago fashion illustrator who helped me learn what being a self-employed illustrated entailed. It’s been a fun journey. So, to answer your questions: part trained, part self-taught (with a little help and mentoring along the way).
Q. All of the work on your website appears to be created digitally, do you prefer digital illustration to the old fashioned pen on paper variety?
Yes, I’m absolutely sold on creating art on the computer. I like the freedom of unlimited exploration, in terms of color, scale, and “save as” abilities — which allows me to keep playing and experimenting without losing what I’ve done. You sure can’t do that with pen on paper! Besides that, I’m hooked on exact 90 degree angles and perfect circles. Ha! That aside, there is a great sense of tactile workmanship that comes with pencil and paper. I certainly miss that, however at times I will use it to create more fluid sketches that are imported into Adobe Illustrator to use as a foundation for the artwork I’m creating.
Q. Tell me more about your work as an illustrator — have you always concentrated on illustrating architecture?
My work as an illustrator has been varied. Along with my architectural work, I also have a career in illustration and concept work for commercial clients. For the past 8 years, I’ve been doing a lot of work in the toy industry. Working on projects that include products like Barbie and Hot Wheels, to name a few. The architectural interest is still very present in my toy work as well; I designed and illustrated Barbie’s Malibu Mansion for Mattel as well as schoolroom scenes for Monster High. It’s a lot of fun doing that kind of work, it’s very inventive and filled with highly imaginative content and saturated colors.
Q. What is it about architecture that fascinates you?
I love architectural details! I’m totally enamored with what architects, designers, and artisans create that takes a basic box and turns it into art. I like seeing how styles and trends over the decades affects the look and design of homes. It’s a good indication of what people valued and desired in their living and business spaces.
Q. Do you have a favorite architectural style to illustrate?
That’s sort of like asking me what my favorite movie is! Ha! Seriously, I think it’s fair to say that when a style is executed really well, it’s my favorite… Having said that, Art Deco and Mid-Century Modern styles have top spots in my favorites list.
Q. Where do you find inspiration?
Walking around. I’m a big walker…and building stalker! I’ve had s couple people come out and stare at me as if I was casing their place. I feel like they should be thrilled that someone actually takes the time to see the beauty of their home or building…but that’s my opinion, or maybe, my defense. If you find me on the sidewalk, staring at your home, with camera in hand…don’t be alarmed…it means I really like your house! So much in architecture gets taken for granted. I like to take the time to appreciate what makes the structure unique and question why it appeals to me enough to stop and take a longer look. I like to image the people that built the home and why they made the choices they did.
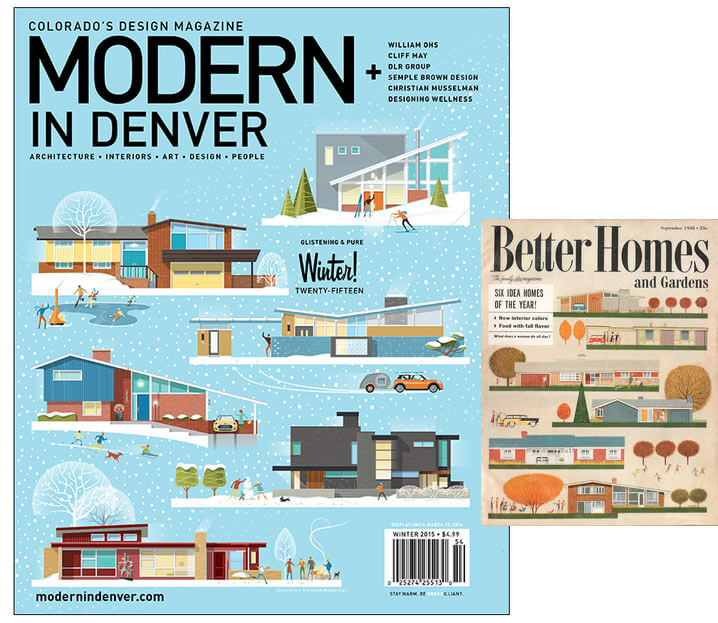 Q. I noticed you created a “Modern in Winter” illustration that was inspired by a vintage Better Homes and Gardens Magazine, which is fantastic!
Thanks, Kate. I had the great fortune of working with Modern in Denver. It’s a beautiful magazine, created by a group of very committed and passionate modernists. I feel honored to have been asked to create the cover; it was their first illustrated cover since the magazine was founded.
Q. What is the most challenging part of doing a custom home illustration for a client?
Getting the details right! Especially when long-distance. I rely on clients sending specific photos of their homes…often as many as 10 – 20 images to get the details I need: how rooflines meet, window framing details, brick patterning…even the small details like house numbers, lighting and door knobs…anything that makes the home personal and unique It’s a lot fun for me, and I’ve found that the owners often learn things about their home that they didn’t notice before. For most clients it ends up being a really fun process.
On the flip side…the least challenging part of doing a custom home illustration is working with the homeowners. They are incredibly passionate about living in their mid-century homes. It’s really fun for me to share in that enthusiasm and to try my best to incorporated their pride and personal investment into the illustration.
Q. How long does it take to complete a typical home portrait?
It’s hard to give an exact response, because, as you learned…it’s an incremental process from the time I get a client’s request and photos, to the time I send the final image to them for their approval to print the artwork. There are often multiple requests for specific photos so I can get the details right. Of course, your photos, Kate…were spot-on for what I needed…like a good designer, you knew exactly what I’d be looking for. Good job! 😉
Q. How much do you typically charge for a custom home portrait illustration?
Creating a home portrait is very custom work and I think some clients get that, and others are expecting a price more like a print on Etsy. In general the pricing is somewhat dependent on the size of the home (not the size of the artwork) and the level of detail involved. Some homes are beautifully minimalist — and those take a bit less time than a mini-mansion…so the price reflects that. Generally pricing falls between $350 to $700, with most homes falling in the middle. Printing is a separate cost. I have a fine art printer that does beautiful work on archival watercolor paper. The final print size determines that cost. Most prints fall between $80 – $140.
Q. What style home/building do you currently live in and what is your ‘dream home’?
Currently I live in a high-rise condo building. It’s a bit mid-century, built in 1961 with some cool features like a walnut paneled Mad-Men-like wall in the lobby. There’s also a pool and lounge area on the 16th floor…great views! Funny because they’ve maintained patches of grass for lounge chairs to sit on and there are trees up there too! A little oasis in the city, on the 16th floor.
My dream home would be a classic Mid-century…with huge sliding doors along the back of the house that would open to a lounge and pool area…and LOTS of light! Hmmm…sounds a bit like Palm Springs doesn’t it…however, I’ve found amazing pockets of Mid-century’s that fit that description in almost every community around the country. Creating these home portraits has taught me that the basic concepts of mid-century living was (is!) alive, well and present everywhere. It was such an optimistic time and it’s fun to see how home-owners embraced the concept of modern living –and chose to live in that particular style of the American dream, both then…and now.
How to get Christian’s illustration work on your wall
- Work with Christian to create a Custom Home Portrait of your house
- If you don’t have the wall space or budget for a complete custom portrait of your home, but would love to have a detail illustration of one of your home’s best features — like a front porch or architectural element — Christian does those too!
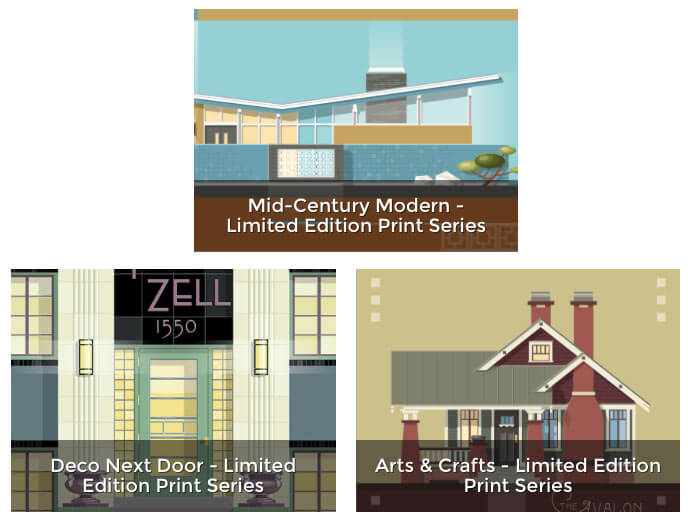
- Christian also has a store where he offers limited edition prints of Mid-Century Modern, Deco Next Door and Arts & Crafts homes — each available in two size options that you can purchase. (Also available, his “Modern in Winter” print, created for the cover of Modern in Denver magazine.
- Christian also writes a blog where you can keep up with all of his projects.
Mega thanks to Christian Musselman for creating an amazing custom home portrait for me — It makes me smile every time I see it — and for answering my many questions.


Sharon says
Adding pets can really personalize a portrait. And memorialize them after they are gone. Nice touch.
Mary Elizabeth says
Lovely house, and fantastic portrait! I will be back to sign up for the drawing. I’d love to see what he could do with my house, which looks very small and rectangular from the front but has a sweeping addition with a large deck in back, which you can see from the side.
Scott says
Amazing. I already was admiring the portrait but then when I saw Leo in the window… no words. Wonderful.
The drawings really brought out a few details that I had never noticed before too, so besides being exceptionally attractive, they are quite effective too.
Carol says
Kate, I love your house. I’ve seen snipets of the outside but I only remember seeing one elevation. This rendering of your house is wonderful and the colors are beautiful. I absolutely love it. I also have a soft spot for your exterior window sills. I love those on a midcentury brick house, so neat and tidy and “institutional”. My father was a stone and brick mason so I have a love for ALL things concrete and masonry. Your house is a wonderful example. My little brother built a house in 2000. It’s a brick “tudorish” style that one would find off any mainstreet USA from the 30’s to 40’s. The style of house with the dining room on the side with all the windows, and the curved brick entryway on the small front porch. He expanded one side of the house 4ft. and had a few other modifications done. I took the new drawing and had it printed on archival paper and framed. It was his Christmas present and still hangs in the front entry hall. I used to tell him about the “granny” house I wanted to build one day. I saved the plans from a magazine and the article about the one the architect built for his family in Texas. He came to my house one day with the plans for his new house. I took one look and went to my house ideas file and asked him if he wanted to see it finished. We were flabbergasted that we both chose the same exact house. To make a longer story shorter, His idea to work and be the general contractor and laborer caught up with him after the house was dried in. He was so discouraged, I stepped in and started with insulation. I hung drywall, laid tile, fabricated millwork, laid hardwood floors, shopped, set tubs, painted 23 wood windows and 18 wood doors and all the trim in oil. The house is great and timeless and he happily resides there with his lovely wife. My point is, finally, that with all the blood, sweat, and tears, and yes that saying was very true for both of us in the year and a half it took to finish the inside of the house. We were so proud of what we managed to accomplish with the inside of that house, that the drawing still takes a place of pride in the entryway to this day. It’s good to be house proud when your labor and creativity is called to the test. It takes a lot to make a house truly a home. Your house is a prime example. It’s lovely.
Clarence Ellis says
OMG Kate–can’t believe I never noticed your Broyhill Brasilia hutch in the dining room. Green with envy!! 😉
Melanie says
I’ve been working with Christian on my own home illustration for my Wisconsin home for a while now. My project is a surprise for my husband’s birthday in December, which has made this the most challenging as I’ve had to limit my public praise of Christian’s work. Since DH doesn’t follow this blog site to the degree I do, I FINALLY have a venue to share just how wonderful it has been to work with Christian. The process has been very casual and comfortable sprinkled with excitement each time I see an email from him pop up. We have been on hold for a few weeks because DH advised that we are getting a new roof – standing seam – which will change the look of our house. Christian has been waiting patiently for the roof to be installed. I’m so grateful though that we didn’t finish that portrait and THEN change the roof! What a surprise to wake up to this great story!
Carolyn says
Oh, my – this would make a unique housewarming gift! Or, for yourself, it’s the way you SEE your house (please, you’ve got to admit, the usual colors are pretty blah – blonde bricks, brown/tan/white siding), not too idealized but enhanced.
Sure, you could do this yourself after you invest a boatload of money into the software, printer & ink, time (HA!) and patience (HAHA!). Christian has the expertise but more the VISION to show you what you think you see and what you could see.
Robin, NV says
My house is essentially U-shaped with a 6 ft brick privacy wall closing the front of the U. I’d be curious to see how that would come out in an illustration.
Kate’s house is so cute!
Kate says
Thanks Robin! I love my house! 🙂
Cynthia says
Fantastic! Your house looks great the way a good portrait should be. Could he also do a picture of the rear elevation of the house and you could hang it beneath the picture of the front!
He definitely captures the style and vibe of the mid century.
Jay says
Great story Kate. Like you, I love my house. Sounds weird I suppose. The space you chose to hang the portrait is a great spot space wise but I suspect you planned it that way. Of course I’ll be back tomorrow for one of RR’s great give-aways along with several hundred other readers.