My easy and inexpensive DIY home bar — starting with a $10 furniture buy from the ReStore
Pam Kueber - Updated: August 18, 2021
Retro Renovation stopped publishing in 2021; these stories remain for historical information, as potential continued resources, and for archival purposes.
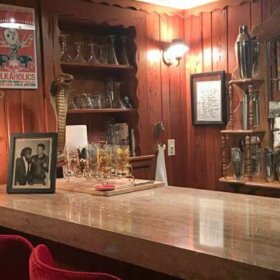
I built my own tiki bar using the top of a 1970s step-back cupboard — and it’s the perfect size for a small home bar. I bought the cupboard for just $10. And I am not lying: Making this bar took less time than making this 2-minute video with all my DIY tips!
See all the stories about my Mahalo Lounge project here.
I am in awe of people who have this kind of vision, to see the potential in a “castoff” and turn it into something so great. Wow. Just wow. ????????????
Karensays
I never would have thought of turning it upside down! I was wondering about the stability with the open part on the bottom. What did you use for the top of the bar?
Pam Kuebersays
The bar top is a piece of cedar that I bought at an estate sale many years ago.
The bar seems pretty stable — it’s heavy — but as I said in the video I plan on adding more supports.
Lindasays
Full on brilliant, Pam!
Dalesays
To Jay’s point – on projects likethis, could you also publish a few pics in addition to the video? Whether its because we can’t get to YouTube, or its data limits or download speeds, video is often difficult or impossible to view.
Thanks!
Pam Kuebersays
I’ll do a story with just photos this week…
Alicesays
Pam – what a great job! Lord knows, I am so tired of repairing and renovating this house and looking forward to the day I can do “fun projects” rather than scraping wallpaper and patching plaster!
Wow – this is your 10th year? That mean’s hubs and I have been retro-renovating this house for 10 years because we found you the weekend we bought our mid-century ranch!


Cathe Anderson says
Why are they marked , they are correct!
GlenEllyn says
I am in awe of people who have this kind of vision, to see the potential in a “castoff” and turn it into something so great. Wow. Just wow. ????????????
Karen says
I never would have thought of turning it upside down! I was wondering about the stability with the open part on the bottom. What did you use for the top of the bar?
Pam Kueber says
The bar top is a piece of cedar that I bought at an estate sale many years ago.
The bar seems pretty stable — it’s heavy — but as I said in the video I plan on adding more supports.
Linda says
Full on brilliant, Pam!
Dale says
To Jay’s point – on projects likethis, could you also publish a few pics in addition to the video? Whether its because we can’t get to YouTube, or its data limits or download speeds, video is often difficult or impossible to view.
Thanks!
Pam Kueber says
I’ll do a story with just photos this week…
Alice says
Pam – what a great job! Lord knows, I am so tired of repairing and renovating this house and looking forward to the day I can do “fun projects” rather than scraping wallpaper and patching plaster!
Wow – this is your 10th year? That mean’s hubs and I have been retro-renovating this house for 10 years because we found you the weekend we bought our mid-century ranch!
Thanks for the energy you keep giving!