

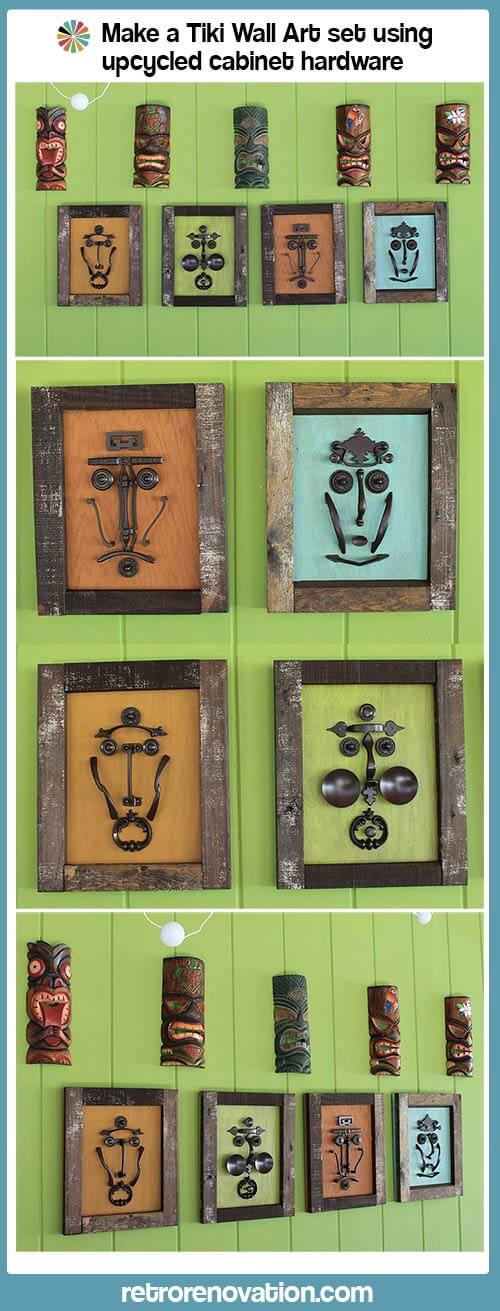
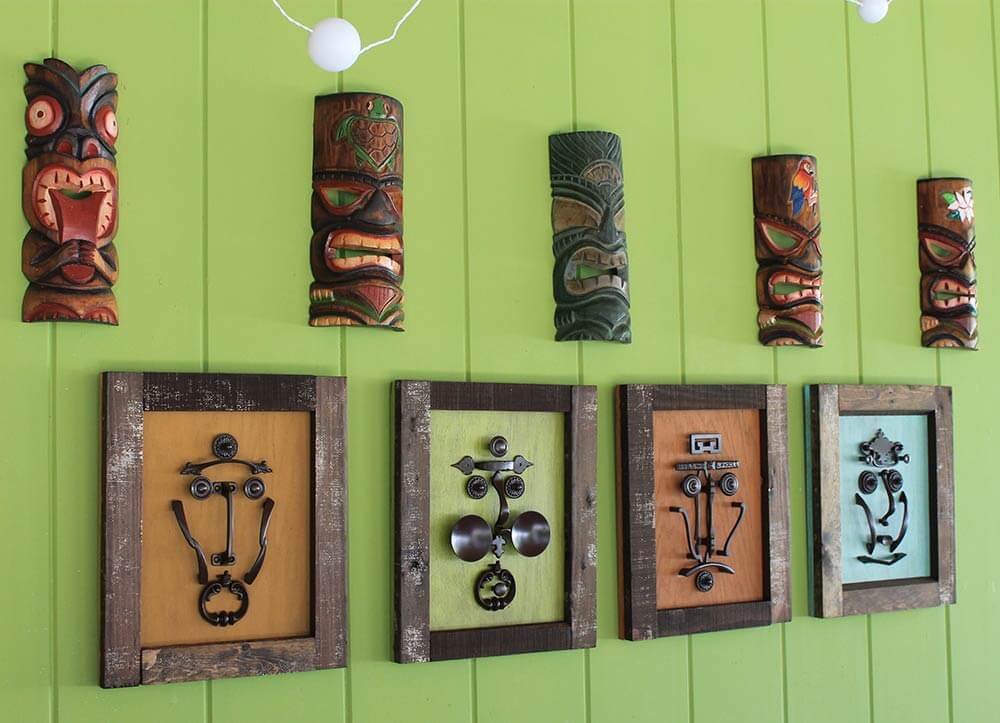
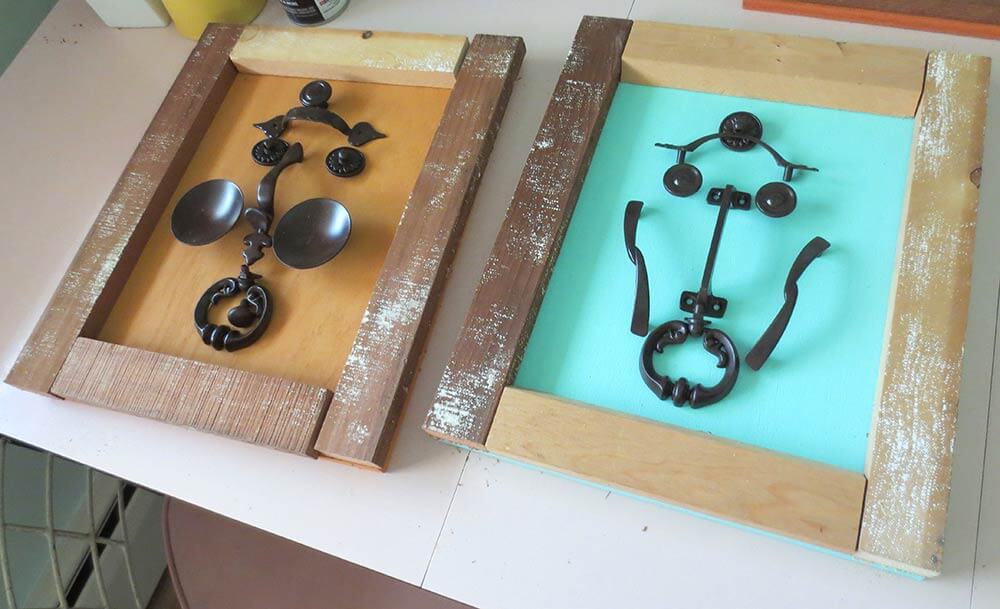
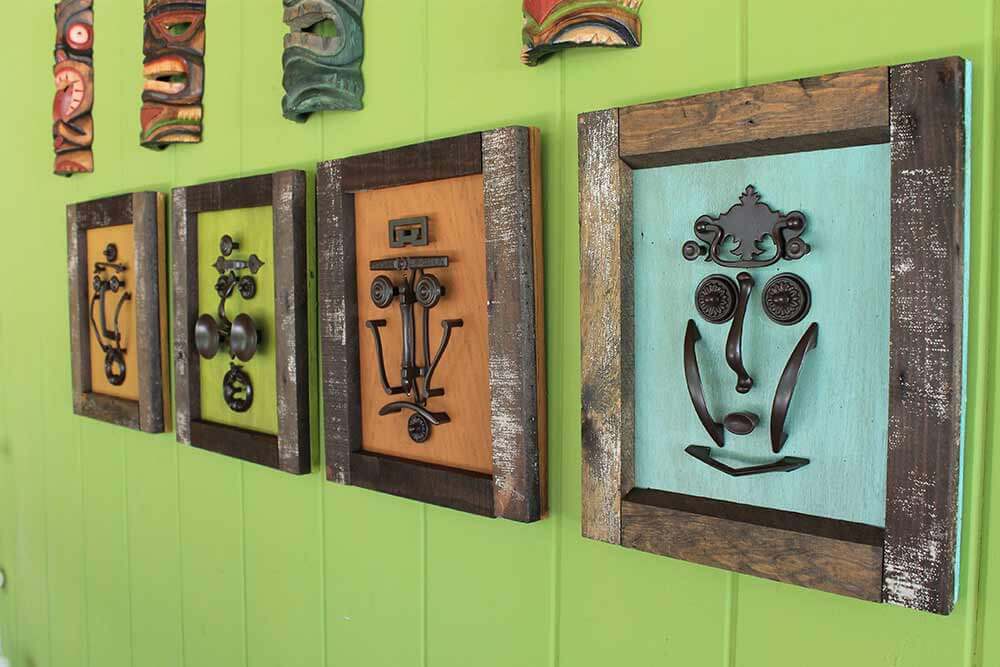
 Pam arrived at The Hukilau yesterday — and I’m on a plane today, woot! In preparation for our panel on how to design and create a home tiki bar, we have been immersing ourselves in everything tiki. Pam now owns $240 of Sven Kirsten books — Tiki Modern and The Book of Tiki (affiliate links)… but my expenditure was only $10. Yes, I got Retro Crafty and used vintage kitchen cabinet hardware to make a set of tiki masks. This might be the wackiest crafty idea ever — but, who’d a thunk it — the tiki masks turned out great and look fabulous in my tiki-patio!
How did I get this idea? Tiki surfing on ebay, I saw a Witco-style wall mask… and while working out in the yard later, I began pondering how to replicate the idea with odds and ends or its and bits. Pulling weeds, I pulled the kitchen-cabinet-knobs-and-pulls idea out, too. I pitched the idea to Pam… she said go for it… and I headed to the Habitat for Humanity ReStore to see what the Retro (Tiki) Decorating Gods would deliver to me. And they delivered well.

 How to make my upcycled tiki wall mask set:
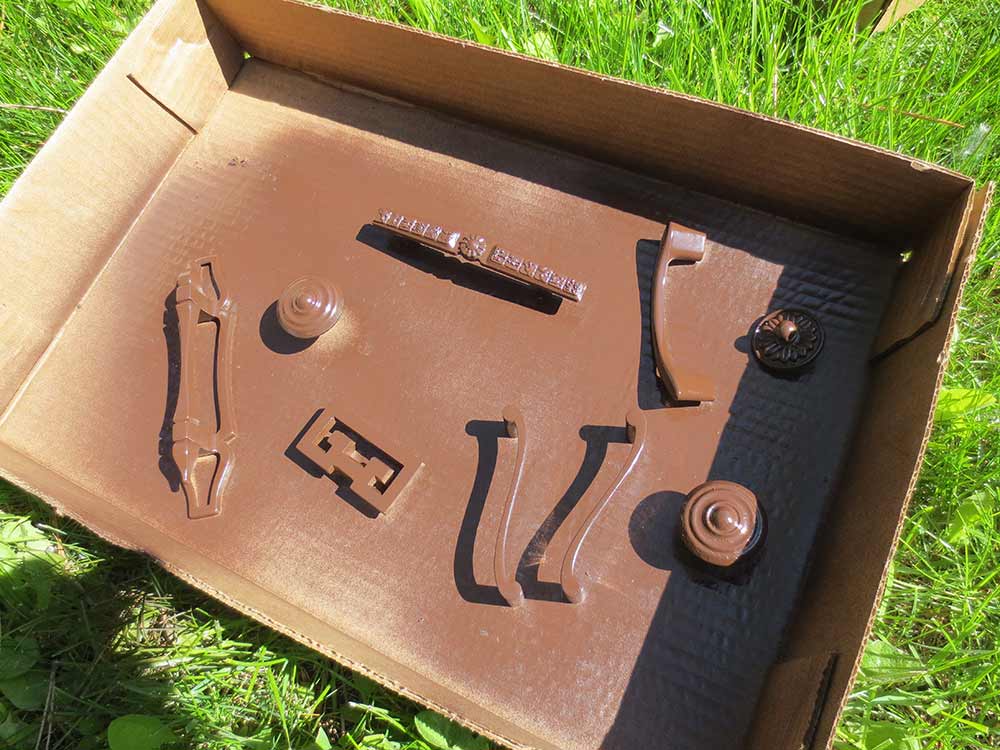
I only spent about $10 on this whole project. How much you spend will depend on what you already have sitting around the house and how many tiki faces you want to make. Here’s what you’ll need:
For the faces:
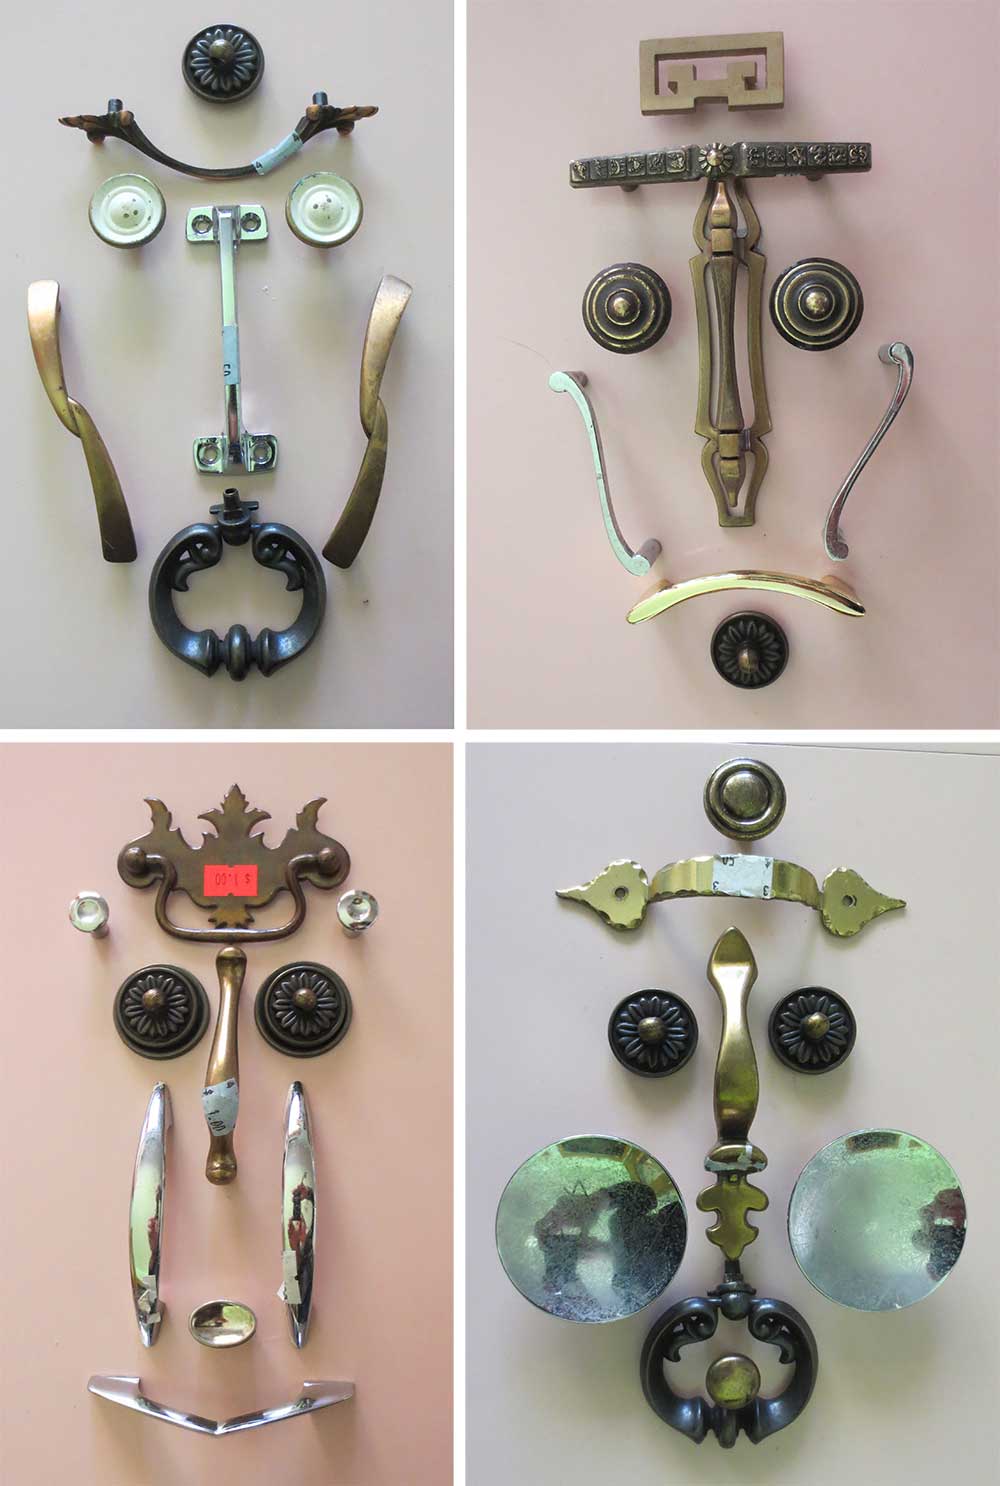
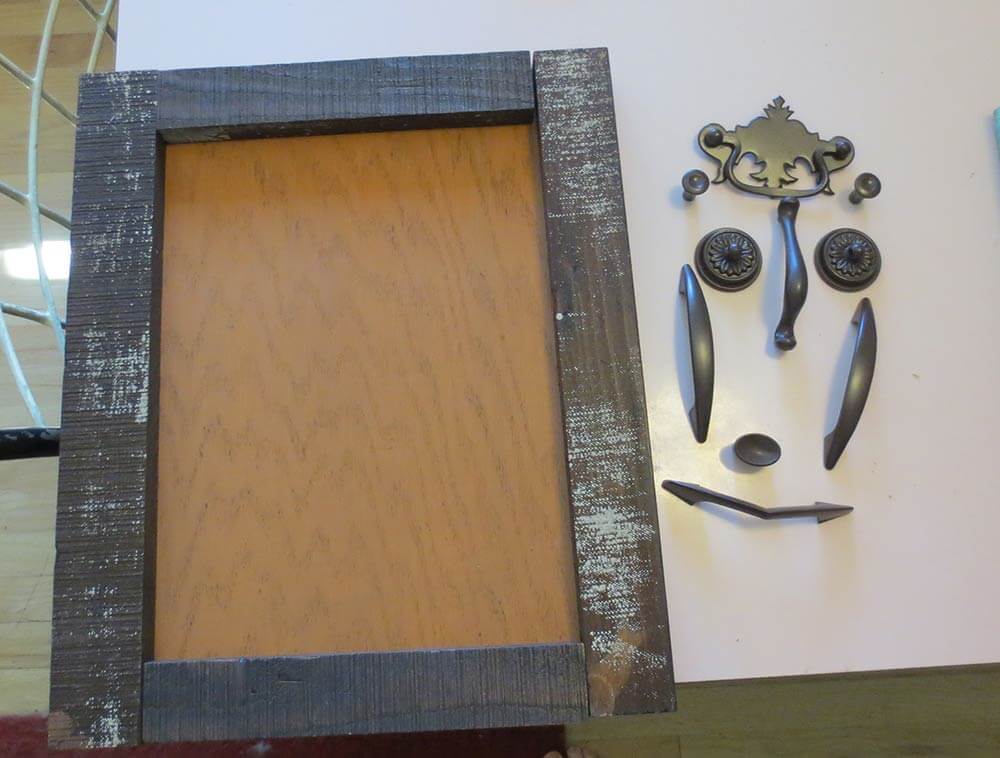
- A selection of different cabinet knobs, pulls and other small hardware that could be used to make a face. The bigger the stash of old hardware, the better — more to play with! If you can’t find hardware that will work, another great idea is to use small wood scraps in various shapes and sizes — or other found objects. This is your chance to get creative.
- Spray paint (I used Rustoleum satin espresso)
- Glue to attach the knobs to the frame (I used super glue, but hot glue or other glues that bonds metal and wood should work fine.)
For the frames and canvas:
- If you want to make your own frames like I did, you can use any leftover wood scraps you have laying around. I used leftover plywood for the background/canvas and some old scrap wood I had laying around for the frames. No scrap wood? Check with neighbors or your local Restore.
- For the canvas, you could also wrap burlap or another rough-hewn fabric over hardy cardboard or thin wood
- Leftover paint and stain from other home projects — for both the frame and canvas
- Finish nails
- Picture hanging materials
Note: If you aren’t handy, or don’t have the space, leftover materials or tools to get the framing job done, keep an eye out for old picture frames to use for this project. The frames can be painted and tiki faces can be glued to the cardboard insert that comes with the frame, which can easily be covered with fabric, paper or paint to jazz it up.
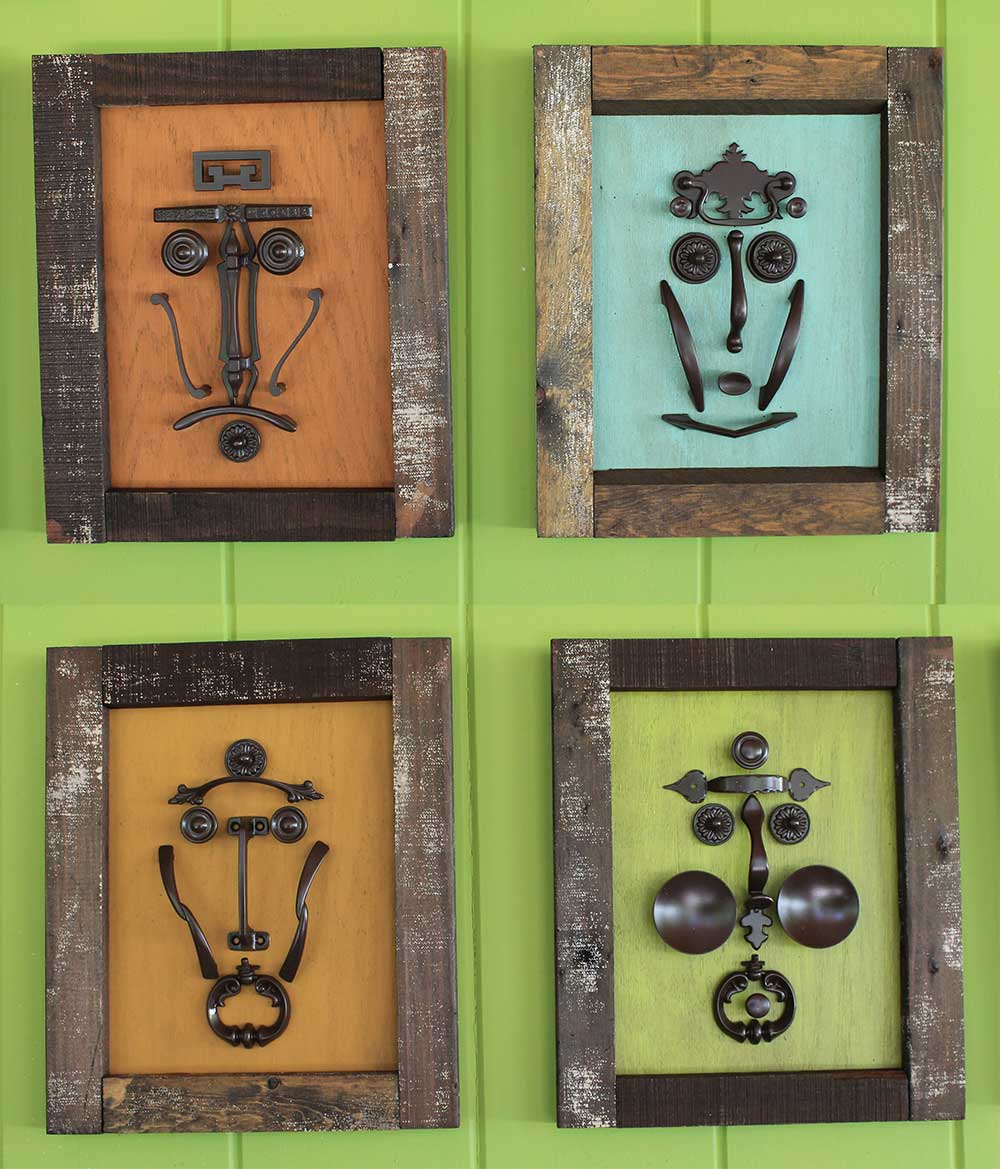
Step 1 — Make a face
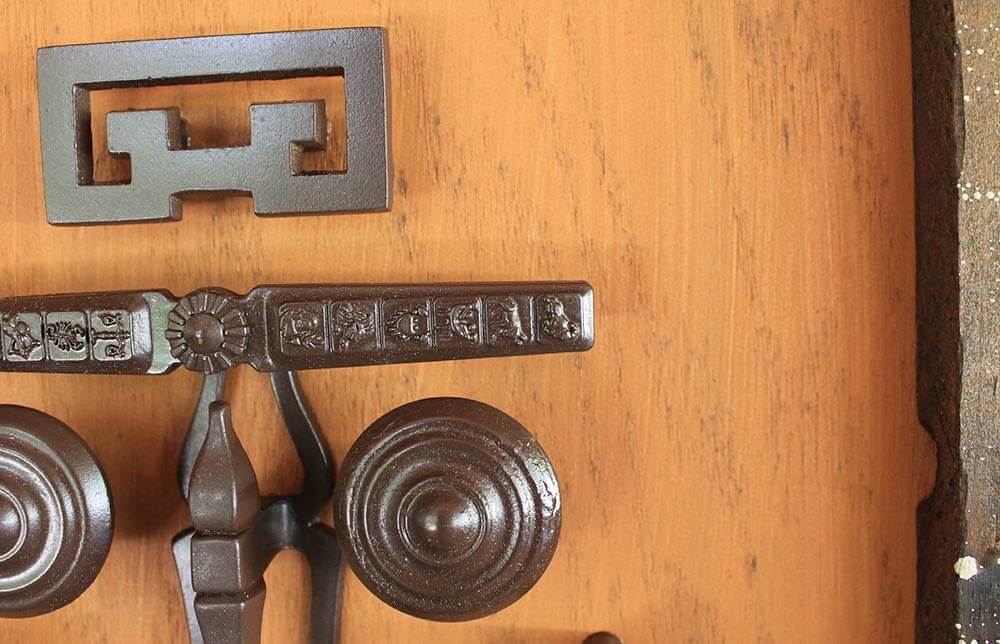
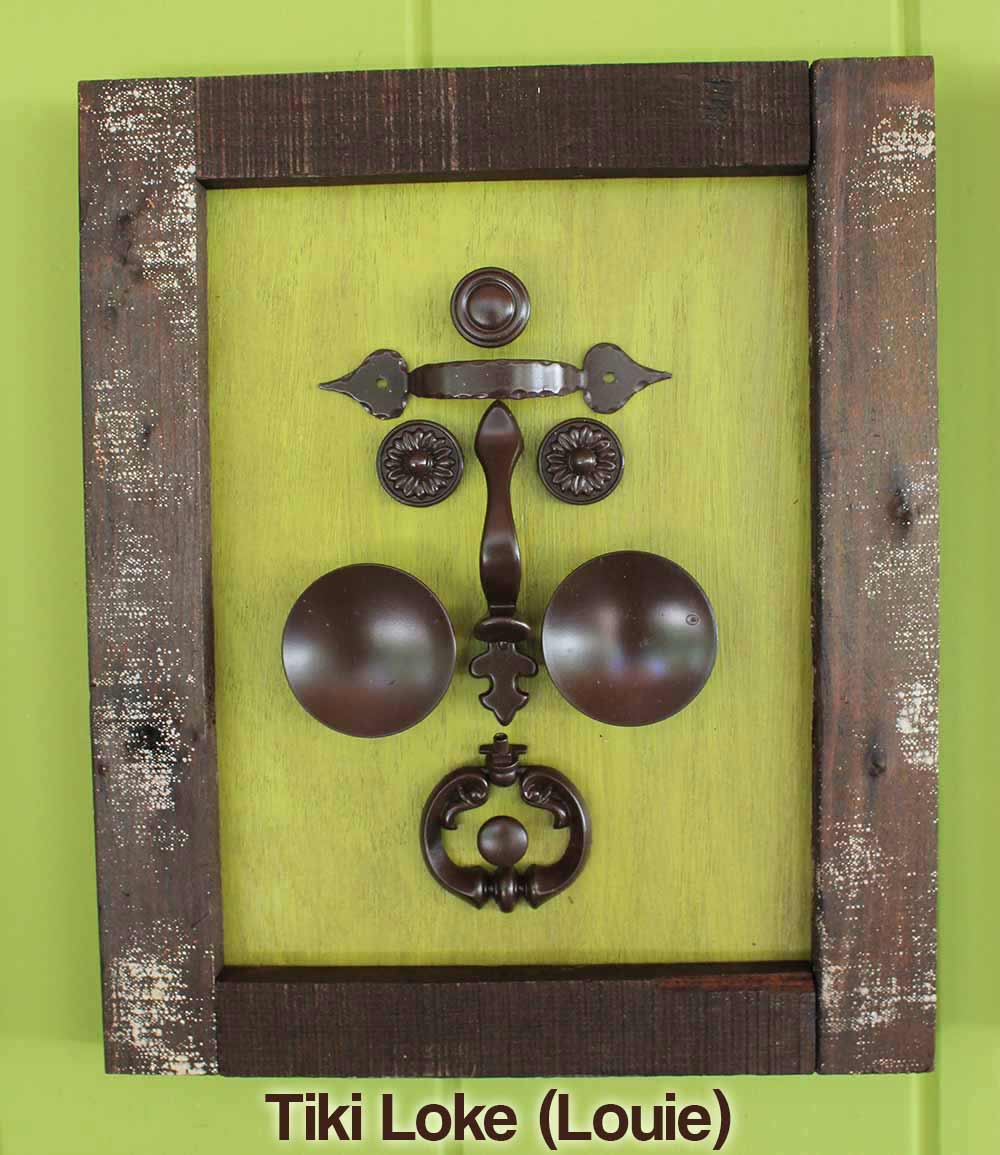
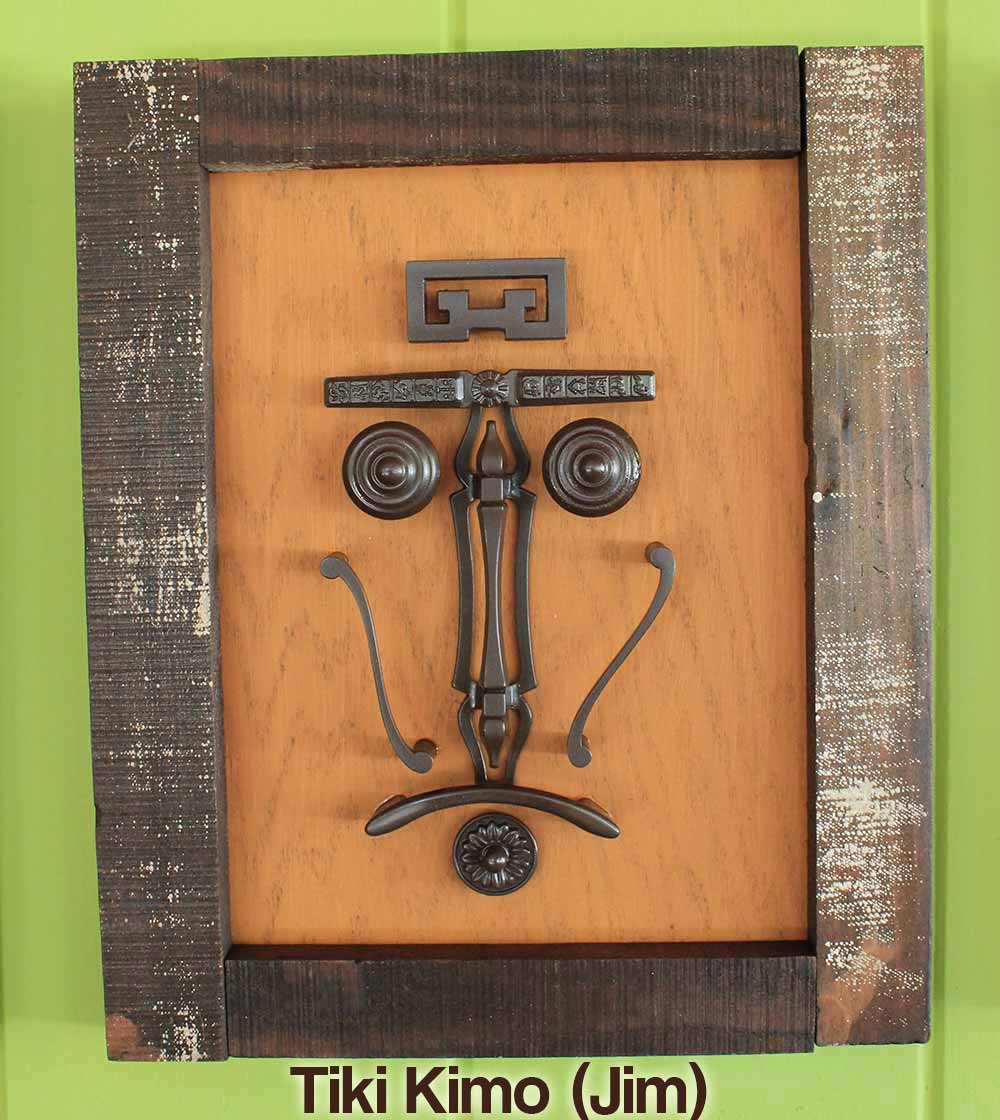
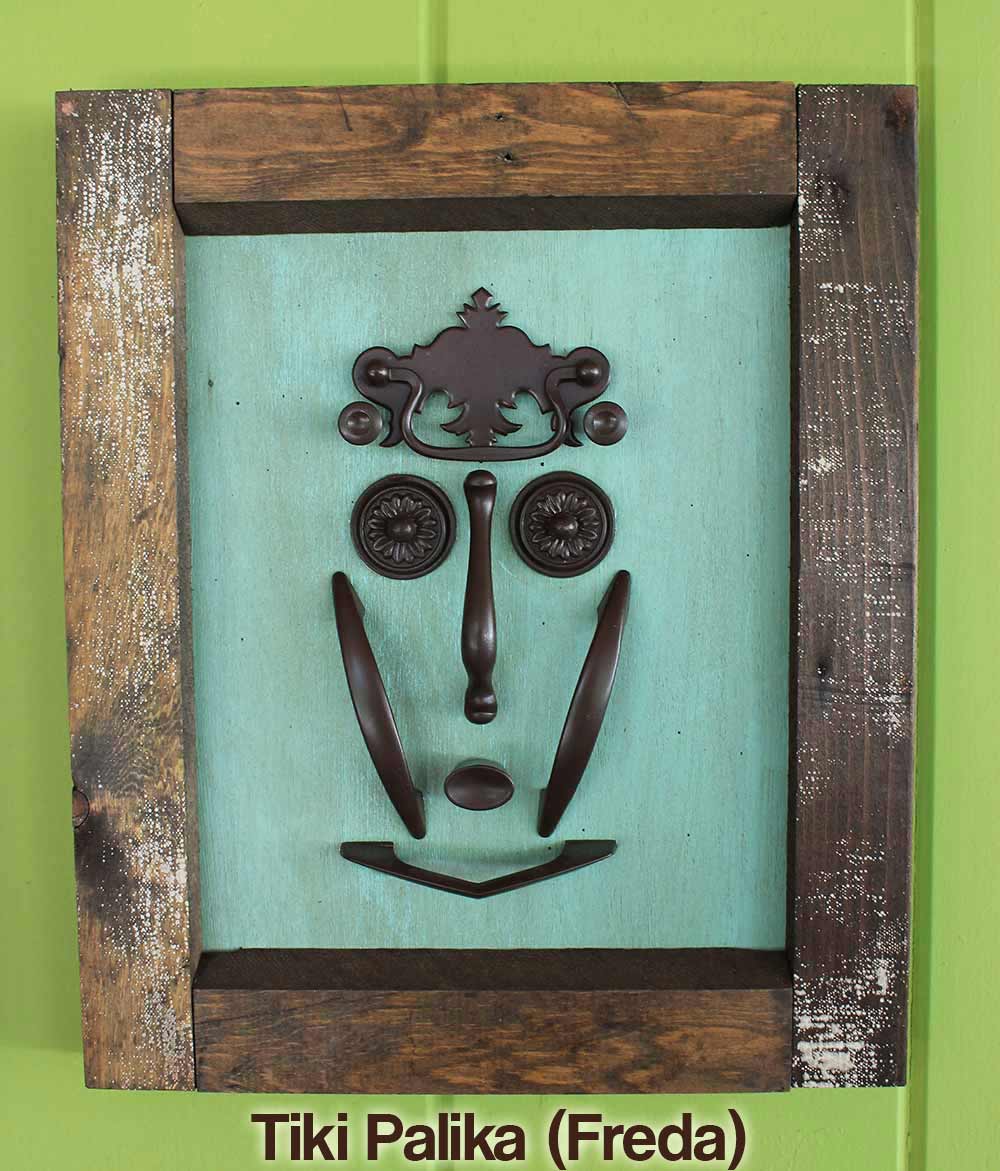
This is the fun part. Start playing around with your selection of cabinet knobs and pulls to make tiki faces. I found that maintaining some sort of symmetry in the face is the best way to go. Look for a few crazy pieces for the nose, mouth and forehead, then use two of the same kind of pull or knob to make cheekbones and eyes. Cabinet pulls that have an asymmetrical design make great noses as seen in the bottom two faces. Don’t rule out other small hardware like hinges, hooks and latches too.
 Step 2 — Clean and paint the hardware
Once you have decided on your tiki faces, you may want to take photos or make quick sketches to remind yourself how the faces fit together. Clean off and remove any price tags from the cabinet hardware. Once everything is clean and dry, spray a few light coats of the spray paint color of your choice — I chose Rustoleum espresso in a satin finish — and let dry.
 Step 3 — Make the frames
Note: If you are using pre-made frames, paint or decorate them as wanted and skip to step 4.
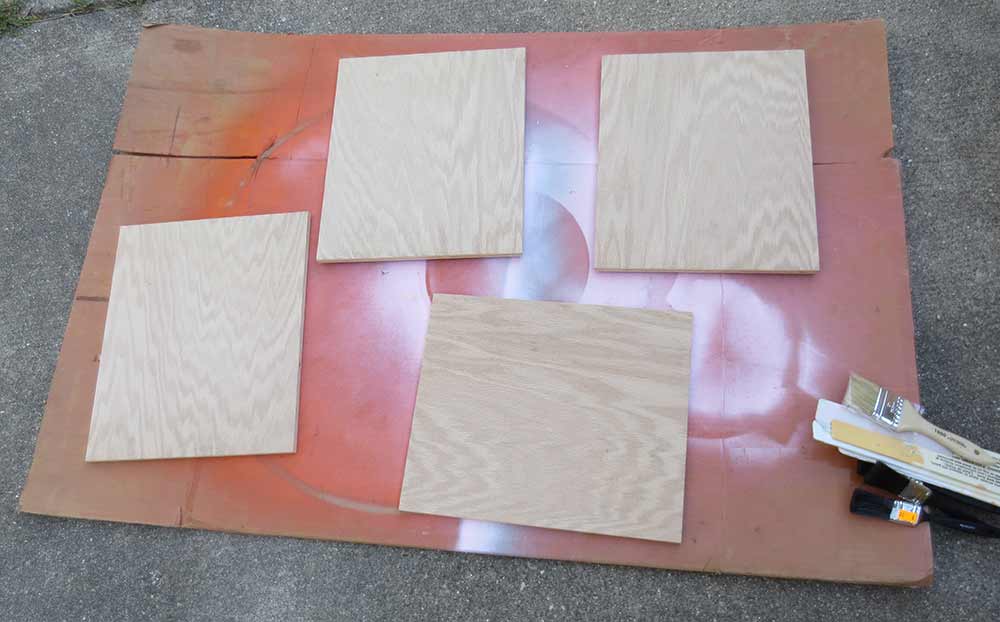
I had a strip of leftover plywood from when I built my bathroom vanity last summer, so I sliced it up into four equal sized pieces to use as the back of the tiki frames.
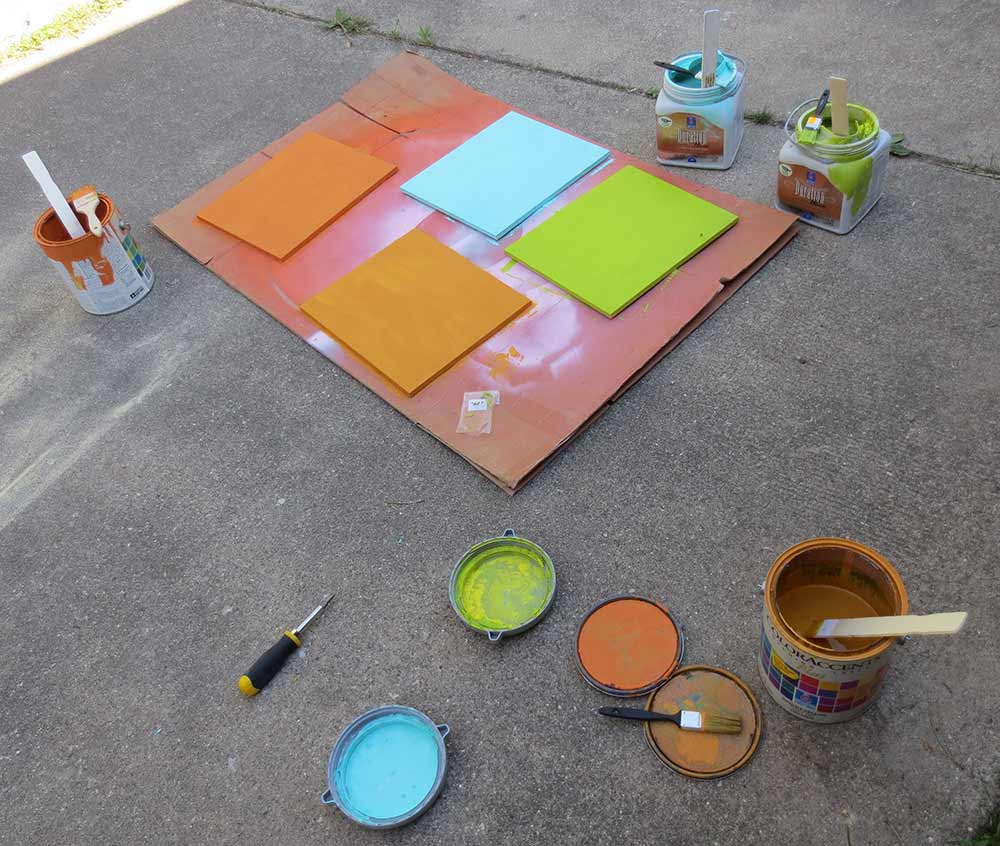 Next I used some leftover paint in several different colors to paint the boards. I didn’t prime and only used one coat of paint. We are trying to achieve a ‘found on the beach’ kind of look, so perfection is not needed for this project.
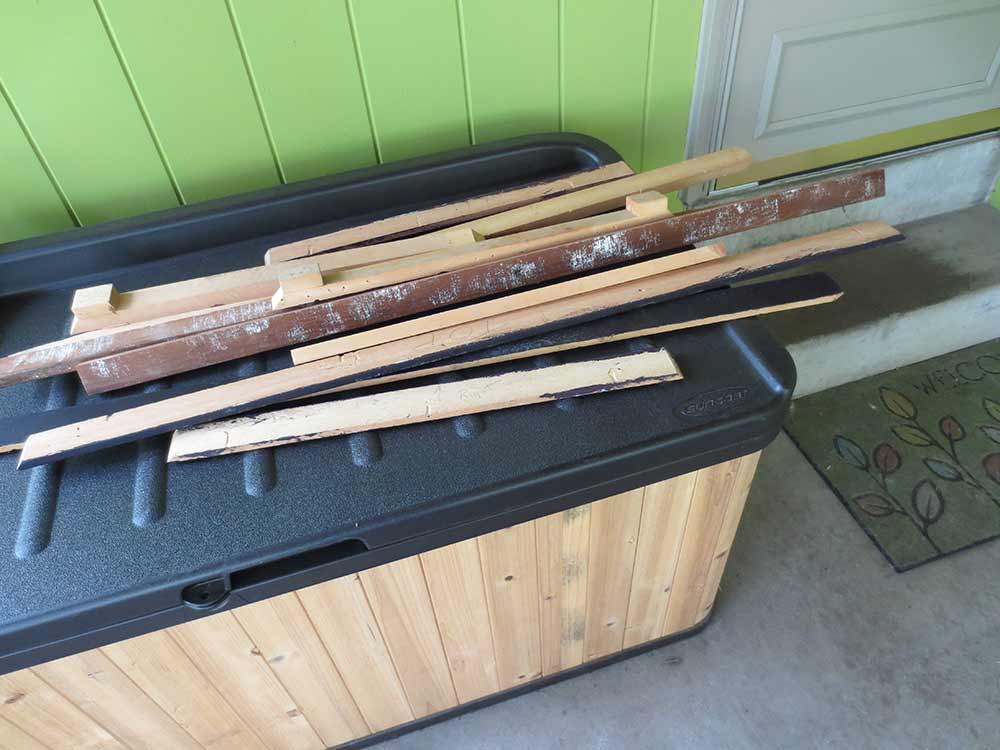 Then I dug around in the garage until I found some old scrap wood that would work for making the frames. The wood was all beat up with nail holes and dents, different sizes and colors — just what I needed to achieve that rustic, found object look.
 I cut the frames to fit each tiki back board, not worrying too much about making it perfect. The beauty is in the imperfection!
 Then I used some leftover dark stain to age the painted back board by brushing on some stain, letting it sit for a few seconds and then wiping it off.
 The stain filled in the grain of the wood and gave the painted wood board an aged look. I also applied stain to the frame pieces to make them have a slightly more uniform, darker color. Last, I nailed the frame to the back board using small finish nails and then added picture hanging hooks to the back of each frame.
 Step 4 — Glue on the faces
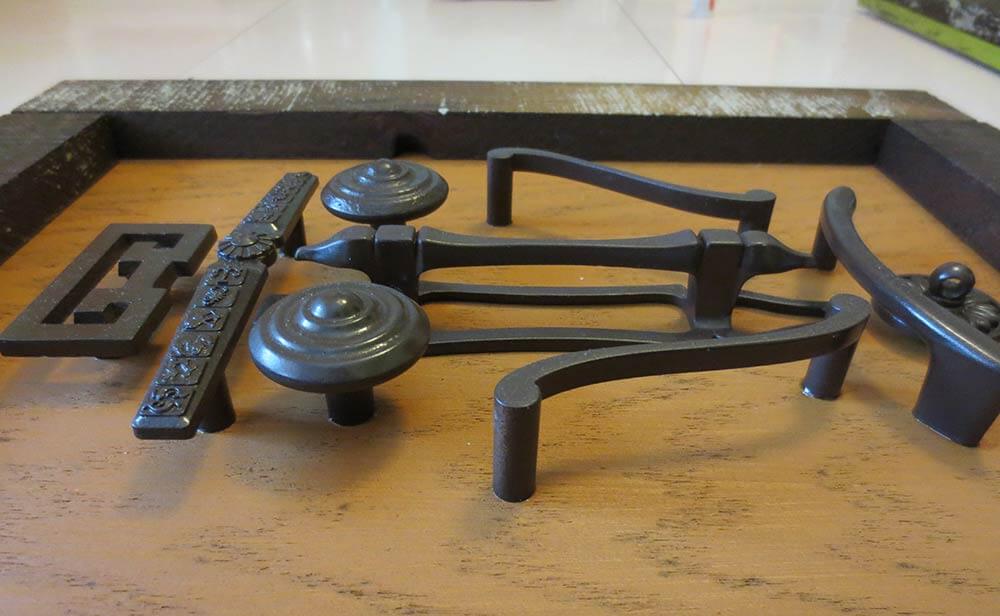
Using a glue that will bond wood and metal, or whatever materials you will be using, carefully glue the tiki faces onto the frames. I recommend laying out the tiki faces on the frames first to make sure that the placement is right — centered in space horizontally and vertically — and that you tweak the tiki faces so everything is in just the right spot. The location of each facial feature can make a big difference to the overall expression of the face.
 Step 5 — Hang and enjoy!
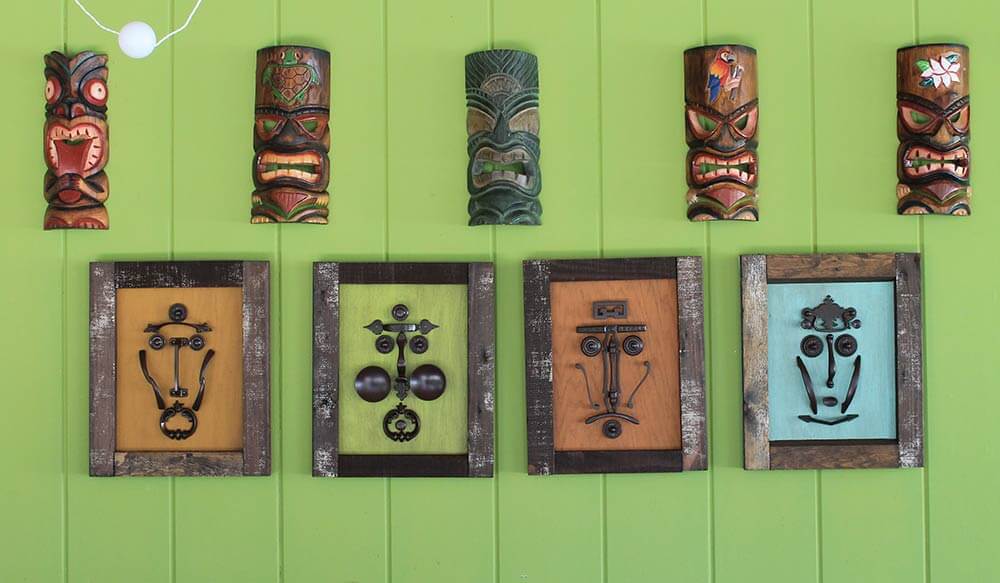
Pick a spot in your tiki room, porch, hallway or wherever you need a little whimsical, tiki-inspired artwork and hang up your new island friends. Heck, you can even give them names like I did for added fun.

 Which tiki is your favorite? I love the character you can create with just a few pieces of cabinet hardware, don’t you?
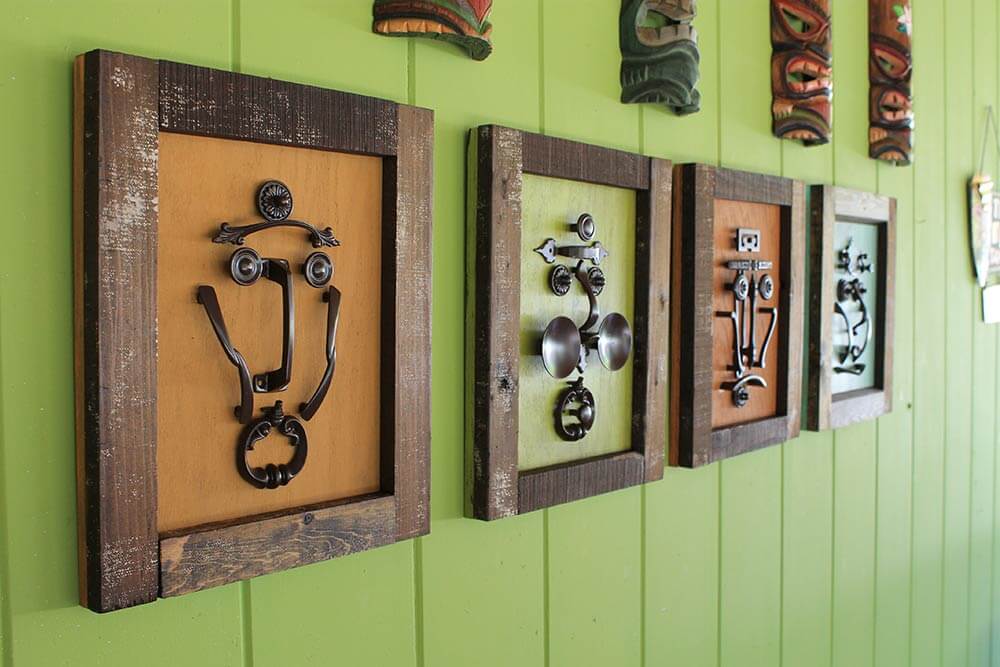
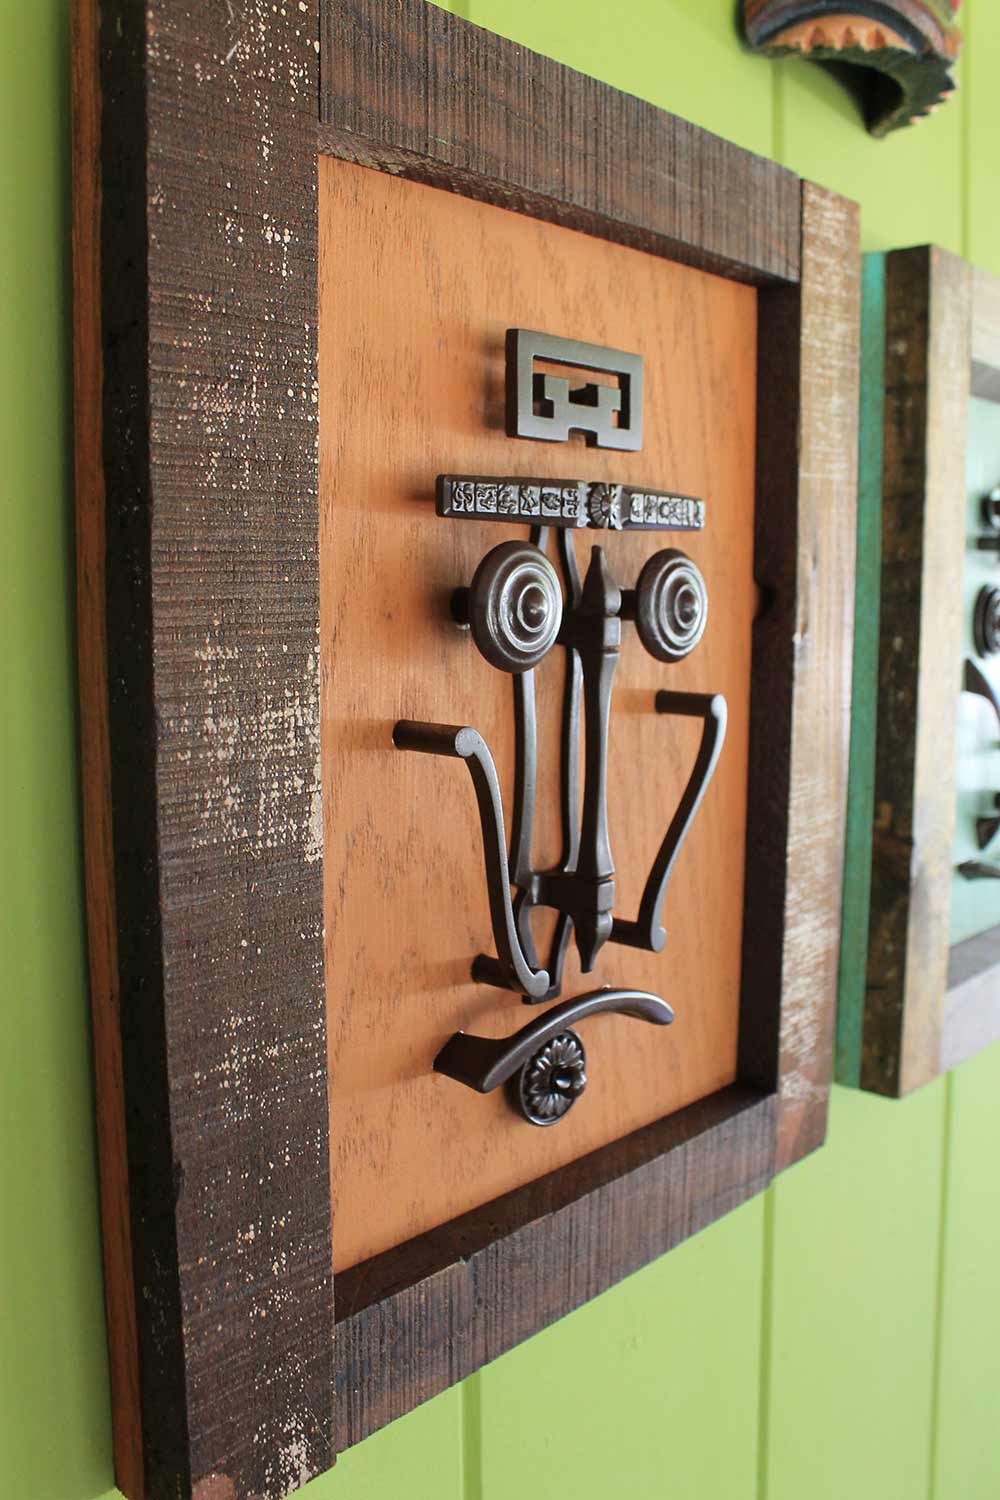 These tikis are great when viewed from any angle — the knobs and pulls have such great dimension and really add to the overall effect of the “carved” tiki face.
 Ok — who is planning on making some funky tiki face artwork this summer? If so, I’d love to see how your tiki faces turn out — send me photos of your finished upcycled tiki artwork to retrorenovationkate@gmail.com.


tammyCA says
Kate, you’re so creative..these are very cool. I’m always saving junk for crafting & collages.
These remind me of the funny bottle cap ashtray/nut tray men that people made and put on their bars. You should make one of those..save those bottle caps. Not long ago I found a vintage ’60s/’70s craft book that had the weirdest things to craft with…meat bones!
Mary Elizabeth says
Yes, the ’60s and ’70s were crafting fever time. I remember working on all kinds of crewel embroidery at that time, gluing seashells to mirror frames, sticking contact paper onto cardboard barrels for end tables in my dorm room, etc. My husband made jar candle holders by cutting wine bottles with a glass saw. I never did use old bones, though. That’s a hoot!
Mary Elizabeth says
Kate, I love this project for so many reasons: 1) It uses all the leftover bits of stuff (wood and hardware) we have lying around our basements. 2) It is evocative of the tiki masks rather than literal. 3) It has many colors, which can be used to harmonize with one’s decor. 4) It is just happy. 🙂 Nice job!
Proof positive that routine work (floor scrubbing, sanding, pulling weeds) frees the mind for creativity.
Enjoy your Hukilau Holiday, ladies. You deserve it.
pam kueber says
In my studies of vintage tiki, I quickly saw: Witco had wall sets like this — masks against different color solid backgrounds just the way Kate did it — in fact, Witco’s background colors were even brighter pop: The effect was Witco-meets-Mondrian.
Mary Elizabeth says
Kate has me going on remembering all the Arts and Crafts movement in the 60s. Here’s a non-tiki project that we could make with stencil paint and wooden door knobs:
ebay.com/itm/Vintage-Art-by-WITCO-Kitsch-Artwork-1960s-Flower-Daisy-Painting-MIXED-MEDIA-ART-/321414555753?pt=LH_DefaultDomain_0&hash=item4ad5cce869
pam kueber says
Yes, that’s a great one! Lots of potential with this idea. I think the key would be finding wood pieces with wonderful graining! Thanks!
Carrie says
I Looove those flowers! What an easy project to replicate…
Robin, NV says
Geez yeah. Considering the nearly $1000 price tag on those Witco flowers, you’re better off buying a few arts and crafts materials and giving it a go yourself. I mean, unless you’re a collector, of course.
Carrie says
Yah, and the 100 dollars to ship from CA to CA? Riggght. Me thinks they will be holding on to that for a while. Meanwhile, I found wood grain scrapbook paper at Michaels. HeeHee
Roundhouse Sarah says
Hilariously cool project Kate! You two have fun in Florida! I wish I was there too!