

 My husband has a saying, “Good. Fast. Cheap. Pick any two.” For most everything and anything in life, I have found this to be true. My annual January essay, The Hard Way, also underscores the often-frustrating journey that we have undertaken as Retro Renovators. New case in point: Susan’s amazingly detailed saga of her seven-months working to bring a beautiful vintage Youngstown kitchen back to life and into her home as her own. Oh, and Susan shares her positive experience with a small company in New Jersey that she found to carefully strip then refinish her steel kitchen cabinets.
Click on first image to start slide show:


Grabba cuppa, because Susan took no shortcuts with her kitchen renovation — or with her story documenting it for us. She writes:
Here’s a “start to finish” narrative of my retro reno, based on a set of late 1940s/early 1950s Youngstown metal kitchen cabinets.
FINDING THE CABINETS AND MAKING A PLAN
I was not scouring heaven and earth for just the right cabinets. Once, about a year ago, I had come upon a beautiful set of white metal cabinets with red countertops and curved Lucite tambour-like upper cabinets on e-bay. The kitchen had been in the Stella D’Oro baking family and was “to die for.” I had serious conversations with the seller, but, alas, there was no way to fit all those cabinets in my little kitchen (it’s “eat in,” but essentially a long rectangle with two tall windows on the short sides of the rectangle and 3 doorways breaking up the long sides of it). I hadn’t scheduled the time or money for a kitchen re-do, but every so often I’d troll Pam’s cabinet-sellers site or e-bay to see what was there. I hadn’t looked for a while in August 2009 when I happened upon a great set of white Youngstown cabinets for “$650 or best offer” on e-bay. My best offer involved waiting a month before coming to get the cabinets, since I didn’t have a renovation plan in place. Seller did not take that offer—needed to be rid of the cabinets as soon as possible, so I bought the whole set, including the cast-iron sink with ridged drain board, for $650. Of course, installing “new” cabinets in a kitchen costs more than a mere $650.This is the point at which every serious renovator has to decide her goals and her limits. I decided I wanted to make lots of cosmetic changes to make the cabinets look as “at home” as possible, but I wasn’t going to do much structural changing, other than replacing the cabinets. The windows and white faux-wood blinds were new, so they would stay, as would the lighting and the linoleum floor. These last two items were functional and wouldn’t detract from my overall plan. No walls needed to come down or go up.
I also decided that I am not the right person (nor is my male significant other) to do any of the actual construction, demolition, painting or physical work. As this story will reveal, however, there was plenty for me to do, and I do believe I can take credit for designing and overseeing this kitchen renovation.
I talked to folks who had undertaken kitchen renovations to get referrals, and I did an Internet search on historic and vintage renovation in this area. I started corresponding by e-mail with several potential contractors, giving them the outline of my vision. One interesting firm, a women-owned design-and-build firm called Myers Constructs, helped me solidify my wants and needs and told me that even without design assistance, the changes I wanted would run $10,000 to $15,000. This was a wake-up call which sent me to the bank to arrange some financing before proceeding. After getting estimates that ranged from $4,000 to $40,000 without covering the cost of painting the cabinets, I feel that this advice was valuable and on target.
MOVING THE CABINETS
To get the cabinets out of Washington DC, the location of the seller, and to East Lansdowne, my “just outside of Philadelphia” location, required my first added expense. I called a mover, but not just any mover. I found two different companies on line that are set up to move items purchased on e-bay, as well as other antiques (TSC Moving and Antique Transport, Inc.). Antique Transport could do it sooner, but charged more. It cost around $550 to move them, but this company also was located in the Philadelphia area and held onto the cabinets until I scheduled a painter and delivered them directly to the painter—totally worth it.CONFIGURING THE CABINETS
I used detailed measurements from the e-bay seller of the cabinets to figure out how the cabinets could fit in my space before ever seeing them in person. I used Microsoft Word tables function to envision different arrangements of the top and bottom cabinets. The entire set needed to fit on the one wall that housed my previous cabinets—a wooden set from the 1970s. One amusing glitch was a computer crash that erased these Word files while I was visiting my mom in Michigan. I borrowed a sharp pencil, a ruler, and some plain white paper, and recreated the drawings by hand (I had memorized the measurements by this time). It was the hand-drawn plans that I eventually submitted to the contractors—how vintage! Fitting the curved open shelves, one of my favorite features of the cabinets, was a little challenging. I couldn’t just pair them over the sink to frame an open window, as they had been configured in the seller’s kitchen, because (1) I don’t have a window over the sink, and (2) I couldn’t afford to give up the long, 18”-high cabinets that are now mounted over the sink and stove. With only one wall of cabinets, I needed as many as I could squeeze in the space. Also, I had to work very hard to get the bottom and top rows of cabinets to look balanced. The stove was staying at the far right of the wall, and the sink was going to be roughly centered in the remaining stretch of wall, but everything else was up for grabs. The final layout was facilitated by my contractor putting in spacers as needed and being willing to construct one narrow matching door-front for the bottom row of cabinets that is mounted on the edge of a wooden pull-out storage unit that holds boxes of foil and baking trays.GETTING THE CABINETS PAINTED
This is the step in the process that almost derailed the entire project. I had sunk $1200 into buying and shipping the cabinets at this point, and several times I considered cutting my losses and giving up. Based on some articles … I explored automotive painters and powder-coaters. We needed the surface of the cabinets to be shiny and rustproof. We have neutered cats who continue to mark vertical surfaces in our home, despite their testosterone-deprived state, and their “liquid deposits” had made a mess of the wooden cabinets. I couldn’t find an automotive painter willing to take the job, so I elicited some quotes from powder coaters and chose one that was reasonably priced and located near my weekend volunteer gig.The aforementioned shipper delivered the cabinets to the powder coater and I went to visit them and discuss their future the week following. This occurred more than a month after I purchased the cabinets (delivery occurring the following ten days, and delivery to the powder-coater about 2-1/2 weeks after that). Scheduling things and keeping in contact with everyone is one of the most challenging aspects of a remodel. Things always get delayed!!
The powder-coaters quoted me a price of $2500 for having the cabinets sand-blasted (a job they would send out) and powder-coated. They could not guarantee that the doors would not warp in their ovens or that that the sand blasting wouldn’t reveal areas that were rust through after the process. Also, their process would involve dismantling the cabinets hinge by hinge, and they were not planning to reassemble the cabinets. In fact, they couldn’t guarantee that some of the hardware wouldn’t break irrevocably in the process! After I agreed to these terms and put down a deposit of half the amount, I went home contacted Pam Kueber of Retro Renovatin. I needed some perspective. After Pam generously shared her time and wisdom (including the fact that Maaco automotive painters usually were willing to paint cabinets), I contacted the powder-coaters and asked if they could try the entire process on one cabinet that was extra (did not fit into my configuration) for a nonrefundable amount. They refused, so I pulled the cabinets from them. Again, I hired a mover, scheduled a mutually agreeable time, paid some money, and moved the cabinets—this time to my dining room! Now I had $1500 sunk into the project and little more than knowledge.
My next step was to take my show on the road, while I considered other options altogether. I put two cabinets in the back seat of my Corolla, so they would be ready to show to any and all possible rescuers. I proceeded to call my local Maaco store. They said, “Fine, come on over.” I checked the local architectural salvage web site and found they had just received a set of St. Charles white cabinets, so I told the wonderful owner I’d be over right after work. I visited modern kitchen showrooms and considered modern alternatives that would give me a similar look. I went to a media blaster, recommended by the architectural-salvage-store owner. The Maaco rep. said he could paint the cabinets after hand-sanding them for $1,000, but he also said, “They won’t turn out very good.” The media blaster (which would be a process for removing all of the old paint so as to possibly have a better result from the auto painter) also said his process would only result in a bunch of rust holes that would require extensive work, so he didn’t recommend doing it. The modern showrooms and costs attached did not produce any attractive alternatives (though looking at the new St. Charles cabinets was fun-fun-fun! I think they are a fabulous option for a grand space). The vintage St. Charles set was boxy and had corner pieces I didn’t need—and, most importantly, none of the chrome charm of my lovely Youngstown cabinets—even with the hideous gold paint (a shade browner than harvest gold) that accounted for several layers of what was visible inside and along some of the exterior sides.
During this time, I was also trying to choose a contractor, telling them they might have to put cabinets back together. Then I started asking them if they had any ideas for the painting of the cabinets. Enter JG Humphreys, a small firm (basically 1 guy + helpers) in New Jersey that I found by searching historic renovations on the Internet. They visited my house, as did two other contractors I was considering, and provided references. When I reported to Dan, the owner of JG Humphreys, the disappointing results of my “road show,” he suggested he come out and look at the cabinets in person. There was rust on them, scratches and dents in places, including the ugly gold/brown side and toe kick of one cabinet, and a cabinet that had attached to a stove hood had a huge round hole on its top and bottom. Even with all of this, Dan saw their potential and was convinced he could come up with a plan to paint them.
He’s in New Jersey and set up to do others if anyone else is willing to sink some money into it! I know he used a painting booth, and he just happened to take on a new worker with auto painting in his background just as he was getting started on my cabinets.
This process ended up being more expensive than the rest of the work the contractor planned to do on the kitchen (demo; installation of cabinets, counter, sink, faucet, new stove & backsplash; and painting of the room). The cabinet-painting was $4,000, and all the other stuff totaled about $3600. But $5500 for new kitchen cabinets in my favorite style and that could withstand cat pee did not seem that bad, especially considering how much brand new cabinets can run.
The most important ingredient was the contractor’s taking pride in the final product. Sounds corny but I was willing to pay if he was willing to give it genuine effort and come to the process with lots of problem-solving smarts! He’s a young guy, but obviously fearless!
So JG Humphreys was hired. They hauled the cabinets to their location, and although it took more than a month, they did a great job painting my cabinets. He took good care all the chrome hardware and accents, including the brand name plate on the front cabinet. He got it!
Some little issues that have arisen with the cabinet refurbishing are the latching of the cabinets—one latching mechanism was missing and he is jerry-rigging a new one—and the stickiness of the drawers, which seems to ease up with use. Also, one of the bottom cabinets had its own pull-out drawer that Dan set aside and forgot about until I reminded him!
DESIGNING AND UPDATING AROUND THE CABINETS
Some choices I needed to make once I started going down the white-metal-cabinet road were:
1. to keep or ditch the cast-iron sink
2. which countertop design and color to use
3. what color scheme to use
4. what, in addition to color, could be done or changed to tie in the rest of the kitchen
5. to get a truly vintage stove, a reproduction vintage stove, or a modern stove in a matching colorThey were resolved as follows:
1. COLOR & DESIGN I requested laminate countertop samples form barsandbooths.com, as well as visiting local kitchen showrooms to look at Formica and natural options. I love boomerang designs but I wanted a dramatic contrast to the white cabinets. I also requested glass tile samples (thinking backsplash) from SusanJablonmosaics.com. These cost a little bit, but it was worth it to see the product in person. In retrospect, a ¼-sheet sample would have been enough to tell me what I needed to know. I toyed with a coral scheme and a turquoise scheme (aqua being my favorite midcentury hue).
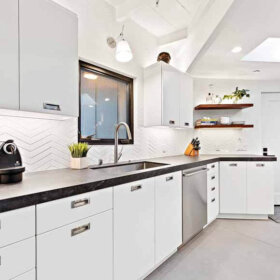
But I couldn’t shake the image of the white cabinet with the red countertop. I actually have a freestanding Geneva corner cabinet with this combo, and the beautiful Stella D’Oro kitchen was still calling out to me…. I must mention the 1940s galleries on Retro Renovation, specifically the 1946 glo coat kitchen!… The gallery illustration helped me focus on a vision! My floors may not be green, but gosh darn it, I can go boldly into that green red & white dreamland! Barsandbooths.com had a red cracked ice laminate that they used with metal edging for a sleek look. But what to do about the backsplash? My 1920s porcelain-topped table had a white top with black edging, but I had painted its wooden base a persimmon (burnt orange) color, with peach and yellow accents on the four wooden chairs. My Fiesta dishes were a wide variety of colors. I had a vintage cream-painted free-standing cabinet with black edging. I really didn’t want to repaint everything for a fully matching look—that seemed forced to me. But I did want to repaint the kitchen. It was a harvest gold that echoed the 1970s stove and sink, both of which were slated to go out the door. I found the Zen Funk mosaic design on SusanJablonmosaics.com and updated it to create something in red, green, and white, using the site’s Custom Blend Tile Designer (lots of fun!). I ordered more samples, and my color scheme was born: green walls, red countertop, white cabinets, and green-red-and-white glass tile backsplash. The rest of the room would just be accents to this zingy colorfest!
2. SINK I decided to ditch the sink, even though it was a very cool vintage model with ridged drain boards on either side, because it would have taken up countertop space, of which I have very little. I wanted to see the red and use the red! Also, the sink was substantially rusted and would have been very expensive to rehabilitate. After investing in the cabinets, I didn’t want to overspend in other areas. The $10,000 to $15,000 estimate was about all I was willing to devote to the project. Hubby and I chose a cast iron double sink with a low divide, but because it was standard size (35 long by 22 back to front), it didn’t fit the recessed under-sink Youngstown cabinet. (The fake top drawer panel juts out a bit, so a sink cannot span the entire space from front to back of the cabinet because the bowl of the sink hits the cabinet doors.) By the way, our old harvest gold sink was about 25 x 20! With some quick work on the Internet I discovered a stainless steel sink that was 32 x 18, with no divide. It reminds me of a chemistry lab sink! And it was in stock at the home store. The faucet that I picked looks a little like a soda fountain, which is fun, even though I’m really NOT trying to recreate a diner here! The faucet fixtures had to be narrow to fit the remaining space.
3. TYING IN REST OF KITCHEN To get some of the new color scheme in other places and to tidy up the look of the room, I decided to replace the current blue plastic recycling bin and plastic Rubbermaid trash can. The attached photos show the results. The cabinet houses two pull-out bins for recycling. It was created to my exact specifications by barsandbooths.com, so it matches my countertop exactly. Also, check out the 1970s nutone fan to the right of the cabinets. It’s one part of the old kitchen that finally looks at home!
4. STOVE I looked at the vintage reproductions by Big Chill and Elmira Stove Works—very expensive and only really fun if you’re getting one of the zingy colors. I had enough color going on in my kitchen, so I decided to get a modern self-cleaning gas stove in white. I tried to get black grates for the model I chose, but decided that they weren’t worth the extra money.
I’m finally moved in to my new kitchen. Unpacked boxes all weekend! Have a glass of champagne (or break a bottle over a metal cabinet) in my honor! Here are a few pictures of that last space saver (& solution for the width of the cabinets being just a bit off), my foil drawer! Also, some of the open shelves with dishes on them. Kitchen is in use & not as pristine as the other photos I sent. It seems happier now!
That’s my story! And seven months after the journey began, I do feel it has all been worth it…. Thanks for being there and for keeping the love of this stuff alive! By the way, I haven’t felt this absorbed and guided by forces beyond my control–and not always in a good way–since beginning to plan my wedding–also an off-beat retro affair, though it didn’t start out that way. Even we feminists can’t always resist the gender-based programming of our upbringing. I think one of the reasons for embracing the 50s style is to reclaim it, with all its efficiency and style, as real art and true usefulness, rather than representing the golden age of housewivery. Is this a religious experience? THANKS, PAM!!!
Best,
Susan
Susan — woah. Thank you so much. By this point I am speechless – and so are most readers, probably. Yes — this is A LOT OF WORK. But yes — you know that I agree: It’s worth it! Your kitchen is gorgeous and most important, you look like one happy camper. Enjoy!
Susan’s Resources List:
- J.G. Humphreys — For stripping and refinishing cabinets
- Bars and Booths — for red crackle ice laminate countertop, aluminum edging and recycling center cabinet
- Susan Jablon Mosaics — for Zen Funk mosaic backsplash designed using the Custom Blend Tile Designer
- Home Depot — for 32 x 18 stainless steel sink
- Rev-A-Shelf pullouts: spice shelf …. peg board …. foil and tray holder
- White self-cleaning stove from Frigidaire
- Canisters that drove the color scheme: snagged from ebay


Anthony says
Hi Susan
I just read your story and I am impressed with your tenacity. I just picked up 17 metal kitchen cabinets (I over paid) that need refinishing, but the timing is right as I am having my kitchen redone now. Not sure if I will need all 17. I reached out to JG Humphreys hopefully will hear back.
Christine says
Thank you so much for detailing your travels and thought processes Susan. I think it is a long hard process to embrace the old and stick with it. It would have been much easier to rip out your kitchen, install ikea cabinets, marble backsplash , hardwood
floors and then have a kitchen like everyone else. It’s people like
you (and Pam) that motivate me to roll up my sleeves and keep a bit of history in my own house instead of taking the quicker expedient route.
Linda Psomas says
Well done Susan!
AH says
That looks so nice. BTW, what is that exhaust fan unit next to the stove?
Mick DiSalle says
Wow! Not only was I inspired and amazed, I was shocked to see that you live in the next town from me, Susan! (I’m in Clifton Heights) The kitchen looks F*A*B*U*L*O*U*S and i am in love with the colors you chose! I hope you have hears of happiness and service! Good job! ~ Mick.