


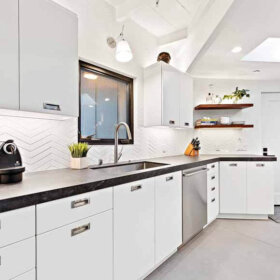
 Readers Cathy and Dave have been slowly renovating their 1914 Arts and Crafts Bungalow in Buffalo, New York, over the last several years, trying to undo years of neglect, poorly executed “fixes” and adding modern day conveniences (like having more than one countertop outlet in the kitchen). Initially drawn to Retro Renovation through their research on VCT flooring, they found a wealth of other helpful information and sources for their vintage kitchen remodel. Initially intimidated by installing VCT flooring, they realized it wasn’t that difficult and are extremely happy with how their flooring — and kitchen as a whole — came together. Continue reading to get all the details… and to see 9 more photos. Special thanks to photographer Biff Henrich of imgink.com for permission to use the lovely “after” photo — what a charming kitchen!
 Cathy writes:
Our house is older than mid-century (a 1914 Arts and Crafts bungalow), but Retro Renovation has been a great resource for us.
When we bought the house nearly 16 years ago, it was definitely a “fixer-upper” but it had good essentials — including a front porch, nice woodwork (hidden under layers of paint) a back deck, and working fireplace. Alas, the kitchen wasn’t one of the selling points. It had a poor layout, almost no counter space, particleboard cabinets, and a wacky assortment of cheap wall treatments – fake brick, contact paper, and cheesy paneling. The floor was part beat-up wood (actually a sub-floor) and part crumbling tile, and other “features” included a dropped ceiling and a single counter-top electrical outlet. Finally, the window (the only replacement window in the house) had been installed sideways so the crank was in a hard-to-reach upper corner.
We made some changes to the kitchen as time went along. Slowly all of the bad wall treatments were replaced with fresh plaster, paint, and real wood wainscot. But the main features remained.
After many years of researching and dreaming, we finally took the plunge and renovated last summer. We came up with the new floor plan ourselves, ultimately fine tuning details with the advice of our contractor and the cabinet salesman.
How It Worked: We had a contractor do the demolition, as well as electrical; plumbing; and installation of the subfloor, cabinets, countertop, and window. We did the wall painting and installed the floor and wall tile ourselves. Dave built the framing around the window (inside and out) and built the interior trim and extended the wainscoting using materials from Home Depot, Lowe’s, etc. We’d like to add a ‘thank you’ to our contractors — Jeff Ingersoll and his staff at Ingersoll Painting and Construction — and to George Siwy at Artisan Kitchens and Baths for their expert help.
Kitchen floor: We chose Armstrong Excelon VCT… decided in part by reading this blog. (Salespeople tried to talk us into other options, like sheet vinyl-but they just didn’t look as good.) After installation, we emailed Armstrong to ask about recommended cleaning products, they responded very promptly. It’s worked out fine, and we really enjoy the look. For anyone considering VCT, don’t be scared by those who say that it’s hard to install and maintain — it’s not!
Kitchen backsplash tile: We used American Olean white ceramic subway tile in white. (The yellow pencil-trim tile had to be custom made, so we had to wait about 6 weeks for them.) This was our first tile installation project, and it was really fun!
Kitchen countertops: Staron (similar to Corian) in Sanded Onyx. We wanted a dark color to create a more definitive horizontal line in the kitchen. We love the look, but it does require more everyday cleaning and maintenance, as water spots and spills are very visible.
Kitchen lighting: We bought a schoolhouse-style fixture from Rejuvenation catalog, augmented by ceiling canister lights.
Appliances: To stay within budget, we’ve kept our current stove and refrigerator for now. But we added a dishwasher (a luxury!) and replaced our sink and microwave. Maybe someday — a cool red fridge made by Big Chill!
Challenges: The electrician had some difficulty with metal-lath walls and plumbing in the ceiling, forcing unplanned relocation of lights and outlets.
Overall: It came out the way we’d hoped – we wanted the kitchen to fit the design of our bungalow. We didn’t increase the size of the room, but our storage capacity, lighting, and working space are so much better. We love walking into our cheerful kitchen now! As you can see from the “before and after,” we were able to make a pretty significant change on a reasonable budget, and it’s a great feeling to walk into our cheery kitchen every morning.


Cathy and Dave’s vintage kitchen remodel hits very close to home for me, since I did a very similar gut remodel to the kitchen in my first house — an 1890 Colonial Revival — with some of the same problems (especially in the kitchen) that they faced in their 1914 bungalow. It is wonderful to see other homeowners tackling such a big job — and getting such great results. With a vision, some creativity and lots of hard work — it is possible to have the vintage kitchen of your dreams. Thanks so much for sharing your kitchen transformation with us, Cathy and Dave. Give yourselves a pat on the back for a job well done.
See more stories about Kitchens with Checkerboard Floors here.


Cathy says
Thanks so much for the kind feedback, everyone! We really enjoy reading Retro Renovation and seeing so many creative ideas – and connecting with people who cherish (and have fun with) classic design!
tammyCA says
Awesome! Such a vast improvement from the before & definitely cheerful. I have an apron in the same retro kitchen fabric, which I super love!
Your house is charming…I’m always happy to see an historical house kept as intact as possible.
People just don’t need to make ginormous living spaces – in the past they had larger families than today and cooked & ate 3 huge meals a day in small kitchens and it seemed to work out just fine for them…(this is what I think about every time I see the hideous monster houses that engulfed once quaint houses around here…honestly, they are the ugliest things ever…sorry, I get off track).
Great job! 🙂
Lauryn says
What a great transformation … I’m guessing your patience with the “before” kitchen really paid off in the end, giving you lots of time to figure out how to make the space more efficient for your needs. And what a sweet, sweet house and welcoming porch!
Susan says
Hi there!
We just bought our very first house, a mid century modern in Washington state. It was virtually untouched from the original design of 1954 (complete with the original architects plans!) with high post and beam ceilings and (unfortunately) lots of single pane glass.
We’re slowly renovating without losing the history and charm, and we love the exposed post and beams, but we are dealing with lighting issues. Wondering if you have come across this and if you found any remedies (other than drywalling over the wood, even though this would give us better heat retention over the winters, but we adore the beauty of the original wood ceilings). Right now, we are having to run our pendant lights from the plugs, up the wall, and across the ceiling to where they should hang. In some instances, it looks fine, but we have been diying it and wondering if others have had the same issues?
Thanks so much!
Susan
Jana (Berniecat) says
Love, Love, Love the renovation!!! You went from dark, dull, depressing (need I go on?) and created a wonderful light, bright and lively kitchen that radiates warmth and life!!! Awesome job! p.s. I made my kitchen curtains out of the same Michael Miller fabric 🙂
Kate H says
It looks so great! The old kitchen makes me nervous just looking at it. Love all the changes you made.
Suzanne says
Beautiful job!
Tracie@MiddleClassModern says
This is such a great remodel. Thanks for the reassurance on using VCT tiles. I’ve been wavering.
Mid Century/Mid TN Mom says
Kate: From the first picture all the way through the write-up, all I could think of was your first home and the kitchen remodel that you tackled and succeeded in there! Someday you should do an article on that remodel … it was an incredible transformation. The long summer of no kitchen, cooking on the grill and the microwave and doing dishes in the bathroom sink were definitely worth it on that one.
Mid Century/Mid TN Mom says
Oh .. .just checked the link … guess you did do a pretty complete article on it. Memories!
Kate says
🙂
Robin, NV says
This gives me courage to do my own kitchen remodel. My kitchen is in good condition but there are those little things that could use fixing. I’m mostly afraid to dig into the wiring. I’m sure an electrician is going to see dollar signs when he sees my kitchen.
Beautiful remodel and an amazing transformation. I’m sure Cathy and Dave are loving their new space.