

If you are looking for an “easy DIY Christmas ornament wreath” tutorial — this ain’t it. To make a truly stunning ornament wreath, you need a lot of ornaments — and even more patience. This tutorial says 4 hours to make a wreath, but I usually spend 10 hours or more, spread over a few days, to complete a wreath. The way I think about it: I’m making a 3-D collage, aiming to put attention and artistry into each element. And there’s no rush — I’m out to enjoy the process — not just to “get this off the to-do list”.
That said, making a DIY Christmas ornament wreath is a totally doable project — a super-gratifying art form for those of us who can’t paint, draw, or sculpt — once you have a plan in place. To help you make an gorgeous ornament wreath sure to become a treasured family heirloom, I’ve fine-tuned our tutorial, video, and 30+ tips — gathered over more than a decade of wreath-making experience personally and from Georgia Peachez herself.
More than a decade of experience making Christmas ornament wreaths – vintage and new
I published our first tips on how to make a vintage Christmas ornament back in 2010. They were straight from Georgia Peachez, who was a pioneer in the art of vintage Christmas ornament wreaths — I first showed one of her creations Christmas Eve 2009. As far as I know, those first instructions were among — if not THE — first on the internet, helping to launch a gazillion DIY Christmas ornament wreaths ever since and continuing still.
This updated tutorial is even more expansive, including a video and lots of tips from my own, friends’, and readers’ wreath-making experience.
If you want to make art, but are not good at painting our drawing, this is a great craft to take up. So far, I’ve made more than a dozen wreaths — they’ve become family heirlooms to all I’ve gifted. Not easy… but if you take your time, spectacular!
Video: Kate makes a Christmas ornament wreath using our tutorial
Before or after you read our tutorial, check out the video that Kate, managing editor, made showing the wreath-making process start to finish. She used mostly vintage Christmas ornaments, as I recall. Note, Kate was an Art major and is a graphic designer by trade, so she has super design skills and makes the design part look easier that I, for one, find it to be. I take my time — lotsssss of time, to get my design just so!
Step-by-step guide to make a Truly stunning Christmas ornament wreath:
Time needed: 4 hours
Steps to make a DIY Christmas ornament wreath
- Study the designs of the other wreaths
Just like searching out photos of interior designs so that you can refine your own taste and learn how to pull a room together beautifully, I’d say the first step in this whole process is to look at a whole lot of ornament wreaths online.
To help, I put together this gallery of 39 wreaths — including 15 from Georgia Peachez — completed over 12+ years of wreath-making.
Are there certain color wreaths that appeal to you — you’ll want to collect ornaments and weebits for those colorways. Can you “visually deconstruct” the different elements of favorite wreaths and learn from them? Perhaps even print out some ideas and keep them close as you make your wreath. I almost always get some new ideas when I spend quality time looking at other, nicely done wreaths. Google Images is another great place to look, search Christmas Ornament Wreath, and tons of wreaths come up.
In my book, Georgia Peachez is and will always be the master of this art:
- Gather LOTS of ornaments to make your ornament wreath
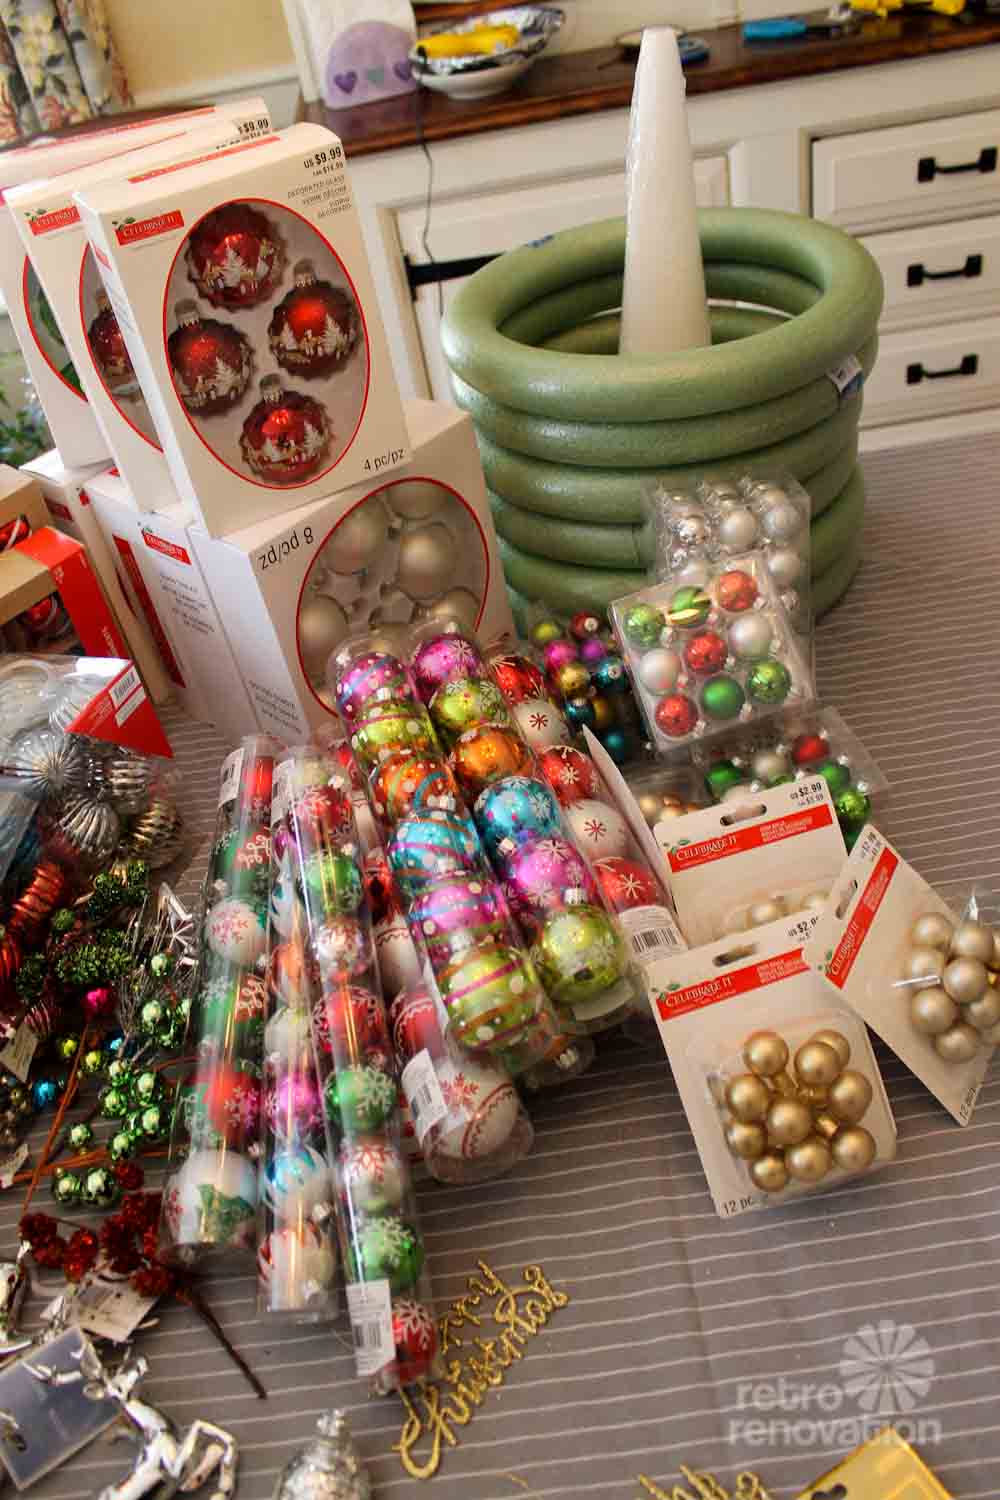
You need ornaments and lots of them. Depending on the size of your wreath form, on how packed you can or want to make your wreath, and on whether you count tiny balls, a Christmas ornament wreath can take from 75 to 150 ornaments. I typically use a 14″ wreath form, and will really fill my wreath, and generally lose count after 125.
You need ornaments in a variety of sizes. Full-size 3″ ornaments work great for the exterior perimeter of the wreath, and good news, this size is easiest to find. If you’re doing the center circle, I’d recommend sizing down. And, you need all sizes for the top layers. Also really key: Tiny ones to fill in little open spaces and add whimsy-doodle to the front of your wreath. “I use every size from 1/4″ and up to fill in all the gaps,” Georgia Peachez says.
Different shapes are good, too — bells, lanterns, teardrops, the kind with concave thingies in them… different shapes, sizes, and textures all add dimension and visual interest.
Ornaments made of different materials also are out there. I collect and use vintage ornaments, and usually try to work in one or more decoupage ornaments. I like the ones wrapped in macrame. And gimme disco! For most of the ornaments, I use the the glass ornaments, not today’s shatterproof plastic. Although, some vintage ornaments are not glass…and if you’re making a wreath using new ornaments and you like the plastic kind, go for it.
Note: A reminder that there can be safety and environmental hazards in the surfaces, layers, materials and products in our homes. For example, there have been reports that lead paint may have been used on old Christmas ornaments, old tinsel may have been made of lead, and old fake “snow” may contain asbestos. I am not the expert: Get with your own professionals — do your own research — on these topics so that you can make informed decisions how to handle. For more info and links see our Be Safe/Renovate Safe page.
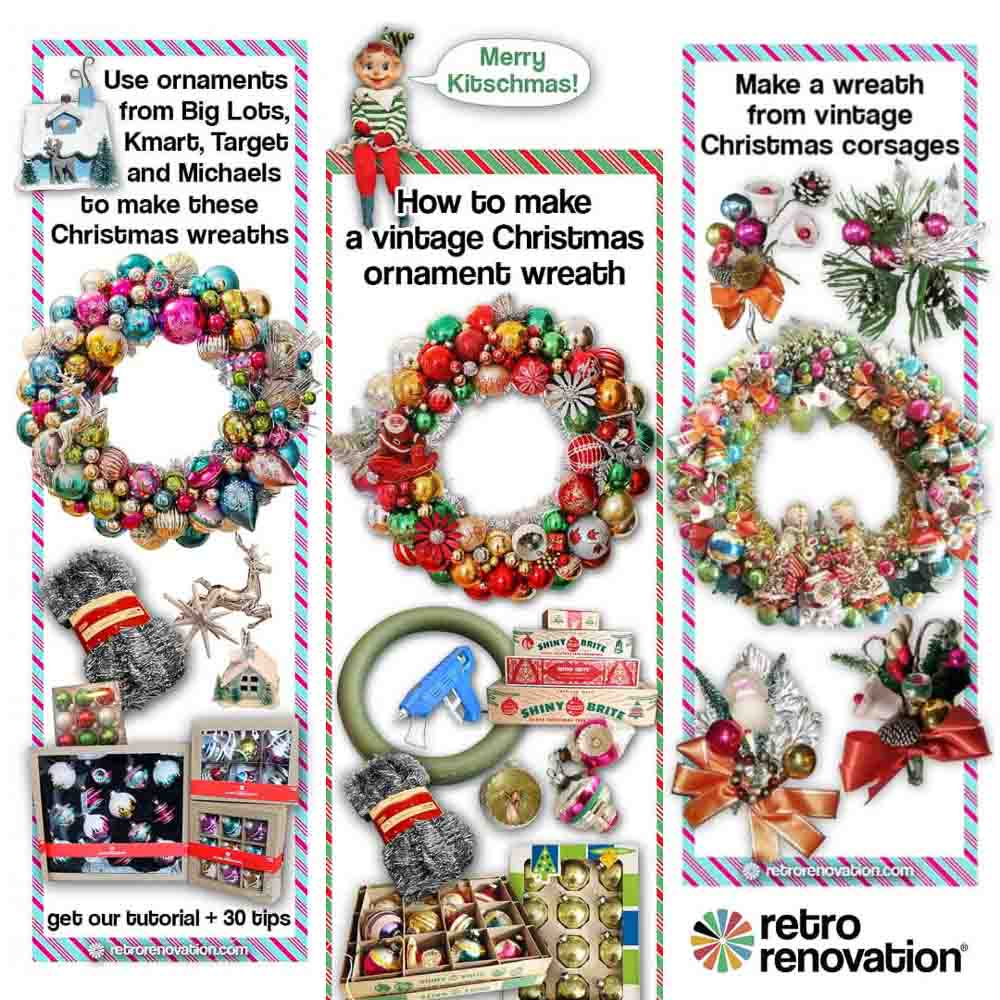
Where to buy ornaments: For vintage ornaments, search on ebay, etsy, facebook marketplace, craiglist, estate sales, thrift shops, and family and friends even (if it’s not too awkward). Vintage brands I have identified: Shiny Brite, Coby, Bradford, Paragon, Commodore. For new ornaments, shop Michael’s, Big Lots, K-Mart, Joanne’s, Target, Home Goods — even Amazon — Christopher Radko ornaments, he licensed the Shiny Brite name, are good options. (affiliate link).
While my wreaths use mostly vintage ornaments, you can also make wreaths out of all new ornaments. See this story for the two wreaths I made completely from new ornaments.
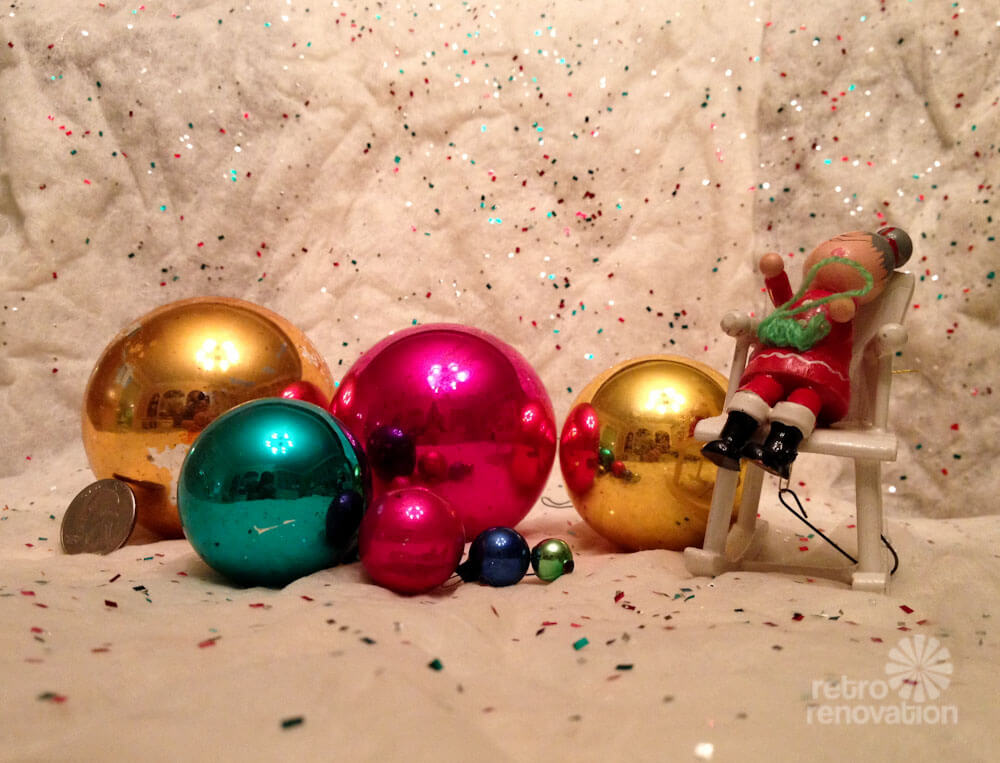
Here’s a photo of the different size, solid color ornaments I have collected over the years – seven sizes, at least!
- Don’t forget the “wee bits”
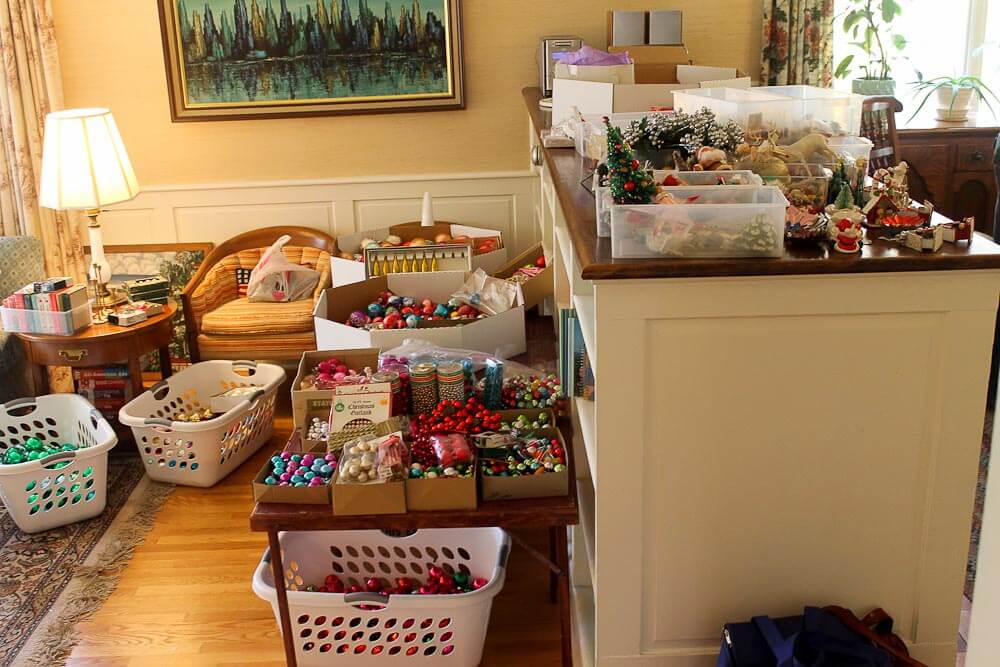
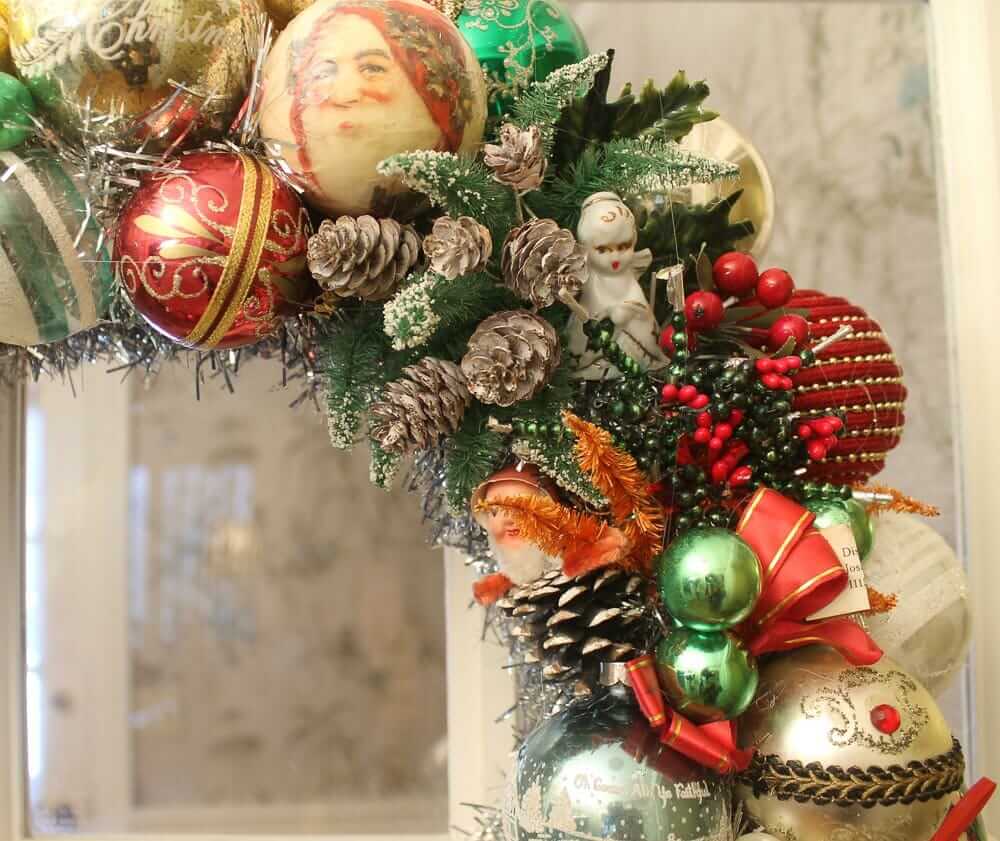
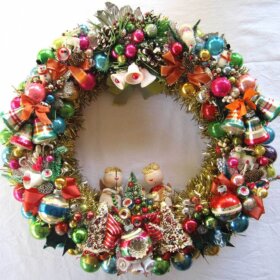
Use vintage Christmas weebits — knee-hugger elves, small wooden ornaments, small ceramic decorations, pine cones, floral pick greenery, tiny bottlebrush trees, and more — to incorporate into your wreath, create focus areas, fill in gaps, and overall all, just plain dial up the impact.
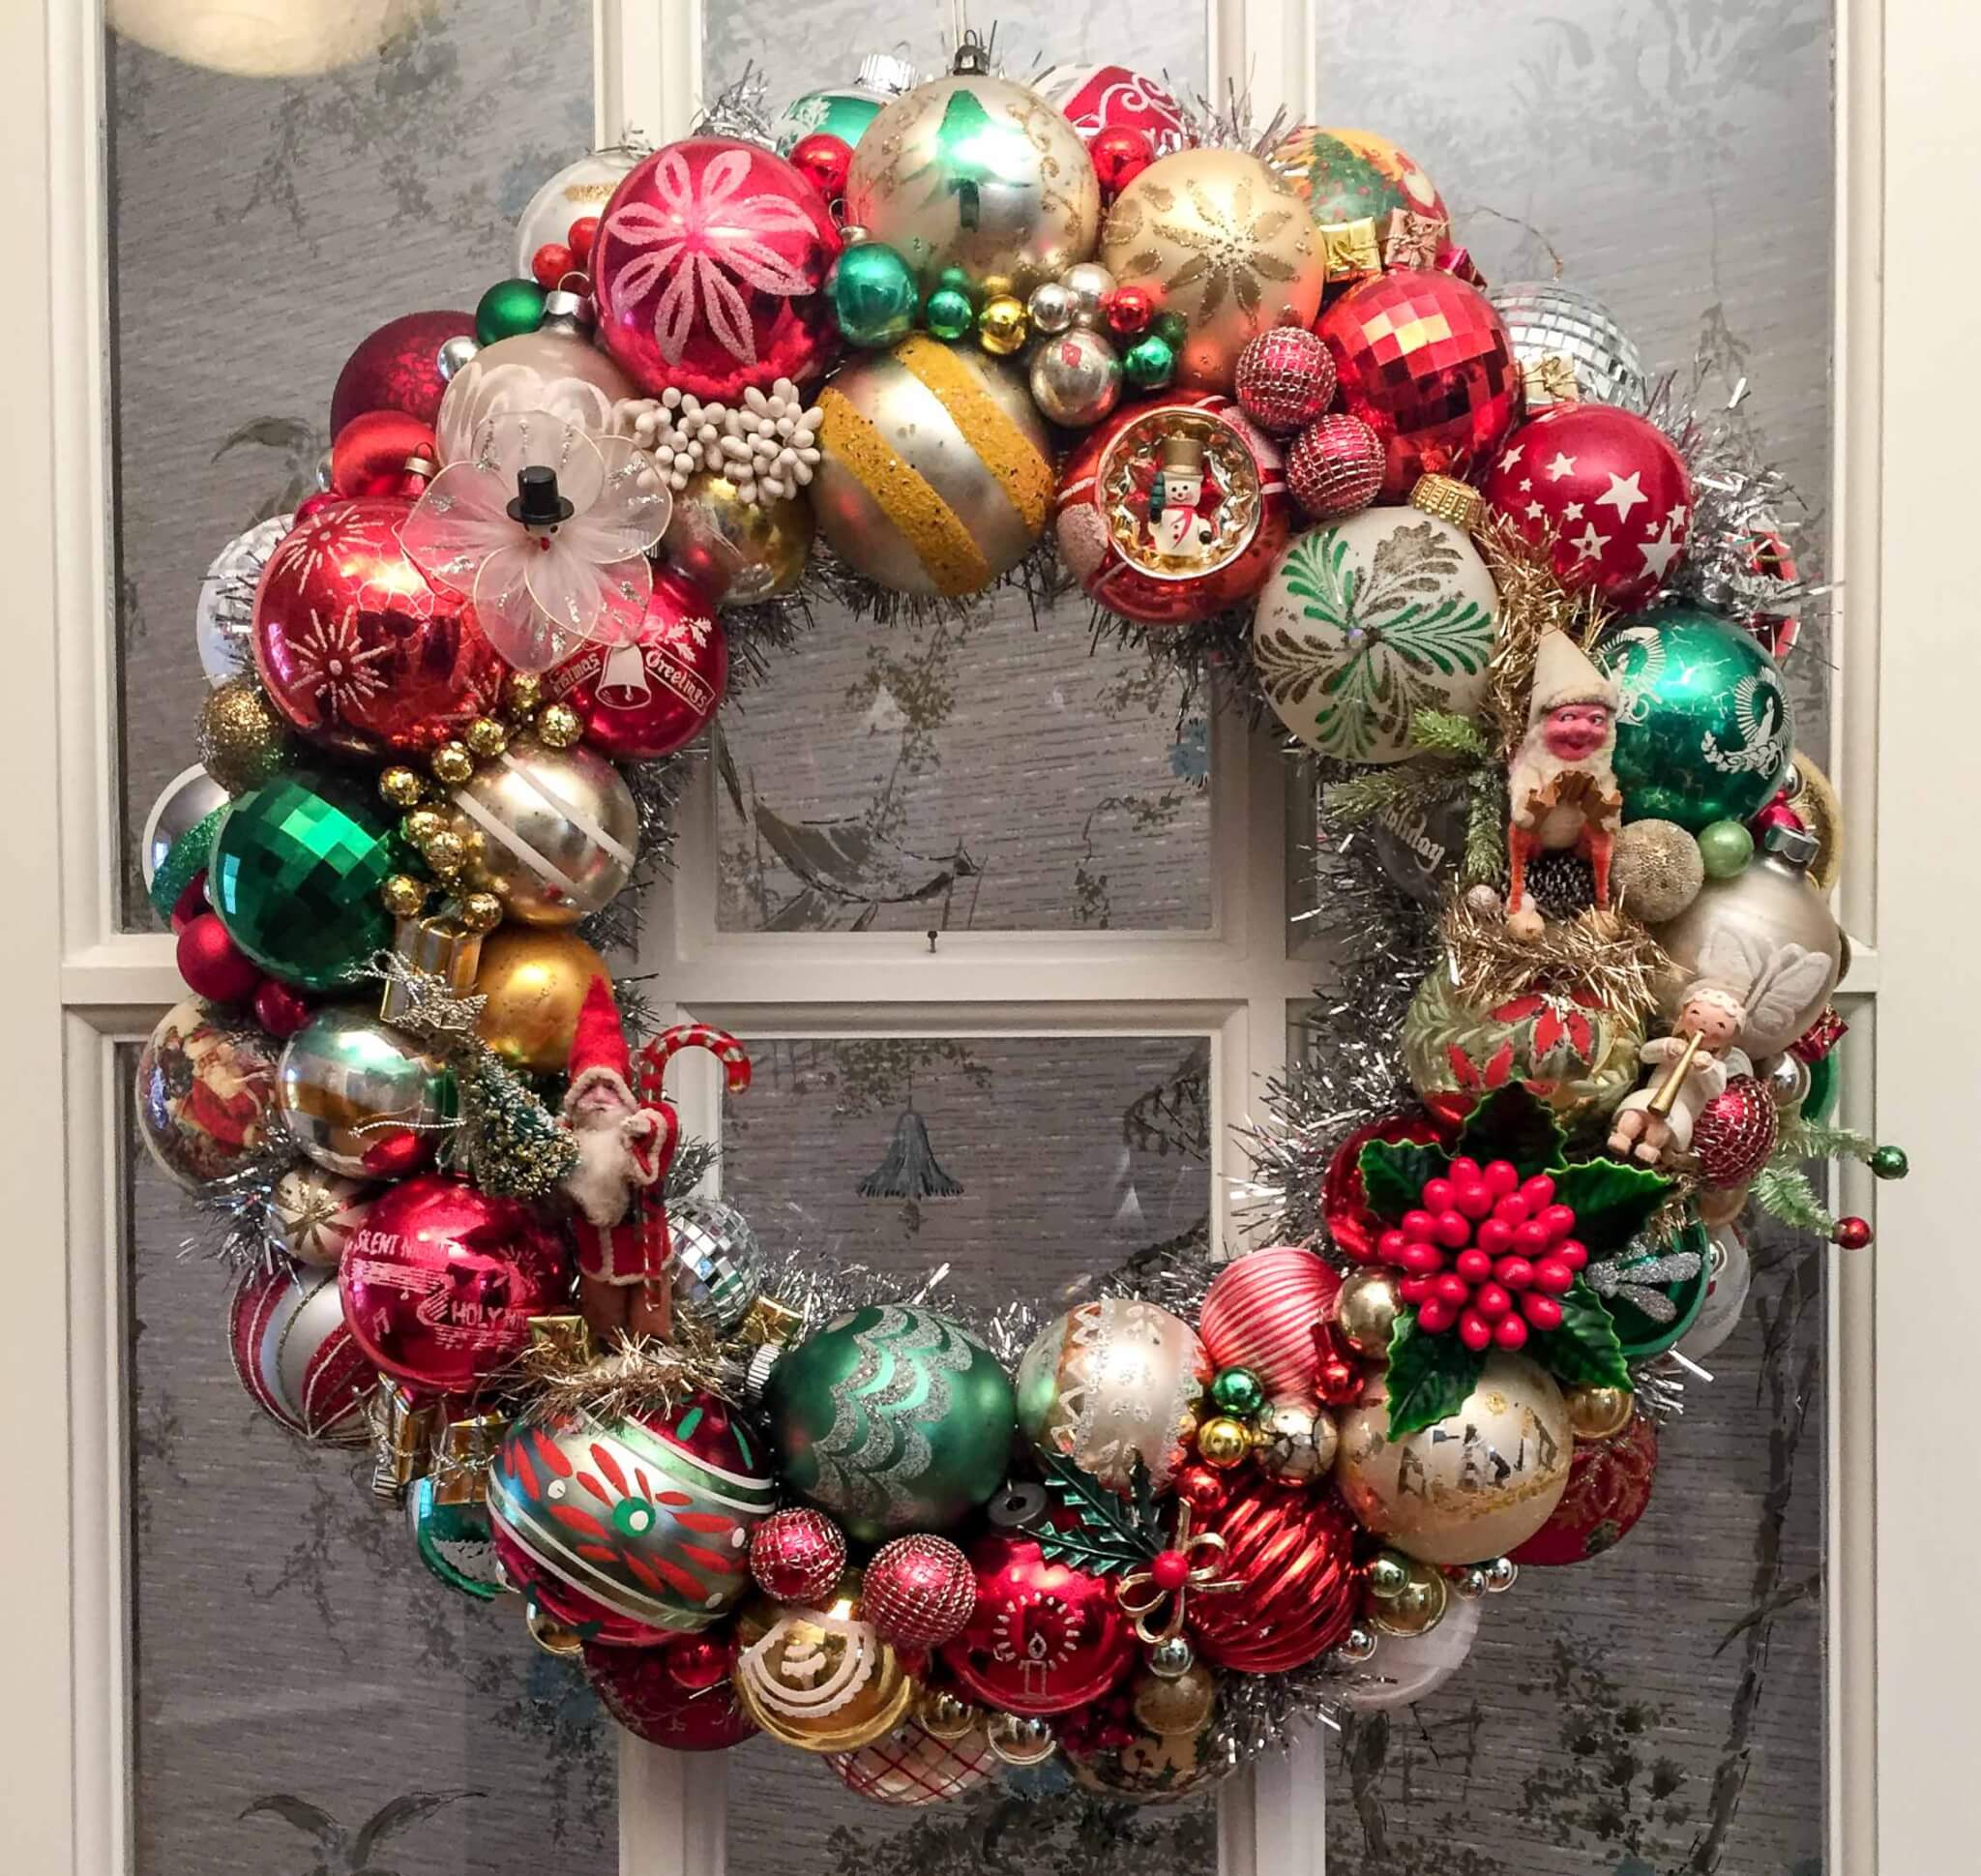
Inspect the following wreath and you can see the variety of weebits: A little gold owl, a pine cone and leaves pick, a Christmas corsage with pine cone Santa, a little house ornament, a ceramic angle, sprigs of fake holly, and the folk maiden. This one also has a reflector with bulb in it to look like a flower (I call this an ornament, not a weebit.) This wreath mixes lots of things up!
- Buy a wreath form and thick, shaggy tinsel
Wreath forms — We used 14″ foam wreath forms, but you can get them in various size. Tip: At one point I was able to buy wreath forms in bulk. Recently, not, though. Tip: Shop early at Michaels and/or Joann’s and bring your coupon(s).
Tinsel — Buy thick, shaggy tinsel garland. The thicker and shaggier, the better to hold the glued ornaments in place. Also, I like to see the tinsel peeking through the center of the ring. I try to buy mine vintage, at estate sales; for some reason, it just seems better quality, plus I love me my vintage. New tinsel garland is easily found at Wal-Mart, Michaels, Big Lots, etc.
- You need a high-heat glue gun & sticks
High-heat hot glue gun and glue sticks — Kate and I generally go for the latest version of the Surebonder High Temp Glue Gun (affiliate link). Note: You might be able to beat the price/value by shopping at Joann’s — with a big coupon. Repeat: You need HIGH HEAT glue gun and the sticks to go with. - Other supplies you will need:
Scissors to trim garland if necessary
Wire to hang your wreath
Wire cutters to cut wire to length
Elmer’s school glue + glitter, if you want
Vinyl cloth to cover your work area — I look for holiday-themed vinyl tablecloths at estate sales, and even though it’s sometimes hard to see ornaments among the pattern of the tablecloth, it sure helps makes the room even more festive! - Decide on your color palette or theme
Think carefully about your color selection. An easy rule, if you are nervous about this step: Use only one, or two closely-related colors, or red and green, and then mix them with the classics, gold and especially: silver. Also, you may do just a pastel wreath… or just a strong-colored wreath. I have seen examples of wreaths that use “all colors” or “more color” and they can be gorgeous, too. I’m just saying that, in general, if you are nervous, editing your palette is a more assured way of getting great results. It will also help you prune the ornaments that you want to work from, keeping some off the table.
When I make a wreath, I also might give it a theme. The one at the top of this story was “Antique Christmas” — I wanted the wreath to be… tarnished looking. On the gold wreath below, I recall I was aiming for gold + a wee bit of woodsy.
See step #1.
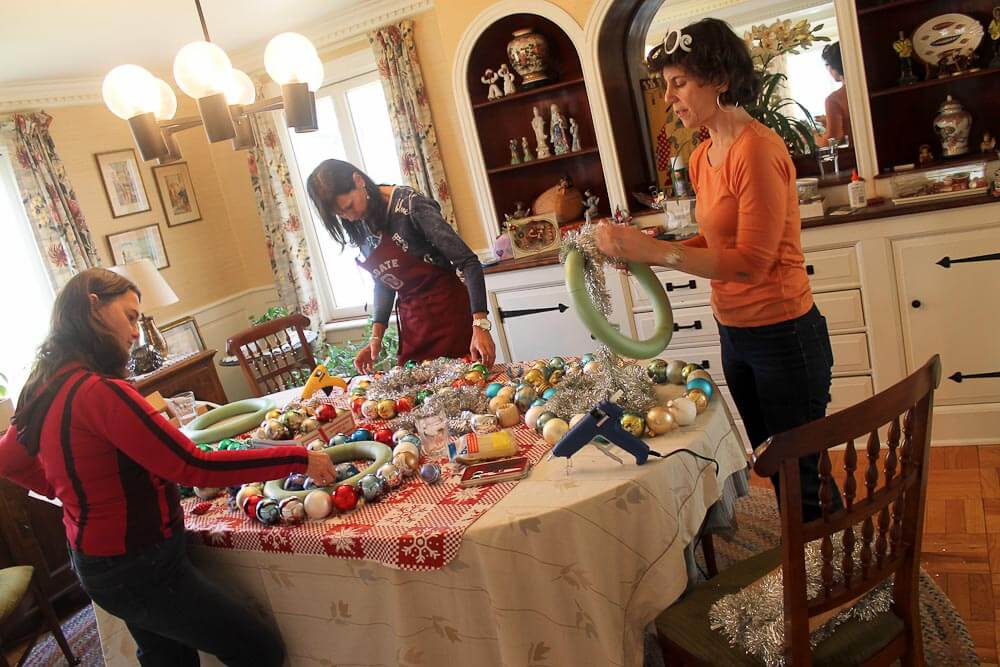
- Pull everything together in a roomy work space
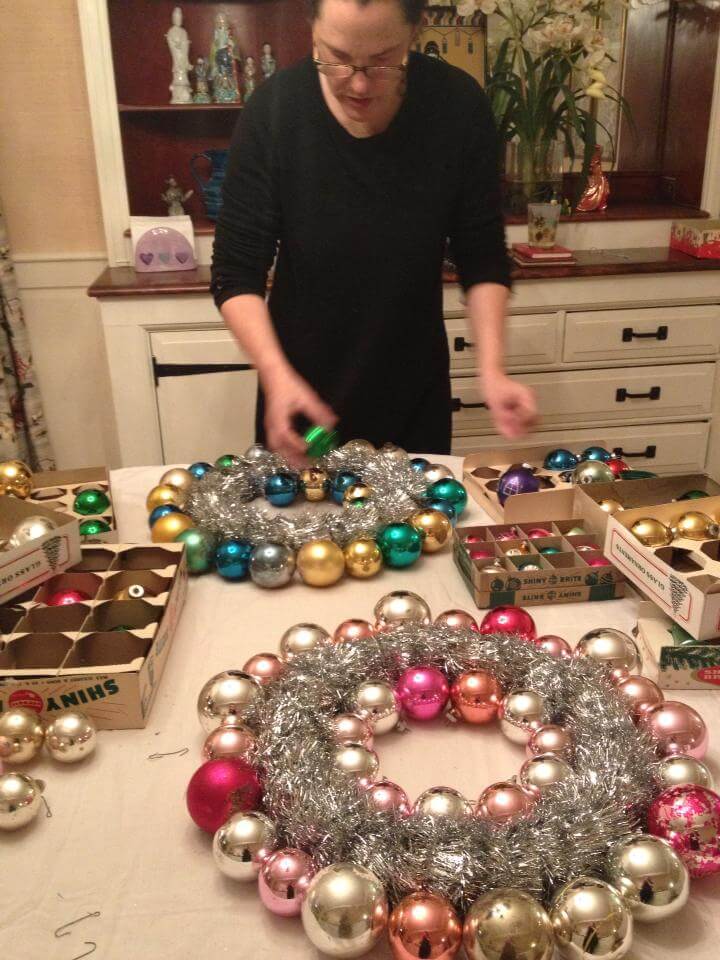
I like to have my main work surface — my dining room table — relatively clean so that I can really see my wreath as I’m working on it. So, I stage ornaments and weebits on the built-in bar next to the table. You could also use a separate work table or tables to hold your ornaments and weebits in waiting. As I get going, I “shop” the ornaments on the bar or nearby table or floor and bring what I need or want to “play with” over to the table.
Don’t forget the snacks and music. Time to pull out the Christmas CDs. The Chipmunks are my personal #1.
- Add wire to hang the wreath
The first thing to do with your wreath form is to add the hanger. Georgia Peachez told us, “I do a very simple wire hook on my wreaths. I cut floral wire about 14″ long, bend in half to make a loop, put behind wreath, bring legs around and thru to front and over again to the back, wrap each around loop. Done. This is after tinsel wrapping. Virtually disappears when hung on wall because you are so stunned by the magnificence of the wreath :->”
Here’s a wreath I made using this method — I hung the loop on a small wreath hook:
- Wrap your wreath form with tinsel garland
Now it’s tinsel time. Wind your tinsel garland around the form… adding dabs of glue to secure the tinsel to the form as you go… keeping the tinsel pretty close together – fluff it up as you go. I always need more than one tinsel garland — this is not the time to be stingy — full and fluffy tinsel = good! On the other hand, I don’t think you need to go overboard with the glue. I only put the glue on one side of the wreath form. This technique has held really well, over many wreaths.
Remember: Use the thickest, chunkiest tinsel garland you can find! - Glue large ornaments to the outside ring of your wreath form
The first ornaments to go on the wreath go on the outside perimeter. I think it’s best to use all the same size. I use the standard large ones – approx. 3″ balls. I glue them at the same level as the table and the bottom of the wrapped wreath. That is, when you are done gluing on the perimeter ornaments, they will “sit” flat on the table.
Dollhouse Kate makes ornament wreaths: - Decide whether to glue ornaments to the inside ring of the wreath form
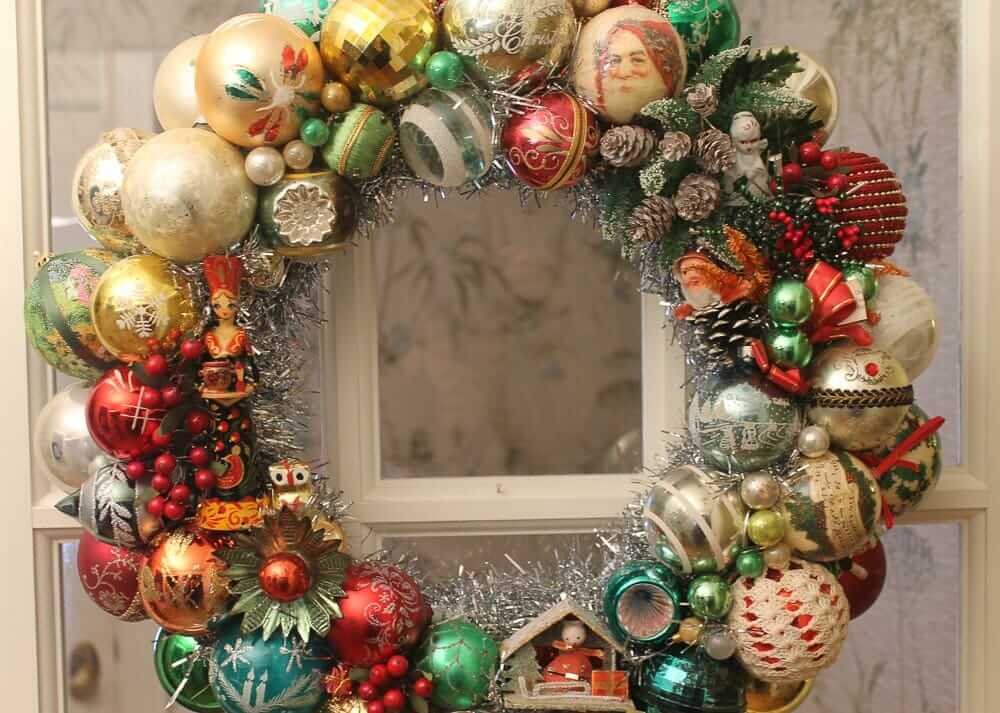
I glued ornaments on the inside ring the first time I made a wreath. “Pro” this method: I think that having the two rings makes it easier for new wreath-makers to build up all their ornaments. For the inside ring, I’d go with slightly smaller than the outside ornaments. “Con” I think the white space of a open ring is more aesthetically pleasing.
However, I now always skip the inside ring. “Pro“: I like seeing more “white space” inside the wreath — I think the wider open hole “frames” the ornaments on the wreath better. “White space” or “empty space” can be an important design element — I like seeing that hole in the middle! I also like to see the tinsel — sometimes I will tuck in some more to get the look I want. Georgia Peachez says that she likes to live the interior ring empty so that she can “build into” the center with her ornaments placed on the top/front. “Con“: It’s fussier to build a wreath this with the interior ring left open, but I like the challenge. While making a wreath can be done in as little as three- to four hours, I usually take… 1o hours or so!… to make mine. I try to really ENJOY — not rush through — the process. Slow crafting– that’s me these days!
- Continue “building up” ornaments to create your wreath design
Start gluing. In general, we used two dabs of hot glue on each ornament: #1 to secure it to the wreath substrate. #2 to secure it to the ornament adjacent — this seemed to add extra stability. Fortunately: The glue gun glue is darn forgiving: If a bit spider-webs, it pulls off the ornaments easily.
The hardest part, of course, is filling out the wreath. This tutorial says the whole process can be completed in four hours — and it can — but I’ll often work on a wreath over the course of two or three days before I consider it finished — 10 hours or more, in all — also aiming to “enjoy the process” itself.
Think carefully about your design as you go — take it slow. Try to keep it “balanced” in terms of color, size, shape, material of ornaments, and in terms of the “weight” of each focus area. Step back… step away… and glue status permitting, tip up or even hang your in-process wreath up to see if you like how your plan is shaping up. This is… a form of 3-D collage, I’ve found. Mix and match ideas before you commit to glue, and before you know it, you will be the proud creator of a STUNNING vintage ornament wreath!
Should you double-dab your glue? I am a double-dabbler. Yes, I put an initial dab of glue on ornaments to adhere them to the wreath form (or nestled between other ornaments) at the “bottom.” Once I’m happy with the placement, I add another dab connecting one ornament with another adjacent ornament for added stability. I try to do this in a place that is as inconspicuous as possible — you don’t want to see glue anywhere, ideally. By starting with just one dab, you may have the opportunity to cut the ornament away from the tinsel if you decide you don’t like it’s placement. Use sharp pointy scissors and work very carefully. Finally, if the glue spider-webs a bit, it pulls off the ornaments easily.
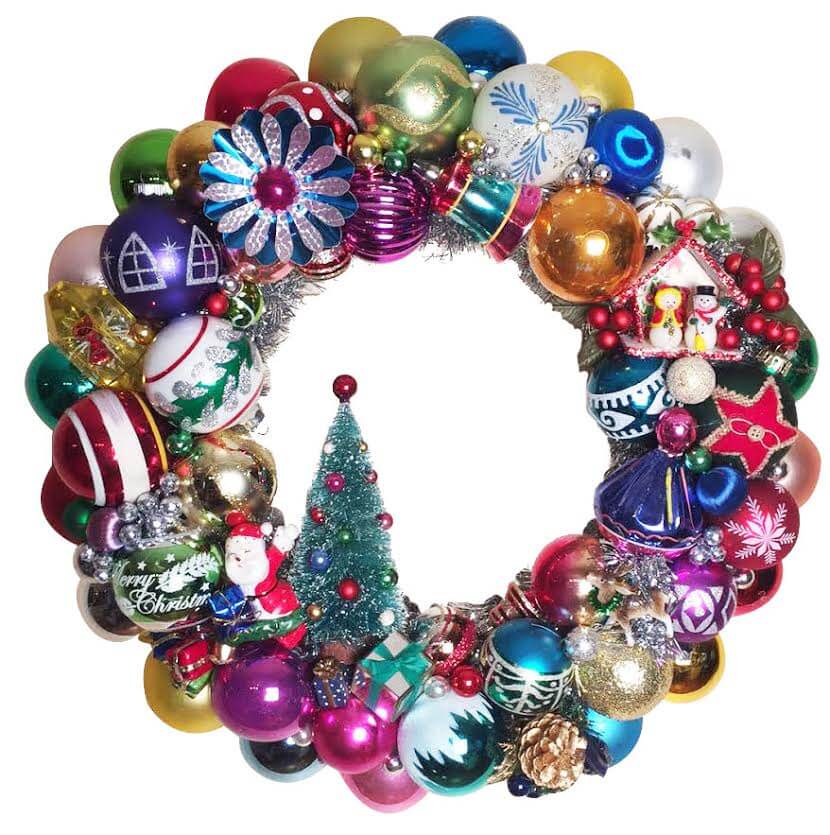
- TIP: Consider building three “feature” areas
I read once that the reason to put things together in threes makes a design more visually dynamic, because as humans our tendency is to look for pairs and when we don’t or can’t, we kind of stop in our tracks. For my wreaths, I generally create three “focus areas” — usually at 2-3 o’clock, 5-6 o’clock, and 9-10 o’clock. Or some such — three areas equi-distant apart on the wreath. I usually put the “heaviest” focus areas at the bottom, in respect of “visual gravity.” There really are no rules to this, though. I’ve seen all kinds of beautiful arrangements done!
The snowman ornament… the tree with Santa and Merry Christmas… and the flower power reflector arrangement demonstrate both these concepts:

- Fill in the gaps and consider glitter
Collect small ornaments so’s you can fill in the gaps. I also use tweaks of tinsel or greenery from floral pics for this sometimes, but try not to overdo it.
And, I learned from Georgia Peachez that if I want to bedazzle some plain colored ornaments, I can use Elmer’s to add a little accent ball of glitter. Of course, I try and collect vintage glitter, too!
Tiny Christmas ornaments fill in the gaps:
- More tips to get the best results with your ornament wreath
Tips straight from Georgia Peachez:
I always use thick, shaggy tinsel. Ornies grip it better. Thin, pitiful tinsel is a bad move.
You can get a decent full size gun for high temp gluing at Joann’s for $20, less the coupon they constantly have, so it is very reasonable at $10-12.
High temp glue is absolutely CRITICAL.
I don’t put ornies around the middle of the ring. Doesn’t work for me, makes it harder to design on top. Many times what I’m placing on top needs to hang a bit into that center space. I don’t recommend it.
Don’t recommend displaying wreaths outside or even on a porch. I think the cold would shrink the glue too much and then you might get more pop offs. I don’t do it, so I don’t speak from experience here.
I make mostly multi color wreaths, but composition is everything. The colors must balance, everything must balance. Lop-sided wreaths make my OCD tendencies flare up real bad. Your instructions on that were spot on.
Advise readers: Don’t glue vintage ornaments to an evergreen wreath form. DON’T DO IT. They do not hold up over time.
More tips from my wreath-making escapades:
I got much better at designing, with experience. If you want to “practice” before committing to your precious vintage ornaments, you can make one or two wreaths using all-new ornaments. With so many new vintage-look ornaments available today, you might not be able to tell ‘much’ of a difference.
One of my friends said, “I thought the building of little groupings and then filling in between them worked well for me.”
Taking a break and stepping away would be good advice. And, I broke a couple but glued them back so they were hidden! 🙂
Relatedly, I ‘hang’ the wreath if I want to make sure that certain elements sit vertically straight, assuming I want that effect. Sometimes, though, I prefer to tilt feature areas.
Identify your “big winner” ornaments for the front of the wreath — make sure you give them the most prominent position — build the other elements around them. Clear case in point: Knee-hugger elf should be a star of your wreath!
Massing of smaller elements like this — in particular in threes — works very effectively.
I like having the metal parts of vintage ornaments showing on the front of the wreath. Sometimes I’d have them hidden or tucked under, sometimes I have them show. I like the patina of the old metal.
Don’t worry about having the tinsel underneath show. You don’t want large gaps, though — play with your ornament configurations before committing, and be sure to have a big stash of the tiny orbs to “fill in” before you get going!
Sometimes I cut small pieces from the tinsel garland and stuff them into the wreath for an accent and to fill a gap. I find that the shiny white metal of the tinsel helps make other ornaments stand out. Don’t overdo it, though.
If you want to make your precious vintage ornaments go further only use plain ornaments for the outside and inside rings; plain vintage ornaments are easier to collect, and you can get new plain ornaments pretty easily too. Save your decorative vintage ornaments for the highly-visible top part of the wreath.
Overwhelmed? Try my story on making Three-Step E-Z Wreaths.
Invite a friend — double the fun! - Hang, enjoy, and bask in the glow of compliments — and your wreath!

- How to store your wreath
You’ve spent so much time making your wreath, be sure to protect it! I typically find wreath storage containers made of a strong plastic at Big Lots and Target. Go early in the season, because they do run out. They also can be a bit pricey — but my experience is that the sales prices also launch pretty early. I wanna say: I usually can get one for $8-$12 on sale. I see the brand I usually find locally also is on Amazon (affiliate link) – but the price is much higher on Amazon; I guess I would go that route only if I were really stuck. I also found cardboard wreath boxes at U-Line. They work fine too. - If the ornaments come loose after a few years
Over the years, when the holidays are over, I have been storing some wreaths in my attic. I live in Massachusetts. In the winter my attic is super cold. And in the summer, it gets very hot. Over time, I noticed more loose ornaments. So now, when I bring wreaths down from the attic, before I take them out of their boxes I carefully check for loose ornaments. After carefully lifting the wreath and putting it on a covered surface, I take the opportunity to reglue ornaments sturdily in place. I am a double-dabber, no question. Also, this is a good time to make changes if you want. That is, on one wreath I am working on this year, the ornaments were so loose that I was actually able to pull off some ornament groupings so that I would rework the areas. See this story for more.
So there you have it! Click here to read all our stories about wreath-making — lots of photos and more tips on supplies. - And: Save your vintage ornament boxes
Oh, one last thing! Don’t throw out your vintage ornament boxes. Use them to make ornament box dioramas — or, I think there’s actually a market for selling these to other crafters for this purpose. Don’t store your ornament boxes in humid places or they may… wither.


Lisa Compo says
These wreaths are so beautiful. You have done a wonderful job and the tutorial was very informative. I must admit that it makes me a little sad that the ornaments will never again grace a tree, but I suppose they can be just as beautiful forever in this configuration. I would like to know how to keep one of these clean…just dust it off with a duster or the sweeper from a good distance? I am sure mine would be dusty in a few days.
You are really getting my creative mind spinning with these. I love Christmas decorations so these wreaths have really gotten under my skin to make something soon. 🙂 I don’t have a good spot for a wreath so I have been thinking of other ways to make something similar. I wonder how it would look to use one of those styrofoam pyramid cones and do this same procedure. It would look like a Christmas tree shape with large ornaments on the bottom and decrease in size as you went up. I don’t have any vintage ornaments so I might have to improvise and see what Target has available to make one.
Until then, I will continue to admire the pictures that are coming in and steal a few ideas from folks. I sure wish those knee hugging elves were made these days, maybe I will finally buy the Elf on the Shelf for myself. LOL
Jane says
You can get the little elves from Vermont Country Store. They have a set of 3 small elves for 19.99 and 3 larger ones sold separately for 12.95 set for 29.95 and a ladder too. I also just got 2 boxes of new vintage ornaments and I just love them. They’re a great source for retro Christmas goodies. vermontcountrystore.com
Brian T says
They all look great! Here are a couple of other angles that people might want to consider:
The smooth green cylindrical foam forms are a lot sturdier than the flat whte scratchy kind. I’d warn against using the white scratchy styrofoam because it’s really easy to see it snapping with disastrous results.
The dyes on these vintage ornaments may not be very stable or light-tolerant (especially the reddish dyes). It’s one thing to hang a vintage ornament on a tree indoors; it’s another to place it in lots of direct sunlight for weeks at a time. I’ve had some “old world” blown glass ornaments where some colors have completely faded away. If your wreath-hanging spot gets a ton of direct sun, you might want to reconsider how valuable your vintage ornaments are to you.
June Cahill says
I totally agree with Brian – also I’ve tried ‘dusting/cleaning’ some of the old ornaments using a damp cloth – NO NO NO!!!! The paint/color will rub right off – always ‘clean/dust’ lightly! with DRY cloth – I’m not as prolific as Suzy, but to date, I’ve made over 60 – so I’ve got a bit of experience!
pam kueber says
How about turning a blow dryer to no-heat setting and blowing dust off?
June Cahill says
Great tip! I’ve used the blow dryer on ‘high heat’ to ‘disconnect’ ornies – I’ve broken a few (but surprisingly FEW, like 3 or 4 – once their in the wreaths)…and needed to take them off and replace with others – the heat from blow dryer works great to loosen the glue. Just don’t get it too close to the garland – it, too, will melt under higher heat.
Also, I used every color of garland – as long as it’s thicker…and pick that up at thrift stores anywhere from .50 – $1.00.
Robin, NV says
OK, regarding the cocktails. Really guys, a screwdriver and Jack Daniels? Clearly some egg nog with brandy is the correct beverage for this project. Mulled wine or hot toddies would work well too. Or my personal favorite – peppermint patties.
pam kueber says
I wasn’t really prepared re the cocktails….
Robin, NV says
How can you be the retro hostess with the mostest if you don’t have a fully stocked bar? 😉
For years I’ve been wanting to do a Kentucky Derby hat decorating party – mint juleps and key lime pie will definitely be served!
pam kueber says
Not key lime pie — Derby pie! Check it out – pecan pie with chocolate added. nom nom
Robin, NV says
According to my friends from Louisville (pronounced Lewuhville), key lime pie is a must on derby day. But a pecan pie with chocolate? Oh lordy that sounds good.
pam kueber says
I went to high school in Meade County, KY. All my kin live in Louisville (pronounced Lewahvull :), I will see what they say….I could well be out of touch.
Robin, NV says
Hah! Of course – Lewuhvull.
pam kueber says
yes – that is an even better ‘spelling’ with the uh
Lisa Compo says
I love the idea of a KY Derby hat party…naturally you’d have to invite them back for Derby Day for the real party. I am KY born and still here but my Derby Pie is a little different version than Pam’s. Mine might be wrong but I’ll share it with you–it’s good anytime and easy. Crap-now I want to make one. 😉
1/2 cup melted margarine,1 cup sugar, 1/2 cup flour, 2 eggs slightly beaten, 1 tsp vanilla, 3/4 cup chopped walnuts, 3/4 cup chocolate chips. Mix in order given, pour into 9 in. unbaked pie crust, bake 350 degrees in vintage oven (LOL) for 30 minutes.
Cebette says
Hi Lisa, I live in Louisville and your Derby pie recipe is almost identical to mine except I use pecans ’cause I like them better! They’re good for all occasions- no need to wait for Derby- I’m taking some to family Thanksgiving. Can’t say I know anyone who does Key Lime pie for Derby but hey, it’s always good too!
Lisa Compo says
Hi Cebette, I think maybe next time I make a Derby Pie I will use pecans and see how it turns out. I love most any kind of nut so either would be great in my book. Another thing I like a lot are the little pecan tarts. Mmm Anyway, I have never heard of Key Lime Pie on Derby Day either, but usually to me the more desserts the better. 🙂
Jay says
They look great! Thanks for all the technical insight. Answered all my questions. I always wondered about the ornament’s metal caps and loops – hiding them because it’s not always possible. I will have to start accumulating a stash for next year. I think the large ones are not as bountiful to find because they were probably not manufactured in the same quantity as the mediums plus bigger equals more fragile and more likely to break when they bounce on the floor when dropped.
Interesting that Suzy doesn’t do the interior perimeter of her forms. It wasn’t readily apparent to me looking at her creations.
pam kueber says
Thinking about the pros vs. cons of lining the inside perimeter:
– I think that if you are not as confident of your design skills, lining the interior of the ring is a good idea — it assures a symmetry of design because all your toppers fit into the symmetry of the round structure.
– If you are more confident of your design skills — as Suzy surely is — you can leave the center open and depend upon a balanced asymmetry of ornaments reaching into it, to achieve a beautiful outcome. And, the plush garland has its own beauty. In contrast, if you are not as skilled, you risk your intruding ornament design looking like a hot mess. Although… even with that said… I think it’s hard to imagine almost any design not being beautiful. I, on the other hand, like Suzy, am pretty OCD. See how Danielle is bothered by the two little blues ending up in the wrong place on her wreath? Perfectionistas beware… and if you fall into this category and are a novice at the wreaths, lining the interior may be a safer way to start.
DIane in CO says
I think Danielle’s wreath is breathtaking, but wondering — is it possible to “break off” a tiny ornament like that, then cover the remaining fragment with a different (color) ornament? Would that risk doing damage to adjacent ornaments?
Might be good to know your take on “undoing…..”
Lisa Compo says
Being a fellow OCDer..those little blue ones would drive me crazy, too. I think the easiest solution is to get a few more and put them at the top and sides and sort of balance it out that way. Just tuck a couple more in so those two strays don’t look so lonely.
Jay says
Thanks for that insight. I would probably do as you did. I sort of prefer to have an overall design instead of imagining it on the fly. This Fall I put down a small slate landing pad for the wheeled trash bin and I had to sketch out the sizes and placement beforehand numerous times rather then doing it on the fly so to avoid having all my slate seams line up in straight railroad fashion.
Diane in CO says
I’ve collected vintage ornaments for about 10 years — but to use on my “1950’s Christmas tree” – our secondary tree. SO, I have to say it pains me to see some of these stellar vintage ornies glued to a wreath!!
HOWEVER, I’m not letting that stop me from attempting one of these awesome wreaths; Pam and Danielle, your creations are simply gorgeous. I began hitting some thrift stores last year to stockpile vintage ornaments. Hard to find them! Of course, I culled the really nice few for my permanent collection and saved the lesser type for a wreath.
How much can you get away with using some that are scratched and worn a bit? I was thinking for the inner layers, saving a few good ones for the top.
How about the vintage ones that are PLASTIC (still shiny) – can those be used?
The tiny ones are hard to find now – does it detract to use new ornaments mixed in? (of course not those with gold hangers!)
Thank you for this incredible tutorial and thanks to Suzy too!!
pam kueber says
I LOVE scratches and ruboffs — to me, the patina not only adds, it is preferable!
Yes, I used vintage Bradford — the shiny plastic kind. I LOVE them.
I think that if you need to use new, you gotta do what you gotta do. As I mentioned in the tutorial, I am going to test some aging methods. I may run out and get new ornies today to try this. I keep thinking I have sated my obsession — but I have not!
Tina says
Thank you for your beautiful art work. I will try to make one. Love you.
Lynne Larkin says
What a great tutorial with all the pictures!! I have wanted to make one of these wreaths but was just not confident enough to do it, until now.
I am going to go through my stash of vintage ornaments today!!
I am really interested in hearing how your experiment in aging newer ornaments turns out as I have a very limited supply of vintage and I know both my daughters are going to want one of these!!
Thank you so much
Leann says
You guys did great!!!! Beautiful!!! I do have one question… Made one for my Mom but now wondering the best way to ship it. The ornaments are so fragile. Not sure how to pack it so they’ll survive USPS or UPS or FE. Hehehe
susan says
Leann,
I would put it in a large garbage bag, and then put that bag in a large box filled with packing peanuts. The garbage bag will prevent the peanuts from getting in between the ornaments.
Diane from PA says
After having made one of these last year I wanted to know how everyone is storing these away for the following year without doing a lot of damage.
susan says
Diane,
They sell tupperware type wreath holders at Home depot for around $10. Look for the kind where the top snaps on so no bugs can get in.
gsciencechick says
Definitely a slightly different look between inside vs. no inside ring. They are all fabulous, though!
georgiapeachez says
Bravo!!!!!
pam kueber says
Thank you so much, Georgia Peachez, for your tremendous generosity in sharing your tips! You are THE BEST!!!!!!
June Cahill says
Late in replying…sorry…was out yesterday! Pam – it looks FABULOUS! What a wonderful job – and the other gal with the little one – just GREAT!