

If you are looking for an “easy DIY Christmas ornament wreath” tutorial — this ain’t it. To make a truly stunning ornament wreath, you need a lot of ornaments — and even more patience. This tutorial says 4 hours to make a wreath, but I usually spend 10 hours or more, spread over a few days, to complete a wreath. The way I think about it: I’m making a 3-D collage, aiming to put attention and artistry into each element. And there’s no rush — I’m out to enjoy the process — not just to “get this off the to-do list”.
That said, making a DIY Christmas ornament wreath is a totally doable project — a super-gratifying art form for those of us who can’t paint, draw, or sculpt — once you have a plan in place. To help you make an gorgeous ornament wreath sure to become a treasured family heirloom, I’ve fine-tuned our tutorial, video, and 30+ tips — gathered over more than a decade of wreath-making experience personally and from Georgia Peachez herself.
More than a decade of experience making Christmas ornament wreaths – vintage and new
I published our first tips on how to make a vintage Christmas ornament back in 2010. They were straight from Georgia Peachez, who was a pioneer in the art of vintage Christmas ornament wreaths — I first showed one of her creations Christmas Eve 2009. As far as I know, those first instructions were among — if not THE — first on the internet, helping to launch a gazillion DIY Christmas ornament wreaths ever since and continuing still.
This updated tutorial is even more expansive, including a video and lots of tips from my own, friends’, and readers’ wreath-making experience.
If you want to make art, but are not good at painting our drawing, this is a great craft to take up. So far, I’ve made more than a dozen wreaths — they’ve become family heirlooms to all I’ve gifted. Not easy… but if you take your time, spectacular!
Video: Kate makes a Christmas ornament wreath using our tutorial
Before or after you read our tutorial, check out the video that Kate, managing editor, made showing the wreath-making process start to finish. She used mostly vintage Christmas ornaments, as I recall. Note, Kate was an Art major and is a graphic designer by trade, so she has super design skills and makes the design part look easier that I, for one, find it to be. I take my time — lotsssss of time, to get my design just so!
Step-by-step guide to make a Truly stunning Christmas ornament wreath:
Time needed: 4 hours
Steps to make a DIY Christmas ornament wreath
- Study the designs of the other wreaths
Just like searching out photos of interior designs so that you can refine your own taste and learn how to pull a room together beautifully, I’d say the first step in this whole process is to look at a whole lot of ornament wreaths online.
To help, I put together this gallery of 39 wreaths — including 15 from Georgia Peachez — completed over 12+ years of wreath-making.
Are there certain color wreaths that appeal to you — you’ll want to collect ornaments and weebits for those colorways. Can you “visually deconstruct” the different elements of favorite wreaths and learn from them? Perhaps even print out some ideas and keep them close as you make your wreath. I almost always get some new ideas when I spend quality time looking at other, nicely done wreaths. Google Images is another great place to look, search Christmas Ornament Wreath, and tons of wreaths come up.
In my book, Georgia Peachez is and will always be the master of this art:
- Gather LOTS of ornaments to make your ornament wreath
You need ornaments and lots of them. Depending on the size of your wreath form, on how packed you can or want to make your wreath, and on whether you count tiny balls, a Christmas ornament wreath can take from 75 to 150 ornaments. I typically use a 14″ wreath form, and will really fill my wreath, and generally lose count after 125.
You need ornaments in a variety of sizes. Full-size 3″ ornaments work great for the exterior perimeter of the wreath, and good news, this size is easiest to find. If you’re doing the center circle, I’d recommend sizing down. And, you need all sizes for the top layers. Also really key: Tiny ones to fill in little open spaces and add whimsy-doodle to the front of your wreath. “I use every size from 1/4″ and up to fill in all the gaps,” Georgia Peachez says.
Different shapes are good, too — bells, lanterns, teardrops, the kind with concave thingies in them… different shapes, sizes, and textures all add dimension and visual interest.
Ornaments made of different materials also are out there. I collect and use vintage ornaments, and usually try to work in one or more decoupage ornaments. I like the ones wrapped in macrame. And gimme disco! For most of the ornaments, I use the the glass ornaments, not today’s shatterproof plastic. Although, some vintage ornaments are not glass…and if you’re making a wreath using new ornaments and you like the plastic kind, go for it.
Note: A reminder that there can be safety and environmental hazards in the surfaces, layers, materials and products in our homes. For example, there have been reports that lead paint may have been used on old Christmas ornaments, old tinsel may have been made of lead, and old fake “snow” may contain asbestos. I am not the expert: Get with your own professionals — do your own research — on these topics so that you can make informed decisions how to handle. For more info and links see our Be Safe/Renovate Safe page.
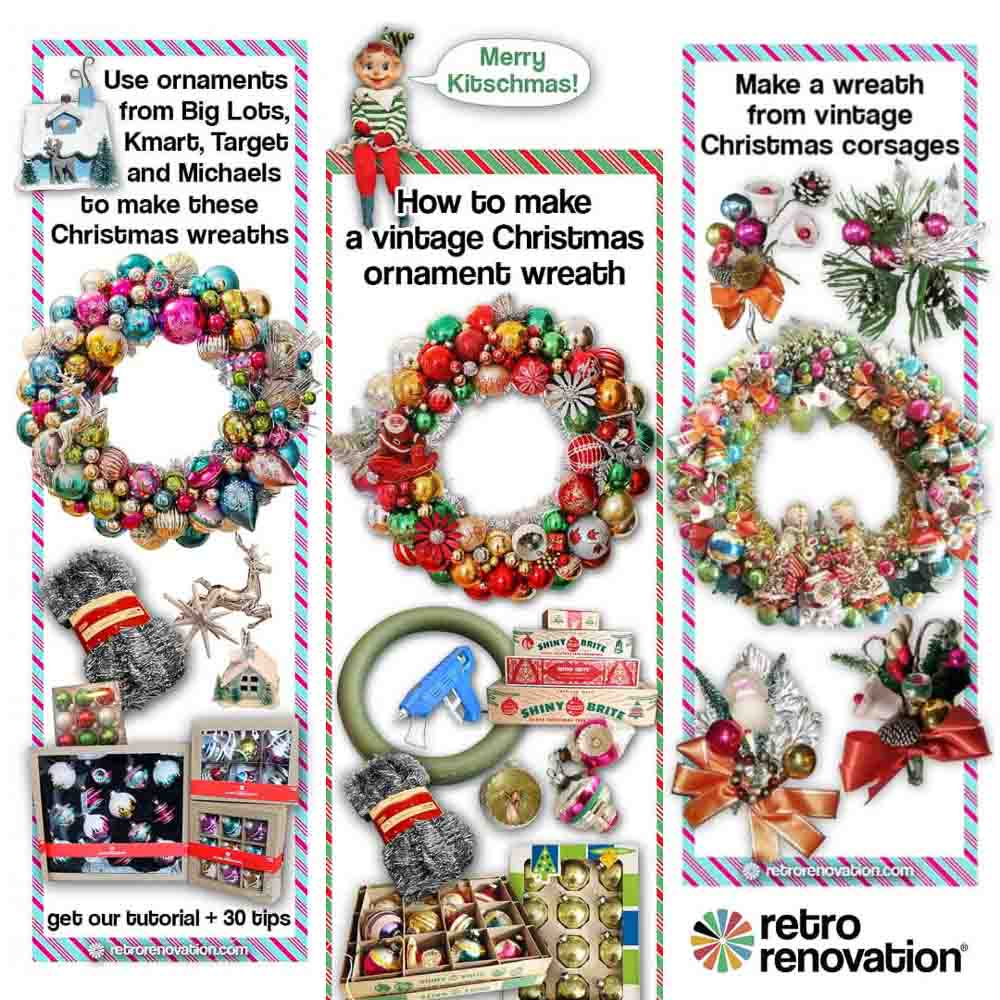
Where to buy ornaments: For vintage ornaments, search on ebay, etsy, facebook marketplace, craiglist, estate sales, thrift shops, and family and friends even (if it’s not too awkward). Vintage brands I have identified: Shiny Brite, Coby, Bradford, Paragon, Commodore. For new ornaments, shop Michael’s, Big Lots, K-Mart, Joanne’s, Target, Home Goods — even Amazon — Christopher Radko ornaments, he licensed the Shiny Brite name, are good options. (affiliate link).
While my wreaths use mostly vintage ornaments, you can also make wreaths out of all new ornaments. See this story for the two wreaths I made completely from new ornaments.
Here’s a photo of the different size, solid color ornaments I have collected over the years – seven sizes, at least!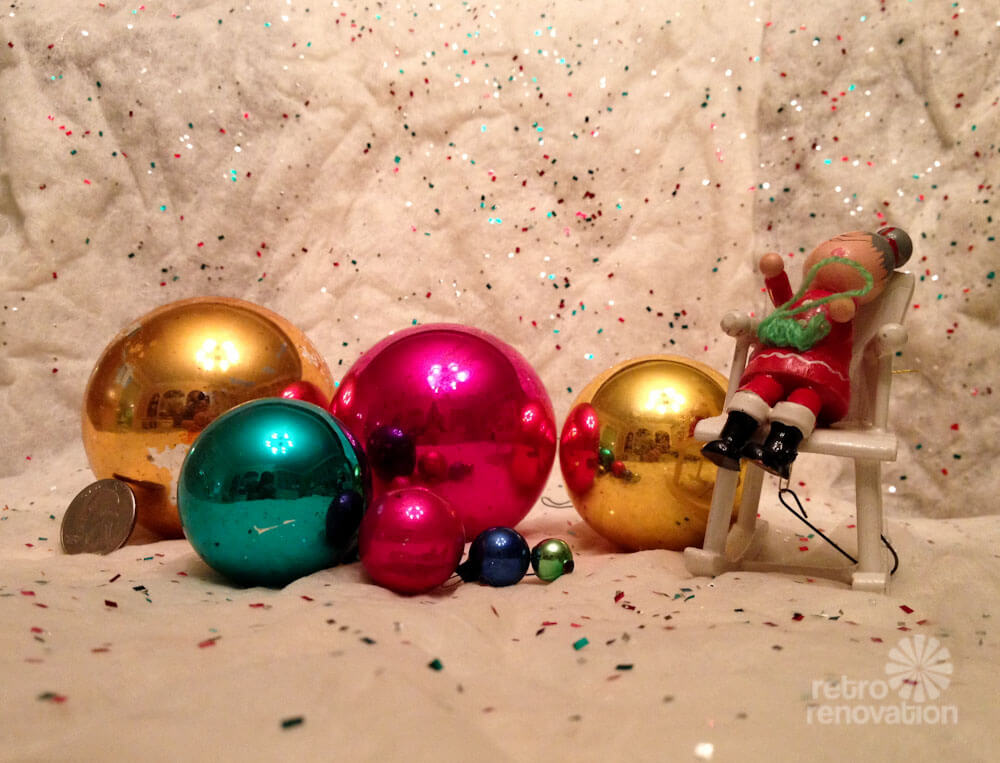
- Don’t forget the “wee bits”
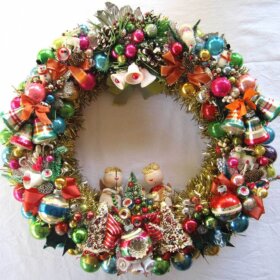
Use vintage Christmas weebits — knee-hugger elves, small wooden ornaments, small ceramic decorations, pine cones, floral pick greenery, tiny bottlebrush trees, and more — to incorporate into your wreath, create focus areas, fill in gaps, and overall all, just plain dial up the impact.
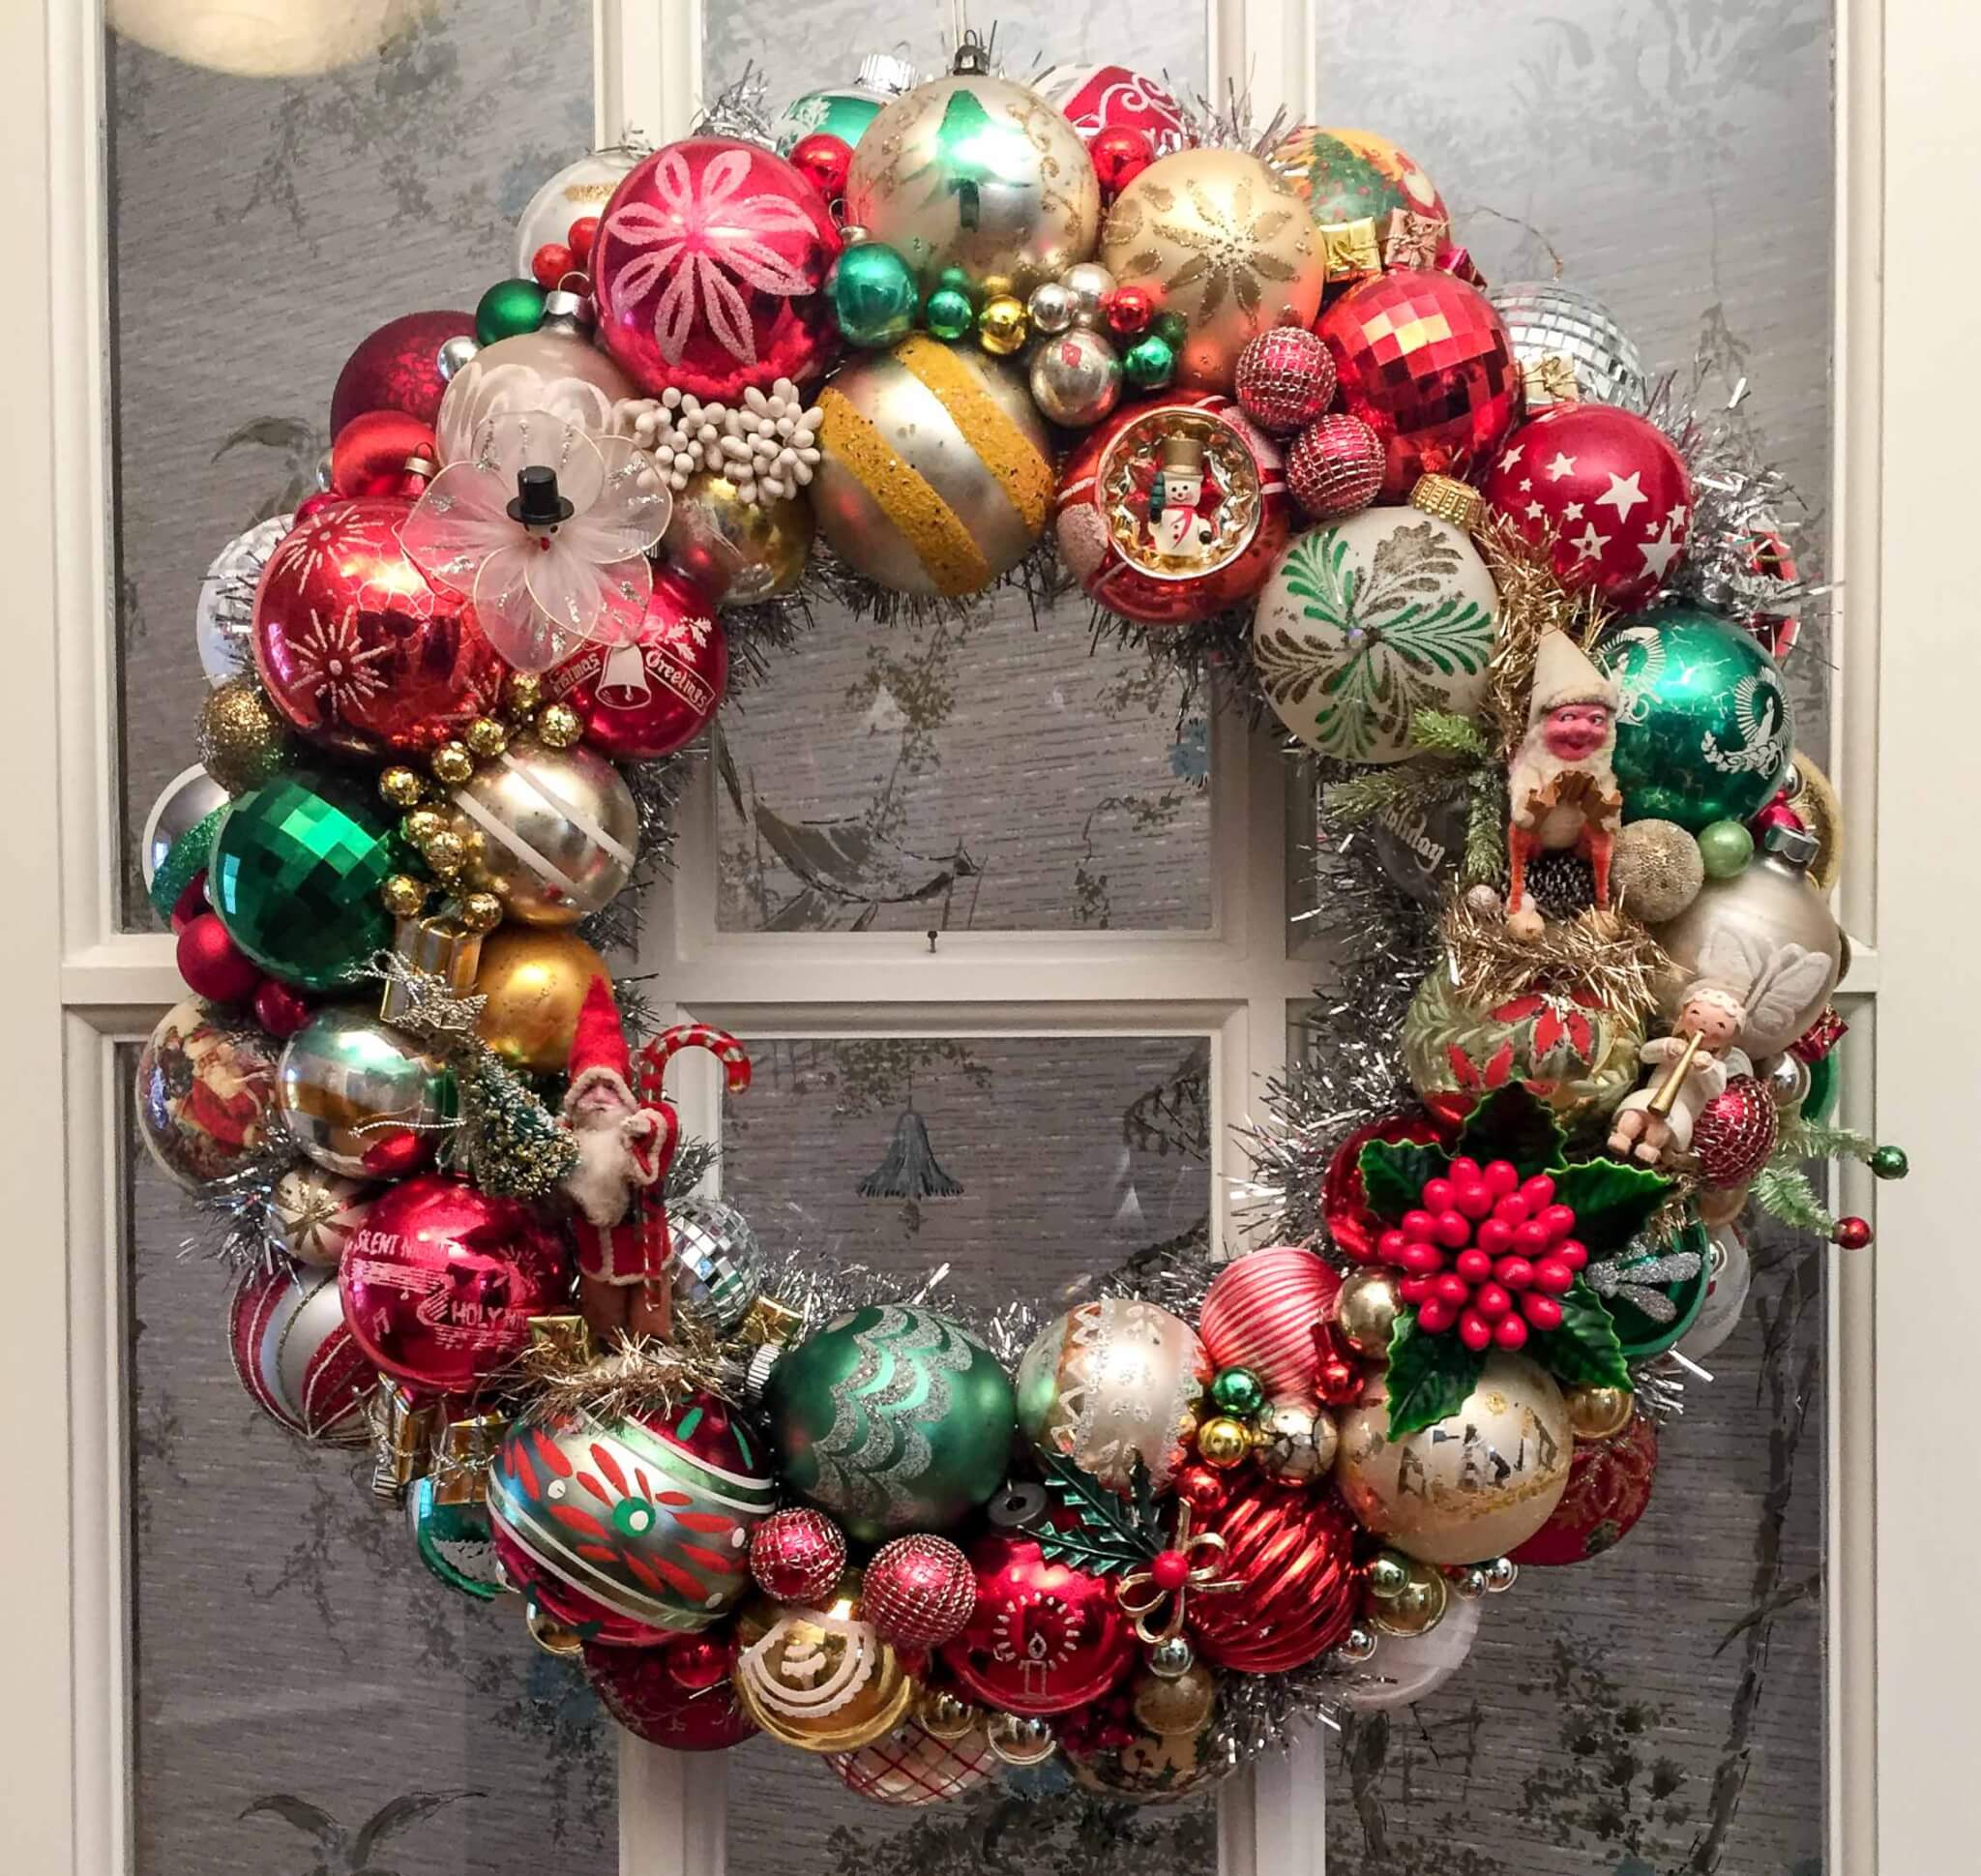
Inspect the following wreath and you can see the variety of weebits: A little gold owl, a pine cone and leaves pick, a Christmas corsage with pine cone Santa, a little house ornament, a ceramic angle, sprigs of fake holly, and the folk maiden. This one also has a reflector with bulb in it to look like a flower (I call this an ornament, not a weebit.) This wreath mixes lots of things up!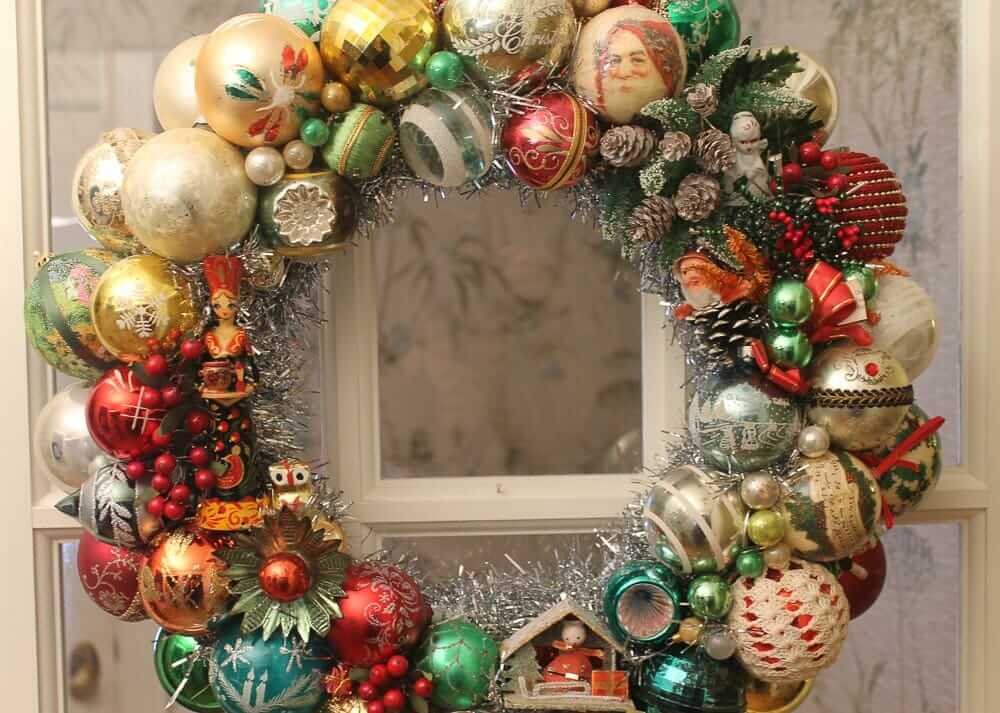
- Buy a wreath form and thick, shaggy tinsel
Wreath forms — We used 14″ foam wreath forms, but you can get them in various size. Tip: At one point I was able to buy wreath forms in bulk. Recently, not, though. Tip: Shop early at Michaels and/or Joann’s and bring your coupon(s).
Tinsel — Buy thick, shaggy tinsel garland. The thicker and shaggier, the better to hold the glued ornaments in place. Also, I like to see the tinsel peeking through the center of the ring. I try to buy mine vintage, at estate sales; for some reason, it just seems better quality, plus I love me my vintage. New tinsel garland is easily found at Wal-Mart, Michaels, Big Lots, etc.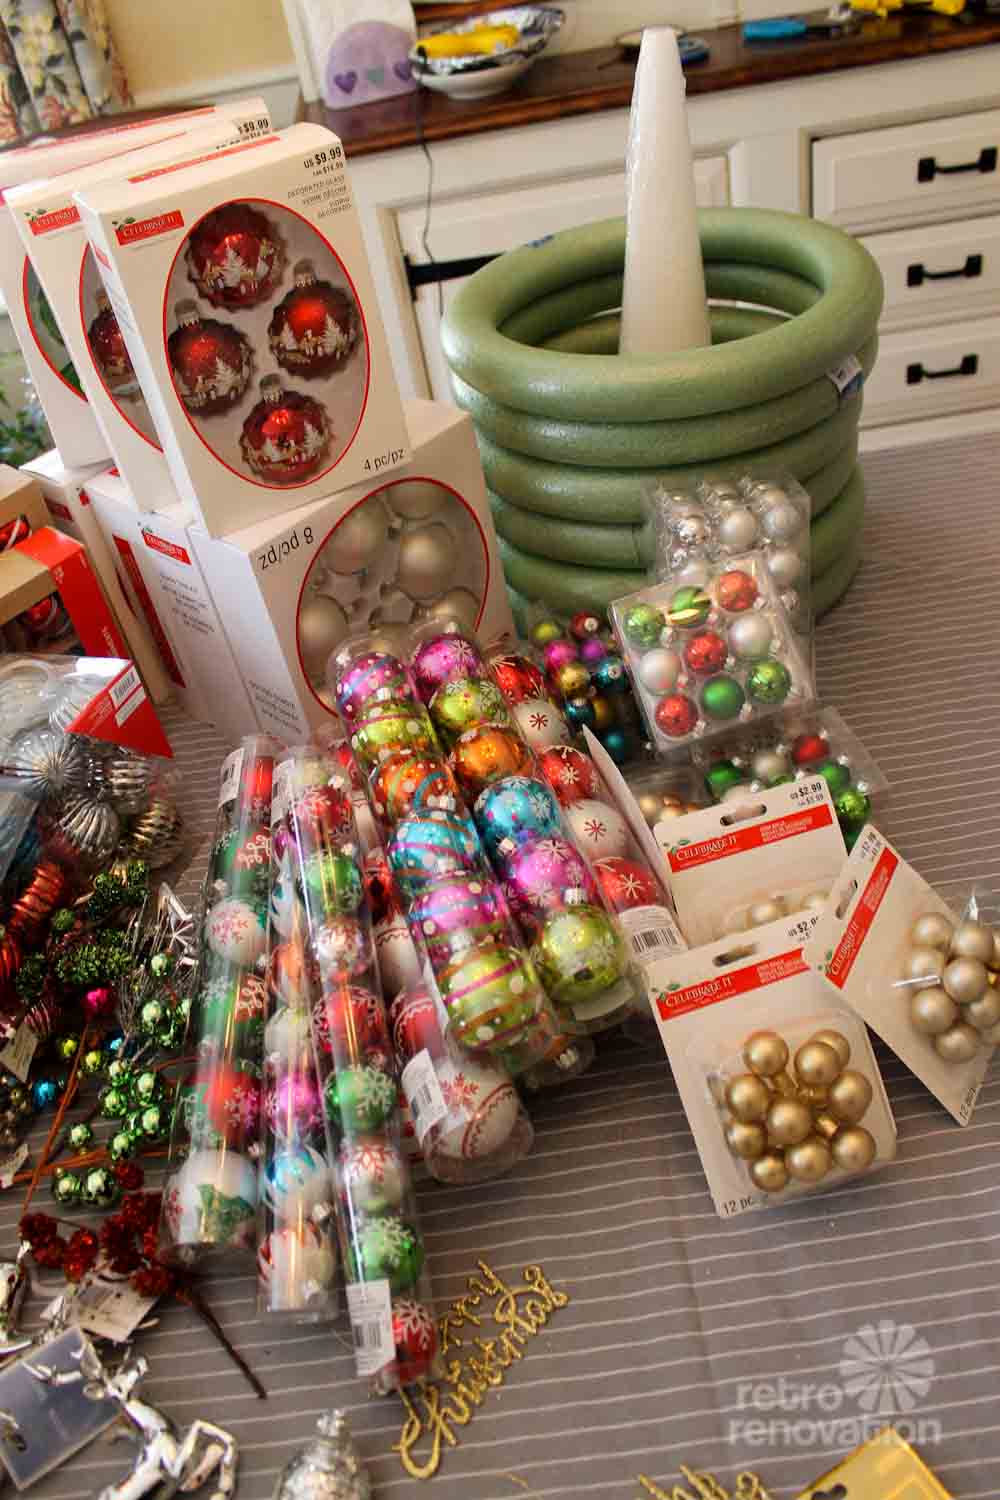
- You need a high-heat glue gun & sticks
High-heat hot glue gun and glue sticks — Kate and I generally go for the latest version of the Surebonder High Temp Glue Gun (affiliate link). Note: You might be able to beat the price/value by shopping at Joann’s — with a big coupon. Repeat: You need HIGH HEAT glue gun and the sticks to go with. - Other supplies you will need:
Scissors to trim garland if necessary
Wire to hang your wreath
Wire cutters to cut wire to length
Elmer’s school glue + glitter, if you want
Vinyl cloth to cover your work area — I look for holiday-themed vinyl tablecloths at estate sales, and even though it’s sometimes hard to see ornaments among the pattern of the tablecloth, it sure helps makes the room even more festive! - Decide on your color palette or theme
Think carefully about your color selection. An easy rule, if you are nervous about this step: Use only one, or two closely-related colors, or red and green, and then mix them with the classics, gold and especially: silver. Also, you may do just a pastel wreath… or just a strong-colored wreath. I have seen examples of wreaths that use “all colors” or “more color” and they can be gorgeous, too. I’m just saying that, in general, if you are nervous, editing your palette is a more assured way of getting great results. It will also help you prune the ornaments that you want to work from, keeping some off the table.
When I make a wreath, I also might give it a theme. The one at the top of this story was “Antique Christmas” — I wanted the wreath to be… tarnished looking. On the gold wreath below, I recall I was aiming for gold + a wee bit of woodsy.
See step #1.
- Pull everything together in a roomy work space
I like to have my main work surface — my dining room table — relatively clean so that I can really see my wreath as I’m working on it. So, I stage ornaments and weebits on the built-in bar next to the table. You could also use a separate work table or tables to hold your ornaments and weebits in waiting. As I get going, I “shop” the ornaments on the bar or nearby table or floor and bring what I need or want to “play with” over to the table.
Don’t forget the snacks and music. Time to pull out the Christmas CDs. The Chipmunks are my personal #1.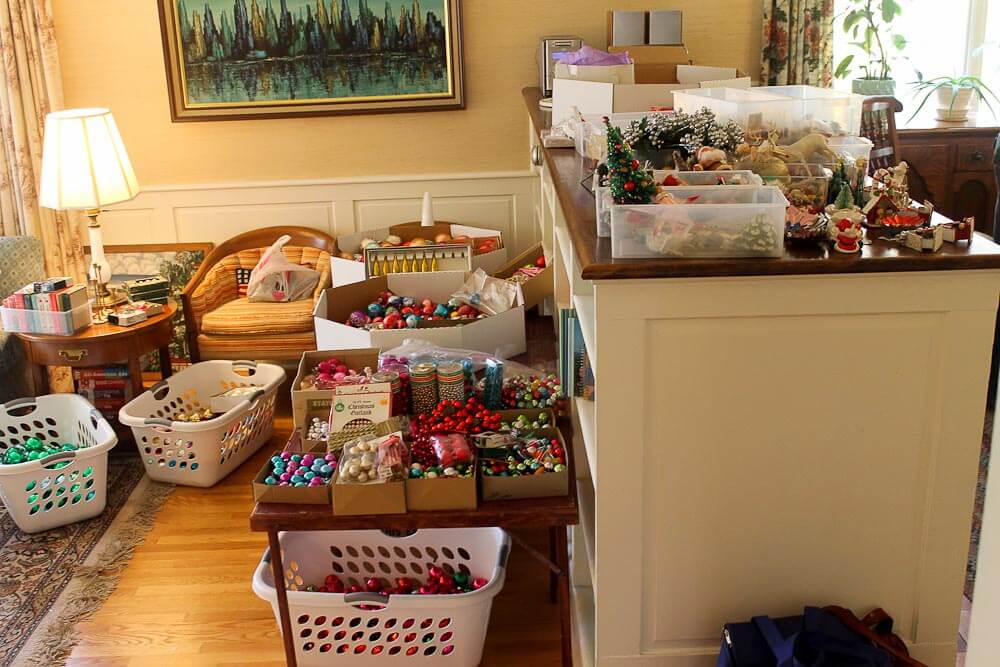
- Add wire to hang the wreath
The first thing to do with your wreath form is to add the hanger. Georgia Peachez told us, “I do a very simple wire hook on my wreaths. I cut floral wire about 14″ long, bend in half to make a loop, put behind wreath, bring legs around and thru to front and over again to the back, wrap each around loop. Done. This is after tinsel wrapping. Virtually disappears when hung on wall because you are so stunned by the magnificence of the wreath :->”
Here’s a wreath I made using this method — I hung the loop on a small wreath hook:
- Wrap your wreath form with tinsel garland
Now it’s tinsel time. Wind your tinsel garland around the form… adding dabs of glue to secure the tinsel to the form as you go… keeping the tinsel pretty close together – fluff it up as you go. I always need more than one tinsel garland — this is not the time to be stingy — full and fluffy tinsel = good! On the other hand, I don’t think you need to go overboard with the glue. I only put the glue on one side of the wreath form. This technique has held really well, over many wreaths.
Remember: Use the thickest, chunkiest tinsel garland you can find!
- Glue large ornaments to the outside ring of your wreath form
The first ornaments to go on the wreath go on the outside perimeter. I think it’s best to use all the same size. I use the standard large ones – approx. 3″ balls. I glue them at the same level as the table and the bottom of the wrapped wreath. That is, when you are done gluing on the perimeter ornaments, they will “sit” flat on the table.
Dollhouse Kate makes ornament wreaths: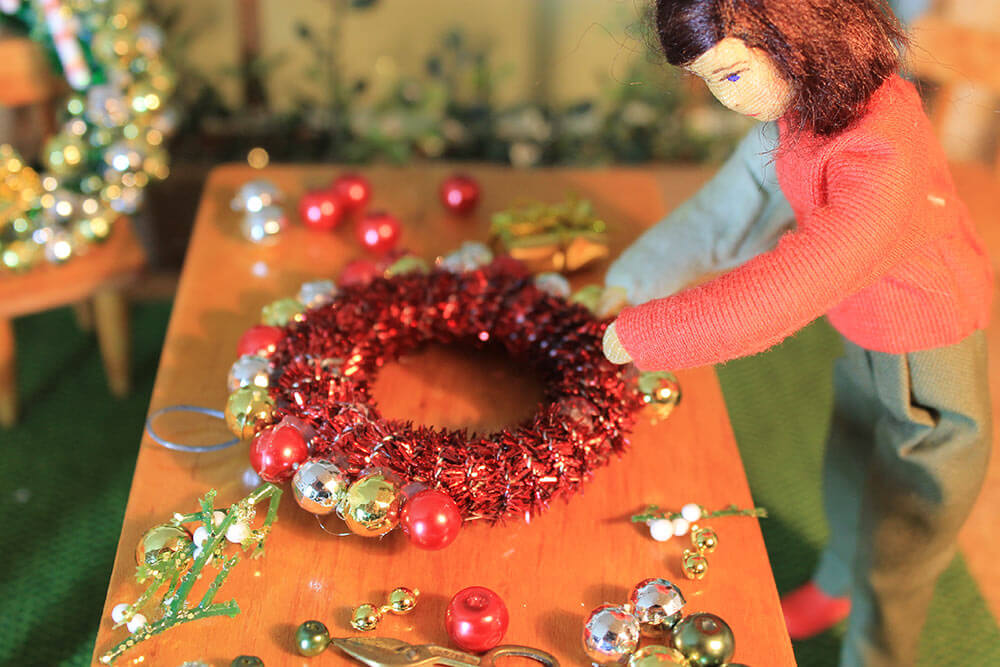
- Decide whether to glue ornaments to the inside ring of the wreath form
I glued ornaments on the inside ring the first time I made a wreath. “Pro” this method: I think that having the two rings makes it easier for new wreath-makers to build up all their ornaments. For the inside ring, I’d go with slightly smaller than the outside ornaments. “Con” I think the white space of a open ring is more aesthetically pleasing.
However, I now always skip the inside ring. “Pro“: I like seeing more “white space” inside the wreath — I think the wider open hole “frames” the ornaments on the wreath better. “White space” or “empty space” can be an important design element — I like seeing that hole in the middle! I also like to see the tinsel — sometimes I will tuck in some more to get the look I want. Georgia Peachez says that she likes to live the interior ring empty so that she can “build into” the center with her ornaments placed on the top/front. “Con“: It’s fussier to build a wreath this with the interior ring left open, but I like the challenge. While making a wreath can be done in as little as three- to four hours, I usually take… 1o hours or so!… to make mine. I try to really ENJOY — not rush through — the process. Slow crafting– that’s me these days!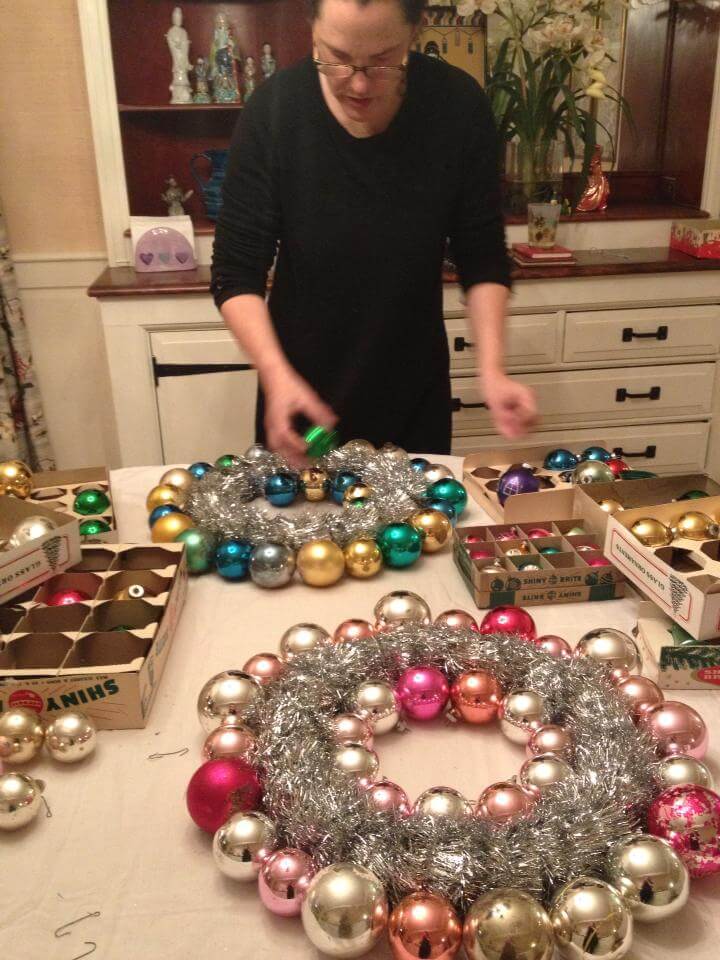
- Continue “building up” ornaments to create your wreath design
Start gluing. In general, we used two dabs of hot glue on each ornament: #1 to secure it to the wreath substrate. #2 to secure it to the ornament adjacent — this seemed to add extra stability. Fortunately: The glue gun glue is darn forgiving: If a bit spider-webs, it pulls off the ornaments easily.
The hardest part, of course, is filling out the wreath. This tutorial says the whole process can be completed in four hours — and it can — but I’ll often work on a wreath over the course of two or three days before I consider it finished — 10 hours or more, in all — also aiming to “enjoy the process” itself.
Think carefully about your design as you go — take it slow. Try to keep it “balanced” in terms of color, size, shape, material of ornaments, and in terms of the “weight” of each focus area. Step back… step away… and glue status permitting, tip up or even hang your in-process wreath up to see if you like how your plan is shaping up. This is… a form of 3-D collage, I’ve found. Mix and match ideas before you commit to glue, and before you know it, you will be the proud creator of a STUNNING vintage ornament wreath!
Should you double-dab your glue? I am a double-dabbler. Yes, I put an initial dab of glue on ornaments to adhere them to the wreath form (or nestled between other ornaments) at the “bottom.” Once I’m happy with the placement, I add another dab connecting one ornament with another adjacent ornament for added stability. I try to do this in a place that is as inconspicuous as possible — you don’t want to see glue anywhere, ideally. By starting with just one dab, you may have the opportunity to cut the ornament away from the tinsel if you decide you don’t like it’s placement. Use sharp pointy scissors and work very carefully. Finally, if the glue spider-webs a bit, it pulls off the ornaments easily.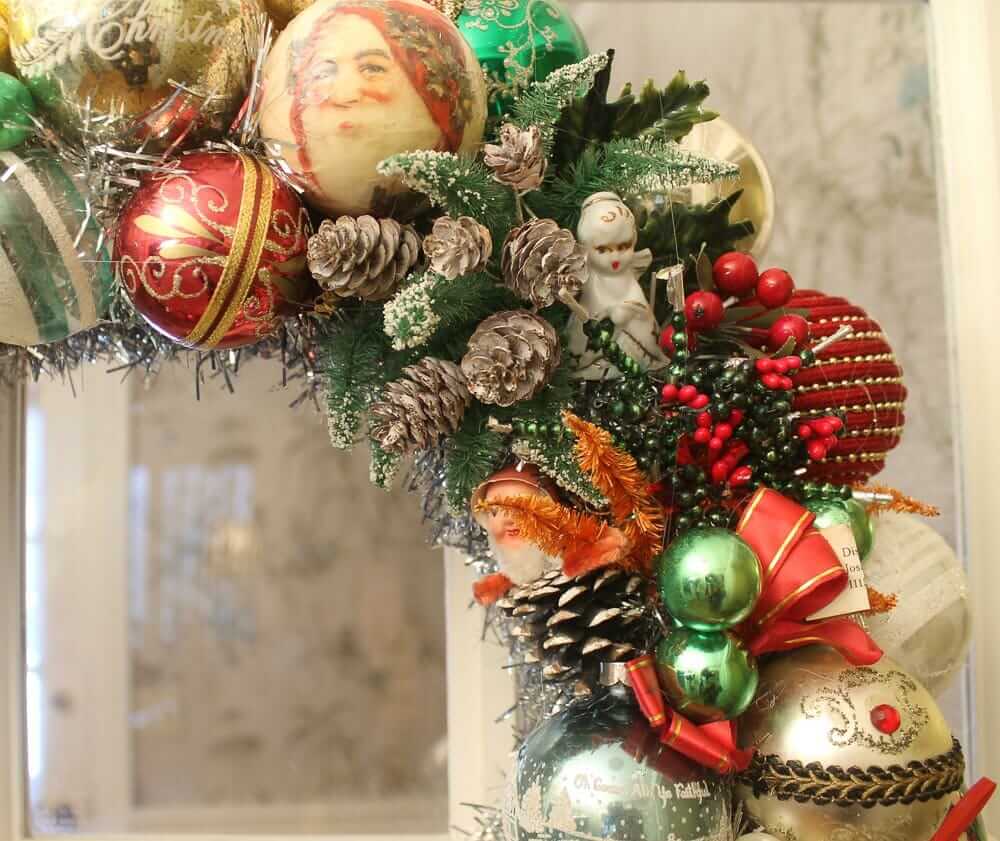
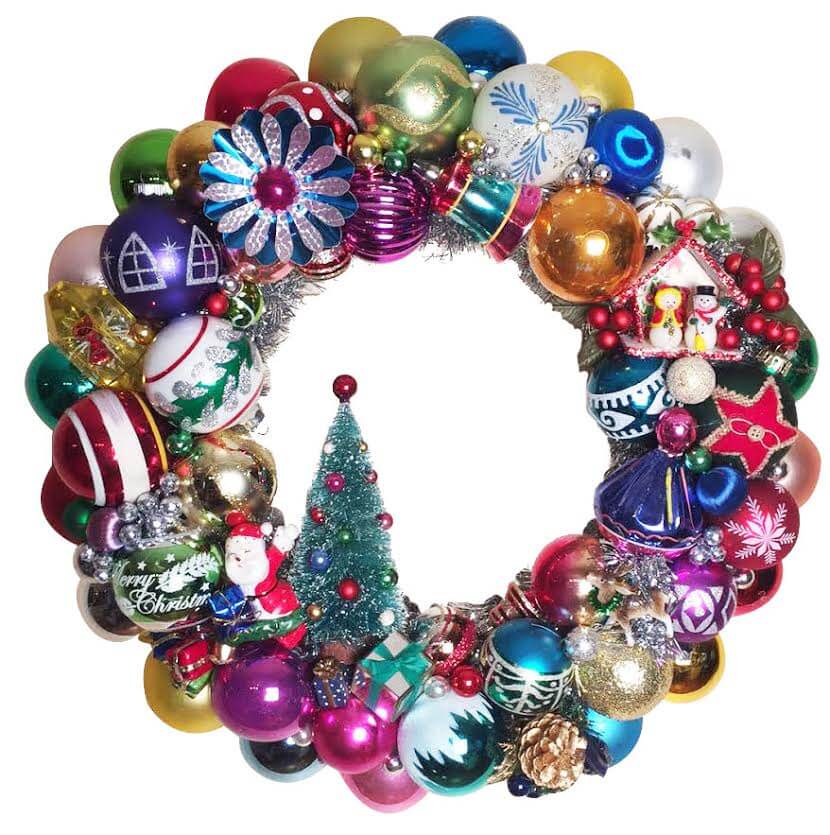
- TIP: Consider building three “feature” areas
I read once that the reason to put things together in threes makes a design more visually dynamic, because as humans our tendency is to look for pairs and when we don’t or can’t, we kind of stop in our tracks. For my wreaths, I generally create three “focus areas” — usually at 2-3 o’clock, 5-6 o’clock, and 9-10 o’clock. Or some such — three areas equi-distant apart on the wreath. I usually put the “heaviest” focus areas at the bottom, in respect of “visual gravity.” There really are no rules to this, though. I’ve seen all kinds of beautiful arrangements done!
The snowman ornament… the tree with Santa and Merry Christmas… and the flower power reflector arrangement demonstrate both these concepts:
- Fill in the gaps and consider glitter
Collect small ornaments so’s you can fill in the gaps. I also use tweaks of tinsel or greenery from floral pics for this sometimes, but try not to overdo it.
And, I learned from Georgia Peachez that if I want to bedazzle some plain colored ornaments, I can use Elmer’s to add a little accent ball of glitter. Of course, I try and collect vintage glitter, too!
Tiny Christmas ornaments fill in the gaps:
- More tips to get the best results with your ornament wreath
Tips straight from Georgia Peachez:
I always use thick, shaggy tinsel. Ornies grip it better. Thin, pitiful tinsel is a bad move.
You can get a decent full size gun for high temp gluing at Joann’s for $20, less the coupon they constantly have, so it is very reasonable at $10-12.
High temp glue is absolutely CRITICAL.
I don’t put ornies around the middle of the ring. Doesn’t work for me, makes it harder to design on top. Many times what I’m placing on top needs to hang a bit into that center space. I don’t recommend it.
Don’t recommend displaying wreaths outside or even on a porch. I think the cold would shrink the glue too much and then you might get more pop offs. I don’t do it, so I don’t speak from experience here.
I make mostly multi color wreaths, but composition is everything. The colors must balance, everything must balance. Lop-sided wreaths make my OCD tendencies flare up real bad. Your instructions on that were spot on.
Advise readers: Don’t glue vintage ornaments to an evergreen wreath form. DON’T DO IT. They do not hold up over time.
More tips from my wreath-making escapades:
I got much better at designing, with experience. If you want to “practice” before committing to your precious vintage ornaments, you can make one or two wreaths using all-new ornaments. With so many new vintage-look ornaments available today, you might not be able to tell ‘much’ of a difference.
One of my friends said, “I thought the building of little groupings and then filling in between them worked well for me.”
Taking a break and stepping away would be good advice. And, I broke a couple but glued them back so they were hidden! 🙂
Relatedly, I ‘hang’ the wreath if I want to make sure that certain elements sit vertically straight, assuming I want that effect. Sometimes, though, I prefer to tilt feature areas.
Identify your “big winner” ornaments for the front of the wreath — make sure you give them the most prominent position — build the other elements around them. Clear case in point: Knee-hugger elf should be a star of your wreath!
Massing of smaller elements like this — in particular in threes — works very effectively.
I like having the metal parts of vintage ornaments showing on the front of the wreath. Sometimes I’d have them hidden or tucked under, sometimes I have them show. I like the patina of the old metal.
Don’t worry about having the tinsel underneath show. You don’t want large gaps, though — play with your ornament configurations before committing, and be sure to have a big stash of the tiny orbs to “fill in” before you get going!
Sometimes I cut small pieces from the tinsel garland and stuff them into the wreath for an accent and to fill a gap. I find that the shiny white metal of the tinsel helps make other ornaments stand out. Don’t overdo it, though.
If you want to make your precious vintage ornaments go further only use plain ornaments for the outside and inside rings; plain vintage ornaments are easier to collect, and you can get new plain ornaments pretty easily too. Save your decorative vintage ornaments for the highly-visible top part of the wreath.
Overwhelmed? Try my story on making Three-Step E-Z Wreaths.
Invite a friend — double the fun! - Hang, enjoy, and bask in the glow of compliments — and your wreath!

- How to store your wreath
You’ve spent so much time making your wreath, be sure to protect it! I typically find wreath storage containers made of a strong plastic at Big Lots and Target. Go early in the season, because they do run out. They also can be a bit pricey — but my experience is that the sales prices also launch pretty early. I wanna say: I usually can get one for $8-$12 on sale. I see the brand I usually find locally also is on Amazon (affiliate link) – but the price is much higher on Amazon; I guess I would go that route only if I were really stuck. I also found cardboard wreath boxes at U-Line. They work fine too. - If the ornaments come loose after a few years
Over the years, when the holidays are over, I have been storing some wreaths in my attic. I live in Massachusetts. In the winter my attic is super cold. And in the summer, it gets very hot. Over time, I noticed more loose ornaments. So now, when I bring wreaths down from the attic, before I take them out of their boxes I carefully check for loose ornaments. After carefully lifting the wreath and putting it on a covered surface, I take the opportunity to reglue ornaments sturdily in place. I am a double-dabber, no question. Also, this is a good time to make changes if you want. That is, on one wreath I am working on this year, the ornaments were so loose that I was actually able to pull off some ornament groupings so that I would rework the areas. See this story for more.
So there you have it! Click here to read all our stories about wreath-making — lots of photos and more tips on supplies. - And: Save your vintage ornament boxes
Oh, one last thing! Don’t throw out your vintage ornament boxes. Use them to make ornament box dioramas — or, I think there’s actually a market for selling these to other crafters for this purpose. Don’t store your ornament boxes in humid places or they may… wither.


Diane in CO says
Ohhh-K!!
Dozens and dozens of vintage ornaments of various sizes and shapes – check! Weebits to fill in – check! Sturdy green wreath form via Michael’s – check! Wire for hanger – check! Thick luxurious tinsel garland – check! Surebonder glue gun ordered – check! Pool table cleared and covered with plastic pad – check! Cocktails at the ready – check!
Whew!! Total cost: (you don’t want to know, hehe) I used to think Giorgia’s Peachez’ wreaths were pricey — and now I wonder why I just didn’t order one of hers!! LOL!
Do have two critical questions, PAM.
1. Could you indicate the diameters of the ornies you used for the outer ring? Did you use any that were 3″ across? I have only 3 that large; the bulk of mine for outer ring being 2.5″ – 2.75 inches across. Are those large enough?
2. Did you apply the hot glue to the garland or directly to the ornament? Or both?
Thanks!
pam kueber says
1. I have been preparing for my next wave of wreaths. The ones I am using for the outside are 2.5. I also have very very few that are larger than that.
2. I only applied to the ornie. I double dabbed, though: Once where the ornie would hit the garland-covered foam core and another spot where it would attach to the adjacent ornie. I guess you could even triple-dab onto the ornie “behind” as well. I may do this next time.
Hope that helps.
Agreed: Once you start vintage ornie hoarding, you quickly see how expensive it can get.
Tip: I just came back from Target, golly, they have some really nice looking vintage-style ornies, including medium-smalls with flocked words on them. They are not cheap — $8 for 9 ornies — but, maybe they will go on sale Black Friday (if you can handle the hoards). For sure, I will likely be on top of the sales as Christmas approaches. Story on these ornies to come. For plains: I found 15 for $4 (on sale from $5) at Big Lots. I still need to test my distressing of them. All that said, my key goal still is to do vintage — and this summer, to really focus on estate sales etc.
Diane in CO says
Thanks for helpful reply, Pam! Yes, my problem is I didn’t want to use any of my “regular hoard” of vintage ornaments – that go on my tree. Had to “start over” gathering ornies for a wreath. Teeny-tiny ones must be a thing from back East and in the South ‘cuz they sure as heck aren’t prevalent in my neck of the woods. Also, never have seen a knee-hugging elf out here (and I’m a frequenter of antique malls/shops etc.) But I have other tsotchkes……
The Target ornaments sound interesting — but like you I’m intent on using mostly all vintage for my first wreath. I did get some lovely tiny silver balls with white icicle flocking at the top at Big Lots to fill in if needed.
Holly-cutie pie cottage says
Oh no! don’t hang it outside? 🙁 I just made one specifically for my covered porch. I guess I “could” just try it and regret it! Ha-ha!
Carissa says
I was so inspired by the original contest photo that I went crazy buying vintage ornaments anywhere I would scoop them up; I was at the 2 Goodwill stores closest to my home a few times a week and found some GREAT ornaments on the cheap!!! I just made my first wreath and now I’m working on others to give as gifts. This is so fun, I wish I could share pictures!!!! 🙂
pam kueber says
send us your photos at retrorenovation [at] gmail [dot] com
I can’t wait to see your creations, Carissa!
CC in Virginia says
I ran across this Vintage Christmas ornaments website while searching for retro Christmas. Here it is if anyone’s interested. http://www.christmastraditions.com/Themes/Xmas/XmasVin4.htm
Lisa Compo says
We stopped in Target yesterday to look for some vintage look alike ornaments. I bought a few boxes and our Christmas tree this year will be all retro look–I can’t wait. 🙂 I can’t believe I am doing this because I have an extreme dislike (h***) of glitter, but I couldn’t put the boxes down with the little glitter bands on the shiny balls. I am a changed woman. They also have a CD of Christmas songs by the Rat Pack..had to have that!
We found a decent selection of ornaments if someone wants to make a wreath but doesn’t have the heart to use your real vintage stuff. Also, for the uncrafty people or afraid of breakage issues they are selling wreaths similar to these in a medium size of plastic turquoise, clear and cream ornaments for $20. That being said…they are nothing of the quality and art being seen on here, but if you are desperate for one and can’t afford the ornaments theirs was cute enough to get by.
Oh..and the wrapping paper is to die for. I could have bought about $200 worth just to look at.
Diane in CO says
Okay, spent some time this afternoon searching for supplies. Big Lots had 18′ lengths of what I assume is the heavier-duty tinsel garland for $4. Anyway it was the thickest one they had…. Michaels had the green 14″ round hard styrofoam. Thrift shop ornaments have obviously been picked over by the dealers in the antique malls. 🙁 **note to self** find some new thrift stores…
GLUE GUNS: Is it better to get a cordless?? I did not commit yet. Michael’s all were small; no “pro” models. Is the cord a problem?
Louisa says
I found the thick large gold tinsel last week at Target. Hope that helps!
Diane in CO says
Thanks Louisa, I BOUGHT the silver tinsel garland at Big Lots. It seems nice and thick…. “thick & shaggy” not “thin & pitiful” as Suzy stated, but it’s not labelled like that – lol! So it’s hard to know if I got the right thing.
A close-up photo of the correct tinsel style would be helpful. Silver, right? Anyway I got silver.
Been playing around with color and selecting out the balls that complement one another — and I find half of my ornaments will be rejected (will use for second wreath w/ different color palette) so now I really need even more ornaments. Just a warning…. you will reject a bunch so you really do need a LOT!
georgiapeachez says
Yes, you will need a LOT of ornaments. You should see my xmas craft space. I spend SO much time dry fitting the ornaments to get the right look.
Glue gun, cord OK. Never tried a cordless.
Work on top of a broken down box or an old plastic tablecloth. This is messy work.
June Cahill says
I always say these wreaths are like ‘a puzzle that has not yet been put together yet’…you will need ALL different shapes and sizes – and about the little ‘hangers’ at the top – I try to hide them by tucking them in, but, sometimes it’s aesthetically better to just let them show. You can always use the tiniest of bulbs to cover them up and fill in the ‘gaps.’
tammyCA says
Very pretty…but, I must be a Grinch here…I could never hot glue vintage ornaments, too precious.
I would probably wire everything on…but, cheap Dollar Store ornaments I wouldn’t mind gluing. I just keep thinking about if one bulb breaks then isn’t the whole wreath lost or can it be removed and replaced? I know hot glue is a stubborn thing to remove.
Christine says
I received one of these as a gift years ago and after about 4-5 years the ornaments started falling off.
Just an FYI.
I really want to put it back together but I’m wary of using hot glue again since it dried out so quickly the first time.
pam kueber says
Suzy says just do it.
Lisa Compo says
Maybe the person who made it years ago didn’t use the high heat glue or not quite enough and that’s why it didn’t hold together. Gosh, anytime I have ever hot glued anything it was FOREVER and there was no undoing it once it set. If you have the pieces it would be worth the attempt at putting it back together with high heat glue. Worst case scenario you have to do it again in 4-5 years. 😉
Lynne says
Okay, here’s a question for all of you that are “in the know”
Is there a particular kind of ornament, bauble or doo-dad that we should avoid using? One that just doesn’t “cut it” over time or during the process? Like maybe those satiny kind??
pam kueber says
I cannot speak to technical issues, such as will certain materials unglue easier than others, but I would say that there are no aesthetic limits. These are works of art. Infinite possibilities based on what speaks to you.
Blondie7 says
WOW. Very Beautiful Pam! Stunning! Thank you so very much for your outstanding tutorial and tips about how to make Georgia Peachez’s phenomenal vintage ornament wreaths. Fabulous and Priceless! Highly appreciated! Simply Gorgeous! Thanks a million to Georgia Peachez too!