

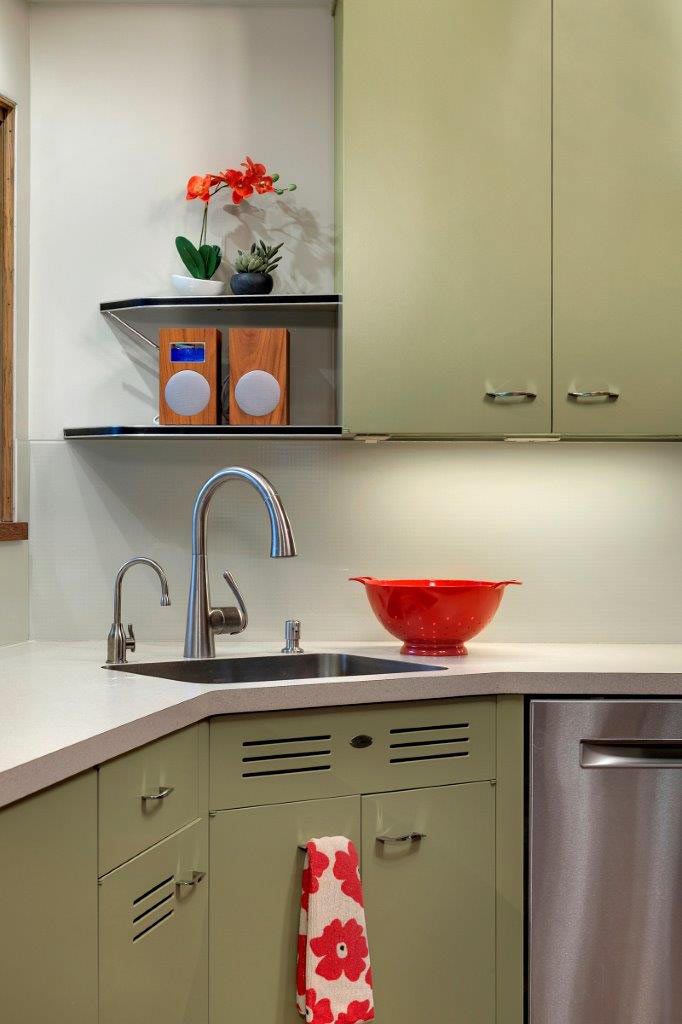
If you have a midcentury modern style kitchen — and want to keep the kitchen backsplash as simple, yet functional, as possible, check out this super ingenious idea from Roger and Lynsey. Their “barely there” solution: Long runs of textured glass, back-painted to match their laminate countertop.
Photo viewing tip: If you are on a desktop computer, click on the photo, and it should enlarge up to double in size on your screen, so that you can see more detail.
We wrote about Roger and Lynsey’s project to remodel their 1953 kitchen yesterday. Oh my: Those delicious St. Charles kitchen cabinets! Steel kitchen cabinets don’t get any better than these cabinets!
To complete their decisively midcentury modern look, Roger and Lynsey wanted a backsplash with just the right measure of minimalist style.
Lynsey wrote:
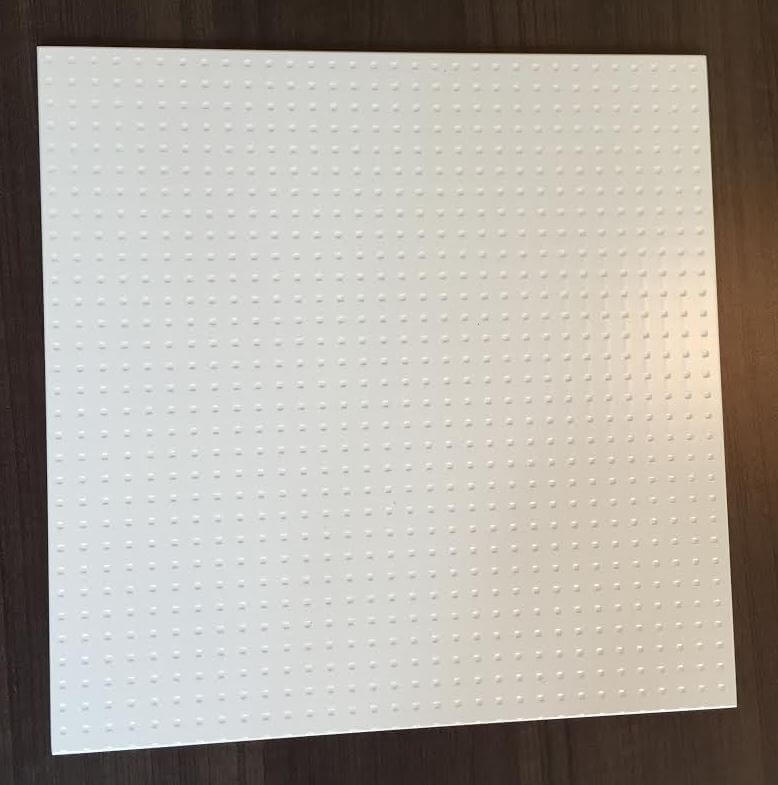
We wanted something very clean looking, so we decided on solid sheets of glass with a small dotted pattern. (You can see the dots just ever so slightly in a few of the photographs.) The back of the glass was painted to match the walls, so in a way it looks like we don’t even have a backsplash.

Alas, the project came with a hitch: The couple went through TWO backsplashes to get everything right.
What happened?
Yes, we put the textured side against the wall. The reason we did this is because when the textured side was out, it felt neat to the touch … BUT it gave off this crazy hologram effect. You remember those little holograms you used to get in a Cracker Jack box? Well, that’s what the backsplash looked like when the textured side was on the outside.
And how do I know this? Because of the “first” backsplash. The contractor painted the wrong side and put the textured side out! (We actually specified it correctly since we were aware of the hologram effect from the sample … but then, I suppose, the contractor was like, “Who are these crazy people wanting to paint the wrong side?”) I walked into the kitchen halfway through the installation and thought I was going to have a seizure the hologram effect was so crazy! It was adhered using some kind of epoxy … quick setting, but not so quick that they couldn’t remove the first backsplash.

The product they used, screen shot from their website, above:
Here’s the glass we used: SGG Master-Carre Glass from Torstenson Glass Co.
Paint color on the back of the glass? Lynsey responded:
The paint color was the same as the kitchen walls — Sherwin-Williams Wool Skein.

Other challenges:
-
Overall length — The backsplash length was longer than the available length of glass. So, we had to use a few pieces, which created seams … and which wouldn’t have been a big deal, but we had to make sure the “dots” lined up so the rows looked straight. Roger added: If I recall correctly the longest piece of glass they could get was 120″, which is why there is the one seam on the left.
-
Un-level countertops — So, as you know with old homes, nothing is quite level … and our countertops (even though new) were still a bit un-level — not enough that things were rolling around on them, but enough that we had to cut the glass a bit “crooked” so that the dots would be parallel with the countertops.
-
Filling the gaps around the windows — Again, given the nature of the old house, the way the cabinets were installed, and the way the plaster “curves” around the window, the backsplash was a bit too long, leaving a gap behind it. We had to create L-shaped pieces to fill the gaps where light from the window was shining through the glass and casting shadows on the countertop. See last photo where everything comes together at the window. (PLEASE ignore the dirty window screens — ha!)
Finally, re installation, Roger recommends working with pros — and this sure sounds like the smart answer to me, too:
I would definitely consider this something you want to hire a professional for. Between cutting the glass to size, painting the back and installing, it’s a bit complicated. The glass is also tempered, so that it was strong enough to carry in the house for the installation.
Very nice, Lynsey and Roger!


Joe Felice says
And yes, as they point out, sometimes we have to re-do things in order to “get them right.” I learned that things don’t always turn out the way we expected.
Crissy says
Beautiful and inspiring! We are FLW/MCM lovers too! I was so excited to see the shelving in the first pic, where did you get the edging?????
Kathryn says
It looks fabulous! This may be a silly question, but, why not just paint the wall and adhere the unpainted textured glass to the painted wall? Wouldn’t the effect be the same as painting the back of the glass?
pam kueber says
I’ll let Lynsey answer but I will guess: You would see the adhesive.
ineffablespace says
It’s not the same. The glass casts shadows and retracts light onto the wall through the small and usually uneven space between the glass and the wall. The wall would have to be perfectly flat and contact the back of the glass completely evenly for this not to happen.
These backsplashes can be fastened mechanically without adhesive on the back.
Mary Elizabeth says
I had the same question. Thanks for answering it.
I love the way this looks, and I love the whole kitchen.
Kathryn says
Yeah, that makes sense. Thanks!
ineffablespace says
I am in definite agreement that painting the textured side is the way to go.
I participate in another forum where many people put in glass mosaic backsplashes and when the tiles are backpainted and textured on the outer surface, they are surprised and sometimes not happy about the visual effect when the undercounter lighting is turned on.
I did a plain backpainted backsplash in 2006 when there was not a lot of them around (it was the first my fabricator had done) and even the edges of the plain glass created a holographic effect with the undercounter lighting. Mine was done twice, too. The first cracked when they were dry fitting it, and actually the second one got a stress fracture in the same spot after installation (luckily it was in a hidden spot).
I ended up painting it myself. The painter had trouble wrapping his head around the idea that you can’t prime because the Bottom coat of paint is what shows, and if you prime the glass, that’s what would show :). It took seven thin coats of paint to look solid.
The use of a slight texture, backwards, as the homeowners did here, is a great idea. I am considering the possibility of a glass backsplash in this kitchen, but I am not quite sure it’s the right thing for this house.
If anyone else wants to do this but has outlets in the backsplash Arnev now sells clear glass switchplates for back painting. And they are Low iron glass so they will not have a green cast.
These did not exist when I did my backsplash and I had to buy mirrored switchplates and strip the silvering which is a sort of nasty process.
Jay says
Aside from the obvious headache inducing effect, another case for reversing the texture is avoiding the ick factor; cake batter and spaghetti sauce tend to splotch and stick, uneven surfaces will present a housekeeping chore; the smooth surface is easy to wipe clean.
midmichigan says
Very nice work! It looks good! How did you paint the glass? Spray, roller, brush?