

 In 2008-2009 the average cost of a mid-range bathroom remodel was $15,899 — with 25% of that *investment* immediately lost. Yes, according to the annual Hanley-Wood Remodeling survey, the “return” on a bathroom remodel is about 75%. But realize, homeowners, that means — the paint has dried — and you just LOST $4,000. Of course, you get to enjoy any updates… but don’t kid yourself, this likely is not a particularly wise *investment* in the sense we generally expect/discuss when we use that term. Moreover, I have read elsewhere that the 75% “return” indicated occurs if/when sell your house immediately… if you sell your home many years later, that bathroom reno likely will be “worth” even less, because by then, the next homeowners will think it is tired and yes, dated. I don’t mean to be a debbie downer, instead, a practical pam. And practical pam suggests: *Invest* your renovation dollars wisely, which I think starts with trying first to love the bathroom you’re in. If it has basically good bones, work with them … keep those mid-century tiles… shop surplus and vintage for new/old fixtures… save a bundle … and *invest* your money in… well, that’s a different blog altogether. Today: Karen kept her her pink speckled tiled shower but turned the rest of her kinda blah 1968 bathroom into a vintage delight for $708. She got a lot of bang for her buck — a bathroom dated to suit her home — and what fun.
Karen, I apologize hi-jacking your lovely bathroom story with the money talk, but Ms. Retro Renovator, you show how it can be done. Karen writes:


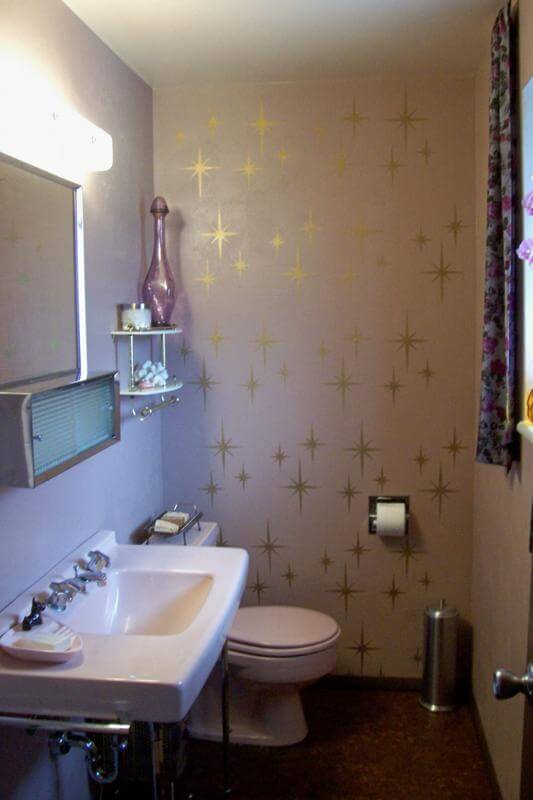
Hi Pam. My husband and I have recently purchased our first home: a 1968 split level in a beautiful town. I just finished my first of maaaaany projects that need to be done to this house. Unfortunately it has not been taken care of that well. The first project I tackled was our tiny master bathroom. As you can see it was horrible. I knew I wanted to add pink fixtures to match the speckled pink shower. The first ones I purchased, which I drove 100 miles to buy, ended up being worthless because I later found a crack in the pink toilet. Ugh! But the decorating Gods were smiling on me (or felt sorry for me) and I found a peachy pink toilet, which ended up matching the tile better than the previous purchase.
.
Then, later that day I went to a nearby architectural salvage. At the very end of the long, winding maze through the bathroom graveyard I found this gorgeous console sink in the exact shade as the toilet. I couldn’t believe it!!!
.
When I started, the walls had this terrible orange peel finish, so I re-textured it in sort of a crosshatch pattern. There was carpet on the floor, YUCK! The subfloor had been “repaired” terribly, so that had to be fixed.
.
The paint I used was Behr paint and primer in one (love the instant results) in a satin finish. The color on the walls is Martha Stewart Colors in Smoke Bush Rose. I have not found another color like it. The best way to describe it is to take neopolitan ice cream and mix it together until the colors are blended. I know this because that’s how I love to eat neopolitan: mixed up, which I did when I took a break from painting this bathroom…. weird. The ceiling color is the same as the fixtures. The flooring is a floating, resilient, faux cork by Traffic Master Allure. Super easy to install with no glue and I special ordered it from Home Depot. It was $1.99 a square foot. They have a lighter shade I may use in my kitchen later.
.
The curtains are from vintage dress fabric purchased at the local thrift store, as well as the tray on the back of the toilet, the light fixture, the two bottles, the shelf over the toilet, and the towel bars, all for $15! The pink scottie dog ash tray that I’m using as a soap dish was purchased at a local antique store for $6. The vanity mirror, door mirror, and recessed paper holder were already in the house.
.
So total I spent $175 on fixtures, $75 on flooring, $15 on plaster for the walls, $20 for the “make your own stencil kit” and paint for the starburst design. Of course I recaulked around the window, toilet and baseboard, and I also recaulked the shower. This cost about $20. I also bought a grout paint pen (my new best friend) for $7.50. I spent about $25 on baseboards. Paint stripper and tape, etc. I probably spent about $75 on to refinish the door. For the paint I spent about $100, althought I will use the pink and brown in other rooms, too. The curtain rod and toilet paper holder were about $20.
>
I had a wonderful plumber that installed the fixtures for about $175. This was money well spent. I did not want my husband to install them because at our last house he overtightened the bolts for our yellow toilet and it cracked! If he cracked this set it would have been grounds for divorce, so I saved us the headaches and legal fees and hired a plumber. By the way, these sinks need special brackets and a sturdy wall to install them on, which our plumber hunted down for me.
.
I am so thankful for this site because it has given me so many wonderful ideas and resources! I am happy with the results and I did all the work myself, except set the fixtures and replace the subfloor (girl power). By the way, the toilet is an American Standard and the sink is a Kohler and it is the most awesome sink I have ever seen in person! Thanks so much Pam and I hope you like the bathroom! Sincerely, Karen


Karen — I LOVE the bathroom, great job, girl power! I especially think your stenciling is a great idea that many folks will jump right on. The sink is fabulous… the floor is terrific… and all the little details: well, you put them together perfectly. I can’t wait to see more of your home renovation story unfold. Many thanks for taking the time to share this with us all.


Alice says
What a creative and well-thought out makeover! Nicely done and thanks so much for sharing the inspiration!
Kelly says
I love it! The attention to detail coupled with the thrifty execution (that doesn’t look thrifty at all) is inspiring – and those starbursts on the wall…I’ll join in singing their praises. I love the sink and I really must check out that Martha Stewart color. It looks beautiful. Excellent job, Karen!
Bakelitebebe says
Karen, thank you for the stencil directions and tips on the paint!! You are a serious DIY master! I am inspired.
Jen says
By the way, Karen — what kind of paint did you use for the starbursts? I love how shiny and gold it is.
Vintigchik says
It is paint specifically made for stenciling. I found it right next to the stencils at the Hobby Lobby. I was impressed at how shiny it was too. They also have silver, which I think I may use in my blue bathroom, just with a different design. -Karen
veg-o-matic says
Karen, those starbursts bring tears to my eyes. I must have them! Would it be possible to maybe scan the stencil you used and post the picture? That way, I could print it out and trace it since I have ZERO artistic ability. How many sizes did you use? It looks like three to me, but my eye’s not very good.
WONDERFUL job. I’m totally jealous!
veg
Vintigchik says
To make the starbursts all you have to have is an exacto knife, a stencil sheet, and a preferably metal ruler. Make a cross the size you want the height and width of the finished star. The vertical line should be somewhat longer (about 1″-2″)than the horizontal line. Then take your ruler touching the top point, move it out about a 1/2 inch or so (I just eyeballed it as to how thick to make the stars) on the intersecting line. Do the same on all the points using the same mearsurement. Then make an X between the cross. Make these lines the same length all the way around. Then repeat this step except move your ruler out a little less: Take your ruler touching the top point, move it out about a 1/4 inch or so. Do the same on all the points. The vertical/horizontal cross should be the same thickness and the X should be the same thickness. Then just use the exacto to cut the lines. That’s about it. It’s really super easy. If you are unsure just practice on a plain piece of paper until you get it right. This design is so simple because it is all straight lines, no curves, which are more difficult. I hope this is easy to visualize. -Karen
KC says
What an awesome re-do! The new sink and sparkly stars make all the difference in the world 🙂
Rebecca says
This is a great rennovation, just beautiful. I just love the stencil design. Where did you purchase the “make your own Stencil” or did you really just make your own stencil. =-)
Great job and thanks for sharing!
Vintigchik says
I purchased them at Hobby Lobby. If you sign up for their email you can get a 40% off coupon:) -Karen
Vintigchik says
The “make your own stenicl kit” is pretty much just a type of vellum plastic sheet. You have to cut your own designs. I give instructions a few posts down. -Karen
Nebraska Nan says
LOVE IT !!
Larry says
I’m totally digging the medicine cabinet. I’ve been renting over the last few years until I can buy a house and to be as frugal as possible I’ve rented a couple of older apartments, no frills, and they both have had the same sliding medicine cabinets over the vanities as your bathroom. It gives me my retro fix while I’m waiting to buy. I have six more months to go and let the house shopping begin! But Karen, the redo is the best I’ve seen in a very long time..my kinda project..low cost but with a huge bang of satisfaction! Rock on!
Erica says
Yep. That is really a great job! LOVE the stencilling. Also so exciting to notice that I have the EXACT same mirror/vanity in my pink bathroom!