
.
To view the slide show, click on the first thumbnail, then proceed forward or back via the arrows just below the image.
.
Lauren writes:
Hello Pam!
.
Well, it’s been a long time in the making, but I am finally able to write you the convoluted and overly detailed story of how things went with our bathroom renovation! Just a head’s up that this may be a lonnnggg email.. lol.
.
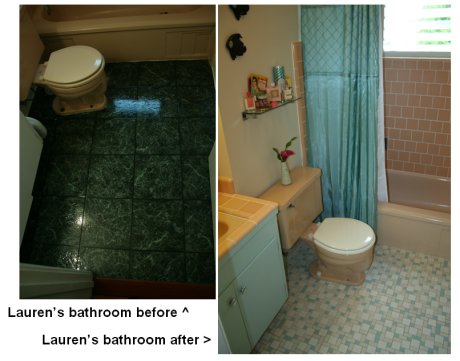
To start with you should know that in our 1956 house we were lucky to have had all the original pink tile in the hall bathroom. The sink, tub and toilet were matching, and so I had a lot to start with. What took the glitter off the diamond was faux marble sheet vinyl linoleum on the floor (in green) and a bad medicine cabinet and swag lamps that hung above the sink.The first thing I decided to do was schedule someone to come out and clean up the grout and professionally clean the tiles. The “Grout Medic” was the company I went with. It took only a few hours and looks great. The fallback here was that since the tiles are brick layed fashion, the grout guy ended up chipping several tiles and scratching a few others. It is still up for debate in my head whether this step was worth it. It pains me everytime I look and see a chipped pink tile that was otherwise *fine* previously. Still, it brightened up the tile, and for that I’m pleased.
The next step was was to decide on what floor I would want. Going off your suggestions, and hours of flickr searching for examples, I decided to use Daltile since they had a customizable feature on their website, and I could switch around colors and patterns. I picked a mosaic “block random” pattern and colors that would accent the pink tile. Daltile does not make a pink that matched mine, so I went with an aqua blue, an almond color and a speckle. Upon going into Daltile to order the tile, the clerk there had no idea about the customizable feature on the website, and had to be shown. A printed sheet of the colors and pattern was shown to him as well, in which he replied, “I don’t think we even make that”… But alas he was wrong, and the tile was confirmed and put on order.
.
I had picked a professional tile guy to do the installation. I chose him via an online service after seeing he had all his licensing and plenty of great reviews. He started work and things were going along decently, (though he had a tendency to really rock out to his classic rock station while working…lol), and I was impressed with his ingenuity with solving a few tile snags that had come up. The toilet was removed, the tile was set, and after just two days — the toilet was to be put back in place and wah-lah! But this is where the story gets interesting… He was putting the toilet back in… Four bolt toilets no longer the standard, he was trying to bolt in the two front bolts when “Crack!”… the base of my original pink toilet was cracked, and a large chunk was broken from it. He was fairly apologetic, and said he would be able to take the toilet and repair it. I was upset, obviously, and skeptical, too… but there was no real choice. A few days later, I inquired to see how things were going with the toilet repair and he said all he had to do was a water test and he would be able to bring it over that. The next day he arrived at my door, flustered and clearly “done”… handed me $300 in cash and said, “I cracked the tank, too. I’m sorry. Here’s money for a new toilet.” Well, my heart was heavy because as you know — we love our original pink fixtures, and to lose one is a bit awful. Not to mention, it put a major dent in the ‘big picture’, or how I wanted the bathroom to look. And so began the start of a search for a matching pink toilet… a near impossible task to find one the same shade of pink as the tub and sink.Meanwhile, the sink and tub were going to be refinished (or reglazed). After much searching and reviewing various companies and processes, I decided to go with ADX Refinishing, run by a very nice guy named Art Bailey. I was able to find paint chips of the sink underneath it, and Art was able to have his people match the color perfectly!!! And, after consulting Art, he thought he may be able to refinish a new toilet as well. After looking around, I decided on the American Standard Champion 4. Art came and refinished the tub and sink, removing the gaudy little star grips that were stuck there since sometime in the late ’70’s, and he took the toilet with him to refinish.
While the toilet was getting refinished, it was time to paint, install the light fixture (the Nuvo 24″ vanity lamp that I emailed you about earlier), the mirror (Nutone Admiral with cosmetic box, which my husband cut a 2×4 square from the back of to allow use of the outlet which would have been otherwise covered), exhaust fan (Hunter Halcyon), and fresh electrical fixtures (GFCI outlet and light switch), and finally the new faucet (Kohler Memoirs with Stately design). Now, it was about time for Art to bring back our new toilet, freshly refinished with the same color as the tub and sink. Alas, it still wasn’t meant to be, and he brought back a shiny white toilet. Apparently, the various curves of the toilet caused the new glaze to drip and ooze and being a good business man, didn’t feel comfortable with the results with the colored glaze on. So, we were now at the point of a nearly finished new-ish bathroom, with fresh tile, tub, sink, faucet, mirror/cosmetic box, and exhaust fan – and a tall, oversized, doesn’t-quite-look-right toilet. Needless to say, even though the bathroom looked nice, we were pretty bummed about that integral missing piece.
Well, five days ago, my husband was out on a walk and he gives me a call: “Get in the car, drive around the block and come get us. Don’t ask questions, just come quick.” I drive around the block, and one of our neighbors had on their driveway the same pink Crane Neuday we had just lost in our renovation! It was not only the same make and color, but it was from the same neighborhood, originally installed the same time as our original! We salvaged the toilet, spent a few hours scrubbing it, replaced the flushing guts, and it was ready for install. Out came the tall, shiny white toilet, and in went the pink. Finally the picture of the bathroom was as it should have been, or as close as we could get it. Score one for Save The Pink Bathrooms! 😉
As far as how we got to this house… Well, I have been into 1950’s stuff for about 15 years, and have always wanted a vintage mid-century house. We bought this house in a neighborhood primarily built in 1956. All the houses around here are very similar, and the neighborhood takes great pride in ownership, thankfully. As for our house specifically- I chose to buy this house because of the original tile in the kitchen and bathroom (and the neighborhood, of course). So many of these houses have already been gutted, so it was nice to see one that had some nice things left. The outside of our house was already covered in vinyl siding by previous owners, so sadly we don’t have the original “combed wood” wood shingles that are the covering for most of these houses. Another cute feature a lot of the houses have (which we don’t) is the built-in bird house at the eave of the garage or front of house. Ah well… we hope to make one one day. In any case, we have done several things to the house since moved in… Refinished the hardwood floors, had custom cabinets built with curio shelf, replaced the kitchen flooring with Armstrong tile, and painting, of course. I have so many ideas and plans… but time and money are always an issue, right? One thing at a time. I’m glad to be done with the bathroom and so very ready to have a “break” from it.
P.S… Just wanted to thank you again for the endless amount of inspiration you have provided via your blog!! Without it, I swear none of this would have been completed.
– Lauren
Beautifully done, Lauren. And, what a great story about the toilet. Thanks so much for sharing.




sam says
I just bought an appartment with the original tiles pretty much like the ones you have put in. First though was to reap them out for something more current but I’ve grown to love them, specially are they are in immaculate condition considering their age. The rest of the bathroom not so much, everything is cracked and/or chipped beyond repair.
In the new bathroom there will be white tiles with a niche of same pattern as floor!
pam kueber says
Great to hear! To replicate vintage floors like this today can get very expensive very fast, even if you can find the tiles. If they are in great shape — yes, we agree — try to keep them!
Faith Carlson says
Site is SO HELPFUL, but I need help with a bathroom addition. In the original bathroom, there is square/mosaic FLAT, matte floor tile? Is it possible to recreate it for my new bathroom? I prefer to avoid the curved-edge kind (can’t remember what that’s called).
Thanks in advance!
pam kueber says
Faith, see our category Bathroom Help / Tile help and ideas for all our resources on where to find tile for bathrooms. It may be that in your original bathroom you have porcelain tile (which usually presents very flat, without sheen) whereas ceramic mosaic has a glaze on top and more likely a pillowy-feeling edge….
Mike Stewart says
What is the best way to contact you and or to purchase vintage tile, cir. 1960, from you. I have a bathroom that was installed back in the early to mid sixties. A mosaic pattern of 1’x1′, 1’x2′ and 2’x2′. Mostly light blue with some darker blue 1’x1′ tiles mixed in.
Thanks for you help.
Mike
pam kueber says
We don’t sell anything here. See the Bathroom Help/Tiles page or FAQ for resources.