

 Reader Lynne emailed a while back asking for ideas about how to handle the room divider inside her 1959 Florida home. With her problem solved — and thanks to lots of suggestions from Retro Renovation readers — she’s back with pictures to share.
Lynne wrote:
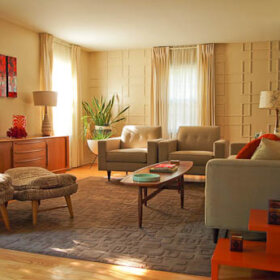
It’s been a long time coming but I wanted to send you some photos of the room divider that I had written to you about several months ago. There were so many excellent and thoughtful tips from your readers, and I really appreciated all the insight. Many people suggested that I live with the room divider (and any other features I may want to change) for a year or so, which turns out to be great advice – it’s so true that once you are in the house and living there day to day what might seem like an issue is not at all. I ended up painting the room divider a sky/turquoise blue, which is an accent color in my green and blue color scheme, and had a piece of MDF cut to fit over the planter portion. I painted the MDF shelf white to match the bricks below, and now I’m able to place a few decorative items on this and it’s very functional. I originally wanted to get white marble but frugality won out! As this is a vacation home, I did not want to put any plants in there at this time, but I can always do that at a later date. When I am in the living room or kitchen the room divider is not as much of a separator between the two rooms as I had originally thought. I have attached several photos of the house, before and after, and overall it’s coming along well and I’m pleased with the progress. Most of the work we did was outside, painting and landscaping, but we did have the carpets removed and the terrazzo floors refinished, and I have purchased a lot of furniture and household goods second hand from many sources – which has been huge fun staying with a 50’s -60’s vibe.


Above: Before.
Above: After.
Thanks,Lynne. It looks fantastic — and it’s so great to see you and Larry enjoying your vacation home…. respecting its original bones, yet still making it your own. 🙂


Gayla says
Actually, if you want to keep to the era, you fill your planter with plastic plants and flowers. Yes, I know but that was the fad. Everyone loved them.Remember, plastic was new tech. It was Tupperware heaven. Before plastic came along, my grandma made flowers out of crepe paper and dipped them in wax to make them look “real”. LOL That would have been in the 40s Actually the only flowers that looked like her creations were either dead or dying. About the same time the plastic craze was going on, my grandma, aunts and mother made flowers out of copper wire they got when they unwove copper window screens. They bent the wire into petal shapes and stretched nylon hose fabric over it. When they had enough petals made they put them together and formed a flower. Big ones went into flower arrangments and the small ones went into corsages that they wore everywhere. I can remember them on ladies at church and also showed up at family dinners. If you left first, the rest of the family critiqued your handiwork. These were actually made of worn out ladies stockings. No panty hose. The nicest were the white ones worn by nurses. I can remember my mother putting my brother in his Taylor Tot and she and I walked to the Dr’s office which was ten blocks away to pick up a sack of snagged nylons. The white ones took the dye colors so much truer than the tan ones, I know at least once when Mom wanted to make flowers for a gift that she bought new white ones. These women all stayed at home all day long and needed something to do. If you fall in that catagory you might want to try making some for your planter. it would be so cool.
pam kueber says
i have some plastic fruit, tee hee
angie says
Lynne!
That looks fabulous. It makes me think of a waterfall!
Well done.
Amy says
LOVE it!!! Everything that Edwin said reflects my feelings as well. Great color choice, too!
Keep us posted on other projects — and I’d love some close-ups of your terrazzo floors!