


 Here is a recipe for a (relatively) cheap, cheerful and effective work bench or crafting work space: Take two of these Ikea Trofast children’s storage frames… butt them together low-end to low-end… fill them with the Ikea plastic bins… top with a ready-made laminate countertop, or order a design you like, or use a Ikea Numerar countertop (now discontinued, but there are other butcher block-style options)… and voila: A nifty work space with tons of handy storage. The Trofast frame stands 36″ high at its highest level, so with the countertop, it’s just a tad higher than a standard kitchen counter — a good working height, I think, if you are at least 5’6″ tall or so.
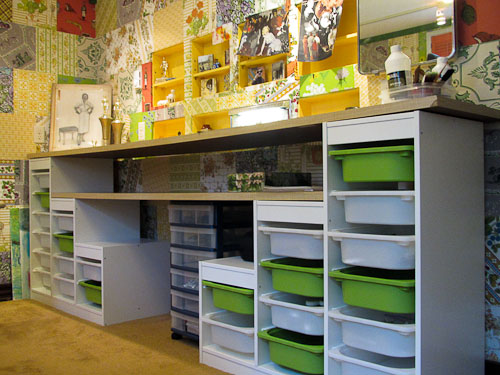
The idea in real life (mine):

Okay, so the photo above is not super pretty. This is my husband’s work area wedged into a small tool room in our basement. He is an absolute neatnik — I take blame for that mess in the middle; if I were a prouder blogger, I’d clean it up for this photo. Although, I guess you could say: This is real. The reason I even thought to do this story about our Ikea work bench hack is that, with ideas buzzing for my office makeover, I went and communed for a while with this whole set up to consider whether I just straight-out copy it into my office-turned-office/craft room. I dragged DH into the discussion, and he agrees: This tool room work bench — which uses two Trofast children’s toy storage units that we purchased from Ikea 13 years ago — is the best ever. His words.

The Trofast’s pine frame — at least the one we purchased circa 1998 — is impressively sturdy, indestructible, even. From the photos online today it looks the same — construction quality does not appear to have changed. The plastic bins are lightweight but strong. They slide in and out just like drawers, and you can take them all the way out, and tote them where you need to use them — this would be good in a craft room.
Ikea has a variety of other shapes and sizes of this Trofast storage units that use this same pine-frame-with-plastic-drawers design concept — lots of pieces to potentially combine into creative systems of stuff to hold your stuff ugh. However, I do wish that Ikea had a design as deep (18″) and high (36″) as the Trofast, but with drawers that went all the way to the top so that the big mess-in-the-middle, when used according to my design would not occur; alas they do not. If I actually do this in my craft room, I will have to hack the hack to fix the gap.
Will I replicate this world’s best workbench for my office craft area? Maybe, maybe not. I need to explore every goshdarn potential solution until my eyes bug out. I still may need to do the craft room all vintage, The Hard Way. Ideas still buzzing.
 Update: See how I used my Ikea hack but with a different spin — for craft storage in my office. Super happy!


Jay says
The workshop looks nice and those units would probably work for you but you might prefer something with a bit more posh as your room is finished. Somthing with real drawers or door fronts which would keep the craft contents clean and dust free. You can go crazy with the IKEA possibilities alone. I want to see your eyes bug out!
pam kueber says
Yes, that is among my concerns, Jay!
denise says
Ditto what Jay says. I do like the idea though for an area not finished, like a clean basement used as craft area.
thanks for this, as I’m trying to figure out a solution for a tabletop with underneath storage for fabric…in my basement.
I’m also with you on being determined to find vintage pieces that will work. I try to stay away from buying new plastic. It pains me to say it, but recently I have decided that sometimes in order to get things in order, one cannot wait for the magic of vintage to happen…gosh that makes me sad. 😉
pam kueber says
Yes, Denise. I am not sure that I am going to be able to pull off “the magic of vintage” in a timely way. I don’t want to take months or years to finish this. No way. We’ll see.
sarah says
we have current trofast units and if you look, there is a tall unit for 49.99 that is basically the tall part of the stepped unit on its own; it would cost more to just use those but it would go all the way to the top and you could customize the width a lot better. In our local ikea they have a kid’s room setup with 3 of those bolted together, I like it better than the stepped unit (although my kid loves the stepped unit as a play surface!)
sarah says
scratch that — I just remembered that those tall ones are sideways so it wouldn’t work for you. Also, why is your comment system grabbing an avatar for me when I’m not logged in? That is creepy.
pam kueber says
sarah, i quick took out your email and your avatar disappeared. i will see what i can go re settings, but am not sure. it’s grabbing avatars associated with email addresses – i think. maybe YOU can change your email settings????
pam kueber says
Sarah: Further update on the avatar system. Mine is a WordPress site. This is their default, I believe. They say the gravatar is based on your email address. There are no settings for me, expect to choose what generic image (or none) shows if there is no gravatar. My dashboard control for this says gravatars are pulled based on email addresses. I think that whether your avatar renders is something YOU control in your email settings. If you prefer you gravatar not show, put in a dummy email address…or again, check your settings to see if you can control how/where your gravatar renders. Hope this helps.
sarah says
thanks, Pam. I will log into wordpress and try and figure out why it’s doing that. I had to do something to wordpress recently through my myfolia account and maybe it changed a setting, I rarely use their system so I’m not very familiar with it.
sarah says
ok, looks like it is not actually wordpress (I had no avatar saved there) but gravatar itself pulling the image; I think I have fixed it though, so if you don’t mind let this comment go through so I can see what happens. thanks!!
sarah says
ok, yes, it was because I had a gravatar account with an image in it; wordpress pulled the gravatar based on my email address in the comment. I wasn’t logged in to either system, it was all automatic. Apparently the only way to fix it is to either use a different email address or remove/change the image. You can’t choose whether or not to display the image as far as I can figure out. (Or close a gravatar account! Which was news to me.) thanks for your help!
pam kueber says
still showing, sarah!!! i’ll take it out – but you should know
pam kueber says
yikes, all this tech – it’s something new every day!
pam kueber says
pulled your image out again!
sarah says
argh! that is seriously strange because for me there was just the blank gravatar. ok, looks like more research is required. thanks again!
sarah says
ok, I think I’ve finally got it cleaned out of everyplace….now let’s see what happens. sorry to hijack your thread, btw!!
pam kueber says
hey, not to worry!
pam kueber says
Yes, I looked at those tall ones – right height, but only 12″ deep. 18″ deep would be spot on.
pam kueber says
They also have 20″ tall (three bins horizontally). But, 40″ for a work height is just too high. Not my much, drats
Breeboo says
Just put the back panel on the OTHER side and the drawers should still work. Doesn’t all IKEA come in pieces anyway?
Breeboo says
Then, you might have room to do this with four units and have a long counter after all.
Breeboo says
Just an observation, don’t know if it will work in actuality, but it appears you might be able to turn the second unit upside down on top of the first like a tetris puzzle. This would keep the counter at the same height, but would get rid of the middle muddle. Of course, the back would have to work with this, and the unit wouldn’t be as long……
John aka AtomicHipster says
Hi Pam, if you flipped one of those unite upside down they would fit together like a puzzle piece but then the slots for the drawers wouldn’t work unfortunately.
John
Susan Rose says
I love this idea, may I Pinterest it?
pam kueber says
Yes, you can, as this is my photo. Good for you for asking, that is the Right Thing to Do.
Susan Rose says
Thanks, Pam!
Kate says
This is AWESOME! I might need to make one of these for my future basement work shop.
🙂
clampers says
Did you attach these to the wall? Or the countertop? Just wondering about logistics…
pam kueber says
Clampers, I don’t remember. I think it would be the right / safe thing to do!
Colleen says
Wish I would’ve seen this earlier!! My makeshift “craft area” in my basement is a hodgepodge of storage. This would’ve been perfect for me. Great idea!
Kathryn says
Doors also make great work surfaces. The flat ones, of course, not the 6-panel. 🙂
Love that the supports have storage!