Brian & Keri’s Happily Ever After $7,000 kitchen remodel
pam kueber - Updated: May 4, 2021
Retro Renovation stopped publishing in 2021; these stories remain for historical information, as potential continued resources, and for archival purposes.
“We moved to Nashville… looking for a better
quality of life and a little house to love…”
When Brian and Keri moved into this Nashville house two years ago, they embraced their home’s heritage — and instead of gutting to granitize, they planned modest updates to the existing galley style kitchen to make the working and eating space even more fun to spend time in.
They did a lot of work themselves, spending just $7,000 to create a super-happy, pretty much “all new” kitchen — that looks like it’s been there 60 years. What’s old was repainted or otherwise freshened… what’s new is authentically suitable to the kitchen’s original era and design. Lots of great ideas, resources — and 17 great photos — all credited Brian McHugh — here. Brian writes:
Hi Pam,
We moved to Nashville two years ago from Los Angeles, looking for a better quality of life and a little house to love.
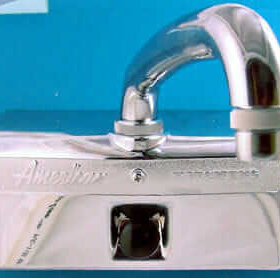
We fell in love with our 1953 cottage-style ranch at first sight, in part because of the mint green and black bathroom, but also because of the super cool red amazon logo on the front of the vintage Youngstown sink cabinet.
[Pam says: Brian calls the badge an “amazon,” but in fact, that’s the logo for Youngstown Diana kitchen cabinets, as in the Roman goddess Diana the Archer. That’s a Diana sink base above and here —
You can also identify Diana sink bases from the unique rounded apron (which holds the logo) and the stepped-back door design just below. Pretty. – Pam]
We even have a knotty pine den, complete with patterned wall paper ceiling. The house was somewhat neglected, badly painted, and decorated in a very utilitarian way. We decided we wanted to bring this neglected little house back with loving appreciation and a modern midcentury aesthetic.
Notice the original countertop and the old style, heavy duty, integrated edging — that’s pretty hard to find. Way cool. – Pam
The kitchen was our last big project. We wanted to double the size of what we already had, moving the washer and dryer, adding a dishwasher and microwave, and moving the old girl into the twenty first century. The original kitchen had a small set of original Youngstown steel cabinets with only two uppers and two lowers. It took almost a year to find another set of Youngstown cabinets to add to our existing set, in part because we were looking for a set with the chrome countertop bumpers and trim. We found a set in Knoxville, drove four hours one way to check them out and rented a trailer to bring them home.
We gutted the kitchen, removing the existing cabinets, and had them painted with the electrostatic paint process.
To save money, we prepped (the cabinets) ourselves, sanding eleven cabinets down to the bare metal. [Precautionary Pam reminds: Please always remember, there can be safety and environmental hazards in the surfaces, layers, materials and products in our homes. When working with old materials and products like this, be sure to get with your own properly licensed professionals to determine what you are working with so that you can make informed decisions how to handle, become familiar with and use recommended best practices, and also learn about the proper disposal of debris, etc. Be Safe / Renovate Safe.]
The original countertops were formica cracked ice. We replaced them with formica aqua boomerang laminate. We saved the original sink, got it refinished instead of replacing. It goes beautifully with logo on the front of the sink cabinet. The whole house needed the electrical updated, and the kitchen need plumbing moved to support our changes to the appliances. The washer and dryer (had originally) lived in the kitchen, which was the first thing to go…. We gave up our pantry and had water lines and power run to the pantry so we could install stackable units.
I wanted to save the original chrome “Fleur O Ray” flourescent fixture in the kitchen, so I found 4 replacement ballasts and installed them, making the fixture useable again.We had to ditch all the original brass door hardware with polished chrome, which complements the kitchen chrome well. Finally, We replaced the flooring with AZROCK laminate, which we found out about on your site. It’s Azrock VL-130 Classic Blue Gray vinyl tile. Tons of work, but totally worth it.
Max and Mitzi are nonchalant about The Retro
Suggestions for refinishing the cabinets, Formica boomerang counter top laminate, and flooring came from the Retro Renovation website. We managed to keep the entire kitchen remodel, including new appliances, plumbing, electrical, and flooring for under $7,000.
We both work in the visual arts, and collect art avidly. The walls of the kitchen are hung with some of our favorite artists: the typography under the clock is a collection of little “ass-ham” painting characters by Arizona artist Lesli Englert, the large print on the back wall and two small prints are by San Diego artist Scott Saw. There are also vintage valentines framed and hanging near the 1950s dinette.
Thanks again for the website! It was a wonderful resource while we were renovating the kitchen, and we couldn’t have done it without you.
Best,
Keri and Brian
Thank you, Keri and Brian, for sharing your story and all these wonderful photos. FANTASTIC kitchen. I love it, and suspect it will be one of our favorites of the year. Even a contender for 2012 Hard Way Award, methinks.
.
Readers, Brian and I chatted about some other things in our back-and-forth. In particular, I wanted to share that he and Keri chose professional electrostatic painting over powder-coating because they were told that (1) the high heat necessary for powder coating could warp the doors and that (2) the material used to stiffen and sound-insulate the doors might even catch fire under the high heat of powder-coat baking. Be forewarned and moreover: Consult with professionals.
.
Also, stay tuned for some more photos from their home. Knotty pine den with wallpapered ceiling, you say? You know I’m onto that.
Love your cabinets . I rehabbed Youngstown cabinets myself and just finished having them installed on a 4 inch
Base(needed the height). How do I show off my pics to you?
Virginia
Dianesays
Hi there…. I’m nearing the end of my kitchen remodel, salvaging original Youngstown cabinets. When I replaced the laminate countertop with Formica ‘cream linen’, there was a slight difference of thickness from the original (thicker) to the new thinner material. Without really giving it much thought, my installer and I shimmed the edges of the new laminate to maintain a good seal where the laminate meets the stainless steel edging. Now, a couple months later and ready to complete phase 2 of the project, I have decided that I want to remove the new laminate, put some kind of thin substrate down, and then reattach new laminate. The shimmed laminate is uneven and wavy in the light, and I’m concerned it won’t wear well over time. It’ll be a concerted effort to detach the cabinets again from the wall, but I really want to do this right.
I am wondering what you used, and if you needed to use anything, to raise your laminate up to create a solid, flat, long-lasting surface.
I’d really appreciate any help you could offer.
Sincerely, Diane
(Tucson ,AZ)
Sherri Washamsays
I’m looking at replacing the original with laminate myself and have the same question. I looked up the crème linen and it’s gorgeous! It’s hard to tell from the pix, is the background more gray or more white?
Sherri Washamsays
I ordered a sample of the crème linen and the background is a very light tan. Lovely pattern, but I wanted a white background.
I asked a friend, who’s very good with making things work right, about the difference in thickness. He suggested the shims be put on the UNDER side of the trim pieces. That way the laminate will lay flat yet the trim will fit tightly. I’m still in the demolition-of-the-old-kitchen phase, but hopefully in a few months I can let you know if this worked for me.
Sherri Washamsays
Love the kitchen, your hard work paid off!
Would you be willing to talk to me about the do’s and don’t of recovering the countertop? I have 2 pieces that are covered in (nasty!) linoleum but haven’t tackled that yet and would appreciate any advice you could give me. You can email me at SherWash@cox.net Thanks!
Wendy Keelingsays
Hi !
I am a local Independent filmmaker looking for a kitchen for a short film shooting in November. This kitchen is exactly what I am looking for!! Would you ever consider allowing a very small cast and crew access to your home? Please message me!!!
Thank you!!!
Wendy
pam kuebersays
Wendy, no one can see your email but the administrator.


 When Brian and Keri moved into this Nashville house two years ago, they embraced their home’s heritage — and instead of gutting to granitize, they planned modest updates to the existing galley style kitchen to make the working and eating space even more fun to spend time in.
 They did a lot of work themselves, spending just $7,000 to create a super-happy, pretty much “all new” kitchen — that looks like it’s been there 60 years. What’s old was repainted or otherwise freshened… what’s new is authentically suitable to the kitchen’s original era and design. Lots of great ideas, resources — and 17 great photos — all credited Brian McHugh — here. Brian writes:
We fell in love with our 1953 cottage-style ranch at first sight, in part because of the mint green and black bathroom, but also because of the super cool red amazon logo on the front of the vintage Youngstown sink cabinet.
[Pam says: Brian calls the badge an “amazon,” but in fact, that’s the logo for Youngstown Diana kitchen cabinets, as in the Roman goddess Diana the Archer. That’s a Diana sink base above and here —
You can also identify Diana sink bases from the unique rounded apron (which holds the logo) and the stepped-back door design just below. Pretty. – Pam]


 Thank you, Keri and Brian, for sharing your story and all these wonderful photos. FANTASTIC kitchen. I love it, and suspect it will be one of our favorites of the year. Even a contender for 2012 Hard Way Award, methinks.


Virginia Burke says
Love your cabinets . I rehabbed Youngstown cabinets myself and just finished having them installed on a 4 inch
Base(needed the height). How do I show off my pics to you?
Virginia
Diane says
Hi there…. I’m nearing the end of my kitchen remodel, salvaging original Youngstown cabinets. When I replaced the laminate countertop with Formica ‘cream linen’, there was a slight difference of thickness from the original (thicker) to the new thinner material. Without really giving it much thought, my installer and I shimmed the edges of the new laminate to maintain a good seal where the laminate meets the stainless steel edging. Now, a couple months later and ready to complete phase 2 of the project, I have decided that I want to remove the new laminate, put some kind of thin substrate down, and then reattach new laminate. The shimmed laminate is uneven and wavy in the light, and I’m concerned it won’t wear well over time. It’ll be a concerted effort to detach the cabinets again from the wall, but I really want to do this right.
I am wondering what you used, and if you needed to use anything, to raise your laminate up to create a solid, flat, long-lasting surface.
I’d really appreciate any help you could offer.
Sincerely, Diane
(Tucson ,AZ)
Sherri Washam says
I’m looking at replacing the original with laminate myself and have the same question. I looked up the crème linen and it’s gorgeous! It’s hard to tell from the pix, is the background more gray or more white?
Sherri Washam says
I ordered a sample of the crème linen and the background is a very light tan. Lovely pattern, but I wanted a white background.
I asked a friend, who’s very good with making things work right, about the difference in thickness. He suggested the shims be put on the UNDER side of the trim pieces. That way the laminate will lay flat yet the trim will fit tightly. I’m still in the demolition-of-the-old-kitchen phase, but hopefully in a few months I can let you know if this worked for me.
Sherri Washam says
Love the kitchen, your hard work paid off!
Would you be willing to talk to me about the do’s and don’t of recovering the countertop? I have 2 pieces that are covered in (nasty!) linoleum but haven’t tackled that yet and would appreciate any advice you could give me. You can email me at SherWash@cox.net Thanks!
Wendy Keeling says
Hi !
I am a local Independent filmmaker looking for a kitchen for a short film shooting in November. This kitchen is exactly what I am looking for!! Would you ever consider allowing a very small cast and crew access to your home? Please message me!!!
Thank you!!!
Wendy
pam kueber says
Wendy, no one can see your email but the administrator.
Wendy Keeling says
I am so sorry!! I did not realize that.
Please email me at wk7milebridgeproductions@gmail.com
Thank you!
Wendy Keeling says
I am so sorry!! I did not realize that.
Please email me at wk7milebridgeproductions@gmail.com
Thank you!