

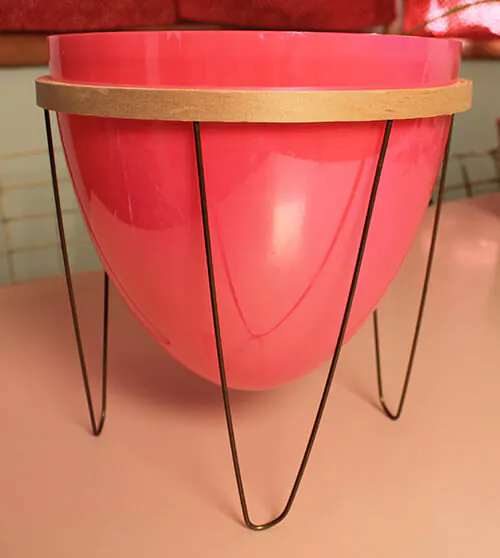
 When I see Easter decorations popping up in the stores, I know that spring was nearly here. This year, I had a great idea about how to use some of those brightly colored Easter eggs for a new Retro Crafty project. The result — a DIY tabletop bullet planter made out of the larger half of a large plastic Easter egg, a wooden embroidery hoop and some wire hangers. It was fun, easy and quick to make — and once the snow melts it will be a great place to make a mini mid century garden.
Materials needed for this project are:
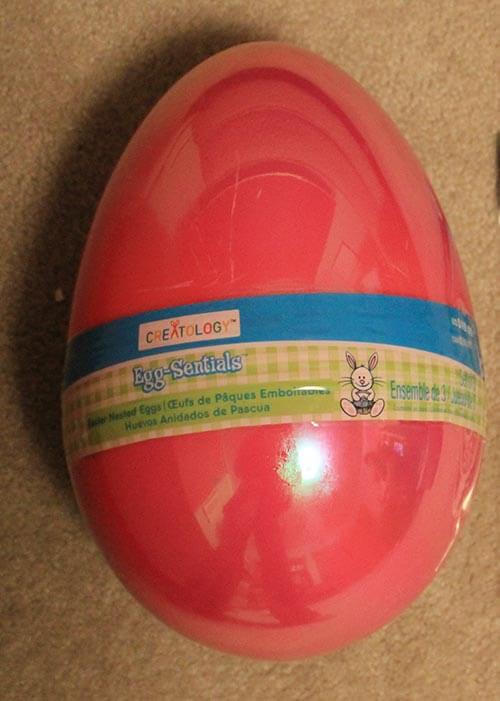
 a plastic Easter egg (I found this large one — part of a set of three nesting eggs at Michaels. With a 40% coupon, the set of three was about $12.)
- two wire hangers
- a wooden embroidery hoop (the one I used was an 8 inch hoop and cost about $1.50)
- wood glue
- pencil
- drill and drill bit that is the same thickness as your hangers
- wire cutters
- spray paint (I didn’t paint mine yet, but in the spring I plan to spray the base all black and the egg a different color using spray paint that is specified for plastic)
This project was quick and easy. Minus glue and paint drying time, the whole project can be completed in about 10 minutes. If you would like to make this project, but can’t find the Easter egg set at Michaels, you could use any size egg that you can locate, as long as you can find a corresponding wooden ring to use for the stand. Smaller planters could be used as a decorative catch-all for smaller objects — such as a push pin holder to place near a cork board, a toothpick holder or even a container to put rings or earrings in when they are taken off for the day. I recommend that you keep this planter indoors or use it outside only in covered areas to keep it safe from the weather and looking its best. No matter how you use your small hairpin leg egg planter, I hope you have fun being Retro Crafty.
This isn’t my first Retro Crafty planter project — take a look at this mid century inspired planter stand I made in 8 easy steps.


Maryann Roy says
This is so clever Kate ! I love it when creatives see
common items in a different light ! Thank you for sharing another inspriational idea. 🙂
Thanks to TammyCA and Pam for mentioning my work and for the links !
Maryann Roy
“Welcome Home”
Jill says
GEEEnius! Thanks for the inspiration!
The Baroness says
Genius! Totally stealing this to make a bazillion groovy planters for around the house. Thanks, Kate!
RetroSandie says
Kate, just love this idea!!!! Who would have thought about a bullet planter from looking at that set of super sized eggs??!!!!! Simply awe-inspiring!!!!
Erin says
Cute! I want to try this! 🙂
Melanie says
This is so cool, and kind of a “duh why didn’t I think of that” sort of thing. I will definitley be making one of these soon. Love the idea of little ones too.
Jan says
I love this! Of course, I loved the first one, too, but haven’t yet been able to find a pot that is just the right shape. But this one – surely I can find a big plastic egg! Thanks for another one, Kate!
Tasha says
Kate seriously, you come up with the BEST mid-century crafts!! Holy cow, I love this!
tammyCA says
Clever idea! I have so many small plastic eggs that I think I’ll make a mini one for our Barbies. Check out these MCM Barbie rooms! Makes me wanna build stuff: http://www.flickr.com/photos/welcomehomefurnishings/7636457122/
pam kueber says
ahhh! we have featured maryann roy’s barbie interiors before. here — https://retrorenovation.com/2009/04/06/midcentury-interior-design-for-barbie-from-maryann-roy/ and here — https://retrorenovation.com/2009/03/09/barbie-turns-50-fashion-doll-quarterly-publisher-pat-henry-puts-our-favorite-doll-in-perspective/
might be time for an update. thanks, tammy!
tammyCA says
Cool…I had wondered if she was featured here before I came on board. I’m inspired now to make my own Barbie-sized MCM furniture…if I can’t have the real size stuff I can now for Babs. 😀
hannah says
First – a tip of the hat to Kate for such a fabulously simple idea! Thanks, Kate!!
Now to Tammy’s remark…I am on a Barbie (vintage) BINGE lately. Creating dioramas, buying clothes, getting some of the vintage (repro) dolls I never had growing up…SO, I find this NIP Gloria bar on eBay for $10. I note while doing a Google image search for ‘Barbie bar’, that people have taken this new item (all pink and gaudy) and turned it into more classy bars for Barbie and their dioramas! Mine just arrived today and I’m going to make it have a Mad Men feel. it comes un-assembled, so that will make it easy to make over with paint and ‘wall paper’.
The original item:
http://www.ebay.com/itm/GLORIA-FURNITURE-SIZE-HAPPY-HOUR-DRINKING-BAR-W-BAR-STAND-PLAYSET-/400419614276?pt=US_Dolls_Bears_Toys&hash=item5d3ade6e44
1 of many makeovers:
http://www.flickr.com/photos/carole_anne/4269999799/
Ok, ALL that to say I think the idea of a mini bullet planter with a small egg for Barbie is fantastic! Could you use large paper clips for the hairpin legs? I wonder….hmmmm
And I’ve seen Maryanne’s Barbie dioramas years back, but was reminded when I ran into Pam’s article via a Google search on Barbie dioramas last weekend. Serendipity! Be sure to visit her blog and search out the “Honey West” photos she has. Really amazing.
A friend and I are actually considering trying to make some MCM Barbie furniture/items to sell. The bullet planter would be GREAT!
hannah says
Tammy, what do you suppose this person used for the hairpin legs on the coffee table??
http://www.etsy.com/listing/111890671/swanky-mid-century-moderne-living-room?ref=shop_home_active
tammyCA says
I was thinking of using actual hair pins…I have a ton. 🙂
I’ve done dioramas with my Barbies before (even had one printed in the now defunct Barbie magazine)…and, I’ve made miniatures for my dollhouses. It is so much creative fun and I’m inspired to get back into it again. I wish I still had my original Barbie from ’64/’65…I only have the Retro reproductions or new ones, like Audrey Hepburn.
Joyce W says
Very cool! And I just bought a set of those eggs to decorate for Easter with! And the best part – something I can use those horrible wire hangers for (DH gets his uniforms on them but I hate them LOL! ) I’m just too excited to try this – and I have the perfect spot for it too since we have just started redoing our dining room,. Thanks for another great project!