

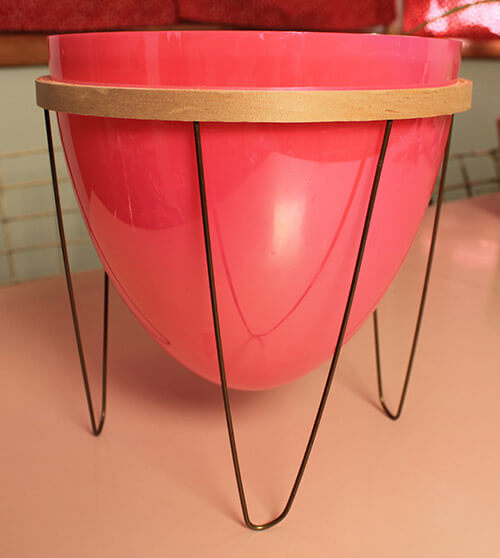
 When I see Easter decorations popping up in the stores, I know that spring was nearly here. This year, I had a great idea about how to use some of those brightly colored Easter eggs for a new Retro Crafty project. The result — a DIY tabletop bullet planter made out of the larger half of a large plastic Easter egg, a wooden embroidery hoop and some wire hangers. It was fun, easy and quick to make — and once the snow melts it will be a great place to make a mini mid century garden.
Materials needed for this project are:
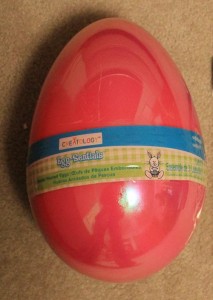 a plastic Easter egg (I found this large one — part of a set of three nesting eggs at Michaels. With a 40% coupon, the set of three was about $12.)
- two wire hangers
- a wooden embroidery hoop (the one I used was an 8 inch hoop and cost about $1.50)
- wood glue
- pencil
- drill and drill bit that is the same thickness as your hangers
- wire cutters
- spray paint (I didn’t paint mine yet, but in the spring I plan to spray the base all black and the egg a different color using spray paint that is specified for plastic)

This project was quick and easy. Minus glue and paint drying time, the whole project can be completed in about 10 minutes. If you would like to make this project, but can’t find the Easter egg set at Michaels, you could use any size egg that you can locate, as long as you can find a corresponding wooden ring to use for the stand. Smaller planters could be used as a decorative catch-all for smaller objects — such as a push pin holder to place near a cork board, a toothpick holder or even a container to put rings or earrings in when they are taken off for the day. I recommend that you keep this planter indoors or use it outside only in covered areas to keep it safe from the weather and looking its best. No matter how you use your small hairpin leg egg planter, I hope you have fun being Retro Crafty.
This isn’t my first Retro Crafty planter project — take a look at this mid century inspired planter stand I made in 8 easy steps.


Donna says
Wow Kate! You have such a creative mind!
Love the planter. Hope to see you again this year when you visit Tennessee.
Donna ( mom and dads neighbor).
Jenny A. says
That is so cute! You are super clever and crafty 😉 Every time I see wire hangers, though, I can’t help but think “NO WIRE HANGERS” in my head, ha ha.
Kate says
I think that too! hehehehe
vegebrarian says
Wow, Kate! This is a very clever idea – I can’t wait to make some of these for the porch!
Annie B. says
Truly adorable!
Robin, NV says
Hmm, I wonder if I could make a small one to hold paper clips on my desk. Wouldn’t that be cute? Come to think of it you could probably make an egg sized one using large paper clips. Just gotta figure out what to use for the ring . . . Maybe the ring from a milk jug?
pam kueber says
Great idea! Let us know what you figure out to use for the ring!
Desirae says
I found this for dollhouse bullet planters. http://modernkiddo.com/dotties-kraft-korner-dollhouse-bullet-planter-diy-from-danielle/
RetroSandie says
Thank you for the link to this cute mini project!!!
Janet in CT says
Very cute project, Kate! If you have alot of little ones or grandchildren, you could fill it full of Easter candy, or even use it at Halloween for candy – it is so Kiddy Cute! That giant jumbo sized egg just speaks lotsa candy to me!
Jay says
This has to be the ultimate retro crafty project.
Don’t forget to put a pot of daffodils or tulips inside the planterfor Easter.
Tom says
How clever!
Rob and Monica says
very very cute!!!!!!!! How do you cut the egg??? the video is private I can not see it!
JamieAbe says
No need to cut the egg. the bottoms are removable, just like the small ones.
Rob and Monica says
thanks! I realized it later after I left for work!!!!!!!! (thats what happens when you wake up at 5 am!!!)
joan says
Hi Kate;
Cute planter – you and Pam are just so crafty. Are you going to make all three sizes?
Joan
ps the video would not play for me – it says private
pam kueber says
ooopsy — fixed! will play now!
Kate says
Thanks!
I just might — but I have to find the right size wooden hoops to use as stands — and maybe I’ll take that trip to the dry cleaner that I’ve been putting off so I can get more wire hangers! 🙂
Sarah g (roundhouse) says
I love this idea, I may have to try this out!! Plus being that I work in the family dry cleaning business I always love projects that require a trip to the cleaners for wire hangers! Lol
Kate says
They are a very versatile crafting supply! Lucky you — my stash is getting low!