Nanette and Jim’s vintage blue bathroom — built new from scratch
Kate - Updated: July 22, 2021
Retro Renovation stopped publishing in 2021; these stories remain for historical information, as potential continued resources, and for archival purposes.
When Pam saw a tantalizing photo of Nanette and Jim’s bathroom remodel on Facebook — posted by rockin’ retro Portland realtor Alyssa Starelli — she knew that we had to feature their fantastic space. So we chased after, with AlyStar making the fairy godmother connection, we get to see Nanette and Jim’s vintage blue bathroom — built from scratch. Using vintage salvaged fixtures, vintage wallpaper and and other era-appropriate choices for tile and flooring, this visionary couple transformed an empty portion of their basement into a beautiful blue bathroom that suits their 1945 transitional ranch home. Seriously, though. Why are we even bothering with this wordy introduction. When we could just say:
WOW!
Nanette writes:
We live in a 1945 transitional ranch in Portland, Oregon.
Goal was to create a second bathroom that looked like it could have been there / was original to the house (in the basement, no small chore).
House did not have a laundry room.
Discovered we could do so inexpensively without digging in new plumbing lines from the street down under the house (used a pump we affectionately call the sh*t pump).
Found vintage/era sink, toilet and medicine cabinet all in MINT working condition which cost way less than buying new and are way more gorgeous. (There’s a bit of a story about getting it all to be code but we managed it, this project was done to code btw).
Used vintage / era wallpaper from Hannahs Treasures, love it!
Used lots of glass block, it comes in hunks already put together!
Varnished knotty pine to match existing pine from the 1940s going down stairwell into the basement. (No small task).
It took a lot more time than we thought it would but it’s so good!!!
Here it is before the demo. It was a storage area that we could access through an large opening at the bottom of the stairwell. We kept a curtain across this hole (which many a person fell through on their way down to the bar).
This storage rack is where the shower ended up, the water heater was moved (and we upgraded to gas).
In the beginning I did a drawing of the space to use as a guide for build out/installation etc. (I’m a graphic designer but have never done anything like this before). It has turned out pretty much identical to the drawing.
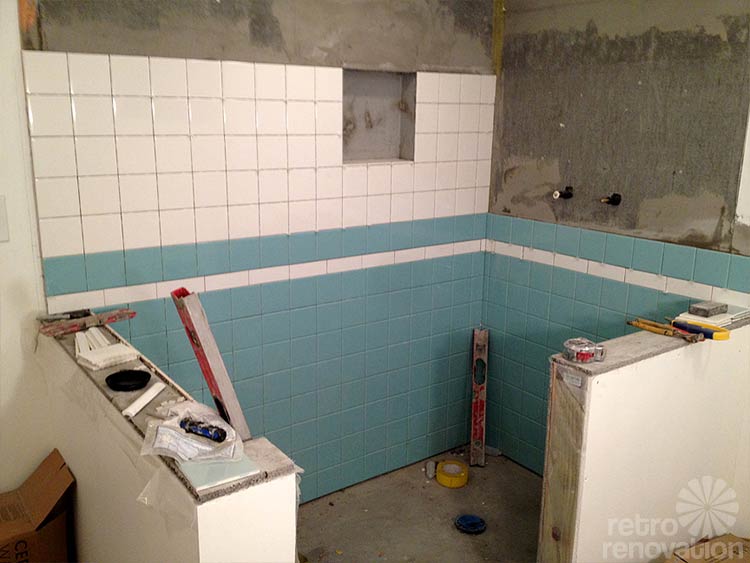
Vintage wallpaper from Hannahs Treasures and tile decisions (this was a hard decision!)?We chose 2 shades of aqua/blue tile from Dal Tile and the white is actually from Home Depot (it’s Dal white).
We hired a tile setter to install the tile, he did an amazing job, he was painstakingly detail oriented. For the flooring we went with Congoleum VCT, it is very vintage looking and polishes up to a gorgeous sheen not to mention really inexpensive. It’s from the Congoleum “value” line, it really was a great value. Our white floor is the berry blossom and the blue is aqua spring. The Congoleum VCT is laid with the pattern going in the same direction (I can’t remember what they call that, not parquet).
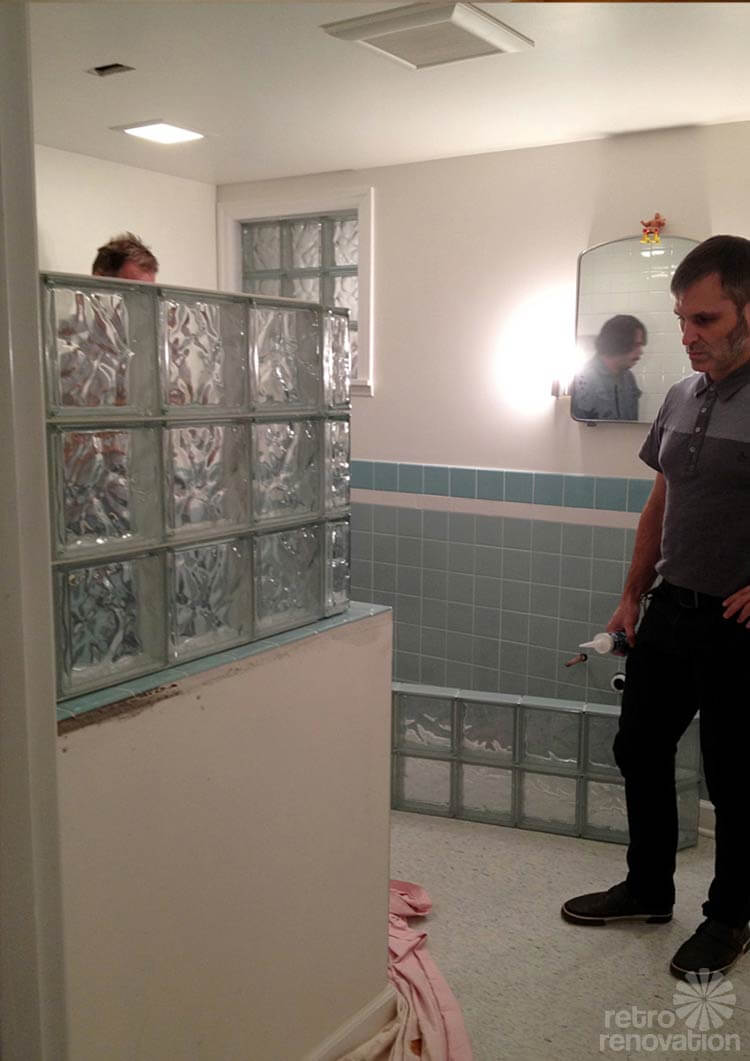
We considered trying to use vintage glass block but after doing some research we found that new glass block was the way to go. It all matched and it came in already put together sections so we didn’t have to mortar them in. Not to mention it was not super spendy.
You can see here there is now a wall at the bottom of the stairs. The replacement knotty pine was painstakingly varnished to match the existing knotty pink that flanks the entire basement.
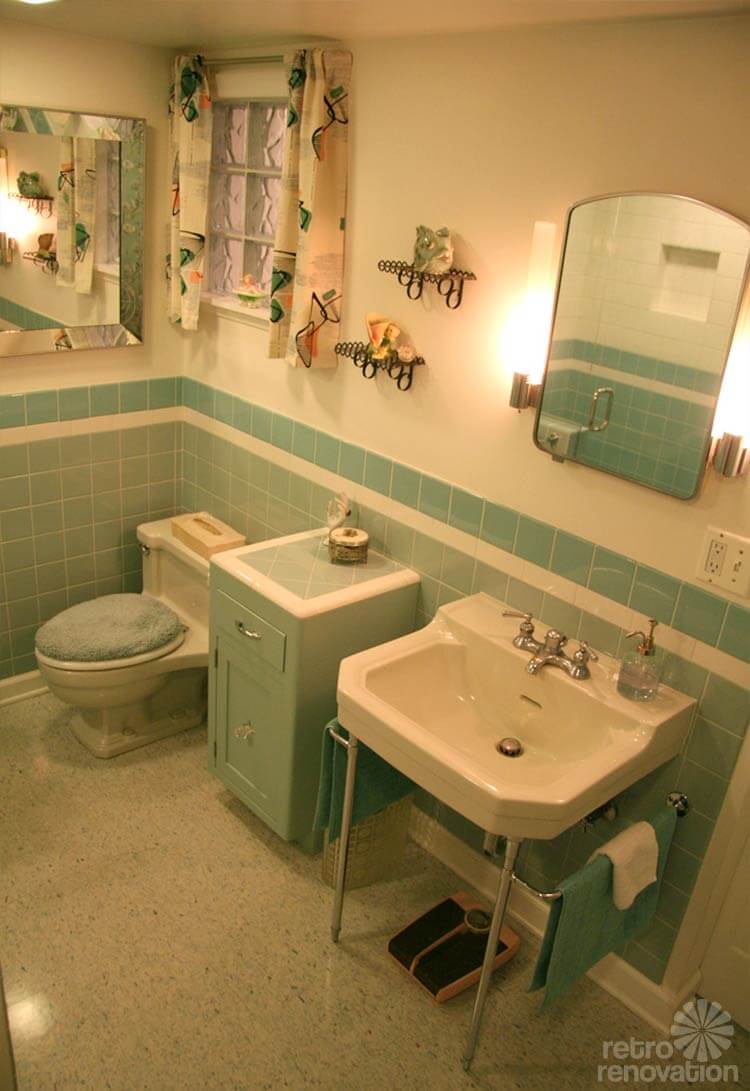
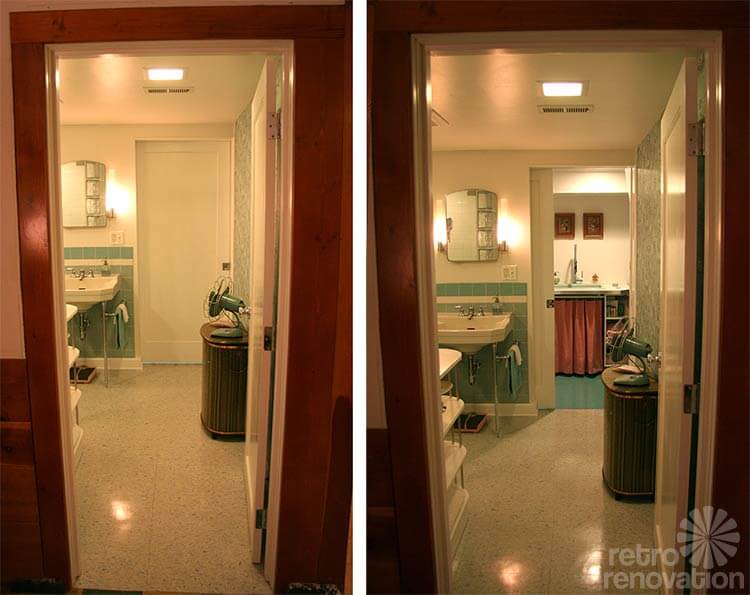
We scored this amazing pre-war Crane sink with all it’s original hardware including mounting brackets and the 1940s American Standard uni-body toilet at Hippo Hardware, it was in perfect working condition. Ended up being WAY cheaper than buying new not to mention — GORGEOUS!
The medicine cabinet seen above the sink is also a vintage score from Hippo Hardware, it was absolutely Mint. I literally stood guard over it when I found it to stake claim as there was anther couple drooling over my shoulder hoping I wouldn’t take it.
This mirror was sitting in a corner of our basement collecting dust for at least 12 years in need of rehab. I finally restored it as much as possible and found it a home!!! Also the window, there is no natural light/windows in this area of the basement, we decided to add a glass block window into the laundry room to give it a warmer feel as if it had a window.
I also found this hamper in our basement collecting dust. It was waiting for a home for over 12 years as well. (Vintage wallpaper from Hannah’s Treasures!)
One other thing that was super hard to find was the square recessed light fixtures in the ceiling. We have a number of those in our house we wanted to match not to mention the clearance is low so we needed recessed lighting. I just can’t remember where they came from. [Pam suggests – see this story about recessed square lighting.]
`Our plumber went to the trouble of finding vintage chrome handles for the hot water valves as well and other chrome parts so that the exposed pipes under the sink would also look stunning. We also learned that cabinet makers are not hungry for work in Portland Oregon, it was a painstaking task to find one to make our cabinetry at a reasonable price. We many had bids ranging from $8,000 to $700 for two small pieces of paint grade cabinetry. Also I used your website a ton for reference whenever I needed to make a decision about how something should look or find a part I started with Retro Renovation!
Pocket door between bathroom and laundry.
The laundry room sink is a Thermocast Kensington acrylic drop in laundry sink. We found this washboard style utility sink online from Home Depot. It’s an Acrylic sink available in a large variety of colors with free shipping
Again, the word of the day, Nanette and Jim, is: WOW. Being in the middle of a bathroom remodel myself, I understand just how much work goes into building a vintage bathroom from scratch. You two did a simply amazing job. Thanks so much for sharing the results of all your hard work and sources with all of us. And thanks to AlyStar for the hot tip!!!
Superb! Bathroom looks as if it’s always been there….I especially love your attention to detail, it’s what makes it all work so well. To Retropink above, the traditional varnish for knotty pine is an amber/orange tint which is quite specific, and should be researched, it is still out there! As to the square recessed lighting, most from the post war era were made by “Globe” lighting, or “Kirlin” lighting, denoted with a capital “K” stamped into the glass reflector. I am fortunate to have both in my home, and about 15 NOS extras! Oh, and the laundry area and flamingo mirror are making me weak….
retropink57says
Jeff- I actually did research the issue and used the recommended Zinsser Amber Shellac and it didn’t match at all. That’s why I was wondering what kind Nanette and Jim used.
Robin, NVsays
Your original knotty pine has probably changed color with age. That will be tricky to match with new materials.
Nanettesays
Thanks so much Jeff! The knotty pine matching took some experimentation. Our original knotty pine has a nice balance of darker and lighter wood, the dark and light changes depending on the wood grain / timber growth. Since we had to use new pine the boards are narrower, the knotts are very small and the color of the wood is/was very uniform. The best results came from a very slightly tinted varnish (tinted to match at the paint store) that was sprayed on rather than brushed. It was done in two different batches actually and by a happy accident the second batch came out lighter than the first so when we put it up we mixed and match light and dark boards — it was absolute magic giving us a similar effect to the light and dark wood grain of the original.
Mary Elizabethsays
About matching the knotty pine, Robin is right. When the paneling or cabinets age, the color becomes a little deeper and more yellow than the original finish. What you first need to do is thoroughly wash the paneling/cabinets with Murphy’s soap and see how much of the darkness is dirt. Then, you can begin experimenting with stain.
Browse through our home photos and look particularly at the kitchen cabinets. The drawers, therefore the drawer fronts, were new knotty pine plywood.
The match is quite good, as you can see. What we did was experiment with scraps taken from the new drawers. What we finally ended up with was an Early American stain, which we wiped on to control the darkness. Then we covered that with a layer of shellac to get the aged yellow look. After it was all dry, we coated everything with several layers of polyeurethane. You will find your own combination after some experimenting.
retropink57says
Mary Elizabeth – your cabinets are AMAZING! I never would’ve guessed that the drawers were not original! Thanks so much for your invaluable words of wisdom. I know what I’m going to be doing next weekend…
Lisasays
Mary Elizabeth, I love that cool minty shade you used throughout the house. Can you share what paint color you used? I have been trying to find a shade like that but can never tell from the little paint chips. Just beautiful. I especially love your kitchen cabinets. Thanks so much.
retropink57says
Thanks for the info Nanette! I was at a loss on how to tackle this…you have given me hope!
Wow! What a fantastic bathroom! It turned-out so well. Some day I’d like to at least build a half-bath in our basement. This is definitely an inspiration.
Sarasays
Fantastic! I know I’ll be back looking at your pictures again throughout the day 🙂 It’s gorgeous! And great inspiration for me. I have a toilet in my basement (that’s it, just a toilet) and someday I want to make a real bathroom down there. And I will be re-doing the main bathroom someday as well, and will definitely want it to look original to the house (built in ’50). You guys did such a great job!
Laurynsays
Yup! The lone toilet in the basement is a staple in Iowa homes. We actually have a shower (never been used in 7 years) and a utility sink on either side of the toilet, but it can not even remotely be called a second bath!
retropink57says
Beautifu! One thing I desperately need to know – what color varnish (and brand name) did you use on the new knotty pine to match the existing? I had not-so-great results when I tried to match the new with the old in our den.
Marjiesays
re: matching stain for T n G paneling. You will have to just start making some stain samples to find a match in your own room w/ the lighting that exists in the space. I have used a zar stain called “aged varnish” to do our neglected basement window casings, but min wax fruitwood worked on a new TnG wall that reasonably blended w/ the early 60’s knotty pine that was on the opposite wall. If you have a broken piece to take w/ you to the store if may help for which stains to start w/ …..I prefer an oil base,penetrating stain….sometimes, I use a light stain like golden oak and then put a second color of stain if I want a darker,distressed look. good luck, remember to have fun!!
Another consideration – our house has all original finishes. Part of the reason they were so difficult for us to match with stain was because they weren’t stained at all, they were shellacked, specifically with amber shellac. Our floors are oak, and in the main spaces we have mahogany paneling and both the floors and walls have amber shellac. It took awhile to figure it out, but the results are spectacular. Shellac is very easy to apply (easier than stain and poly) in small spaces. It can be tricky to apply over a large space like a floor because it dries quickly. But it’s a natural finish and is done in one step instead of two.
Nanette and Jim, I echo that “Wow!” and double it. Every design detail of this room is gorgeous and well-planned, beginning with the colors of cool aqua tones on white. Your graphic design background shows big time even though you say you’ve never done anything like this before.
I also like your use of light. I am a big fan of faux windows between rooms–something about chi, I think–and that gave you a chance to use vintage or reproduction fabric curtains, since your shower is built-in with glass doors and you can’t do a curtain to soften the hard surfaces in the room . Lovely, lovely fabric and wallpaper. Very cool use of glass brick. Very interesting shelf with chrome poles echoing the chrome sink legs. Nice use of cabinet and shelving to make up for the fact there is no vanity.
I want to hear more about how you got the vintage toilet and faucet up to code. This is something we pink/aqua/mint geen bathroom geeks obsess over.
gsciencechicksays
Love it! So great you had the unfinished space to put this in. The blue and white are fabulous. Like the details with t he shower. I also like the shelving on the other side of the shower.
Kkmksays
Amazing! Your rooms are stunning. Not only do the fixtures, tile and cabinets look original, the accessories add an extra bit of “wow.”


 When Pam saw a tantalizing photo of Nanette and Jim’s bathroom remodel on Facebook — posted by rockin’ retro Portland realtor Alyssa Starelli — she knew that we had to feature their fantastic space. So we chased after, with AlyStar making the fairy godmother connection, we get to see Nanette and Jim’s vintage blue bathroom — built from scratch. Using vintage salvaged fixtures, vintage wallpaper and and other era-appropriate choices for tile and flooring, this visionary couple transformed an empty portion of their basement into a beautiful blue bathroom that suits their 1945 transitional ranch home. Seriously, though. Why are we even bothering with this wordy introduction. When we could just say:
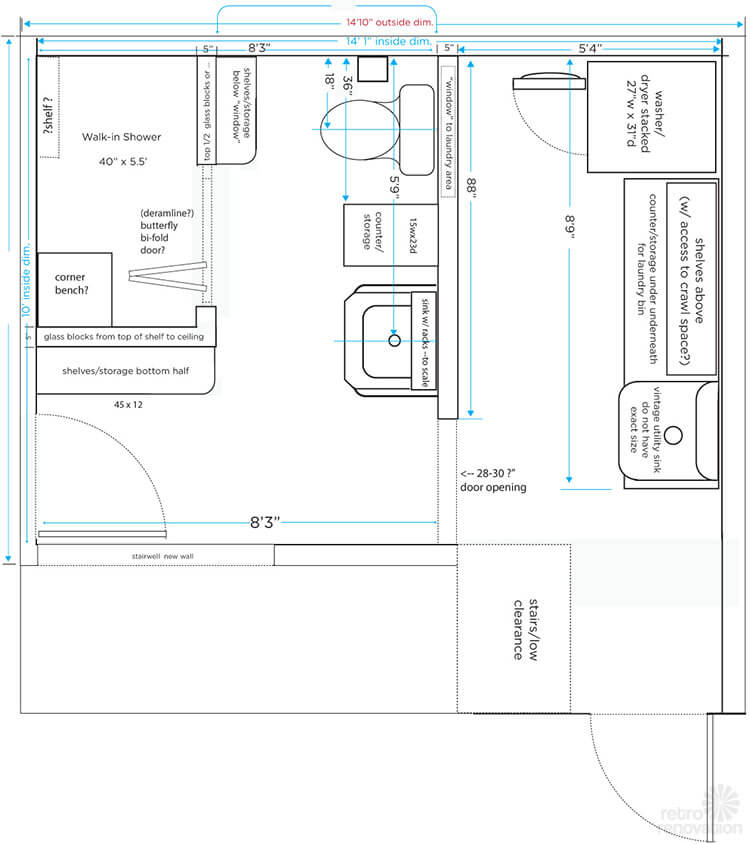 Nanette writes:
Here it is before the demo. It was a storage area that we could access through an large opening at the bottom of the stairwell. We kept a curtain across this hole (which many a person fell through on their way down to the bar).
This storage rack is where the shower ended up, the water heater was moved (and we upgraded to gas).
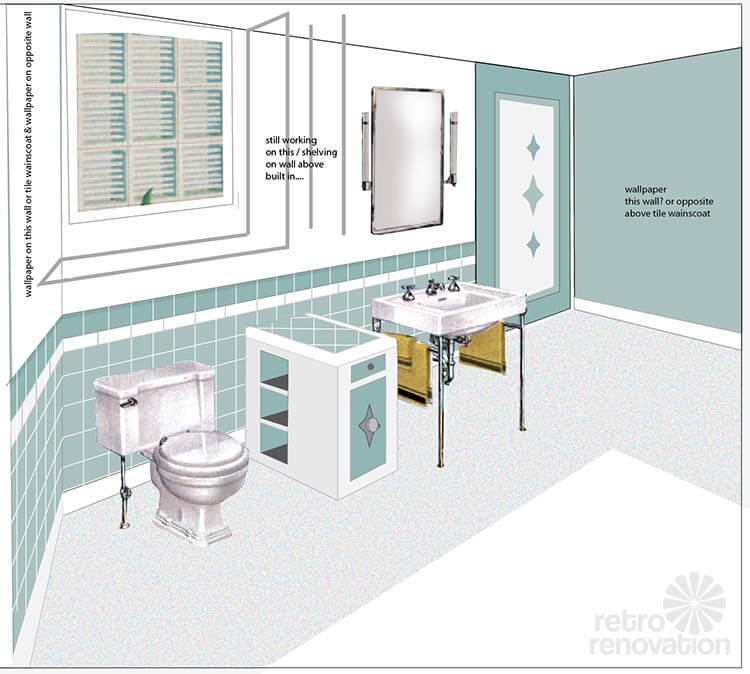
In the beginning I did a drawing of the space to use as a guide for build out/installation etc. (I’m a graphic designer but have never done anything like this before). It has turned out pretty much identical to the drawing.
Vintage wallpaper from Hannahs Treasures and tile decisions (this was a hard decision!)?We chose 2 shades of aqua/blue tile from Dal Tile and the white is actually from Home Depot (it’s Dal white).
We hired a tile setter to install the tile, he did an amazing job, he was painstakingly detail oriented. For the flooring we went with Congoleum VCT, it is very vintage looking and polishes up to a gorgeous sheen not to mention really inexpensive. It’s from the Congoleum “value” line, it really was a great value. Our white floor is the berry blossom and the blue is aqua spring. The Congoleum VCT is laid with the pattern going in the same direction (I can’t remember what they call that, not parquet).
We considered trying to use vintage glass block but after doing some research we found that new glass block was the way to go. It all matched and it came in already put together sections so we didn’t have to mortar them in. Not to mention it was not super spendy.
You can see here there is now a wall at the bottom of the stairs. The replacement knotty pine was painstakingly varnished to match the existing knotty pink that flanks the entire basement.
We scored this amazing pre-war Crane sink with all it’s original hardware including mounting brackets and the 1940s American Standard uni-body toilet at Hippo Hardware, it was in perfect working condition. Ended up being WAY cheaper than buying new not to mention — GORGEOUS!
The medicine cabinet seen above the sink is also a vintage score from Hippo Hardware, it was absolutely Mint. I literally stood guard over it when I found it to stake claim as there was anther couple drooling over my shoulder hoping I wouldn’t take it.
This mirror was sitting in a corner of our basement collecting dust for at least 12 years in need of rehab. I finally restored it as much as possible and found it a home!!! Also the window, there is no natural light/windows in this area of the basement, we decided to add a glass block window into the laundry room to give it a warmer feel as if it had a window.
I also found this hamper in our basement collecting dust. It was waiting for a home for over 12 years as well. (Vintage wallpaper from Hannah’s Treasures!)
One other thing that was super hard to find was the square recessed light fixtures in the ceiling. We have a number of those in our house we wanted to match not to mention the clearance is low so we needed recessed lighting. I just can’t remember where they came from. [Pam suggests – see this story about recessed square lighting.]
We also learned that cabinet makers are not hungry for work in Portland Oregon, it was a painstaking task to find one to make our cabinetry at a reasonable price. We many had bids ranging from $8,000 to $700 for two small pieces of paint grade cabinetry.
Also I used your website a ton for reference whenever I needed to make a decision about how something should look or find a part I started with Retro Renovation!
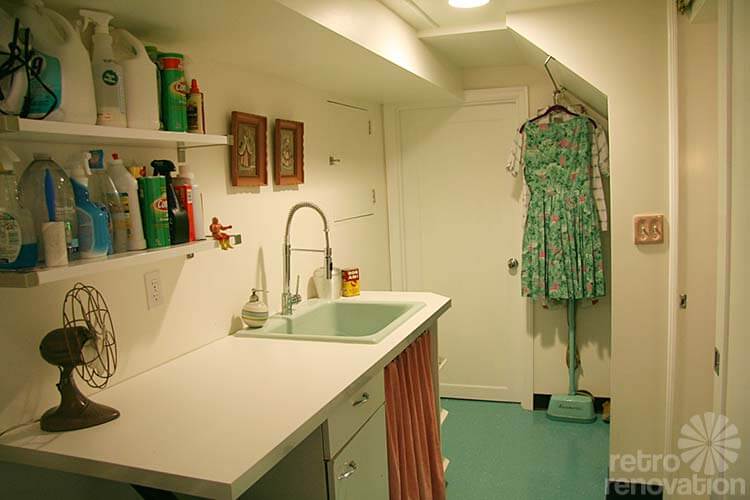
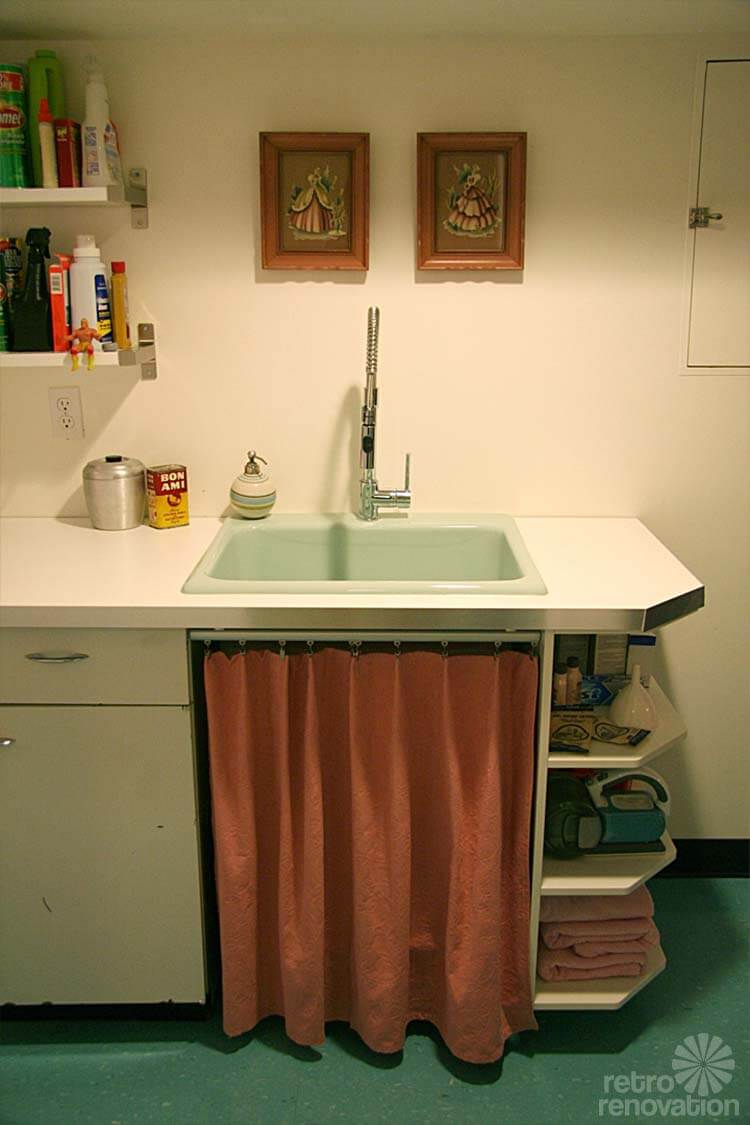
The laundry room sink is a Thermocast Kensington acrylic drop in laundry sink. We found this washboard style utility sink online from Home Depot. It’s an Acrylic sink available in a large variety of colors with free shipping


Nancy Essenpreis says
Love It! Totally gorgeous. What a great job.
Jeff says
Superb! Bathroom looks as if it’s always been there….I especially love your attention to detail, it’s what makes it all work so well. To Retropink above, the traditional varnish for knotty pine is an amber/orange tint which is quite specific, and should be researched, it is still out there! As to the square recessed lighting, most from the post war era were made by “Globe” lighting, or “Kirlin” lighting, denoted with a capital “K” stamped into the glass reflector. I am fortunate to have both in my home, and about 15 NOS extras! Oh, and the laundry area and flamingo mirror are making me weak….
retropink57 says
Jeff- I actually did research the issue and used the recommended Zinsser Amber Shellac and it didn’t match at all. That’s why I was wondering what kind Nanette and Jim used.
Robin, NV says
Your original knotty pine has probably changed color with age. That will be tricky to match with new materials.
Nanette says
Thanks so much Jeff! The knotty pine matching took some experimentation. Our original knotty pine has a nice balance of darker and lighter wood, the dark and light changes depending on the wood grain / timber growth. Since we had to use new pine the boards are narrower, the knotts are very small and the color of the wood is/was very uniform. The best results came from a very slightly tinted varnish (tinted to match at the paint store) that was sprayed on rather than brushed. It was done in two different batches actually and by a happy accident the second batch came out lighter than the first so when we put it up we mixed and match light and dark boards — it was absolute magic giving us a similar effect to the light and dark wood grain of the original.
Mary Elizabeth says
About matching the knotty pine, Robin is right. When the paneling or cabinets age, the color becomes a little deeper and more yellow than the original finish. What you first need to do is thoroughly wash the paneling/cabinets with Murphy’s soap and see how much of the darkness is dirt. Then, you can begin experimenting with stain.
Browse through our home photos and look particularly at the kitchen cabinets. The drawers, therefore the drawer fronts, were new knotty pine plywood.
http://www.condoman.us/142GLB.html
The match is quite good, as you can see. What we did was experiment with scraps taken from the new drawers. What we finally ended up with was an Early American stain, which we wiped on to control the darkness. Then we covered that with a layer of shellac to get the aged yellow look. After it was all dry, we coated everything with several layers of polyeurethane. You will find your own combination after some experimenting.
retropink57 says
Mary Elizabeth – your cabinets are AMAZING! I never would’ve guessed that the drawers were not original! Thanks so much for your invaluable words of wisdom. I know what I’m going to be doing next weekend…
Lisa says
Mary Elizabeth, I love that cool minty shade you used throughout the house. Can you share what paint color you used? I have been trying to find a shade like that but can never tell from the little paint chips. Just beautiful. I especially love your kitchen cabinets. Thanks so much.
retropink57 says
Thanks for the info Nanette! I was at a loss on how to tackle this…you have given me hope!
Jenny A. says
Wow! What a fantastic bathroom! It turned-out so well. Some day I’d like to at least build a half-bath in our basement. This is definitely an inspiration.
Sara says
Fantastic! I know I’ll be back looking at your pictures again throughout the day 🙂 It’s gorgeous! And great inspiration for me. I have a toilet in my basement (that’s it, just a toilet) and someday I want to make a real bathroom down there. And I will be re-doing the main bathroom someday as well, and will definitely want it to look original to the house (built in ’50). You guys did such a great job!
Lauryn says
Yup! The lone toilet in the basement is a staple in Iowa homes. We actually have a shower (never been used in 7 years) and a utility sink on either side of the toilet, but it can not even remotely be called a second bath!
retropink57 says
Beautifu! One thing I desperately need to know – what color varnish (and brand name) did you use on the new knotty pine to match the existing? I had not-so-great results when I tried to match the new with the old in our den.
Marjie says
re: matching stain for T n G paneling. You will have to just start making some stain samples to find a match in your own room w/ the lighting that exists in the space. I have used a zar stain called “aged varnish” to do our neglected basement window casings, but min wax fruitwood worked on a new TnG wall that reasonably blended w/ the early 60’s knotty pine that was on the opposite wall. If you have a broken piece to take w/ you to the store if may help for which stains to start w/ …..I prefer an oil base,penetrating stain….sometimes, I use a light stain like golden oak and then put a second color of stain if I want a darker,distressed look. good luck, remember to have fun!!
Douglas Camin @ House on Rynkus Hill says
Another consideration – our house has all original finishes. Part of the reason they were so difficult for us to match with stain was because they weren’t stained at all, they were shellacked, specifically with amber shellac. Our floors are oak, and in the main spaces we have mahogany paneling and both the floors and walls have amber shellac. It took awhile to figure it out, but the results are spectacular. Shellac is very easy to apply (easier than stain and poly) in small spaces. It can be tricky to apply over a large space like a floor because it dries quickly. But it’s a natural finish and is done in one step instead of two.
georgiapeachez says
SOOOO impressive, absolutely love it. suzy.
deb says
This is truly amazing! Gorgeous!
Mary Elizabeth says
Nanette and Jim, I echo that “Wow!” and double it. Every design detail of this room is gorgeous and well-planned, beginning with the colors of cool aqua tones on white. Your graphic design background shows big time even though you say you’ve never done anything like this before.
I also like your use of light. I am a big fan of faux windows between rooms–something about chi, I think–and that gave you a chance to use vintage or reproduction fabric curtains, since your shower is built-in with glass doors and you can’t do a curtain to soften the hard surfaces in the room . Lovely, lovely fabric and wallpaper. Very cool use of glass brick. Very interesting shelf with chrome poles echoing the chrome sink legs. Nice use of cabinet and shelving to make up for the fact there is no vanity.
I want to hear more about how you got the vintage toilet and faucet up to code. This is something we pink/aqua/mint geen bathroom geeks obsess over.
gsciencechick says
Love it! So great you had the unfinished space to put this in. The blue and white are fabulous. Like the details with t he shower. I also like the shelving on the other side of the shower.
Kkmk says
Amazing! Your rooms are stunning. Not only do the fixtures, tile and cabinets look original, the accessories add an extra bit of “wow.”