Nanette and Jim’s vintage blue bathroom — built new from scratch
Kate - Updated: July 22, 2021
Retro Renovation stopped publishing in 2021; these stories remain for historical information, as potential continued resources, and for archival purposes.
When Pam saw a tantalizing photo of Nanette and Jim’s bathroom remodel on Facebook — posted by rockin’ retro Portland realtor Alyssa Starelli — she knew that we had to feature their fantastic space. So we chased after, with AlyStar making the fairy godmother connection, we get to see Nanette and Jim’s vintage blue bathroom — built from scratch. Using vintage salvaged fixtures, vintage wallpaper and and other era-appropriate choices for tile and flooring, this visionary couple transformed an empty portion of their basement into a beautiful blue bathroom that suits their 1945 transitional ranch home. Seriously, though. Why are we even bothering with this wordy introduction. When we could just say:
WOW!
Nanette writes:
We live in a 1945 transitional ranch in Portland, Oregon.
Goal was to create a second bathroom that looked like it could have been there / was original to the house (in the basement, no small chore).
House did not have a laundry room.
Discovered we could do so inexpensively without digging in new plumbing lines from the street down under the house (used a pump we affectionately call the sh*t pump).
Found vintage/era sink, toilet and medicine cabinet all in MINT working condition which cost way less than buying new and are way more gorgeous. (There’s a bit of a story about getting it all to be code but we managed it, this project was done to code btw).
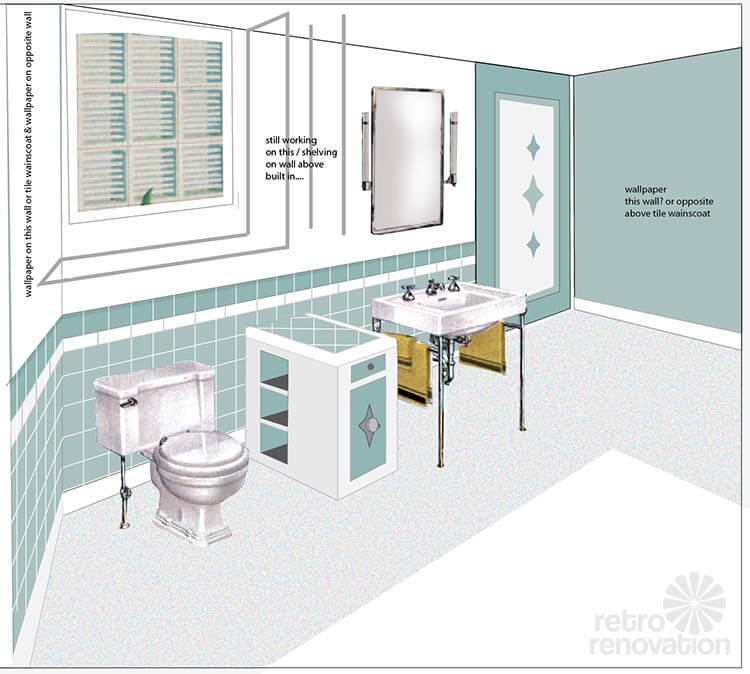
Used vintage / era wallpaper from Hannahs Treasures, love it!
Used lots of glass block, it comes in hunks already put together!
Varnished knotty pine to match existing pine from the 1940s going down stairwell into the basement. (No small task).
It took a lot more time than we thought it would but it’s so good!!!
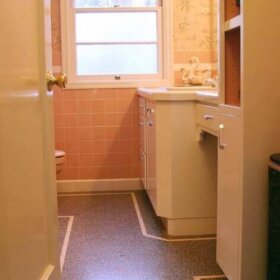
Here it is before the demo. It was a storage area that we could access through an large opening at the bottom of the stairwell. We kept a curtain across this hole (which many a person fell through on their way down to the bar).
This storage rack is where the shower ended up, the water heater was moved (and we upgraded to gas).
In the beginning I did a drawing of the space to use as a guide for build out/installation etc. (I’m a graphic designer but have never done anything like this before). It has turned out pretty much identical to the drawing.
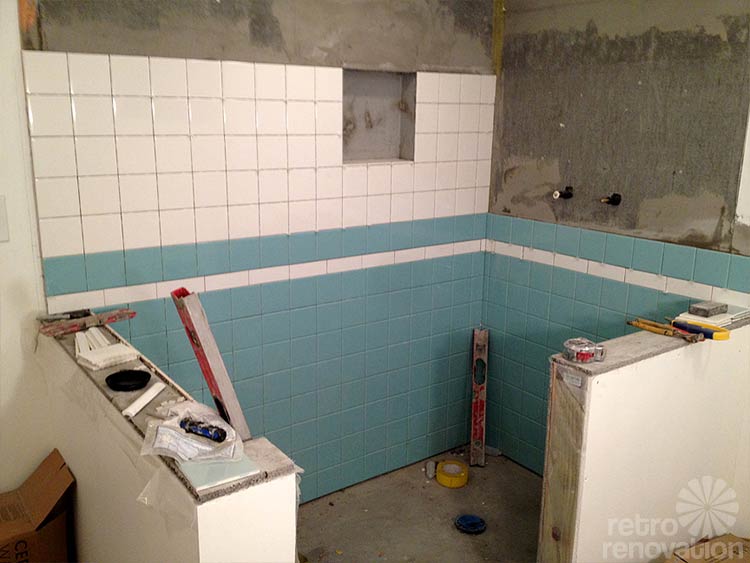
Vintage wallpaper from Hannahs Treasures and tile decisions (this was a hard decision!)?We chose 2 shades of aqua/blue tile from Dal Tile and the white is actually from Home Depot (it’s Dal white).
We hired a tile setter to install the tile, he did an amazing job, he was painstakingly detail oriented. For the flooring we went with Congoleum VCT, it is very vintage looking and polishes up to a gorgeous sheen not to mention really inexpensive. It’s from the Congoleum “value” line, it really was a great value. Our white floor is the berry blossom and the blue is aqua spring. The Congoleum VCT is laid with the pattern going in the same direction (I can’t remember what they call that, not parquet).
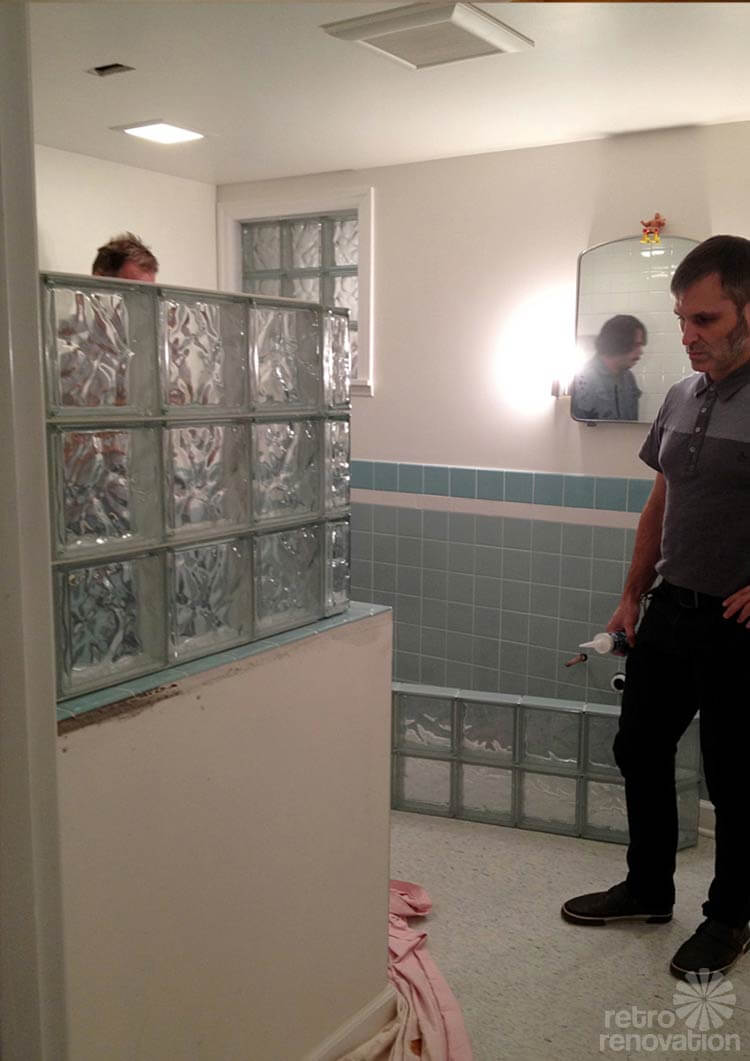
We considered trying to use vintage glass block but after doing some research we found that new glass block was the way to go. It all matched and it came in already put together sections so we didn’t have to mortar them in. Not to mention it was not super spendy.
You can see here there is now a wall at the bottom of the stairs. The replacement knotty pine was painstakingly varnished to match the existing knotty pink that flanks the entire basement.
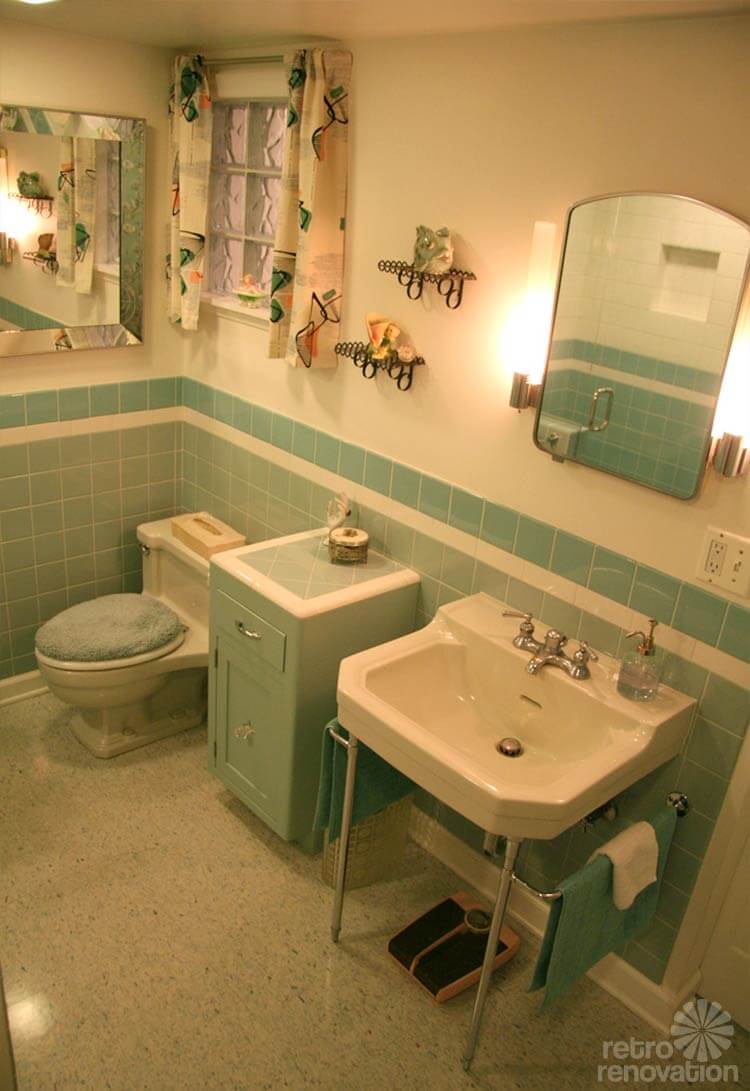
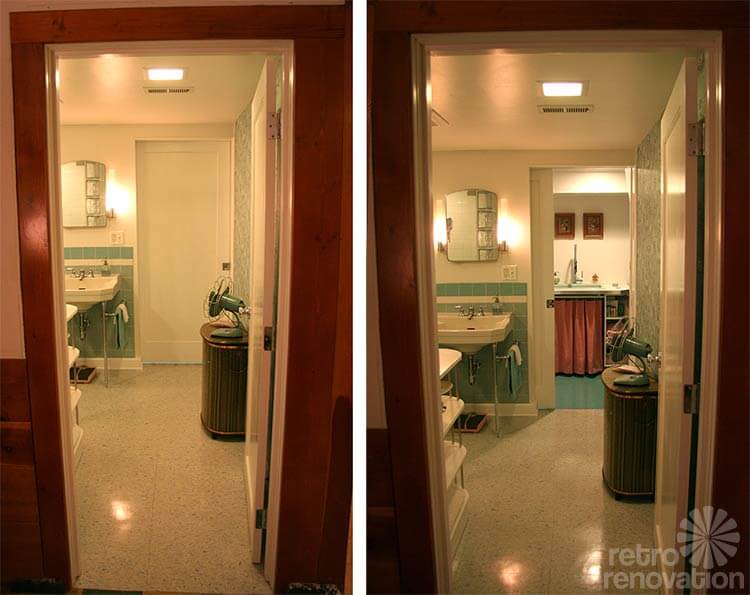
We scored this amazing pre-war Crane sink with all it’s original hardware including mounting brackets and the 1940s American Standard uni-body toilet at Hippo Hardware, it was in perfect working condition. Ended up being WAY cheaper than buying new not to mention — GORGEOUS!
The medicine cabinet seen above the sink is also a vintage score from Hippo Hardware, it was absolutely Mint. I literally stood guard over it when I found it to stake claim as there was anther couple drooling over my shoulder hoping I wouldn’t take it.
This mirror was sitting in a corner of our basement collecting dust for at least 12 years in need of rehab. I finally restored it as much as possible and found it a home!!! Also the window, there is no natural light/windows in this area of the basement, we decided to add a glass block window into the laundry room to give it a warmer feel as if it had a window.
I also found this hamper in our basement collecting dust. It was waiting for a home for over 12 years as well. (Vintage wallpaper from Hannah’s Treasures!)
One other thing that was super hard to find was the square recessed light fixtures in the ceiling. We have a number of those in our house we wanted to match not to mention the clearance is low so we needed recessed lighting. I just can’t remember where they came from. [Pam suggests – see this story about recessed square lighting.]
`Our plumber went to the trouble of finding vintage chrome handles for the hot water valves as well and other chrome parts so that the exposed pipes under the sink would also look stunning. We also learned that cabinet makers are not hungry for work in Portland Oregon, it was a painstaking task to find one to make our cabinetry at a reasonable price. We many had bids ranging from $8,000 to $700 for two small pieces of paint grade cabinetry. Also I used your website a ton for reference whenever I needed to make a decision about how something should look or find a part I started with Retro Renovation!
Pocket door between bathroom and laundry.
The laundry room sink is a Thermocast Kensington acrylic drop in laundry sink. We found this washboard style utility sink online from Home Depot. It’s an Acrylic sink available in a large variety of colors with free shipping
Again, the word of the day, Nanette and Jim, is: WOW. Being in the middle of a bathroom remodel myself, I understand just how much work goes into building a vintage bathroom from scratch. You two did a simply amazing job. Thanks so much for sharing the results of all your hard work and sources with all of us. And thanks to AlyStar for the hot tip!!!
I’m curious as to how much the medicine cabinet cost? I have one just like it that I paid $5 for at a thrift store. I have a vintage 1955 mobile home that I want to restore, and picked it up for that.
Andreasays
GREAT job! You have inspired me.
Tovasays
Wow! I love it!
We are in the process of remodeling our bathroom, and I’d like to use a similar color aqua/blue scheme, but I’m having trouble finding ceramic floor tile that would coordinate. How’s the VCT flooring holding up? I put VCT in our kitchen and love it, but for the bathroom – I’m concerned about how it holds up to water. (We have little kids – splashy baths, potty training, ‘nuf said.) Any insight from your experience?
Joe Felicesays
On my computer, the tile looks more jade, but it could be the lighting and/or monitor. VCT is most durable, and easily stands up to water. Commercial buildings use it in public restrooms all the time, so it will withstand anything you and your kid can throw at it. You may want to consider sheet goods, instead of individual squares, so as to avoid too-many seams/joints. Also, I suggest having the installer run it up the walls all around to form cove base that is one piece with the floor. Most folks back in the day did that any way, so it will actually add to the look, in addition to avoiding a seam at the wall base. It’s the seams/joints that leak. The actual product will outlive you. Have all seams sealed and bonded together. There is a special VCT cement for this. It actually melts the 2 edges together. But watch out: It will make you high.
The ceramic/wall tile color is supposedly discontinued, (Aqua Glow from Dal). The flooring is Congoluem VCT and it’s great! We put it in over leveled concrete that was treated prior to installation w/ stinky stuff. That process was a bit toxic an unenjoyable (I recommend respirators and lots of ventilation). My only caution with regard to children is that if you plan to polish it to a gorgeous high shine it can be rather slippery. We polish our kitchen VCT and it doesn’t seem nearly as slippery as the bathroom. I think it’s the combo of a polished floor and wet bare feet that can be an issue. Bath mats are a good idea. You can also use matte polishes that aren’t as slippery.
Kathysays
Aqua Glow is still available according to the Build.com catalogue I recieved a month ago. It is a great color!
pam kuebersays
Great to know!
Angelasays
Holy moly that is goooooorgeous
Daesays
Per-fec-tion!!! <3
Karensays
I will be redoing my bathroom and I hate throwing away the tile. It’s from 1952. Do you know where or who I could give it too?
You can also try and search for re-use/salvage/ rebuilding centers in your area. In Portland Oregon we have a place called the Rebuilding Center that you can take your used building materials to. The rebuilding center has a large used tile section. http://rebuildingcenter.org/ (People really get into recycling here).
Suzysays
Wow!! You guys did an amazing job. I’d love to see pics of the rest of the house
Tiffnay Brunellisays
So gorgeous!! I’m in the middle of a retro bath romodel and trying to decide on what white paint color to use? What did you use? looks beautiful! x
Stephanie Copesays
The bathroom is amazing! I am curious about the pump. Where is it located and what was the process? We have a basement bath with a macerator, but you can’t tell this needs a pump.
Stephanie the pump is located in the laundry room floor. We had to dig or rather jack hammer a hole into the concrete floor big enough to drop it down into the ground. It’s about the size of a metal garbage can. You can get wall mounded ejector pumps as well, although we wanted a larger one for the laundry and bath. We had a plumber do the job for us but many people install the pumps themselves evidently.


 When Pam saw a tantalizing photo of Nanette and Jim’s bathroom remodel on Facebook — posted by rockin’ retro Portland realtor Alyssa Starelli — she knew that we had to feature their fantastic space. So we chased after, with AlyStar making the fairy godmother connection, we get to see Nanette and Jim’s vintage blue bathroom — built from scratch. Using vintage salvaged fixtures, vintage wallpaper and and other era-appropriate choices for tile and flooring, this visionary couple transformed an empty portion of their basement into a beautiful blue bathroom that suits their 1945 transitional ranch home. Seriously, though. Why are we even bothering with this wordy introduction. When we could just say:
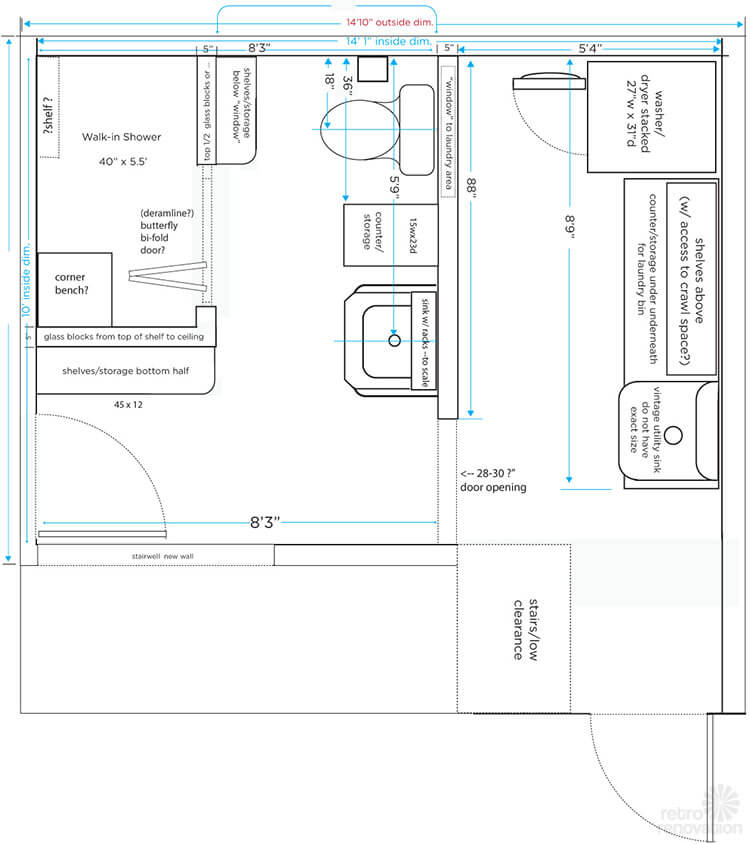 Nanette writes:
Here it is before the demo. It was a storage area that we could access through an large opening at the bottom of the stairwell. We kept a curtain across this hole (which many a person fell through on their way down to the bar).
This storage rack is where the shower ended up, the water heater was moved (and we upgraded to gas).
In the beginning I did a drawing of the space to use as a guide for build out/installation etc. (I’m a graphic designer but have never done anything like this before). It has turned out pretty much identical to the drawing.
Vintage wallpaper from Hannahs Treasures and tile decisions (this was a hard decision!)?We chose 2 shades of aqua/blue tile from Dal Tile and the white is actually from Home Depot (it’s Dal white).
We hired a tile setter to install the tile, he did an amazing job, he was painstakingly detail oriented. For the flooring we went with Congoleum VCT, it is very vintage looking and polishes up to a gorgeous sheen not to mention really inexpensive. It’s from the Congoleum “value” line, it really was a great value. Our white floor is the berry blossom and the blue is aqua spring. The Congoleum VCT is laid with the pattern going in the same direction (I can’t remember what they call that, not parquet).
We considered trying to use vintage glass block but after doing some research we found that new glass block was the way to go. It all matched and it came in already put together sections so we didn’t have to mortar them in. Not to mention it was not super spendy.
You can see here there is now a wall at the bottom of the stairs. The replacement knotty pine was painstakingly varnished to match the existing knotty pink that flanks the entire basement.
We scored this amazing pre-war Crane sink with all it’s original hardware including mounting brackets and the 1940s American Standard uni-body toilet at Hippo Hardware, it was in perfect working condition. Ended up being WAY cheaper than buying new not to mention — GORGEOUS!
The medicine cabinet seen above the sink is also a vintage score from Hippo Hardware, it was absolutely Mint. I literally stood guard over it when I found it to stake claim as there was anther couple drooling over my shoulder hoping I wouldn’t take it.
This mirror was sitting in a corner of our basement collecting dust for at least 12 years in need of rehab. I finally restored it as much as possible and found it a home!!! Also the window, there is no natural light/windows in this area of the basement, we decided to add a glass block window into the laundry room to give it a warmer feel as if it had a window.
I also found this hamper in our basement collecting dust. It was waiting for a home for over 12 years as well. (Vintage wallpaper from Hannah’s Treasures!)
One other thing that was super hard to find was the square recessed light fixtures in the ceiling. We have a number of those in our house we wanted to match not to mention the clearance is low so we needed recessed lighting. I just can’t remember where they came from. [Pam suggests – see this story about recessed square lighting.]
We also learned that cabinet makers are not hungry for work in Portland Oregon, it was a painstaking task to find one to make our cabinetry at a reasonable price. We many had bids ranging from $8,000 to $700 for two small pieces of paint grade cabinetry.
Also I used your website a ton for reference whenever I needed to make a decision about how something should look or find a part I started with Retro Renovation!
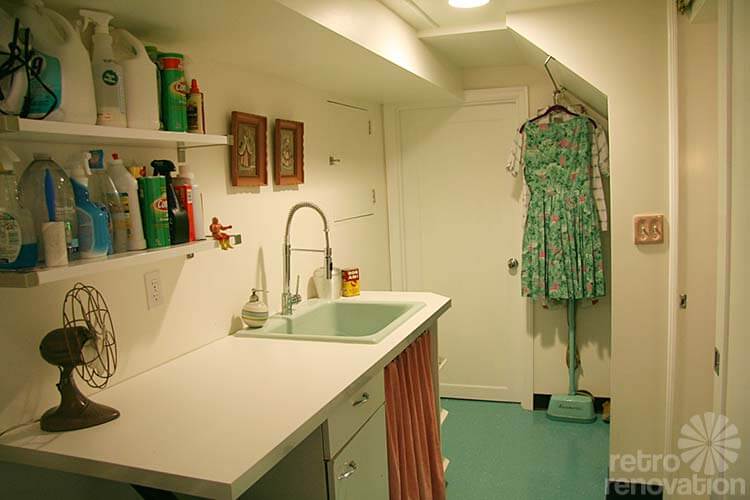
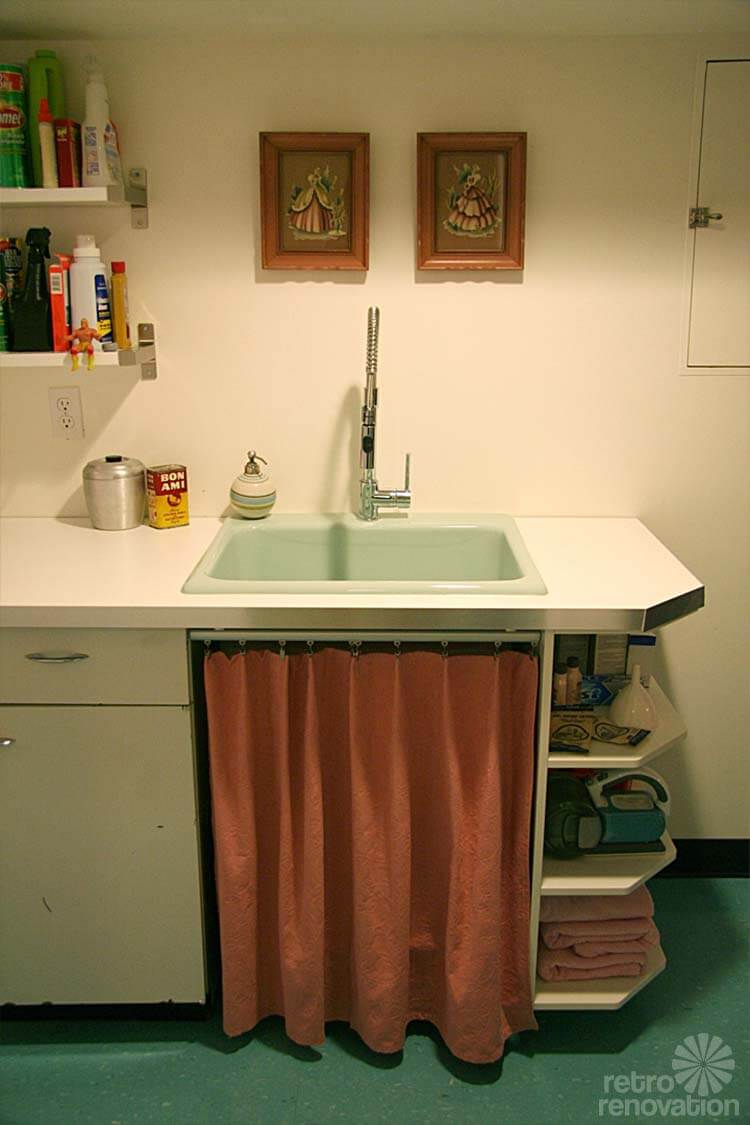
The laundry room sink is a Thermocast Kensington acrylic drop in laundry sink. We found this washboard style utility sink online from Home Depot. It’s an Acrylic sink available in a large variety of colors with free shipping


Helen Payne says
I’m curious as to how much the medicine cabinet cost? I have one just like it that I paid $5 for at a thrift store. I have a vintage 1955 mobile home that I want to restore, and picked it up for that.
Andrea says
GREAT job! You have inspired me.
Tova says
Wow! I love it!
We are in the process of remodeling our bathroom, and I’d like to use a similar color aqua/blue scheme, but I’m having trouble finding ceramic floor tile that would coordinate. How’s the VCT flooring holding up? I put VCT in our kitchen and love it, but for the bathroom – I’m concerned about how it holds up to water. (We have little kids – splashy baths, potty training, ‘nuf said.) Any insight from your experience?
Joe Felice says
On my computer, the tile looks more jade, but it could be the lighting and/or monitor. VCT is most durable, and easily stands up to water. Commercial buildings use it in public restrooms all the time, so it will withstand anything you and your kid can throw at it. You may want to consider sheet goods, instead of individual squares, so as to avoid too-many seams/joints. Also, I suggest having the installer run it up the walls all around to form cove base that is one piece with the floor. Most folks back in the day did that any way, so it will actually add to the look, in addition to avoiding a seam at the wall base. It’s the seams/joints that leak. The actual product will outlive you. Have all seams sealed and bonded together. There is a special VCT cement for this. It actually melts the 2 edges together. But watch out: It will make you high.
Nanette says
The ceramic/wall tile color is supposedly discontinued, (Aqua Glow from Dal). The flooring is Congoluem VCT and it’s great! We put it in over leveled concrete that was treated prior to installation w/ stinky stuff. That process was a bit toxic an unenjoyable (I recommend respirators and lots of ventilation). My only caution with regard to children is that if you plan to polish it to a gorgeous high shine it can be rather slippery. We polish our kitchen VCT and it doesn’t seem nearly as slippery as the bathroom. I think it’s the combo of a polished floor and wet bare feet that can be an issue. Bath mats are a good idea. You can also use matte polishes that aren’t as slippery.
Kathy says
Aqua Glow is still available according to the Build.com catalogue I recieved a month ago. It is a great color!
pam kueber says
Great to know!
Angela says
Holy moly that is goooooorgeous
Dae says
Per-fec-tion!!! <3
Karen says
I will be redoing my bathroom and I hate throwing away the tile. It’s from 1952. Do you know where or who I could give it too?
pam kueber says
craigslist it
nanette says
You can also try and search for re-use/salvage/ rebuilding centers in your area. In Portland Oregon we have a place called the Rebuilding Center that you can take your used building materials to. The rebuilding center has a large used tile section. http://rebuildingcenter.org/ (People really get into recycling here).
Suzy says
Wow!! You guys did an amazing job. I’d love to see pics of the rest of the house
Tiffnay Brunelli says
So gorgeous!! I’m in the middle of a retro bath romodel and trying to decide on what white paint color to use? What did you use? looks beautiful! x
Stephanie Cope says
The bathroom is amazing! I am curious about the pump. Where is it located and what was the process? We have a basement bath with a macerator, but you can’t tell this needs a pump.
Nanette says
Stephanie the pump is located in the laundry room floor. We had to dig or rather jack hammer a hole into the concrete floor big enough to drop it down into the ground. It’s about the size of a metal garbage can. You can get wall mounded ejector pumps as well, although we wanted a larger one for the laundry and bath. We had a plumber do the job for us but many people install the pumps themselves evidently.
Maryann Roy says
Absolutely DIVINE ! What a fantastic job – love it to pieces !