

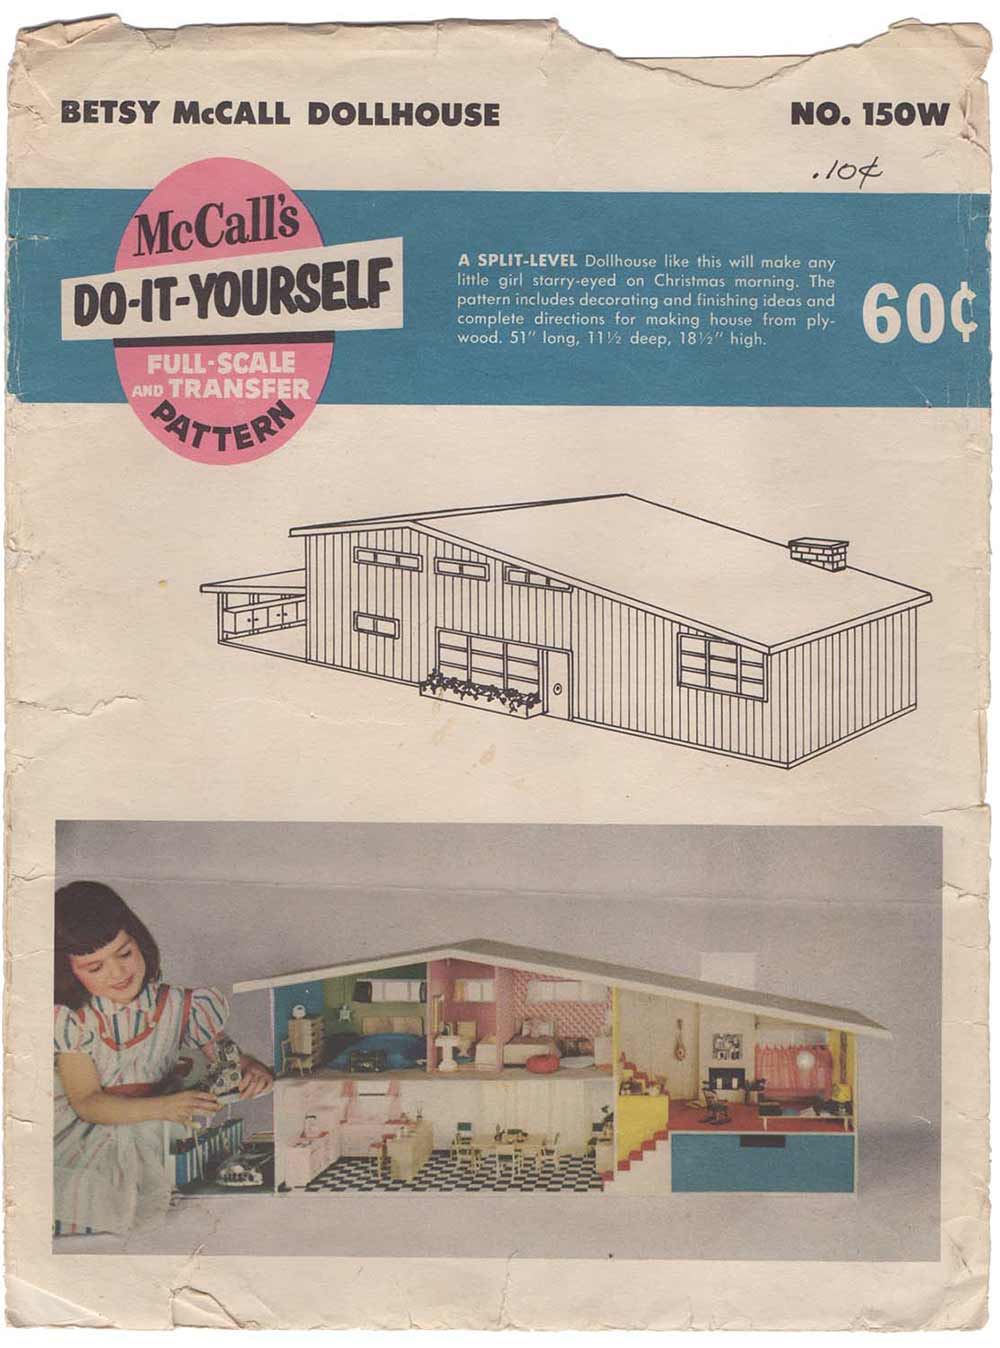
 I’m super excited to start 2015 with a new “mini-series” — literally. Over the course of the next few months, I’ll be documenting the process of building, decorating and furnishing a 1:12 scale, split level, wooden dollhouse — made from an original 1955 Betsy McCall Do-It-Yourself Dollhouse pattern. Is anyone else as pumped as I am about this? I love my job!
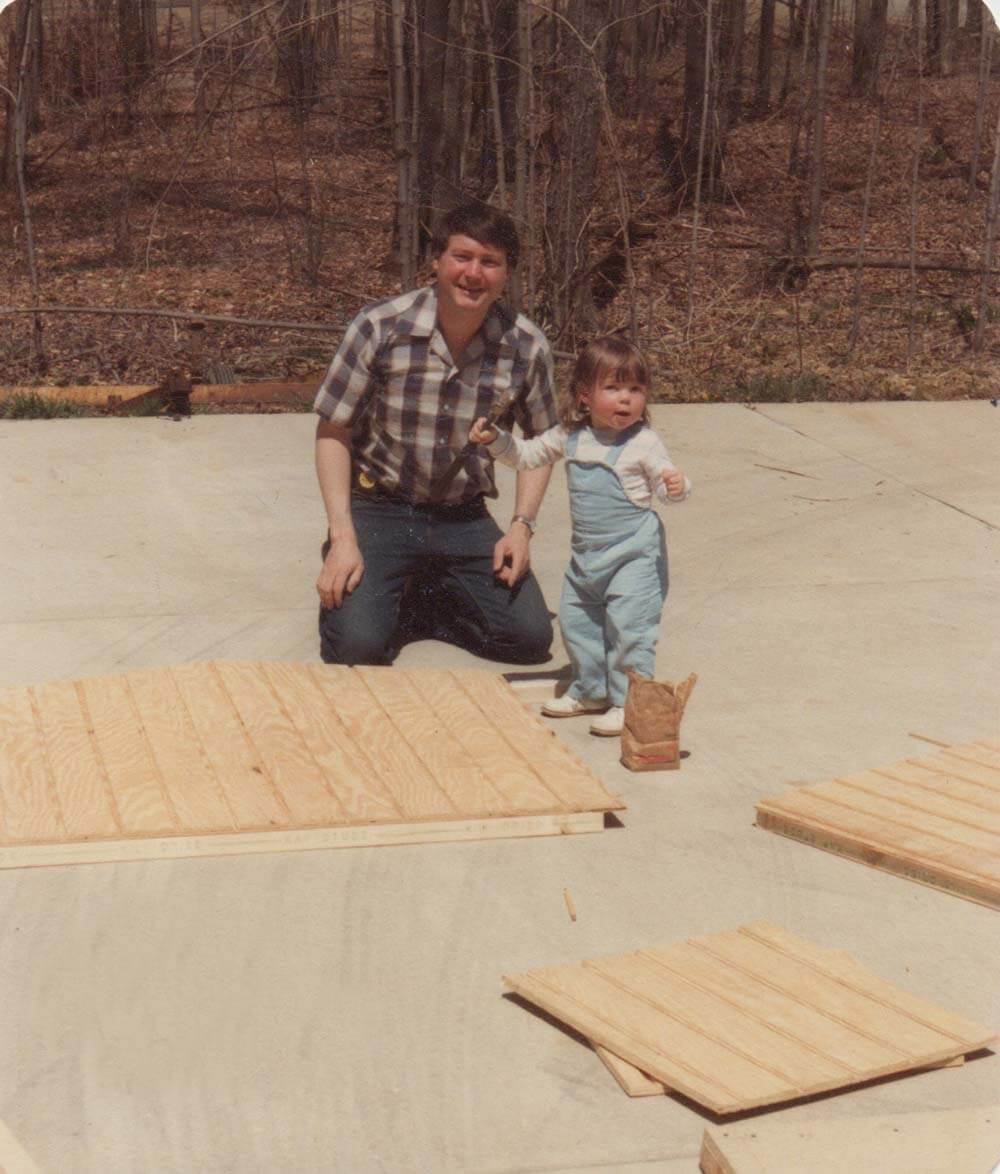
Before we get into the details about the build, let me explain (a) why I am so excited and (b) what made me want to build a dollhouse in the first place. Let’s take a flash back to the early 1980s when I was a kid. My Dad has always been handy — a skill he began sharing with me at an early age — (above) just look at 18-month-old Kate wielding that hammer –watch out world! He had this great idea to make me a little playhouse using some leftover siding and supplies from the 1980 ranch house that he and my Mom built just before I was born. Needless to say, I loved the idea.
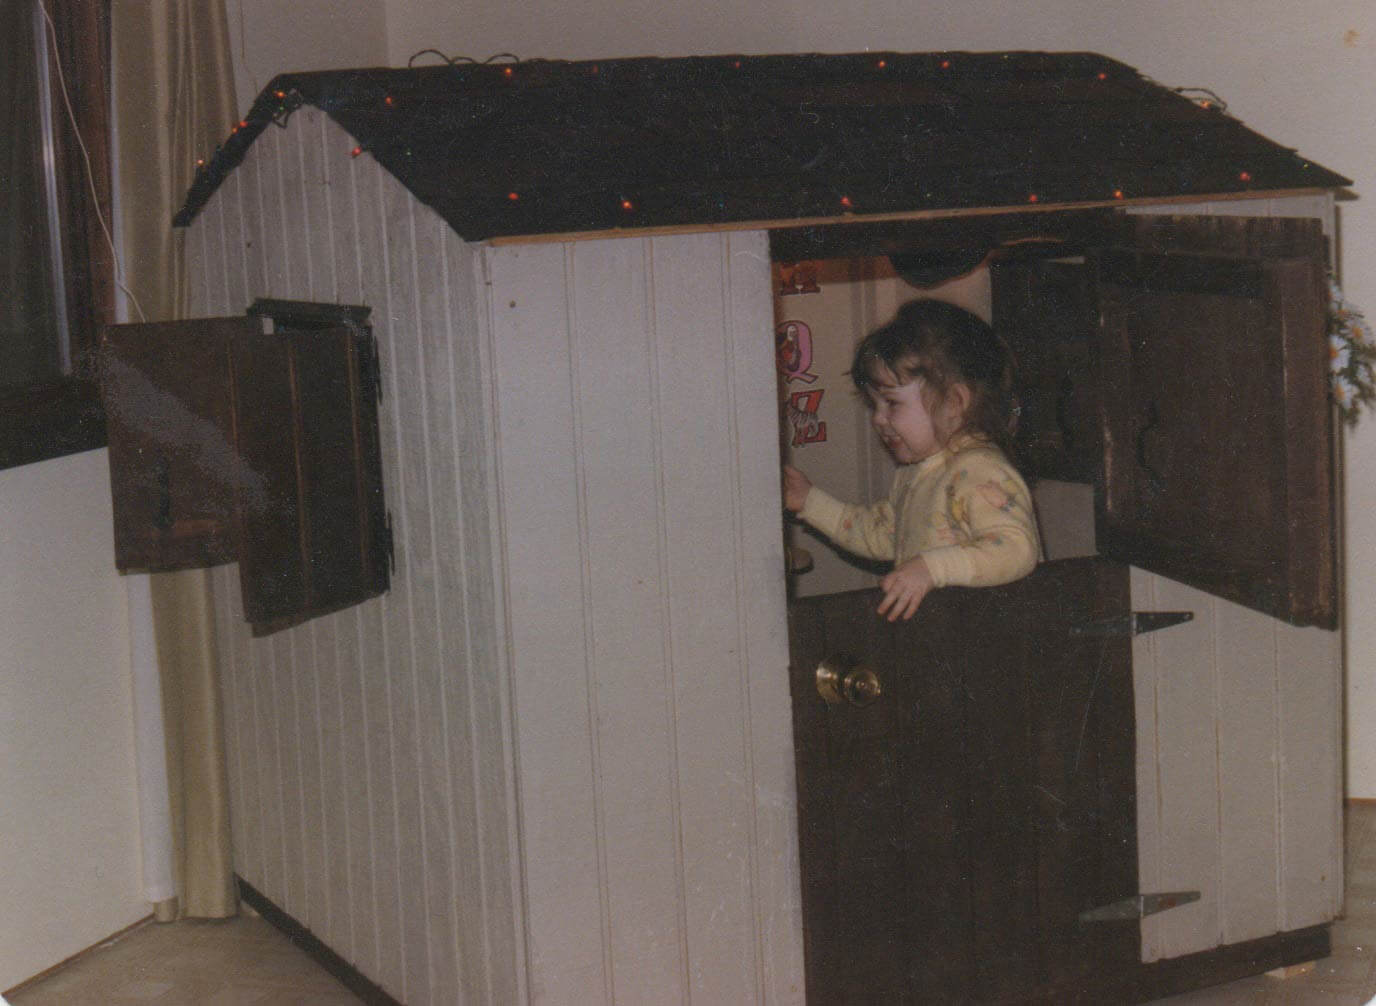 By Christmas, the playhouse was complete, and Dad set it up in our basement so I could play in it all winter before moving it out into the back yard in the spring. I absolutely loved that house, and spent many hours of my childhood hanging out in there hosting pretend tea parties and playing peek-a-boo through the shutters at my Mom. Thus began my love of miniature houses.
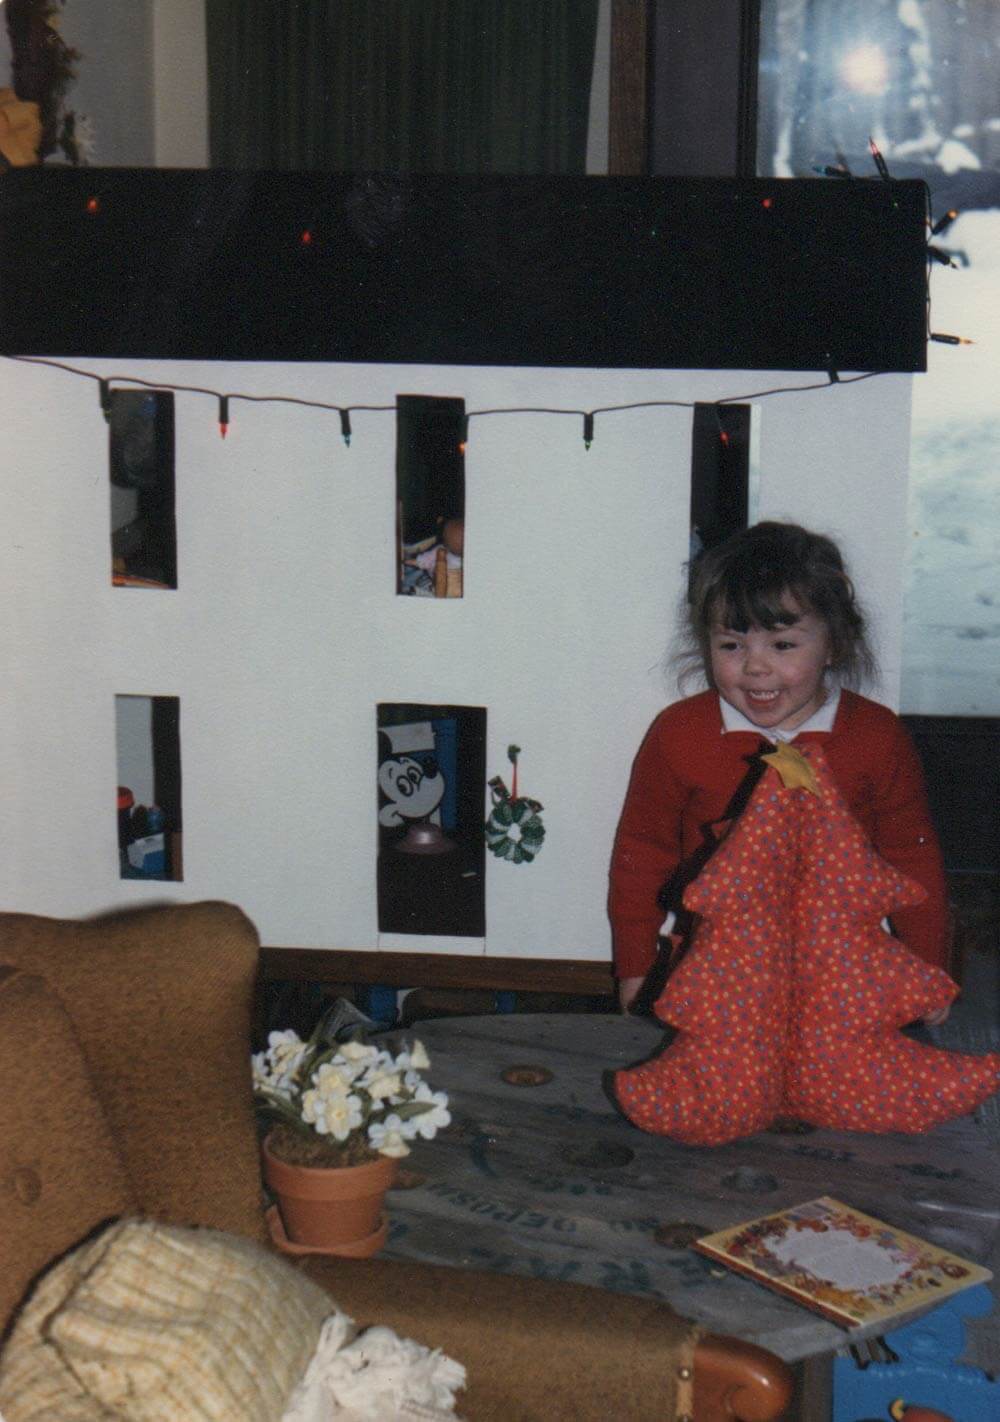 Fast forward a few more years, and yet another tiny house –built by my Dad — found its way under the Christmas tree. To say I was thrilled is an understatement.
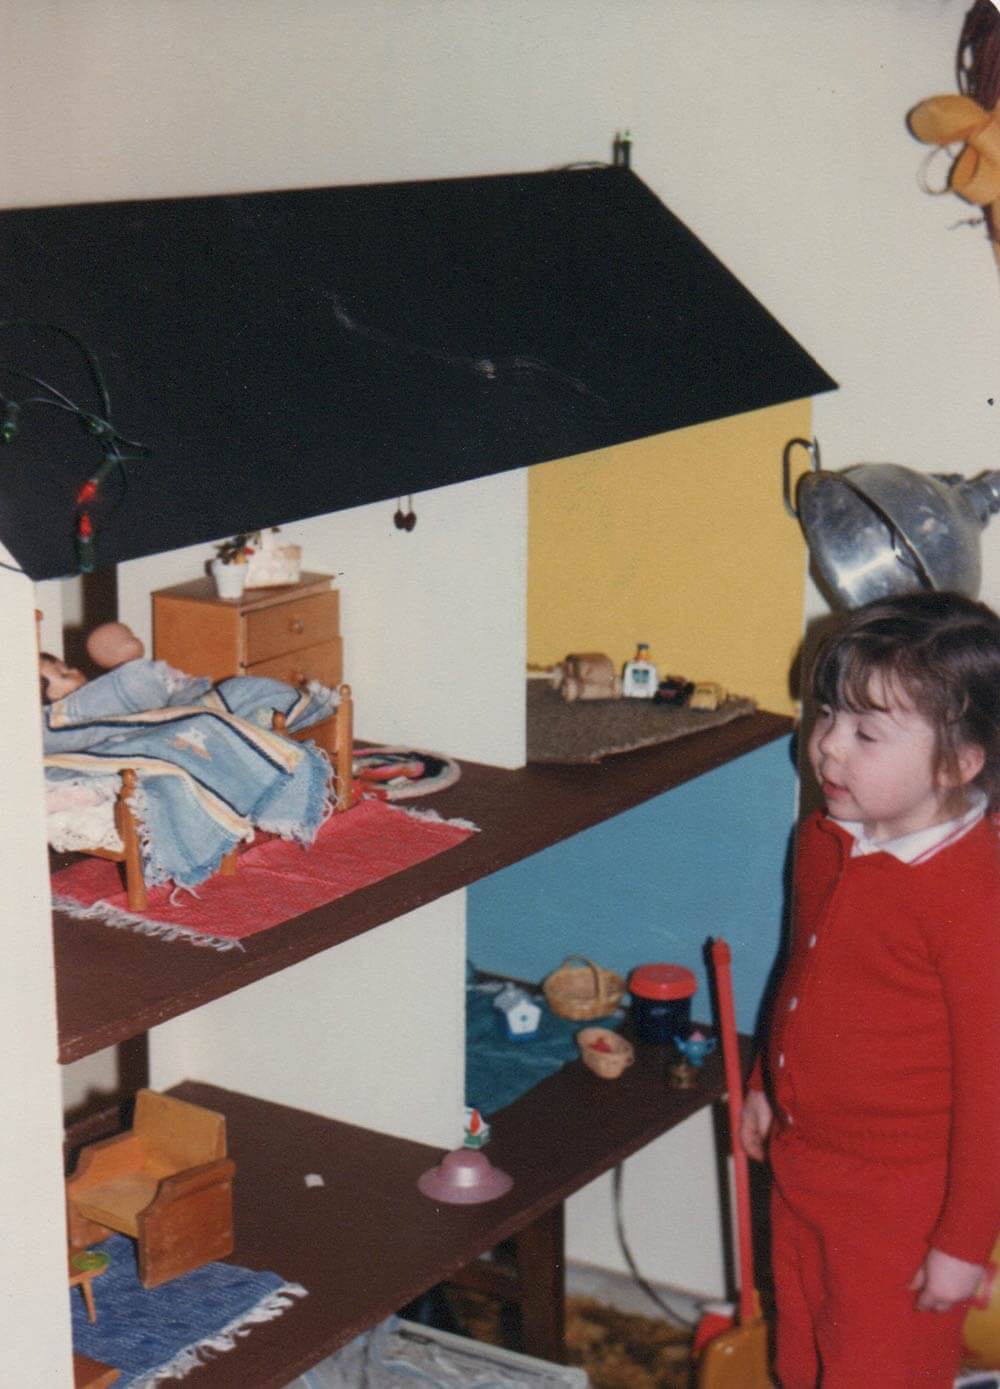 Dad designed and built the dollhouse himself out of 1/2-inch thick plywood. It was furnished with all of my Mom’s childhood doll furniture and various tiny decor items she had collected for me to play with. Mom even sewed me some tiny curtains for the windows. I spent so many hours rearranging furniture, dreaming up imaginative story lines about the Barbie family that lived in the house, and loved every minute of it.
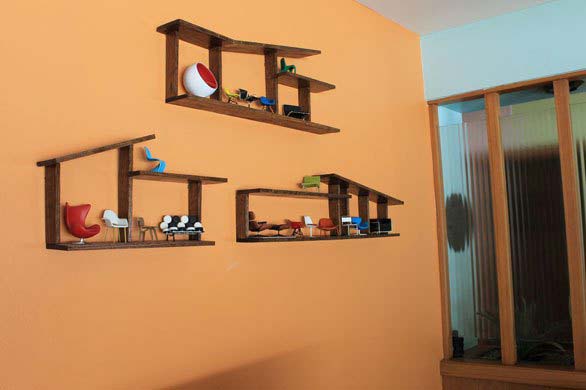 My obsession with miniature houses continued into adulthood, when I found a way to incorporate tiny houses and furniture into my “grown up” decor by building midcentury house shelves for my living room wall to display my miniature chair collection.
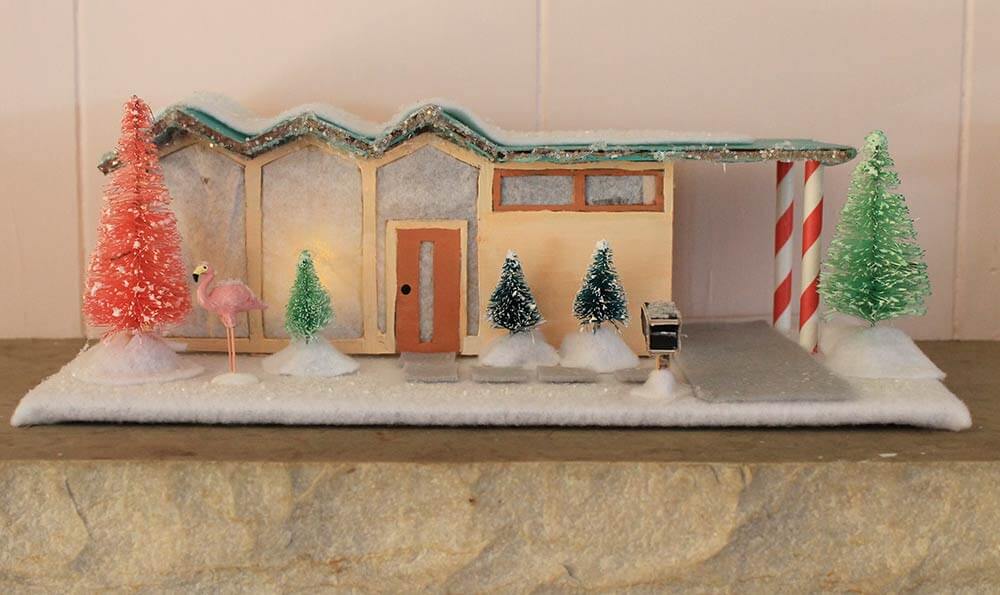 And of course you are all familiar with the midcentury Christmas Putz houses that I’ve been making for the last three years here on Retro Renovation — yet another manifestation of my miniature house infatuation.
 DIY Betsy McCall dollhouse seems to have had a few versions
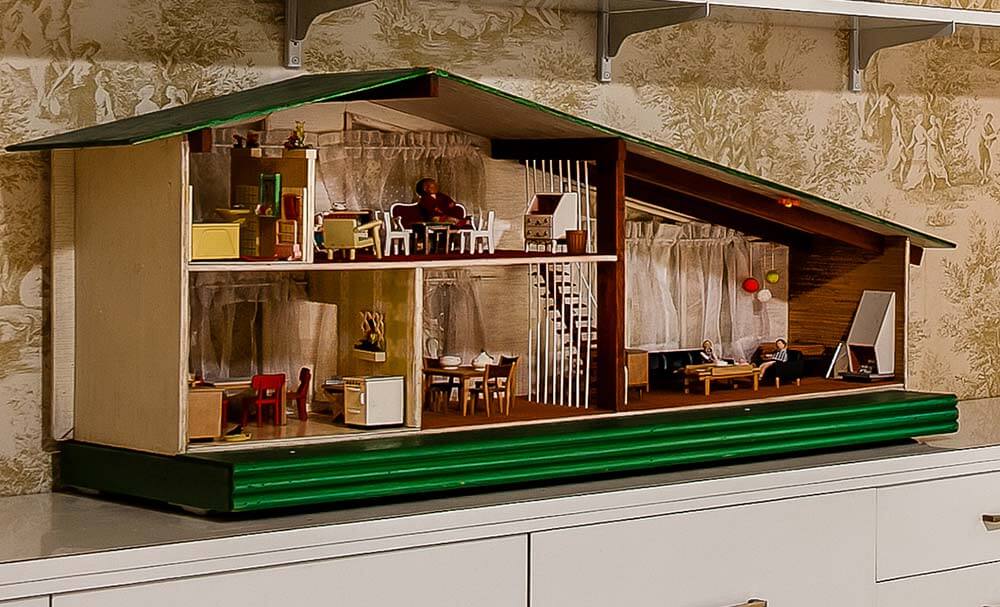
So then, it should come as no surprise that I became obsessed with the midcentury split level dollhouse I spotted in the bedroom of a stunning 1960 Toronto time capsule home we featured late last year. The moment I saw that dollhouse, I knew I had to build one. Thanks to a few of Retro Renovation’s readers, Pam and I learned that the time capsule dollhouse was likely made from a 1950s Besty McCall dollhouse pattern. The dollhouse in the photo above (from the Toronto time capsule) is slightly different than the pattern we found. Are there any dollhouse experts out there who know the model year of this groovy-yet-scary-staired version above?
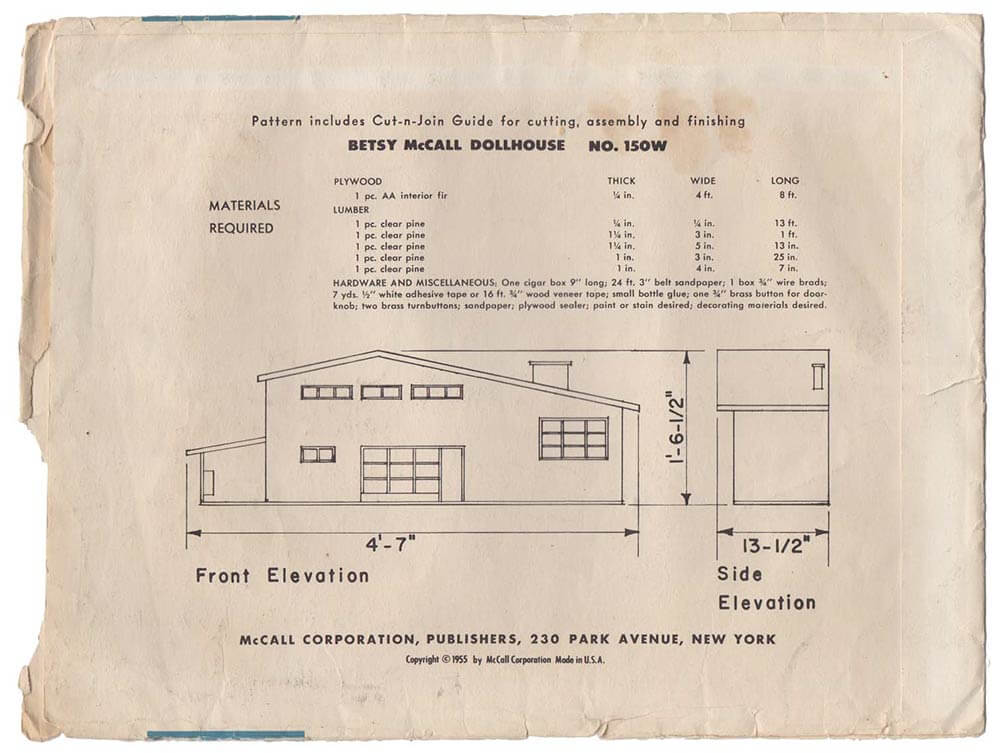 Mere minutes after discovering the existence of the pattern, Pam went into search-and-acquire mode and spotted an original pattern on Etsy. To my delight, she bought it and had it sent to me with the promise that I would build the house and chronicle it on the blog — a task this handy, mini-house loving gal was more than happy to take on. Yes, it is now “my job” to build this dollhouse, documenting the process all along the way.
Making a dollhouse on a budget
Before I began, Pam gave me a few guidelines for building, decorating and furnishing the dollhouse:
- No using any ready-made, new dollhouse parts or furniture in the construction and decoration of the dollhouse — meaning I cannot buy roofing shingles, siding, flooring, etc. that is specified for use in a dollhouse. All such things must be made from materials I can find at the home improvement or craft store.
- All furniture must either be vintage or homemade.
- I have a $100 budget to furnish the house — a real challenge if you know the price of vintage doll house furniture these days.
- Pam sent me a few boxes of goodies from her hoard to help with covering floors and walls.
These rules ensure that I’ll have to be creative and also keep the project true to its humble, homemade retro roots, by repurposing items and using scraps that are already around the house with the goal of spending very little extra money to get the job done. Sounds like a fun challenge to me.


virginia says
What a wonderful father you have! Such sweet and thoughtful gifts. I too would have been completely thrilled.
Kate says
Aww thanks Virginia, yes he is a great Dad! I’m a lucky girl to have him. 🙂
Dyan Carpenter says
I’ve been dying to make a mid century dollhouse since I saw some awesome dollhouse furniture this summer at a thrift store. Sadly, the furniture would have blown the $100 budget.
pamela says
Some of us are ardent 50s dollhouse collectors. I have two metal Marx houses with all the furniture and the families. I even have the swimming pool mint in the box. One of my houses is a colonial and the other is a ranch house. I am so excited to watch your house project.
Nina462 says
me too! I have a couple metal doll houses. and a wooden farm house my brother & dad made. But, speaking of Betsy McCall, as I was cleaning out & sorting my 600+Barbies (yes! that many), I did come across a Betsy McCall doll. I’ll have keep her and not sell.
As for the 600+ Barbies – I was a collection and now we want to sell them. Most are MIB from the 80’s =90’s. I want my basement storage room back!
Rachel says
Oooooooh! I loooooooove this so much! You will do great, and it will be so much fun to follow along. 🙂
Dollhouses have been making a comeback in the DIY/craft community over the last couple of years, so if making your own furniture and accessories is an option, you’ll be able to find lots of tutorials online. This blog always blows me away:
http://1inchminisbykris.blogspot.com/
It’s unreal how she’s able to replicate tiny details with not much more than foam core and paint!
If you can take donations from the RR community, I’ll offer skills to make a punchneedle rug for the house! Maybe a version of something like this:
http://www.ebay.com/itm/VTG-1960s-Retro-MOD-POP-Art-Pink-Cat-Panther-Shag-Hook-Rug-Groovy-Wall-Hanging-/371232128978?pt=LH_DefaultDomain_0&hash=item566f28bfd2
Or this:
http://www.ebay.com/itm/Mid-century-rug-retro-birds-handmade-colorful-/221657787340?pt=LH_DefaultDomain_0&hash=item339bd56bcc
Or this …
http://www.ebay.com/itm/Rya-Shag-Rug-Vintage-Abstract-Turquoise-Pop-Art-Starburst-Retro-Mid-Century-Wall-/221659922625?pt=LH_DefaultDomain_0&hash=item339bf600c1
Possibilities are endless! 🙂
SO excited about this project. Can’t wait to follow your progress!
Jessica says
Wow, just a few weeks ago I started pinning stuff on Pinterest to do the exact same thing! I look forward to reading your updates, very fun!! You are always coming up with something awesome to share with us!!
Roundhouse Sarah says
Baby Kate was soooo cute! Oh I’m so excited to see how you make mini midmod furniture on a budget! Last year I bought a vintage round retro dollhouse off ebay. I have yet to furnish it so these posts will come in handy. The dollhouse is by eagle a Canadian dollhouse maker. Here’s a link that shows one like mine;
https://www.pinterest.com/pin/331929435011146836/
Mary Elizabeth says
Sarah, what a fabulous find for you! Will enjoy seeing Kate’s process and yours.
Scott says
I already know this is going to be awesome. The $100 furniture budget might be tricky unless you can persuade Pam into some time-warp math. Perhaps something like a “then” budget of $25.00 then using vintage catalogs to determine what the doll house goodies would have sold for to know how many you could “afford.” Still true to the concept but allowing for today’s collectibility factor which didn’t apply when these things were new. Love that you are sticking to vintage materials though.
By the way, love, love, LOVE the Mid-Century House shelves. What a great idea!
Kate says
Thanks Scott for the vote of confidence. 🙂 I’ve already started searching for furniture and have found a few good deals, though it is obvious to me now that $100 is not going to furnish the whole house without me trying my hand at making some of the furniture. I think it will be fun!
linda h says
I was impressed that you are reupholstering your grandmother’s sofas with no previous sewing skills. I am sure you are up to this task also. How fun!
Kate says
Thanks Linda H! Yes, I’m so glad my husband is oblivious to messes (i’m the neat freak in the couple) because our kitchen table and laundry room has dollhouse exploding all over it and our office and den are full of sofas and upholstery mess! 🙂
Jay says
Kate, those pictures of you as a child are great. Of course you’re up to the challenge; you built an entire bathroom from scratch. Looking forward to seeing the end result furnished in all its mid-century glory.
Kate says
Thanks — I asked mom if she had any pictures of my childhood dollhouse and she sent them right away! 🙂
AnnWesleyHardin says
The carpeting! Can we cheat and give suggestions? Or at least torture the process pretty please? A braided rug from dryer lint. Don’t hate me.
pam kueber says
hehe, yes, Kate, a braided rug from dryer lint!
Kate says
how do you braid dryer lint?!?!?! hehehe
Robin, NV says
My thought exactly! I’m guessing you roll it to form it into a sort of yarn? A much easier and more colorful way to do it would be to use knitting yarn. I would take several strands of yarn and braid them together then glue the strips to a piece of thin cardboard (like a cereal box). It would be too fussy and irritating to actually thread the braids together like you do with a real braided rug. Maybe I’ll experiment at home and see what I can come up with. I make real braided rugs, by the way.
You’re going to have so much fun building the house and decorating it! I’m so jealous.
Wendy says
You sneak the green and yellow loom -made pot holder you made for your mom in Arts and Crafts class out of the kitchen drawer, lay it in front of the tiny couch and voila! Living room rug.