

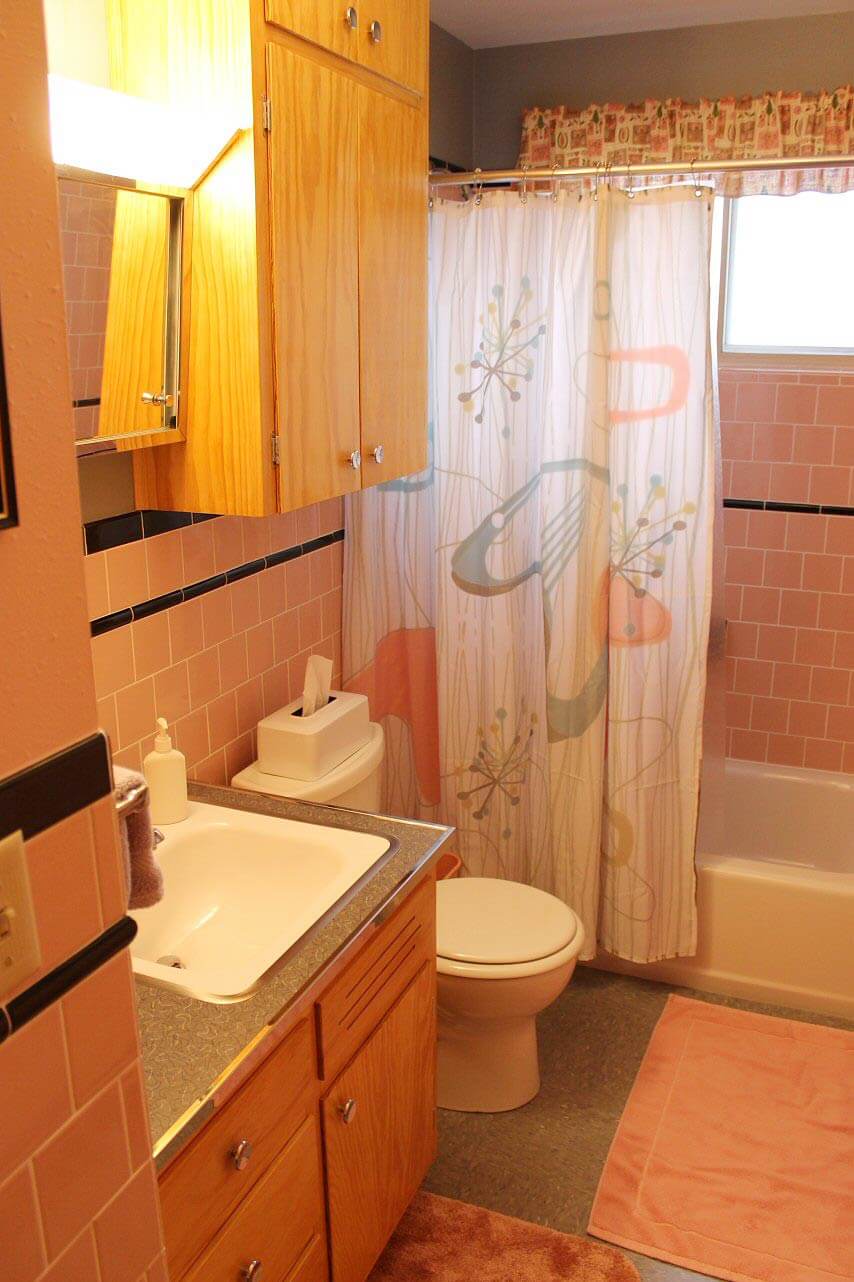
 Taking inspiration from his grandmother’s vintage pink bathroom along with the help and resources he found on Retro Renovation, Jim used his mad DIY stills to tackle a complete gut remodel of the main bathroom in his 1961 midcentury modest home. The results are fabulous — a black and pink bathroom that looks like it has always been there — but brand new!
 Jim writes:
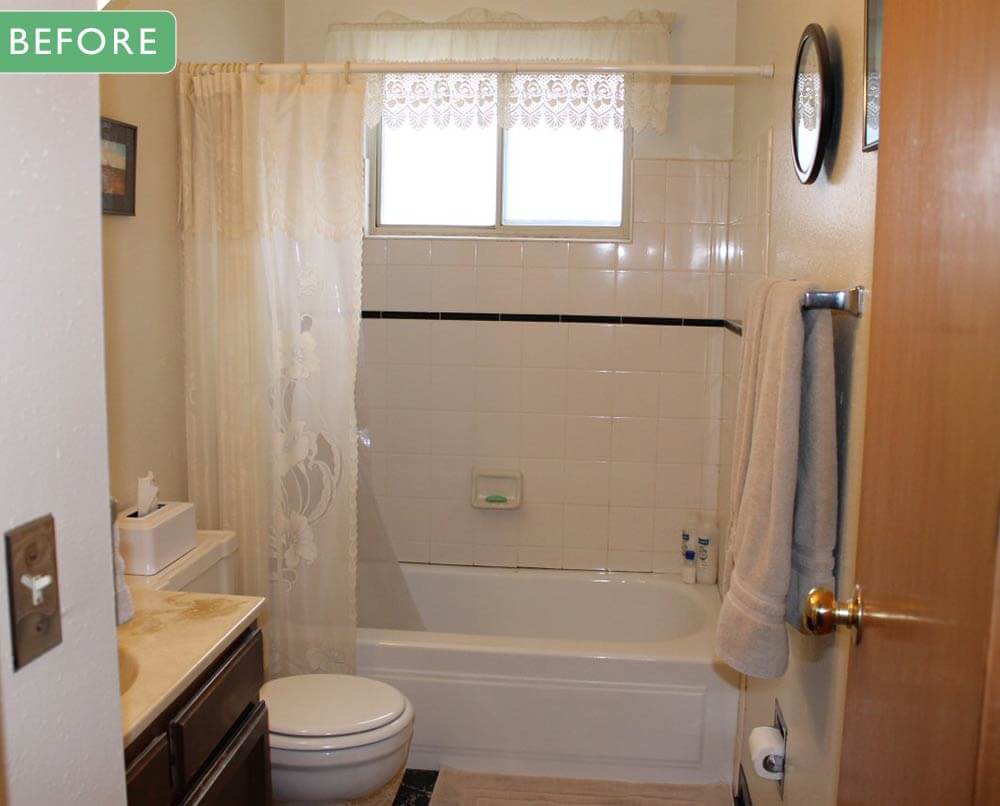
I recently finished a remodel of the bathroom in my 1961 house. Any mid-century charm that it may have had originally had been lost many years ago. It was plain and worn-out.

I put off remodeling it for many years, because I just couldn’t get excited about any of the new materials I saw in stores. Then, I had the idea of restoring it to a style appropriate for a house of this age. My grandmother’s 1956 bathroom came to mind as the ideal look that I was going for. As I started trying to source the correct materials, I kept coming across your websites. The resources listed there were extremely helpful.
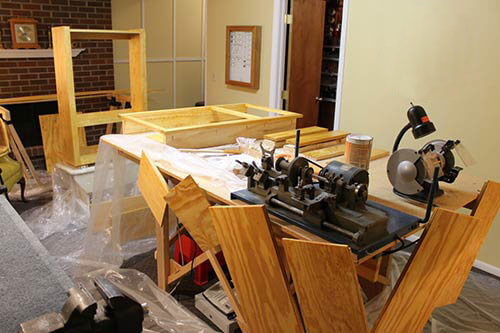

Kate’s pink bathroom project made me realize that there was no reason I couldn’t build my own cabinets from scratch. I built three of them, copying the ones that were in my grandparents’ house.
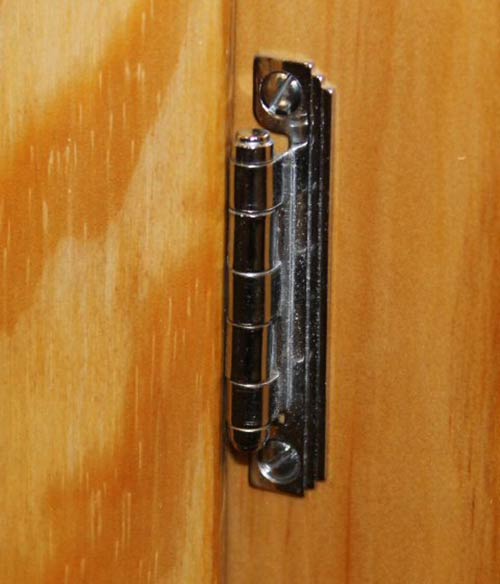
I even found new-old-stock hinges from the 1950s.
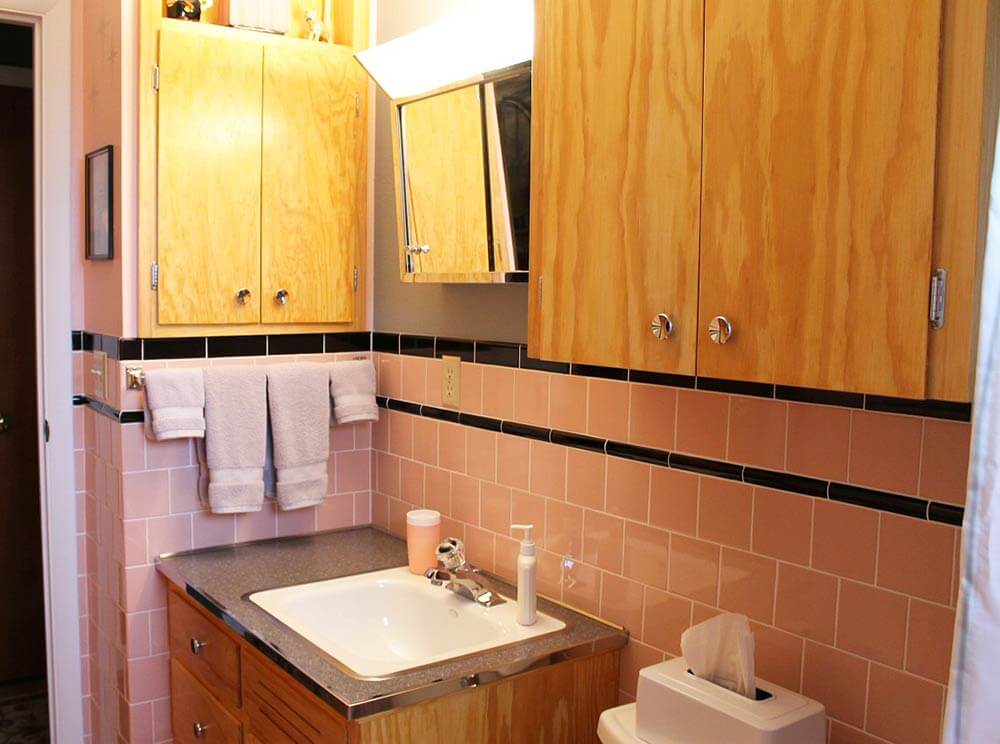

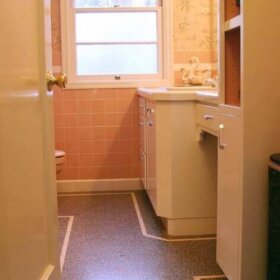
Other than the installation of the flooring, I did everything myself. I spent five months planning and gathering materials. Once I started demolition on January 1st, it took five weeks to complete the room (with very little sleep). I used 1,101 tiles on the walls.
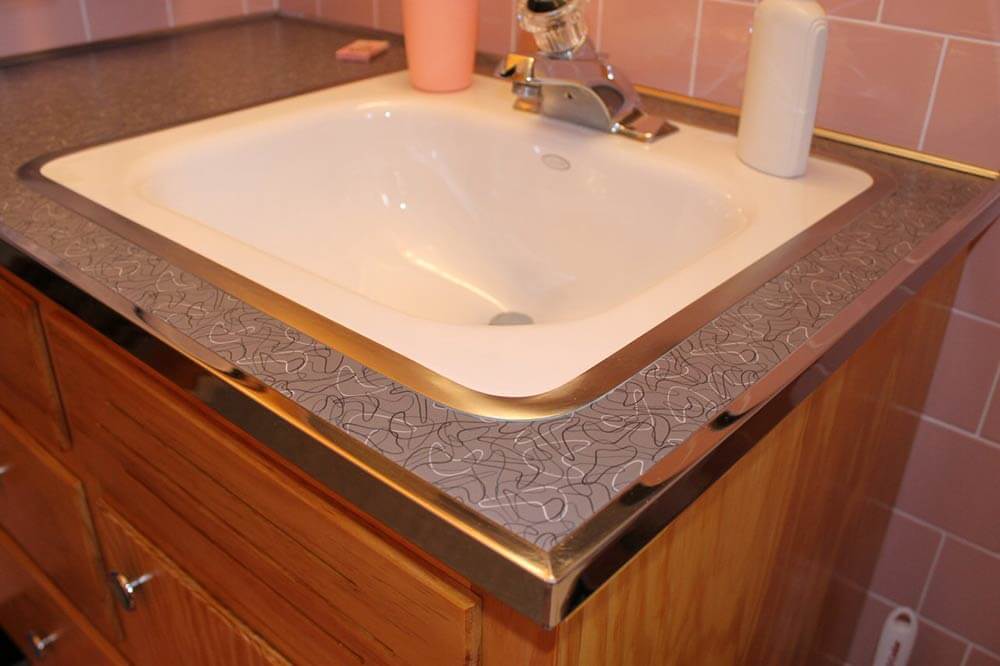
I used B&W pink & black tile and chrome countertop edging from New York Metal. The laminate is Formica Charcoal Boomerang. That was all I was able to find six months ago when I bought it. (Unfortunately, the new Wilsonart boomerang patterns were unveiled a bit too late for my project).
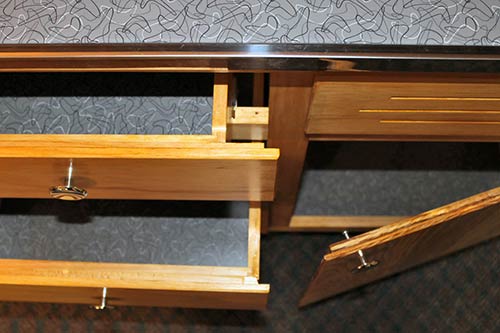
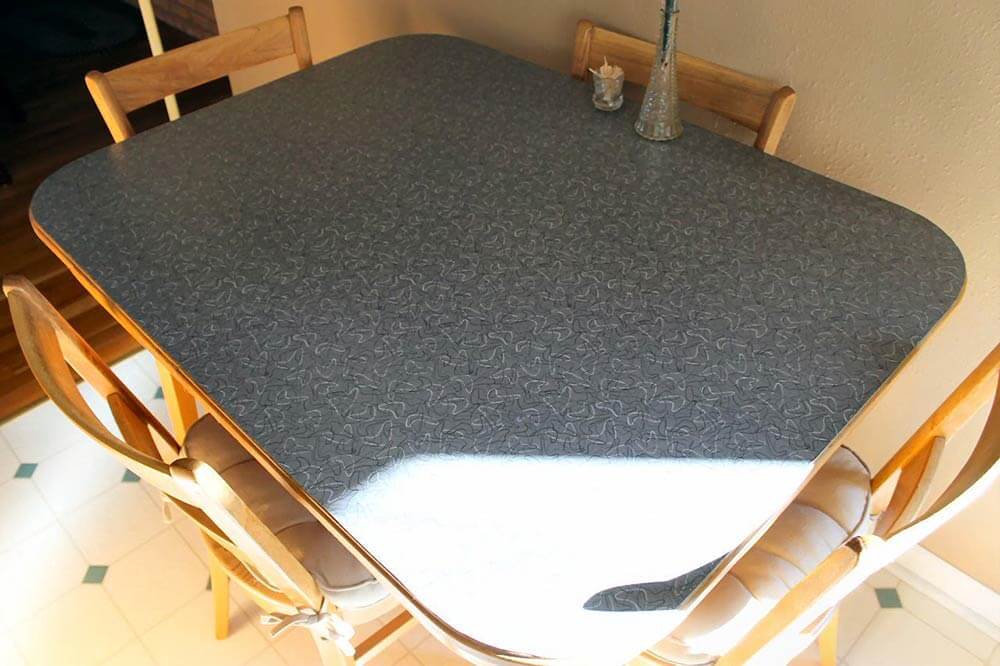
It’s a small bathroom, only about 45 square feet. Since the vanity top was so small, I had a lot of extra laminate from the 4×8 sheet that I bought. I used some of the rest to laminate the drawer bottoms and shelves. Even then, I still had a large sheet left. I decided to use it on my kitchen table (my grandparents’ kitchen table from the 1950s). I cut it to fit, but it’s not glued down. It just sits there as a replacement for a tablecloth, to protect the wooden table top. I’ll attach a picture of that, too. It’s a good use for leftover laminate.
Anyway, I just wanted to thank you for the resources that your websites directed me to. I also thought that your audience would enjoy seeing my bathroom project.
Aww, Jim, I am especially pleased that reading about how I built my own bathroom vanity made you realize that you could also build your own vanity and bathroom cabinets! They turned out wonderful — now friends and family will be asking you to build cabinets and vanities for their bathrooms — just you wait and see!
 Resource list:
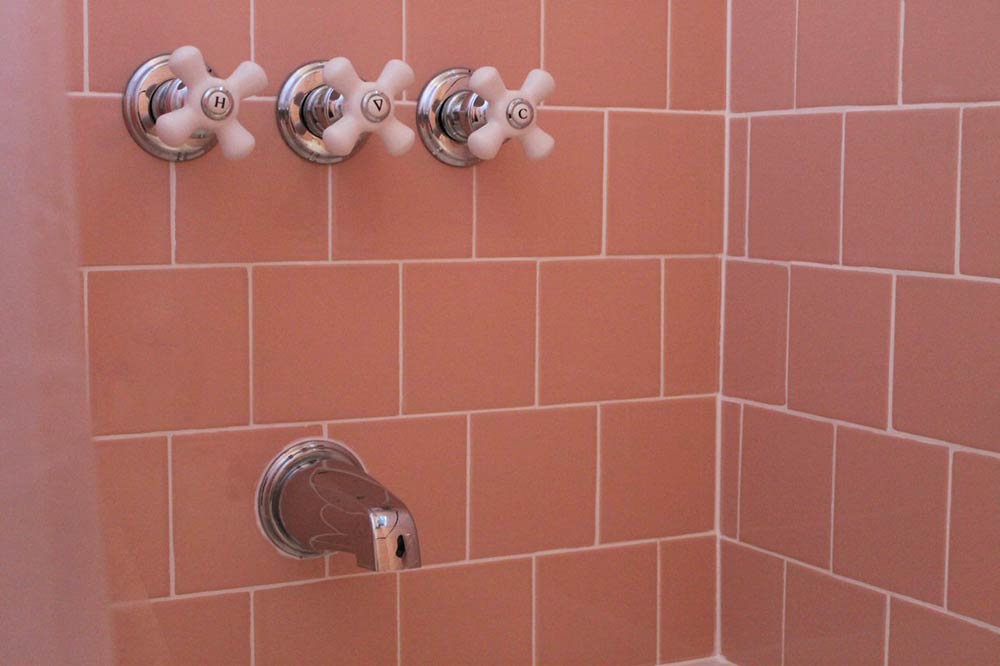
- Tile – B&W Tile 70W Pink & 92W Black
- Sink – Kohler Tahoe with trim ring
- Laminate – Formica Charcoal Boomerang
- Chrome Edging – New York Metal
- Cabinets – Homemade from pine & fir with 1 coat each of clear & amber shellac**
- Cabinet Hinges – Vintage new old stock Stanley 1530 Semi-Concealed Hinges
- Cabinet Knobs – Liberty P65015H-CHR-C 1-1/2″ Concave Round Knobs
- Cabinet Catches – Stanley 71-0100
- Bathtub – American Standard Princeton 30″ White
- Toilet – American Standard Cadet 3 White
**Pam notes: In the comments of this story about amber shellac, readers posted that amber shellac may not hold up well if exposed to water and other chemicals. Pam = not an expert on this question. Readers: When researching what finishes to put on your woods, do your own research, including contacting the manufacturers, to determine what applications are appropriate for a given product.

- Flooring – Mannington Essentials Pewter VCT
- Black Soap Dish – Clay Squared
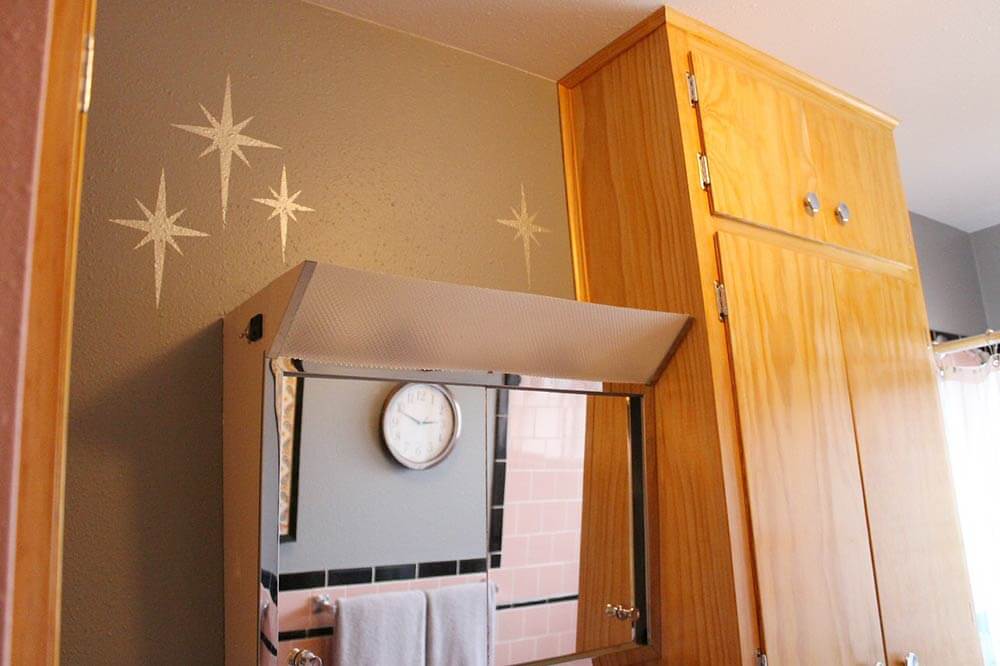
- Mirrored Medicine Cabinet – “Satin Glide” by Williams Products (Came with House)
- Wall Doorstop – Stanley 75-0161
- Towel Bar – 1 original to house, 1 vintage from Ebay
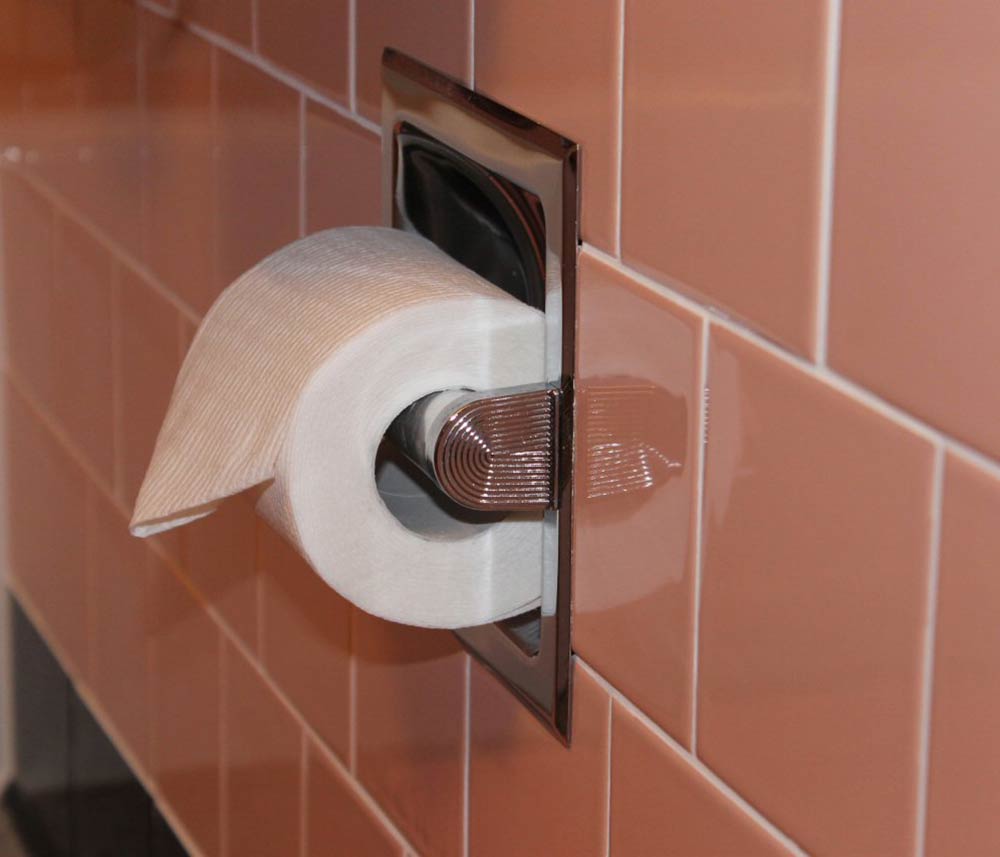
- Toilet Paper Dispenser – Original to house
- Window Valance – Vintage late 1950s from my grandparents’ house
- Shower Curtain – Cafepress through Amazon (turned backwards for more subdued colors)
- Towels – Bed Bath & Beyond Wamsutta Duet in Chrome and Dusty Rose
- Wall Stencils – Homemade from pattern found on Retro Renovation
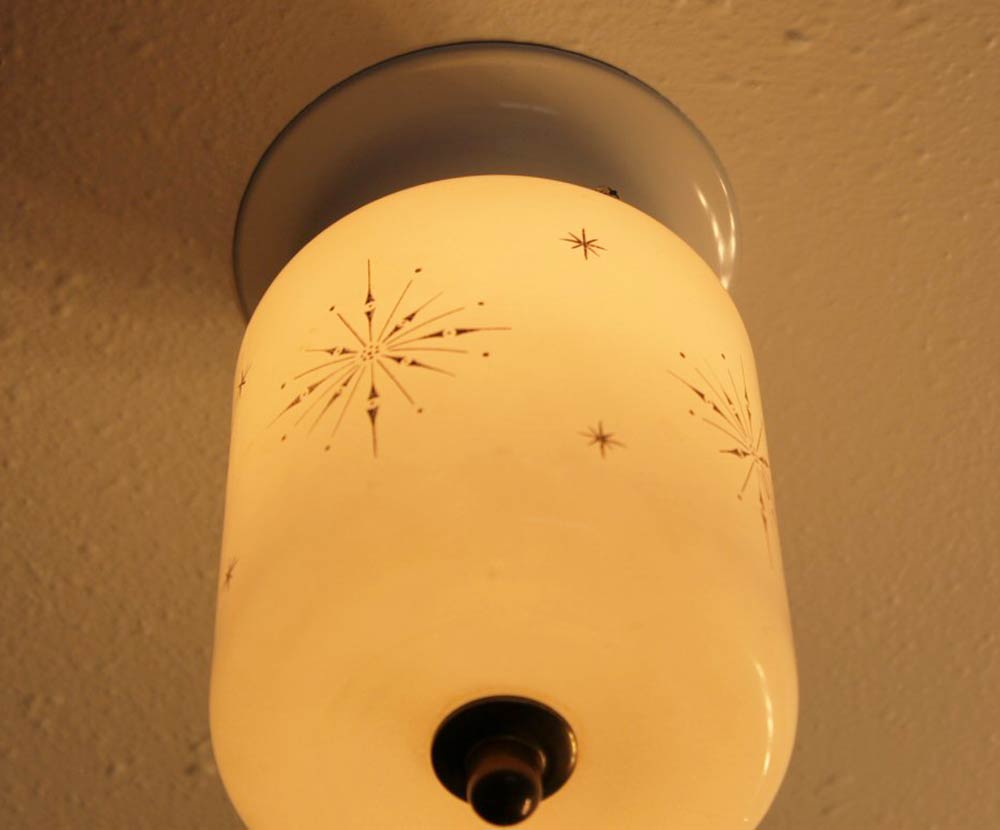
- Ceiling Light Fixture – Habitat for Humanity ReStore
- Light Switch Plates – Vintage 1950s from Ebay
- Gray Wall Paint – Ace Hardware Clark + Kensington “Fog Rolls In”
- Pink Wall Paint – Ace Hardware Clark + Kensington “Rosy Cheeks”
- Sink Faucet – Moen – Came with house, replacement handle from Ace Hardware
- Shower Faucet – Price Pfister – existing from 2003 repair project
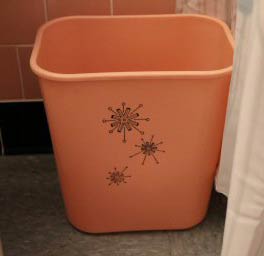
 Trash Can – Vintage Rubbermaid 2955 from my grandparents’ house
- Drinking Cup – Vintage Bolero Therm-O-Ware tumbler
- Medicine cabinet and toilet paper holder – both came with the house
Link Love:


Faith says
Jim, how did you make the cabinet doors? Is each one piece of wood worked with a router? I need new cabinet doors in my kitchen, but am not sure how to fashion the inside. Thanks for any advice.
Jim says
Sorry I didn’t see your question until now.
Yes, each cabinet door is made from one piece of finish-grade fir plywood, with the edges routed. I have a relatively cheap router with its own small router table, and I used a rabbeting bit.
The drawer fronts were done the same way, but using pine boards rather than plywood.
Patti says
Absolutely beautiful! I have the privilege of seeing many homes and always share this website with those of the mid century homes and why they should keep the original look!!
Rick G says
Congrats on your win Jim ( I voted for you ) !!! – You did a super job on this, I really doubt anyone would guess it’s a “new” reno ……… you really captured the feeling of your grandmothers bathroom & the look of the era. And ….. that gray counter material really does goes very well with the colors.
Lisa says
Absolutely beautiful work, Jim! Every detail is spot on. Much needed inspiration for a blue bathroom retro renovation we are starting soon. So, now that I have seen BOTH Kate and Jim’s beautiful custom made cabinets and that they did it themselves I am inspired to try that myself.
Oh, I just wanted to add that I would not fear putting the amber shellac in the bathroom at all. Let’s just say I should have bought stock in Zinsser Amber Shellac because I have used many many gallons of it as I rehab our house and it holds up phenomenally well to every kind of abuse including water. I stripped and finished 4 different sets of birch kitchen cabinets to put our kitchen together and the water just beads right off of them. And we have 7 kids currently at home so those cabinets take the abuse. I also stripped and finished and then added new knotty pine to my living room (lost count at how many gallons) and it holds up very well. When water hits the baseboards and molding it is impervious.
Thanks for the inspiration and the beautiful pictures. I especially love how your work lovingly paid homage to your grandmother and your sweet memories of her. Enjoy your little bit of pink paradise.
Lisa
Sean says
Looks Awesome! I am in midst of doing the same thing to our 1962 Bathroom using the same pink tile! We found a suite of Pink Bathroom fixtures on Craigslist locally, and I am also building all of the cabinets as well. We were also lucky in that we are reusing the original lights, mirror and some vintage tile (they had installed 1″ pink mosaic tile around the sink, and 2′ around the tub) I am reusing the mosaic tile as accents. Its a lot of work, but seeing your beautiful finished result gives me a little kick to keep going!
Margie C. says
Wow, wow, wow! I just love what you’ve done! The tiling job is amazing. Congratulations on its completion and the great homages to your grandparents throughout. Kate’s right: I want you to build the vanity cabinet I envision for my half bath (see 2/23/16 post) reno–the one I want to put “First Lady Pink” boomerang laminate on as a countertop.
Mrs. Elizabeth Walters says
BESIDES the fact that you did an incredible, gorgeous job that honors the memory and legacy of your grandparents–much of it with your own hands, I also found a new nugget that I’m going to steal–LAMINATE IN THE DRAWERS AND UNDER THE SINKS! It’s inspired and brilliant. And the laminate “tablecloth” on your grandparents’ table–genius. Keep up the great work!!!
CB says
Fantastic!
Lori says
Wow Jim you did an amazing job!!! I LOVE, LOVE, LOVE it!!! All the little details are perfect! It’s great to see people bringing back the older look in their homes. I cringe every time I watch HGTV and someone is tearing out a vintage pink, blue or green tiled bathroom! Thank you for sharing your beautiful work!! I’m going to check out your website!
Katherine says
Dear Jim,
It’s just perfect! I wanted to do something similar to our bathroom, but my husband assured me that our house is too old for the look. I’ll win him over one day, regardless.
I was also looking at the web pages of your home, which is also lovely. Can you do me a favor? I can’t remember the name of the wood chair by the fireplace in your living photo, and can’t remember the type of lamp (it’s pink) on the dresser in the Master. Can you help my fading memory?
Kath
Jim says
I’m not sure that I really know an exact name for that style of chair. My grandmother bought it in the late 1950s and sat in it for 50 years. It was made by the Twin Rivers Furniture Company of Fort Smith, AR. I don’t seem to very much information about them. It’s a rocking chair (the kind with a spring mechanism), and the fabric has various historical and patriotic American designs. It sort of fits with the colonial revival style in that regard.
I’d probably call the lamp “atomic” style, and it has a two-tiered shade.