

 Christine has been very busy. Not only did she update her kitchen — complete with vintage pink Lyon steel kitchen cabinets, she also added a bedroom and bathroom in the basement. Taking cues from the original 1962 bedrooms and bathroom upstairs, Christine’s goal was to make the rooms look like they had always been there. Her mission: Accomplished!
Hi Pam,Here are the photos from my basement remodel. We took about 500 sq.ft (of our 800 sq.ft.) unfinished concrete basement and created a bedroom and bathroom that we hope look as close to their 1962 upstairs counterparts as possible.

Ten years ago when we remodeled our master bathroom, I tried to find a source for an authentic looking bathroom vanity, but didn’t have any luck.
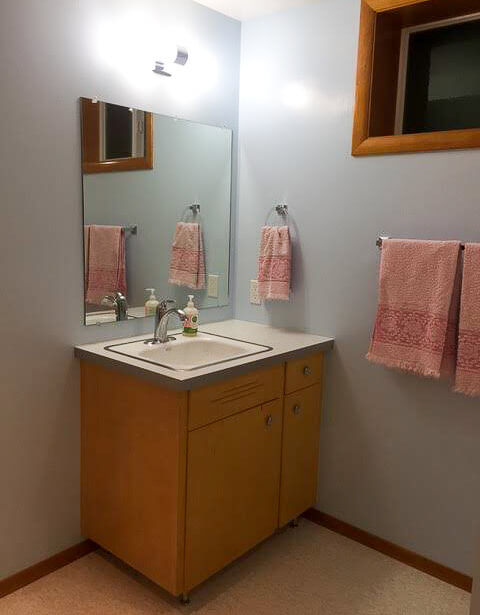

So, this summer when a cabinet maker told me he could recreate my original bathroom vanity and put in a hudee-ring sink, I was beyond excited. I think they did a stellar job.
- Pam says: You don’t know what hudee rings are? Well, we have all the history here.
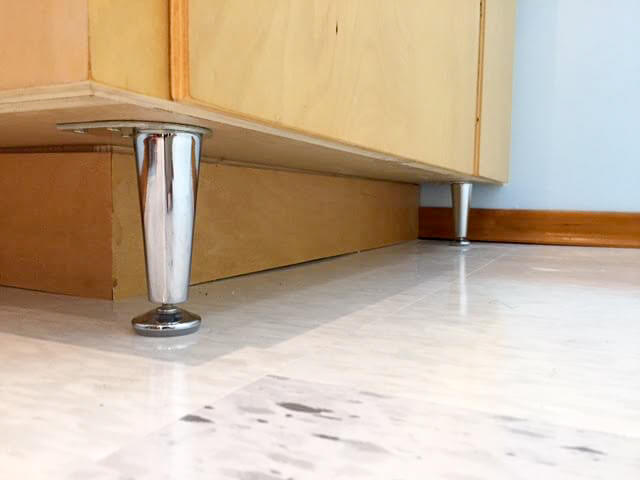
When designing the basement bathroom vanity, the cabinet maker, Dan Lester, insisted I go with the hudee ring sink so it could keep its 60s look and was willing to alter the vanity to fit it. The vanity had already been built to fit another sink, but he added onto to make the bigger sink and its ring fit.When the plumber put in my new sink with a new hudee ring, he said he’d been in business for decades and taken many hudees out, but never put one in.

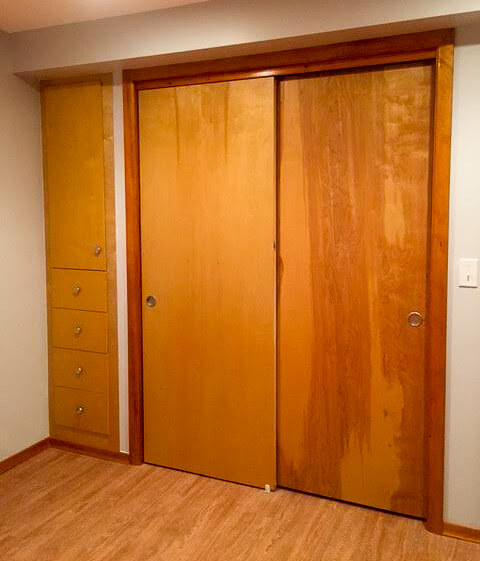
My general contractor, Sean MacNeela of Corrib Construction, usually works on big houses with big budgets that feature the highest end styles. But as my neighbor who also owns a 60s ranch, he knew a lot about the value of good bones, mid-century styles and how to find those same materials in today’s building market. Corrib Construction installed the vanity and built-in, in addition to designing and installing the closet. He really is an amazing craftsman. Couldn’t have done it without him.He referred me to the cabinetmaker and designed the closet so it is identical to all the closets upstairs – all wood rods, same stain and shelves, no metal racks.
Most of my supplies were purchased from our local building materials shop, 52nd Ave. Hardware, where the brothers who own it shared tricks they’d recently used re-installing new interior clamshell trim in their father’s 50s ranch. These tips were invaluable since I stained all the window and baseboard trim in my basement myself. They were all happy to help me find just the right lights, wood, colors and materials needed to help me keep my kitchen in the mid-century where it belongs and fool the eyes into thinking the basement rooms were there all along.Thank you for being an incredible inspiration and conduit for keeping this loving era alive and growing.
Resources for Christine’s basement bathroom and bedroom remodel
Bathroom Resources:
- Vanity: Custom crafted by L & Z Specialties
- Vanity Counter: Formica Paloma Polar, purchased through The Floor Store, installed by L & Z Specialities
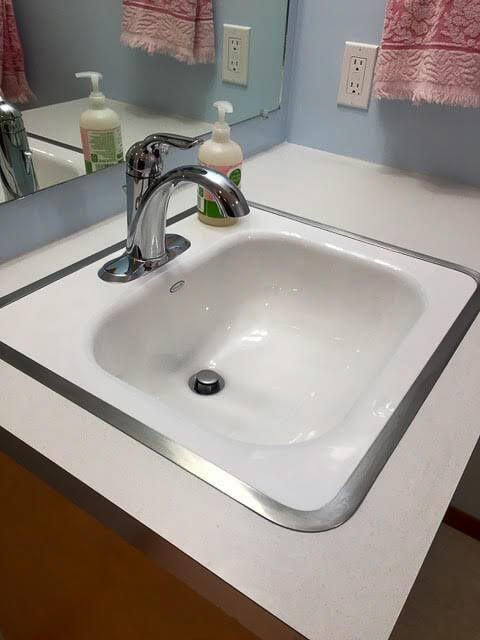
- Edge: Stainless steel, purchased and installed by L & Z Specialities
- Sink and Faucet: Kohler Tahoe with metal frame, Delta Faucet Lahara, purchased through Home Depot and Consolidated Supply, installed by Sharpe Plumbing and L & Z Specialites
- Light Bar: Progressive, purchased at Home Depot, installed by Precision Electric
- Toilet: American Standard Cadet Pro, purchased at Consolidated Supply, installed by Sharpe Plumbing
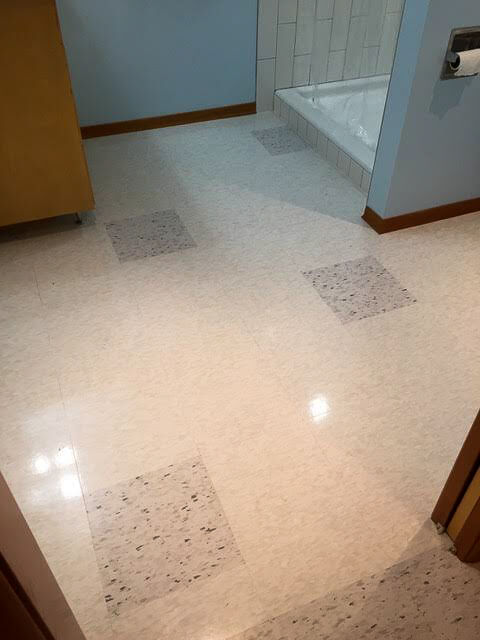
- Floor: Azrock VCT Salt & Pepper and Pinch of Salt, purchased and installed through The Floor Store
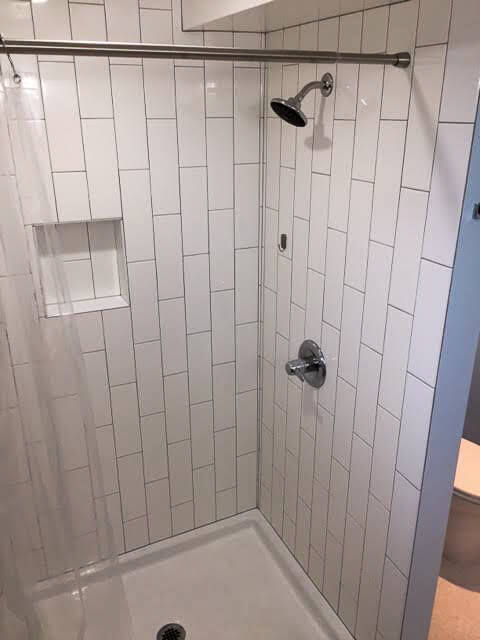
- Shower: Daltile, Delta Lahara Shower head and handle, Kohler shower pan, purchased at Home Depot, Consolidated Supply, Ferguson; installed by Corrib Construction, Eamonn Doherty Construction, Sharpe Plumbing
- All Trim: Clamshell, Pocket Door, Zissner Amber Shellac on all, purchased at 52nd Ave. Hardware, installed by Corrib Construction
Bedroom Resources:
- Built-in: Custom crafted by L & Z Specialties
- Closet: Birch door slabs, interior rod, shelving, Zinnser Amber Shellac on all except doors. *Purchased at 52nd Ave Hardware, installed and designed by Corrib Construction
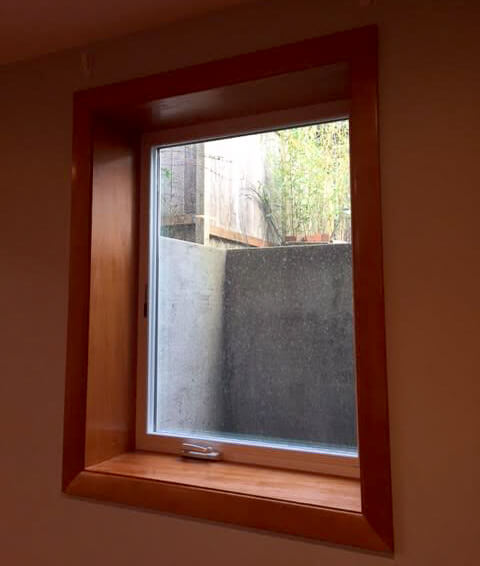
- Egress Window: Milgard * Purchased at 52nd Ave. Harware, installed by Eamonn Doherty Construction and Corrib Construction
- Floors: Click LVT Northern Lights * Purchased and installed through The Floor Store

Howdy hudee, nicely done, Christine! Thank you for sharing your photos and resources for your basement remodel — and for the kitchen remodel we featured earlier. But ack! She’s still not done:
I have a 450 sq. ft. family with fireplace, pool table and gorgeous wood paneling that needs freshening up, and we will be finishing the rest of our basement to match the existing Douglas Fir tongue and groove wood paneling, I hope.
Have fun, Christine!


Ree says
With regard to the bathroom towels, I recently helped my 91-year old aunt move from her house to a retirement community. She had quite a collection of wonderful vintage towels that never used. She told me she saved those for guests and special occasions, and she used plain white, unadorned towels for her daily use. I convinced her that now was the time to consider her move as a special occasion and she should begin to use those beautiful towels herself. She also has some fabulous brightly printed ones that I think probably date from the late 60’s or early 70’s. Since her bathroom at her new apartment is a neutral color with white fixtures, all of her newly found towels are perfect. I love your house and your style. Can’t wait to see what your basement area will look like when you are finished.
Donna says
Love the bathroom towels!
Christine Pashley says
I have them in lavendar, too and I put them out every special occasion. Makes me feel like I’m going back in time when quality and frills were enjoyed. So happy someone else shares my love for these 🙂
Lynn says
Okay, I just keep thinking of things to say, I think because your basement sounds similar to mine. I would love to see what you do with the rest of yours and how you refresh your paneling. Ours is mostly finished–paneling, drop ceiling, and black and white vinyl tiles that we’re installing. Our furnace, water, heater, crawl space entrance (our house is 1/2 and 1/2) and tools are in a separate room that is closed off from the rest of the basement. We have table games but I’m lacking decor ideas. Another challenge is our sump hole is not behind these closed doors–it’s in a long cabinet in the main basement area! Weird. Our paneling is in great shape but is looking dull, so keep sharing the ideas please!!
Lynn says
Sorry–one more question! Would you be willing to share the hardware store’s tips for installing the clamshell trim with us? We have some majorly water damaged trim in our basement that needs to be replaced. Thanks!!
Christine Pashley says
I’m going to get the name of the wood/clamshell trim source tomorrow from the building supply store. But in the meantime, the owners tip was to apply the shellac with foam paintbrushes. It spread the thick shellac more evenly, without brush strokes. I went through A LOT of brushes because they fall apart quickly. But, when I tried to use a paintbrush I quickly discovered why these guys own their own store and know what they’re doing. Foam brushes, three coats, lightly sanded in between.
Christine Pashley says
Hi Lynn,
52nd Ave. Building Supply owner Steve told me the clamshell windos trim was locally made by Oregon Wood Specialities. He said not many wood supplies supply it, but they do because it’s so popular here in Portland. He used it on his own father’s 50s house refresh, as I mentioned in the story. The floor trim was also from Oregon Wood Specialities. I took a small piece to the store so they could help me find the right match. Good luck!
Lynn says
Hi Christine,
Thank you so much for the information on staining and finishing the trim!! I never would have thought to use a foam brush. Thanks also for the information on the manufacturer on the trim–very helpful. I can’t wait to read about your next wonderful project!!
Beth says
I love love love seeing Christine’s home remodels! If you had just posted the photos of the basement bed and bath I would have said they were excellently preserved originals! I can’t wait to see what you do next!
SebastianPDX says
That’s awesome…if I am not mistaken this is a Portland-area home! I was tipped off when she mentioned nearby-to-me 52nd Avenue Hardware. There is such a history of architectural styles here. Rows and rows of beautiful Craftsman-style, or influenced bungalows, the odd Second Empire, or late Victorian, etc., but then, in the middle of two early 20th C homes you’ll see a carefully preserved MCM with its clean lines & rich textures.
mag says
Yay, Christine! You did it again! Love the closet and built ins, and I’m always a sucker for cabinet vents. ???? Can’t wait to see what you post about the paneling in your future post, too. That is something we will have to tackle as well.
Lynne says
What is clamshell trim?
pam kueber says
See the photo of the window — the “ranch” style trim is aka “clamshell”.
Gerry says
Christine, well done!! This is just beautiful. I had missed the prior feature about your kitchen and that was really awesome too.
Maybe I missed read but if Zinnser Amber Shellac was used on all but the doors, may I ask what was used on the closet doors? I have closet and bedroom doors to finish and need ideas.
Gerry
Christine Pashley says
Hi Gerry, I asked the cabinet maker the same question since I planned to stain trim and doors the same color- Here’s what he said,” We just mixed a toner and sprayed it so it wouldn’t be blotchy. You might be able to brush a clear finish with a toner in it. Maybe Sherwin Williams?” I did use the Amber Shellac on my master bath many years ago and it matched the rest of my house really well. Good luck! Thank you for kind words, I’ll pass them onto the people who deserve it – the contractors!
Christine Pashley says
I actually took a door off my upstairs vanity to the cabinetmaker so he could match the stain. I wanted the doors to match the vanity and I knew with such a big area my staining skills would leave streaks, so I asked the cabinmaker to stain them all for me. He did using a sprayer. I was so relieved! Good luck!
Ali says
Very well done! I had to laugh because our plumber said the exact same thing about our hudee ringed sinks when he installed them in our bathroom remodels. And we also got the same comment from just about everyone with our tile and woodwork.