


 Less than a month ’til V-Day, wanna plan ahead? Some World of Tile liquidation sale BFFs, who knew I loved making ornament wreaths, stopped by to show me the Lindt chocolate Christmas wreaths that their grandmother had been making for years. “Grandma making something for years” counts as retro to me, so last weekend I invited a friend over to make our own, for Valentine’s Day. We tried three DIY methods, and one was, hands down, the best way to make this sparkly, edible crafty.
Photo viewing tip: On a desktop computer, once page fully loads,
click on any photo and it will double in size on screen
so that you can see detail better. Hit ESC or off the photo to return to story.
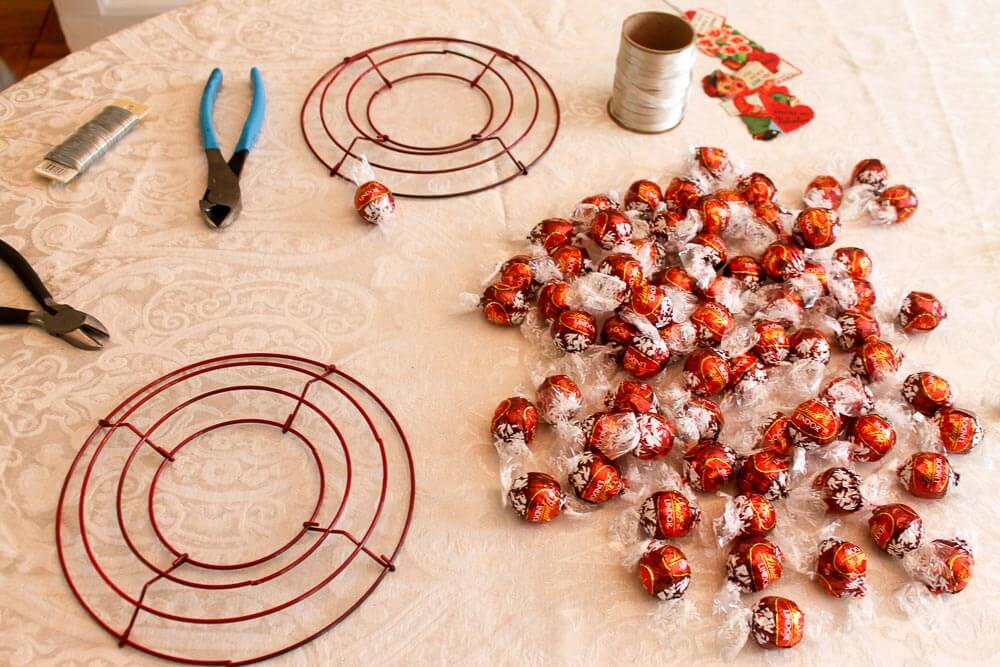
Tools to make Lindt chocolate truffle wreaths:
- Lindt Chocolates: I online-shopped a while, although not insanely, and concluded that the best prices for Lindt chocolates were at Lindt itself, which had a buy-three-get-two-free deal going on. For this project, I chose by wrapper color — red, of course. Link: Lindt Lindor Milk Chocolate Truffles.
- Wreath base: I used 8″ green wire wreath forms that I bought on Amazon. Hey, you could even use a heart-shaped form, but note that the one I see online is quite large — take that into account when you are figuring out how many chocolates to buy. Link: Wire wreath forms on Amazon (affiliate link)
- Wire to wire the candies on to the wreath form and to create a hanger for the wreath. I had lots of wire on hand, so didn’t have to buy any. The wire needs to be pretty thin — you want it to be pliable and easy to work with. I used silver wire because I didn’t want to see it.
- Spray paint: The wreath forms came in green, and I did not want to see green underneath. I had some red spray paint in my stash, so a day or two before my craft day, I spray painted the forms. In retrospect, I think that silver — or even silver glitter — paint would have been better, because, as you will see, on the forms that we used, the center metal ring showed.
- Wire cutters.
- Weebits — I had a stash of vintage Valentines on hand, and we used these for the front of our wreaths. I also pulled out white curling ribbon and red pipe cleaners from my stash. Re weebits: Use your imagination… what can you use to adorn your wreath to give it just a little more zing?
- Hot glue gun — if you need to glue on any weebits.
- Adhesive and cardboard — We used ModPodge to glue the Valentines onto cardboard (thickness of a cereal box) to give them more structural strength.
- Cutter Bee scissors — to trim the Valentines after gluing to the cardboard. Funny: My friend was wary of cutting out her Valentine after it had been glued to the cardboard. “I am not good at cutting.” She mentioned something about having been asked to leave Girl Scouts, because she and her girlfriend spent all their time, during craft activities, hiding in the bathroom. But I gave her a pair of my Cutter Bees — I am truly a fan of this product — and she was amazed at how easy it was. *soproud* that I am giving my crafting-insecure friend crafting confidence! Link: Cutter Bee Scissors (affiliate link)
Our two “don’t do it this way” methods:

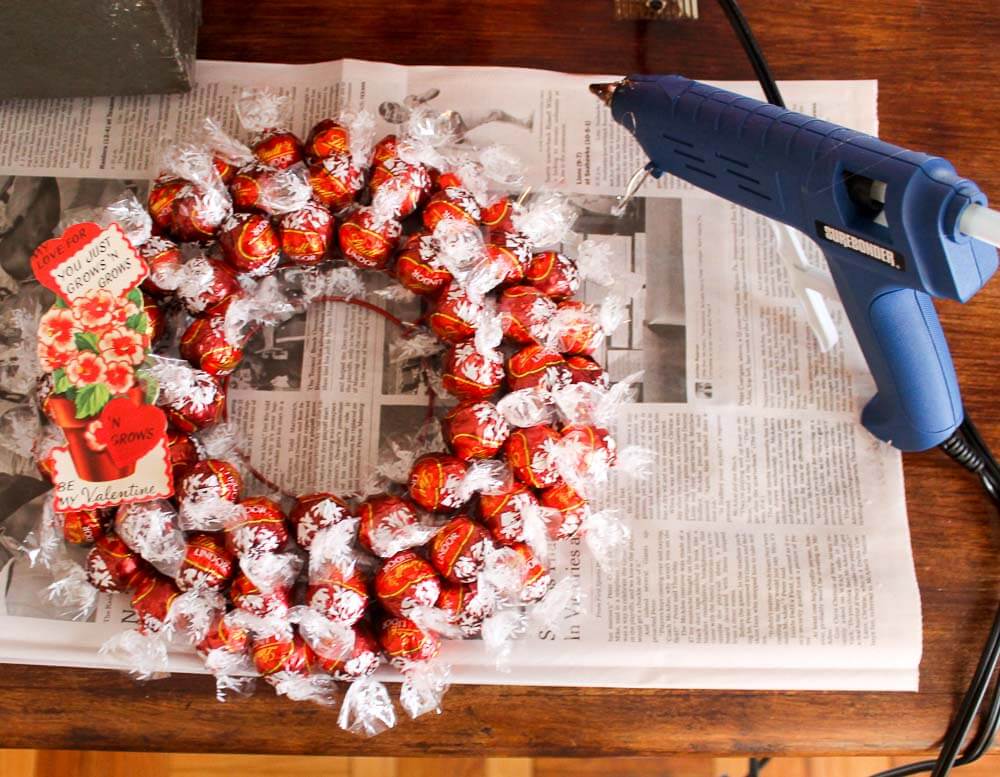
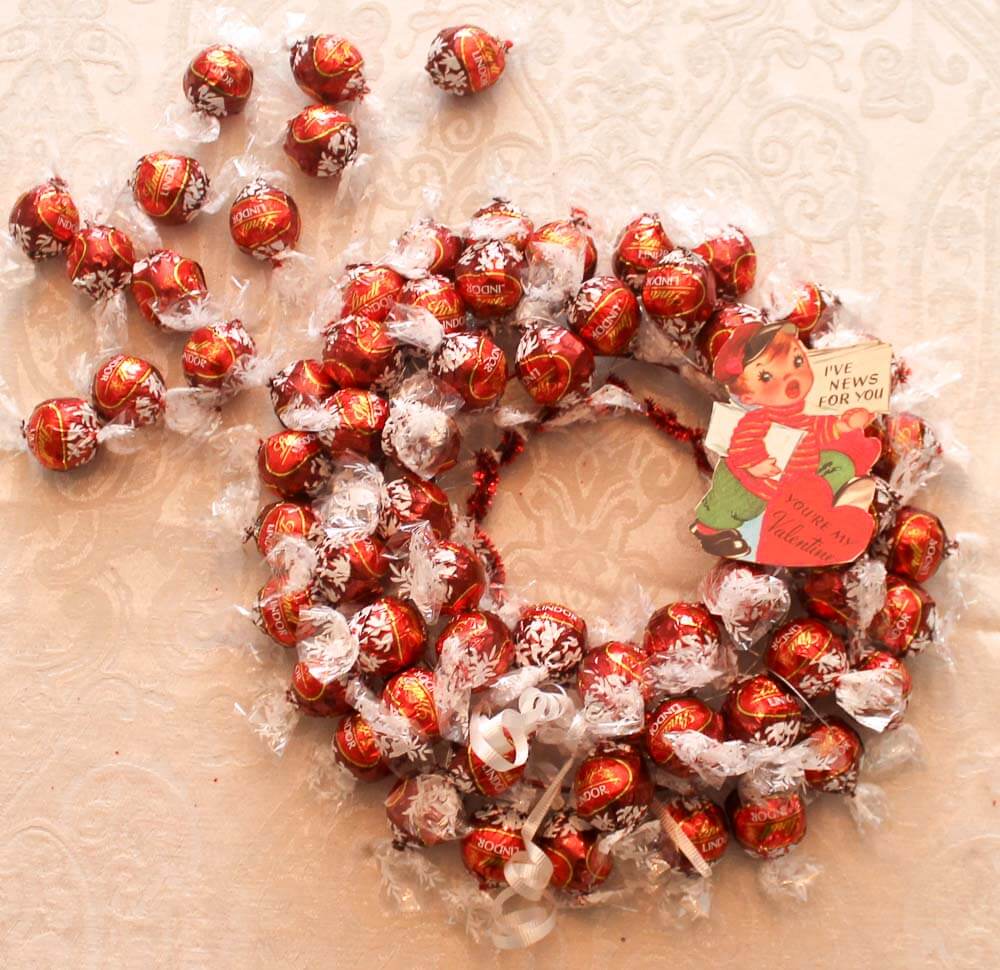 Method #1, above: Create one long rope of Lindts then attach them to the wreath base in one long spiral.
Wiring the candies together was easy peasy. My friend decided to see if she could make one long Lindt rope and then wire the rope to the wreath form. Creating the rope was a breeze – went super fast. Alas, when she tried to get everything onto the wreath form in a tidy way, it was really hard. As I recall, she cut small pieces of wire, bent them in a U or V, and used them to attach the rope to the form from the front to the back, then twist. All this while holding the spiraling rope. It was difficult. We don’t recommend this method — even though if you received this wreath as a present you’d think it’s as cute as heck. Which it is.
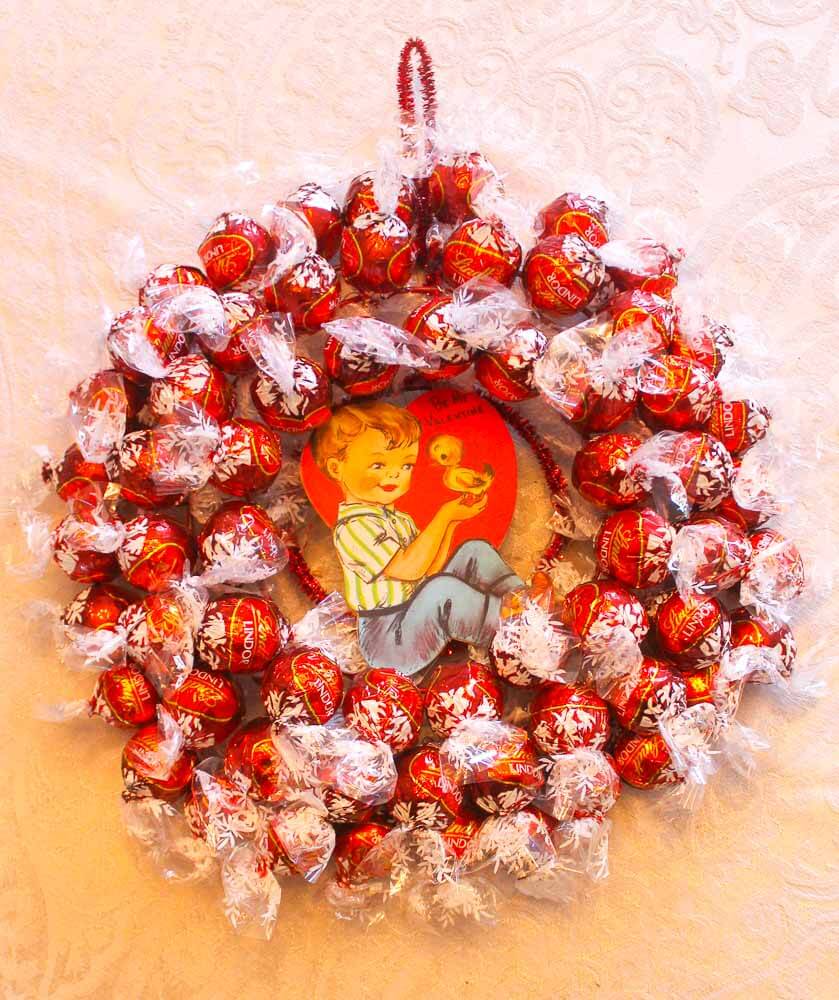
Notice: The center ring of the form shows after attaching chocolates to the three outside rings. Here, she wrapped that center ring in pipe cleaner. She also tied some curling ribbon in strategic spots for pizzazz.
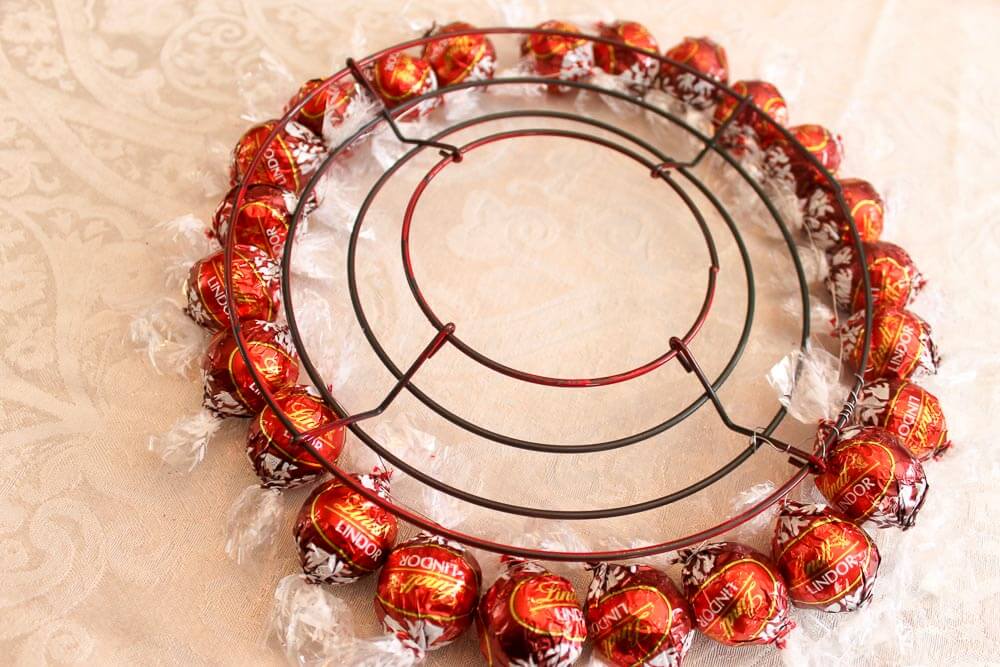
Method #2, above: Make a rope of Lindts for one ring at a time — then attach them.
My first impulse was to wire the truffles together — but to make the ropes just long enough to go on one ring at a time — then attach them. As shown above: I could turn the wreath upside down to attach the ropes to the form with wires more easily.
 Overall, this method worked fine, but still, I thought there might be a better way. Note above: I wrapped the center ring with curling tape. I liked this look the best of all I tried, because the center ring did not ‘scream’.
Note, someone is going to ask why didn’t you write chocolates onto the inside ring. Main reason: I think the truffles would flop forward. And second, we liked having the opening — it looked better; white space is super important in design.
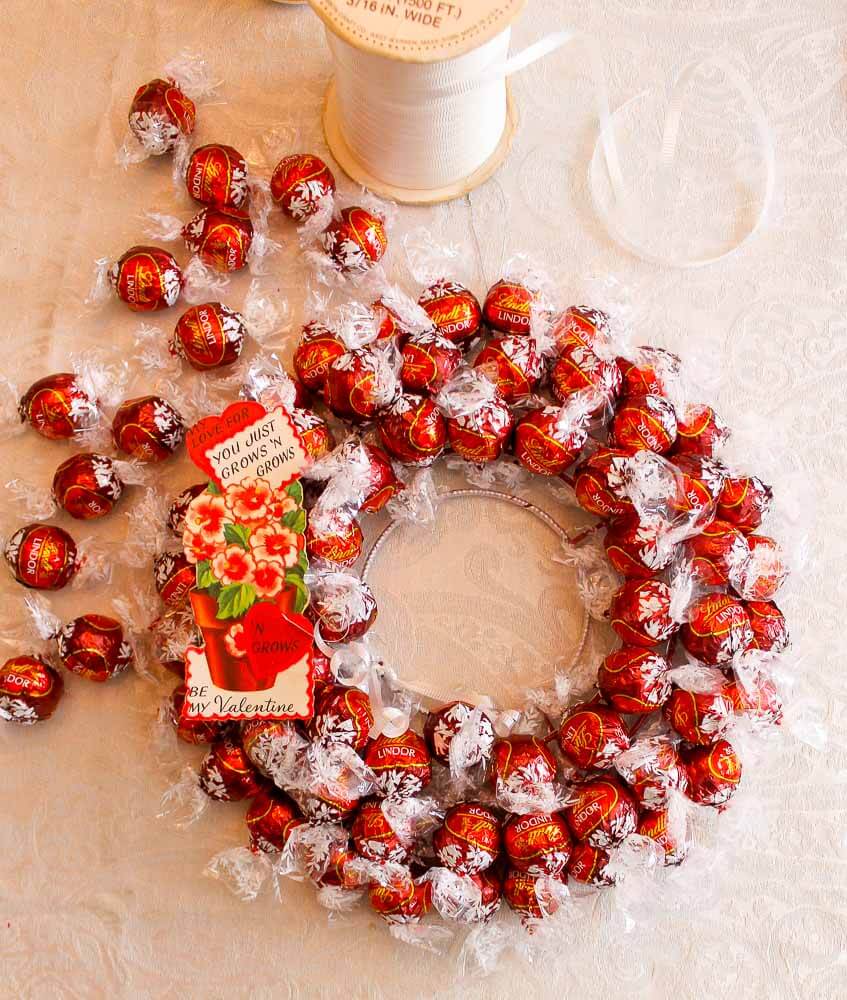
The best method, I thnk: “Sew” the truffles right onto the wreath base
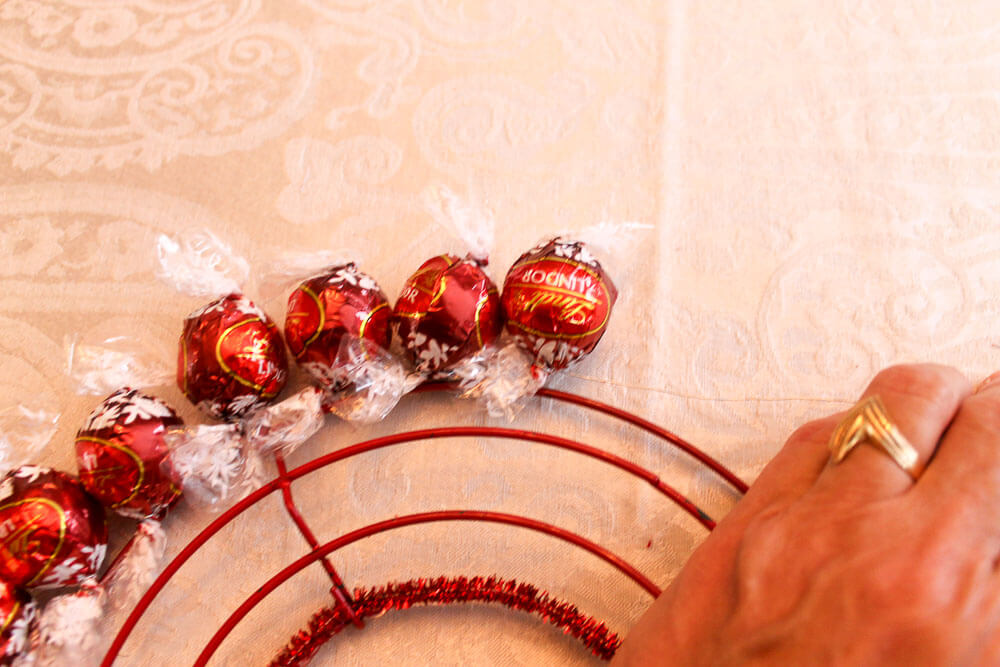
Above: The best way to do this project, I think, is to “sew” the truffles right on to the wreath base. Here’s how I did it:
- Decorate your center ring first — this is easier than doing it later (when all the truffles get in the way). On this one, I hot-glued a pipe cleaner on top of the the inside ring.
- Cut a piece of wire long enough to work with for a while, but not so long as to get tangled.
- Secure one end of the wire to the wreath base.
- Wrap the wire around the bottom of the candy — where the paper twists — twice. This also is a Goldilocks maneuver: You want to wrap tightly enough so that the candy doesn’t fall out, but not so tightly that you guillotine the paper.
- Just like you’re sewing, wrap the wire around the wreath base (to the right of the candy, for right-handers) so that the candy is secure.
- Bring the wire up behind the next candy, wrap twice, secure onto the base… and continue until you are done.
- Do the outside ring first, ending the ‘rope’. Then, move onto other two sections using the same method..
- Use wire to create a hanger (and I covered mine with pipe cleaner, too, for looks only; the pipe cleaner was not strong enough to use as a hanger — I tried.)
- Add your decoration on top.
Voila, here’s the wreath using the ‘sewn-on’ method:
A couple more points:
- When you hang the wreath, the top part may flop forward and make the wreath not symmetric. Whatever.
- Sometimes a candy might fall off. Keep your wire and wire cutters handy and twist it back on.
- Having small fingers helps with all of this. Golly, my friend and I had big fingers. Oh well — good for your concentration. Very zen, actually — I think we were generating lots of happy hormones — and we didn’t even eat any chocolate as we went!
- To eat the candies, tell folks to just unwrap them from the front and dig in. I am told the paper itself looks pretty still in place. Believe it or not, I still have not broken into either of my two wreaths yet — I’m giving them as presents.
Someone on Facebook asked during the holidays if this was becoming a “crafting blog”. No, it isn’t. But (1) I need to art — it’s so good for my soul! and (2) I need to see live peoples more often — my computer cave is lonely, and crafting with friends is fun and oh-so-retro! and (3) I like to mix things up — after nine years of blogging, more so than ever!
And: In response to a comment: NO, this is not product placement/sponsored post. Lindt did not pay me, they did not contact me, nix, nada. I always endeavor to declare any such relationships, if they exist. See my Disclosures page for my policies on such how I make money etc: https://retrorenovation.com/disclosures/


Joy says
My version in the 60’s and 70’s also included a little scissors tied on the wreath with a ribbon. In the 80’s, I made a similar wreath, but used a grapevine wreath. I attached multicolored lollipops (Tootsie Pops were my favorite) for special birthdays – for ex. 30th and 40th birthdays – counted out one for each year. Attached a cardboard decorated #30 or #40, and a big ribbon bow. They were always a hit of the birthday party. Also, color coordinated some of them to the theme of the party. Various penny candy rolls worked too. Lots of possibilities.
pam kueber says
How fun!
Lynne says
My mother in law made something similar, but she used a styrofoam wreath form and stuck the candies on with pins.
Christiana says
Please consider this another vote for some occasional craft posts! They are welcome, especially for a project that CAN get done in the short term while we are saving up for larger, renovation, projects.
KD says
Great idea. And Grandma’s wreath is SO CUTE: I bet said Grandma would love a chance to explain her method and be featured on a famous blog.
Chris S says
Way back when I was in college and the earth was still cooling, I would make a similar wreath for the girls in the dorm during finals. Our favorite was peanut M&Ms. Stuff some in the corner of a plastic sandwich bag. Tie off with a twist tie and trim the bag to fluff out the plastic and attach to a wire hangar spread out in a circle. Didn’t last long.
Andrea says
I use a single gray metal wreath form. 80 truffles makes a nice full wreath. Individually wrapped hard candies work great, too.
pam kueber says
Thanks, Andrea! Folks — Andrea is my friend who provided the idea!!!
Nancy says
The Lindt wreath reminds me of the wreaths my mother made in the 1960’s. No fancy forms for her! She would shape a wire coat hanger into a circle/wreath shape. Leave the ‘hook’ on for hanging. Then, for the decorating. With a needle and thread, maybe dental floss, she would make a ‘string’ of wrapped hard candy. This would be wrapped around and around the wire shape, maybe more than once. To finish it off, a bow was placed at the top and a scissors, attached with ribbon, was hung from the bottom.
I never saw her make these, maybe I was in school or asleep for the night. I can still see one hanging on the coat closet door. They were Christmas gifts, given to neighbors and friends.
Sandra says
I like the idea of keeping the wreath of wrappers for next year–sure to produce chocolate envy (who ate them?).
It reminds me of using bread bags cut into strings to crochet rugs or handbags, and quilting. It gives respect to the value of the material others might throw out.
My own innovation was to cut used Christmas wrapping paper into dollar bill sized pieces and fold them into chain links to make chains (similar to the retro fad of making chains from Wrigley gum wrappers). (Most Christmas paper is not recyclable, so re-using it is nice.)
Teri F says
This is ad8. I wish you wo5have posted oics of the actual wire wrapping around the candy, then the base and onto the next candy. Im so visual I am not quite sure I understand, but im going to give it the ole college try. Thank so so much for an adorable project!