


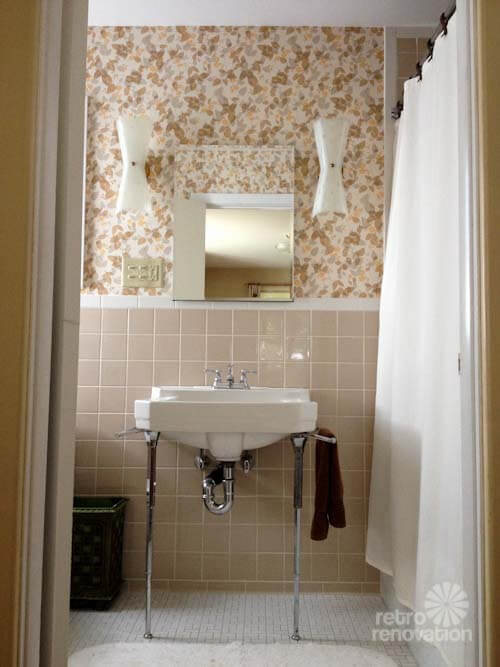
 Over the years several readers have asked about how to wallpaper a wall with vintage wallpaper. So here I go, explaining how Denise and I got all these vintage wallpaper squares up onto the four walls of my home office studio. Mind you, I am not an expert in applying vintage wallpaper. But, this is the third time I’ve put up vintage wallpaper, and the stuff hasn’t fallen down (yet). My first two experiences were (1) wallpapering the soffits and portions of the wall in my retro kitchen and (2) wallpapering my foyer. Both times I used vintage wallpaper and pretty much the same method — which worked just fine, although it was… tedious. Party on to hear about my experiences and my step-by-step.
- Update: After about 10 years up, the vintage wallpaper on my kitchen soffits and a wee bit of one wall is peeling off. I am not sure why, but I am going to attribute it to the fact that, to start with, the wallpaper was very brittle. Next time I do this, I will probably use even more wheat paste… be sure it soaks in the the optimum time… and also, size the walls same day, never the day before or whatever. So far the foyer is doing fine, although I do see some bubbling in one spot, not super noticeable, though.

Step One: Prime your walls
In my office remodel project, we gutted the walls so that we could double up the insulation on the exterior walls. While the walls were open, I also added more electric and some built-in shelving. To prepare for the wallpaper, I first painted the walls with two coats of primer. I *think* I could have skipped this step and just put up wallpaper size. But, I have read too many horror stories about people having a terrible time removing wallpaper — so much so that it destroyed the walls underneath. So I primed. Twice. I am not picky about primer brands. My #1 recommendation is to buy an online subscription to Consumer Reports and check their recommendations assessing price/value.

Step Two: Size your walls
I then used wallpaper size to “size” the walls. Two coats. It’s my understanding that wallpaper size makes it easier to remove the wallpaper, should you ever need to. And it makes the wallpaper adhere better. I am not sure whether it’s recommended that you tint the wallpaper size to your wallpaper color. This probably makes sense if are using one wallpaper and there is a dominant field color. In my case, I first bought a gallon of size tinted beige… thinking that would be ‘neutral’ enough to accommodate all the colors on my wall. When it went up I started to worry it might bleed through and distort the papers that had a white field color. So I went and bought another gallon of size and did not tint it at all. So, the wall above shows what it looks like with one coat of white size over one coat of beige size. Now that all the vintage wallpaper is installed, I see no bleeding through of the color below whatsoever. I think this means I could have just used the plain old white as-is.
- UPDATE: See Hannah’s Treasures’ instructions on how to hang vintage wallpaper, they have additional details, including a discussion about sizing — including, notably, that you should size same day, not the day before or whatever.
 The size that I used: I used the basic Zinsser Shieldz in gallons available from my nearby hardware store. I have not done comparative research on this topic. You can also buy size in powder form, then mix your own, and it’s much cheaper. But I went for speed — and used what I’ve always used.
***NOTE: Here are some great-sounding instructions on how to prepare your walls, from the Bradbury & Bradbury Art Wallpapers website: Instructions for DIY wallpaper installation — see #4 for preparing the wall.
Step Three: Decide if you will use liner paper
It is my understanding that liner paper — a plain white wallpaper — is most often used when you have a valuable wallpaper, vintage or not, that you know you may want to take down sometime. And when you do, you want to get it down in one piece. Because it’s valuable. The liner paper enables this removal process. It’s also my understanding that putting up the liner paper makes the application of the real wallpaper easier. Like, easier to position. Here is what Bradbury & Bradbury Art Wallpapers says about liner papers in their instructions:
For a superior installation, a liner paper should be used to provide a smooth, receptive surface for the pasted sheet of wallpaper, to minimize seam shrinkage and to absorb excess moisture allowing the finish paper to dry quickly.
I thought about putting up liner paper for my office project, but I did not. My thinking went like this: I am going to put up all these squares and then over time collage onto them… What if I get famous for my amazing collage work and crazy collage room… The Museum of Modern Art may want my collages… So maybe I should put up liner paper so’s they can get them down easier… Are you kidding?… If I get that famous, they will just dismantle the room from the studs and reassemble it in MOMA, or maybe the Smithsonian…. the heck with it, there already are too many steps in this project, I need to get the darn wallpaper squares up already and get on with my life… I will let future generations worry about getting the stuff down intact if/when. So there.
Bottom line: Valuable paper? Consider liner paper. But then, if it’s that valuable, you are probably going to be hiring a professional installer anyway, right?
Step Four: Find your starting point, level and plumb
 For starting point: This part of the process is just like figuring out how to start and lay tiles in bathroom. Denise and I wanted to start on the “back wall”, which had no intrusions in terms of doors, windows or built-ins. It was “all wall”. We measured height and width — then found and marked dead center. We knew we were working with 12″ tiles and that we would have a little bit of overlap on each piece. We knew we had trim at the top and bottom yet to be installed and that, because of this, we did not need to wallpaper exactly to the top or bottom. But, we also wanted a substantial amount of our wallpaper squares to show at the top and bottom, and we also assessed how the wallper would “wrap” to the next walls. Based on these triangulations, Denise — who was a superstar in these calculations — identified where we could start. As you can see if you count squares top-to-bottom in my photos, my ceiling is just over 7′ tall. So we were kind of lucky in that our squares are pretty much centered vertically — although as I recall we nudged the square upward just a bit to account for the wider trim tile along the floor. I am sorry if you are confused by all this. Basically: How big are your squares? How big is your wall? Where do you start the squares in order to get a pleasing design/repeat on your walls, taking trim into account as well.
For level: Use a level, draw lines when you start and as you go, as necessary. DO NOT FOLLOW your ceiling line, it is probably not level! Also, when you apply your paper, you’re going to have to consider how you place given how it looks along the ceiling line.
For plumb: Use a plumb line or a long level — make sure that your first sheet of wallpaper in particular goes up plumb… make sure your subsequent sheets do too. Otherwise, your room will appear tilty like the Titanic going down.
 Step Five: Mix your wallpaper paste

I repeat: I am not an expert — I’m just sharing how I did this. I have always used Metylan Heavy Duty wallpaper powder — that’s the box I used, shown above in a photo taken while we were wallpapering. I seem to have thrown the box out, and I can’t find it online. I bought this from Miller’s Art Supply — it’s what they recommended when I vintage wallpapered the kitchen. It worked fine. I *think* this is what’s called *wheat paste* or *methyl cellulose*. Did I really need “heavy duty” wallpaper paste? Well, for my office remodel, I think so: I had some heavyish vinyl wallpapers in my mix. But my kitchen and foyer papers were paper — lighter weight — so I bet I could have done it with the standard powder. On my next project — I think I am going to re-wallpaper my bathroom — I will use the standard paste and report back.
As I recall — remember, I don’t have the box any more — the recipe on the heavy duty box called for me to mix the entire box (about two cups of powder) with 5 quarts of water. Then we had to mix and mix to get rid of the lumps. The stuff was still lumpy. We had to strain it. I think it also said to let it sit at least 15 minutes before using. Which I did. The stuff also stored very well.
Let me also mention: I had used some of my box previously. So, I was played alchemist with the water-to-powder ratio. Consistency: Not too thick, not too thin, you want it to brush onto the paper and stay, but also to soak in, but not to glop. Kind of like: A thick but not too thick gravy? Like, eggdrop soup without the eggs, maybe a tid tad thicker. Just a tid. Maybe best to buy a whole box, mix the whole box according to the recipe on the box, and store any remainder.
Yes, more info from Bradbury & Bradbury, who has this topic covered (along with your walls hahahaha): See #5 for wallpaper adhesives they have seen used successfully. HOWEVER, I was told by Miller’s to use a wheat or cellulose adhesive on my vintage papers; I don’t know about some of the other products mentioned by B&B and whether they would be appropriate for vintage papers.
Hannah’s Treasures also has instructions — she points out to make sure the adhesive is formulated to hang paper, not vinyl. Read her instructions here.
Step Six: Apply your paste
For the 12″ squares I applied the paste to each square with a wide bristle brush. Again: Not too thick not too thin, enough to soak in but not so much as to glob on. A bit extra around the edges — but don’t overdo it! You then fold the square in half (paste side to paste side) and let it rest for two or three minutes so the paste really soaks in. After soaking in for two-to-three minutes, there will still be a slight sheen. Not wet, not dry, just right. I know this is not helping.
Yes, see B&B, they say to let the paste soak for 5 minutes — instructions #6, #7 and #8 about pasting and hanging. Golly, I never let it soak 5 minutes, well, I don’t think so… I hope my paper don’t fall down.
Buuuuuut, Hannah says you don’t need to let vintage paper rest — this is called “booking” — at all! She says that’s just for prepasted. I think she is wrong. But you can read what she says here. I have always let the wallpaper book — this makes it pliable. Again, mine never fell down (seriously) yet.
Step Seven: Apply the vintage wallpaper to the wall
Open the piece carefully and put the piece on the wall. Use a wide wallpaper brush, or a damp sponge, or even a cloth to push any bubbles out from the center and to otherwise smooth the piece to the wall. You have time to do this. I’ve never seen any significant shrinkage of papers on my projects; I’ve read this can be an issue if you apply too much paste; also, don’t *stretch* your paper as you apply it — work gently. When the wallpaper is in place, gently wipe the exterior with a damp sponge or cloth to pick up any excess paste; don’t worry about water out the outside of the paper — this dries. But be careful. Also — I have read, don’t get wallpaper paste or water on metallic papers, and I bet flocked would be a disaster, too.
Note: Some papers, especially the ones with light backgrounds, may seem discolored — like yellowed — when you put them on the wall. Don’t worry, they dry light.
Step Eight: Will you overlap or will you butt?
Will you overlap your edges slightly or will you overlap them slightly? You will need to decide. I have done it both ways successfully.
Step Nine: Check for bubbles and bad positioning frequently as you go
You have some time after the paper is applied to go back, lift it up, and reposition it. Keep checking relatively often to see that you didn’t leave any bubbles, or if the edges need another hit of paste.
Step 10: Roll your edges
I really need to do official research on this. I did buy an inexpensive plastic seam roller from the hardware store. I also had an expensive Japanese-made brayer, which I used for collage. After allowing a bit of time for the paste to dry, I would go back and roll the seams to make sure they were affixed as strongly as possible. I think I read somewhere you should not roll while the paint is still wet — you do not want it to urp out. You want it in there to dry and firmly adhere the edges for all time. Also you do not want to *stretch* the edges of your paper. Do this step with care; pay attention to your method and what seems to be working best.
Step 11: Swear you will never do this again — take lots of pictures for your blog — and have a margarita, stat
Other tips:
Tip one: If possible, apply your wallpaper before you trim goes in. That way, you don’t have to get fussy around the trim. Remove all outlet covers, too.
Tip two: If you must work with existing trim in place, you are going to have to wallpaper up to the trim and then a bit beyond/onto it. Then, you will have to razor-trim the wallpaper at the trim. I have found that is very difficult to trim the vintage wallpaper when it is wet. It just tears, even if you use a very sharp razor edge. The paper must dry quite a bit — then it will razor-cut. If the extra paper sticks to the trim, I have generally not found it difficult to get off — remember, your trim has not been sized and sizing is part of what makes the wallpaper stick nicely, *I think*. I am not good at getting the edges trimmed perfectly against trim in place. It bothers me a great deal, at first. Over time, it bothers me not one whit.
Tip three: What to use to cut the paper next to the trim? I don’t think I have the *best* solution. For my office project, we did not have the trim installed yet, so this was a non-issue. In my other rooms: I recall using a roller cutter. This was not great — or, I was not great. I think that brand spanking new razor blades might be what the pro’s use.
Tip four: If you are working with one paper (rather than a crazy quilt design of multiple papers) you are going to have to match seams. Work on a long table. Carefully cut your first piece and then cut your second piece to match up. Get the first piece on the wall, check that your second piece will work. Cut your third piece. Continue ad nauseum.
Tip five: I tend to work the wallpaper right around corners where it lands. I think that others may stop then restart (seam matching required) the wallpaper at corner.
Tip six: Be cognizant of how your wallpaper design hits the top of the wall where it meets the ceiling. This, you want to look pleasing. Less so what how the design hits the floor. Again, though: Keep the wallpaper applied using true level not the wall-where-it-meets-the-ceiling line, or else the room will make you dizzy.
Tip seven: You might also be cognizant of how the most pleasing part of a design-y wallpaper hits one the most prominent parts of your wall. In my blue bathroom, I asked the wallpaper installer (I had a pro do the three bathrooms) to ensure a particular stripe with geraniums hit the back wall — which you could see right when you walked in — just so. To do this, she had to start at that point and hang the wallpaper starting on the right and working left. Rather than starting on the left and working right. She did it, though.
Tip eight: When I worked with long pieces of wallpaper (rather than small squares) I generally used a paint roller (rather than a brush) for to apply the paste. Fold over, let rest, same way, etc.
Tip nine: I have found that most paper vintage wallpapers are quite brittle after sitting for 50 or whatever years. Be gentle with them, especially when you unroll them. Don’t use the portions of the wallpaper if/where the edges are in bad shape — unless you are going for the shabby chic vintage look, which hey, is all right by me. But, if you do get a tear while you’re papering, I’d say: Don’t sweat it. Just smooth the paper with the paste. Unless the tear is in a highly visible spot and is really big, you will never notice it.
Tip 10: See Hannah’s discussion about how pre-1940s paper can bleed.
Tip 11: See Hannah’s discussion about how she seals her paper with a clear matte varnish before hanging it!
Tip 12: Yes, my vintage wallpaper does come loose in spots sometimes. I don’t know why. But it’s usually easy to re-adhere the loose spots. In the bathroom, after about eight years up on the wall, it’s coming down pretty bad. But that’s because I run the hot water so hot that it’s like a sauna, even with the exhaust fan on. Eight years is a good life for wallpaper in a bathroom. My next wallpapering project will be to take down the vintage that’s falling and put up new vintage — that I recently acquired for, yes, $1 per roll!
Tip 13: The more expensive, the more dear, the stuff is, the more you maybe should think about finding an experienced professional to do the job.
For more info about how to wallpaper a wall with vintage wallpaper:
- Bradbury & Bradbury wallpaper installation instructions — their papers requires paste, just like vintage papers do.
- Instructions for installing vintage wallpaper from Hannah’s Treasures.
- Tips from Rosie’s Vintage Wallpaper
- WallpaperInstaller.com’s list of suppliers.
- WallpaperInstaller.com also has a page with lots of info on DIY. I did not read this before I did mine. I just did mine like I always do mine. I am not so good about reading instructions. Don’t be like me! Okay, I just scanned it — I think I did stuff right. I don’t understand how most of my vintage wallpaper fits into her matrix. Is it “blank stock”?
- WallpaperScholar.com.
Pshew. Another mega-post: 3,246 words on how to hang a wall with vintage wallpaper! Sorry — but I’m trying to be as conclusive as possible so you go into battle eyes wide open.
Readers, I welcome your sharing your experiences — along with any challenges to how I did it — and, with any more leads on authoritative sources on how to ensure we hang our vintage wallpaper successfully. I will aim to keep this blog post the most authoritative resource for hanging vintage wallpaper to be found on the world wide retro web.


Carol Long says
A question please.. I have a roll of gorgeous hand painted French Art Deco wallpaper I want to have hung. Problem is the paint feels chalkey and rubs off on your hands. Is this possible to use without staining the wall beneath it? I will use it only as an upper border.
Thanks in advance.
pam kueber says
I don’t know…. Also, I recently read on Hannah’s Treasures that when you size the walls underneath, you should do it same day…
Darcel says
Can I ask you how vintage wallpaper feels? I have a roll of some kind of vintage paper. It is a large roll and it feels more like a wrapping paper.
Should vintage wallpaper be thicker? Thank you!
pam kueber says
All my vintage wallpaper is pretty thick – about the consistency/strength of a big brown paper bag… maybe even more. One way to check: Go to a wallpaper store, even a Sherwin-Williams paint store, bring yours to compare to what’s in their books. Also, I’ve been meaning to post this, read Hannahs Treasure’s tutorial as well, for instructions: http://hannahstreasures.typepad.com/my-blog/2011/09/how-to-hang-vintage-wallpaper.html
Erin Ward says
My husband and I were house hunting and ran across an attic wallpapered with wallpaper samples. I got all smuggy buggy and poo pooed it. I am now eating my words and they are covered in wallpaper paste. That’ll teach me.
Uncle Atom says
Great step by step write up Pam, thanks. If I ever get some time I’m going to hunt for some appropriate vintage wallpaper for parts of our kitchen.
Lynne says
My ever so patient and easy going husband does all of our papering projects. I am only the yardstick holder, and wrinkle and bubble pointer-outer.
Oh, a word about that yardstick. We use a plastic one that is I think longer than 36″, but it has little bubble levels built into the center of it. Really helps a lot.
TappanTrailerTami says
Wow, Pam, thank you for the extra thorough tutorial, and also to Chris H for chiming in.
I’m going to fall into the “professionally installed” category because A) my mother isn’t here to help me (having help is soooo much better), and B) I’m using Bradbury & Bradbury border which all has to be trimmed, and not only trimmed, but trimmed out around the design. C) I can’t cut Christmas wrapping paper in a straight line, LOL.
One thing my mom and I always did, especially when hanging a long strip of border, was to have one person on the ground with a clean broom to help support the border after it was put up, while the other could more speedily get it up on the wall…..and then the broom holder could keep the paper from falling back down….since you usually have to get off the ladder and on to the floor to move the ladder in order to continue further down the wall. This makes the job a ton easier!
pam kueber says
Yes: Having two people doing the work seems like a VERY SMART idea!
TappanTrailerTami says
Two people and a bottle of something…..well, if the paper isn’t TOO valuable, LOL.
ChrisH says
Nice job.
Liner paper (sometimes called blankstock) has a couple of uses. It smooths out very small imperfections, such as chipped paint on a wall that is being papered. It’s more important use is as a first layer in a wallpaper “lamination” that you are “building”. Wallpaper wants to shrink – which is why seams come apart. Using blankstock under your paper, produces a lamination of two papers which is very strong and will not allow the seams to come apart. (e.g. they become one piece of paper) To achieve this, you want to make sure your wallpaper seams do not fall directly on top of the liner paper seams. IOWs keep the wallpaper seams staggered with respect to the liner seams.
Most wallpaper installers use razor blades to cut paper next to trim. Usually one blade is good for two cuts – one with each corner of the blade. You could easily go through a box of 100 blades on a wallpaper job.
Sheildz by Zinnser is by far the most commonly used size. It’s excellent. You can research it all you want, but there really isn’t a better product for the purpose. Tinting the size is usually done where one is worried a seem might open up – so if it’s tinted the seam won’t show – at least not so much. (But the use of liner will negate this concern) It won’t bleed through, so you’re right, you could have just gone with one coat w/o tint. It’s probably good you went with two coats – most DIYers tent to apply paint/primer/size too thin. With two coats you have a nice well prepared wall.
I wouldn’t work sheets of paper through an inside corner. I’d cut just long of the corner, about 1/4″ then position the piece on the other side of the corner tight to the corner. IOWs you’d have a 1/4:” “underlap” at the corner. If you were working with vinyl rather than vintage paper, you’d need vinyl to vinyl paste in this corner.
pam kueber says
Thanks, Chris!!!! How do you know all this???
ChrisH says
I was a painter/paperhanger for almost 15 years. My brother trained me and he had been trained through the union apprenticeship program. I hasten to add that I’m not claiming to be an expert, just a fairly knowledgeable journeyman.
pam kueber says
THANKS! This is great info. So what I am still hearing is that: Liner paper is optional — but a good idea especially if you have paper you don’t want to wreck in any way?
ChrisH says
I don’t know about the “wreckage” aspect, but liner is just a good way to do a really first rate job. It’s not absolutely essential, but it will prevent your seams from opening. Of course, with a quilt pattern like you are doing, you could just overlap the edges.
Sara D says
Thanks for the really helpful tips Pam! I’ve used vintage papers twice in my home, but both times they are (still usable) prepasted! One is from the 70’s the other from the 60’s and the last did have a bit of edge discolouration but once it got up on the wall you cant see it. So I guess maybe I was lucky that it was so easy to put up but next time I may have to come back and refer to this post!!
Your wallpaper looks really fun!