


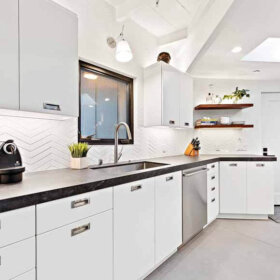
READERS GARTH AND MARTHA from Dallas recently went through the process of having their vintage Crosley metal kitchen cabinets repainted. In this post, Garth recounts the saga. And like most major retro renovation projects – it is indeed a saga…. It includes a drive from Dallas to Ohio and back to get the cabinets…schlepping to nearly half a dozen places to understand the best approach…and doing a lot of the moving and prep work. One thing that’s immediately clear about this kitchen, is that it’s not an exacting “period” re-creation. Garth and Martha have taken very vintage style cabinets and reworked them into a contemporary design — note the stainless steel counters, backsplash and appliances — and yowza, I want an orange Marmoleum floor! Not to mention is that a huge chocolate mousse cake in the corner? A wonderful kitchen, a beautiful job — that really suits the house. Garth and Martha, thanks so much for sharing your experience!
*I also want to note that in his saga, Garth mentions that one painting crew said their paint would have lead in it. Note that the paint in original vintage steel cabinets also may contain lead, like other original painted surfaces in your vintage home. On issues like these: Be sure to get with your own properly licensed professionals to determine what you are working with so that you can make informed decisions how to handle, become familiar with and use recommended best practices, and also learn about the proper disposal of debris, etc. Be Safe / Renovate Safe.
Garth writes:
Metal Cabinet Refinishing
My wife and I bought a house with a kitchen that was partially furnished with Crosley metal cabinets. I found someone thru the RetroRenovation forum [now discontinued] that had some additional Crosley cabinets of the same style that he had removed from his kitchen in Ohio and we drove up from Dallas to buy them. We brought them back down to Dallas and figured a layout to the kitchen that would use most of the cabinets. Both the Ohio cabinets and the ones originally in the house had a number of layers of paint on them and needed to be stripped and re-painted.
After reading posts on the RetroRenovation website, I began by taking a test cabinet to a powder coater in the area. He took it to his sand blaster to have it taken down to bare metal. Unfortunately, his sand blaster thought that the metal on the cabinet was too thin, and that it was likely the cabinet would get many small dents from the sand blasting process. The powder coater recommended that I try and find someone who might be able to chemically strip the cabinets and then bring them back. He also warned me that some of the doors might warp when the cabinets were in the kiln as part of his process.
I took the cabinets to a local chemical stripping business, and he test stripped one of them and found that they were not going to be a good candidate for chemical stripping because the base coat of paint was too tough for his stripper. He took a cabinet by a sand blaster that he worked with frequently, and this sand blaster had the same opinion as the first about likely denting during his blasting.
I then took the cabinets out to a soda blaster in Justin, Texas. Soda blasting is like sand blasting, but the blast media is soda instead of sand. It is a much softer media and can be used on more delicate materials. This blaster also had a couple of other blasting media that he could use, such as nut shells and corn which were also able to be used with a more delicate materials. In talking with powder coaters prior to having the cabinets soda blasted, they had shared their concern that the soda would affect the metal of the cabinets in such a way that their powder coat would not adhere properly and would eventually flake off. Some thought that it had to do with the alkaline properties of the soda and some seemed to think that it had to do with the smoother surface that the soda left the material with. I found a couple of places online that recommend that after the metal is soda blasted, you clean it with power washer and a product called Hold Tight. My soda blaster didn’t think that the Hold Tight was necessary, but that thoroughly washing them down with water through either a power washer or a garden hose with a spray nozzle was necessary. He said they should have a light sanding prior to being finished. I decided that the Hold Tight was fairly cheap insurance so sprayed them thoroughly with a nozzle on the garden hose, and wiped them down with a diluted (1:50) bucket of Hold Tight. At the very least, I thought that the Hold Tight would keep them from flash rusting prior to finishing. It took him about 12 hours to blast them all (roughly about an hour each cabinet). He charged by the hour for his work so it cost around $1,400 to have them soda blasted. I took the cabinets to him so it would have cost a bit more if he either had to come and get the cabinets or do them on my property. It took me most of a day to wash all 13 of the cabinets down.
Since I was concerned about the doors warping, and the powder coaters were generally not excited about the soda blasting process, I decided that I would look into having them painted instead of having them powder coated. I spoke with a local auto body shop about painting them and they seemed interested, but said all of the paints that they used had lead* in them. They felt that the clear coat on the cabinets would protect the lead in the paint from the kitchen utensils, but that it could be a concern. I wasn’t that bothered by the lead, since there was the clear coat, and my wife and I don’t have any children, but the body shop was a little slow in getting a rough estimate of the cost to paint the cabinets, so in the meantime I found a local business that does electro-static painting. This is a process where they give the metal a charge and then spray it with a paint that has the opposite charge, which makes most of the paint go to the cabinet instead of elsewhere in the room. It is used mostly in situations where the cabinets are not going to be removed from the house or business and you don’t want overspray on the floor or wall around where they are painted in place. I took the cabinets to the painter’s warehouse, hoping that it would save me a little money. He painted them with a urethane based paint, since he thought it was a tougher finish than his epoxy based paint. I chose a basic white color (he called it GE White, I think), but I believe that I could have had him match any color that I wanted. It took about 2 weeks to get the cabinets painted and back at the house, but that was because of his schedule. I think that once he was able to get to my job, it only took 3 or 4 days to prep them and paint them. It cost a little over $2,000 for him to paint the 13 cabinets. I was very happy with how they came out.
If I were to do this again I might change a couple of things. First of all, I was really pleased with the soda blasting. If I had thought of it prior to arranging to have the cabinets electro-static painted, I would have asked the soda blaster about powder coaters that he regularly works with. They presumably, are aware of how to prep the cabinets for powder coating when they have been soda blasted. While I am happy with the electro-static painting, I think that the powder coating might hold up a little bit better over time, and I don’t think that it would be any more expensive than the painting would be. Additionally, since the soda blaster and the powder coater have a relationship, they would probably transfer the cabinets between their shops and do all of the cabinet prep, saving me both of those duties. There were not many dents in the cabinets, but there were a few small ones. I decided to just ignore them, but after the painter finished, he told me that he could have filled in the small dents during his prep work had I requested it of him, and I probably would have done that, although it might be an option if the cabinets were powder coated instead of painted. Overall, though, we think that there isn’t anything better than these 60 year old cabinets!
Wow, thanks, Garth! And didn’t I tell you this was a saga, readers?


Susan says
I’m getting quotes for powder-coating a set of Youngstown metal cabinets. They are quoting me by the surface inch. Is it necessary to get the sides blasted and coated if they are going to abut one another or could I just leave the old finish (which is a repainted finish) on? I’m wondering what Garth & Martha did. Of course, the end cabinet sides would need to be done. And I’d have to be CERTAIN about my configuration before choosing this patchwork approach. Don’t worry, I won’t hold anyone liable for what is ultimately my decision.
Gnancy says
I’m moving into a house with 1955 St. Charles cabinets that were
repainted using, I believe, the electro-static paint process. I say this because they were not removed from the kitchen at the time. It is a very durable and lasting paint job. I think Garth will find his paint holds up just fine. My cabinets are in the house where I grew up; I’m not sure when it was done but I’m sure it was over 25 years ago.
michael says
I have a complete kitchen set of lyon cabinets I would like to refinsh myself. I purchase enamel paint from home depot which is supposed to be for appliances. What is the best way to restore cabinets for do it yourselfer. Willing to purchase the neccessary equipment and paint to refinsh the cabinet correctly
pam kueber says
Hi michael, this site focused principally on aesthetic rather than do-it-yourself. But, there are a few posts where readers have shared their experiences with steel kitchen cabinets. Check the category Steel Kitchen Cabinets under All Rooms/Kitchens or type painting cabinets into the Search box to go through the relevant posts. And please be sure to make yourself aware of all safety and environmental precautions, as just one example, testing to know whether you are dealing with lead paint. Good luck.
Alice says
What an inspiration project! Just fantastic!
Heidi Swank says
Absolutely beautiful kitchen! I, too, love the windows and the way the ceiling slopes down to meet them. So modern and cozy!
Garth says
Thanks for all the nice comments everyone and thank you, Pam, for giving us such a wonderful site to share our story. You are the best!
The stainless steel does show lots of fingerprints and scratches, so you have to be able to accept that if you want it on your appliances and especially your counters. M and I aren’t too picky about that, though. I just wipe them down every so often and the scratches let everyone know that it is a real working kitchen.
I wish that I had heard of the dry ice blasting before we got started because that sounds like a great idea. Oh well, I’ll try it next time.
John says
Who did you use in Dallas to strip and paint the cabinets? We have a set and are looking for someone. Thanks
Palm Springs Stephan says
That was quite a labor of love! The end result looks fantastic.
I had the same problem with sandblasting that you encountered: It tends to damage the metal, leaving lots of pitting. Soda blasting does less damage, but then there’s the issue of clean up and paint adherence. And chemical stripping is just so environmentally toxic that I could never have that done.
I have an alternative to suggest: Dry ice blasting. The media is relative soft and will not damage thin metal. It literally evaporates completely away after use leaving no residue or need for cleanup. It will not affect later paint adherence, allowing for either electro-static painting or (my favorite) powder coating. And it is environmentally friendly.
Mary says
Where does one go to have dry ice blasting done?
Jeanne says
Amazing. That’s all I can say. The kitchen is beautiful. My head is spinning thinking of all Garth and Martha went through! I’ve been in my house five months and I’m just starting to paint trim. The dedication those two have! It looks fantastic, though. I love the marmoleum floor and the counters and the cabinets…and everything!!
St. Christopher says
Wow, what an amazing kitchen! I love the “wide screen” window behind the sink. Is it difficult to keep the stainless clean, like with the fingerprints and smudges, et al? But for real, (ugh, I’m so cheap) THREE THOUSAND FOUR HUNDRED DOLLARS!!! On top of the cost of the cabs and all the going to get them.
Wow, that is dedication!
No no….that..THAT…..is love.
So, when do we get to see the rest of the pad?
Chris.
Elvis (aka) Jane says
That kitchen is beautiful! I applaud how thoughtfully you went about restoring the kitchen and cabinets, Martha and Garth. The result is a gorgeous, timeless whole. I love the simplicity of your results: the cabinetry, counters and floor are perfectly in tune with each other. Your approach really respects the style of your house. And your modern touches, like the dishwasher and microwave fit right in. To me, the kitchen alludes to mid-century test-kitchens I’ve seen (and I mean that in the best way!) with that stainless steel countertop and backsplash, but beautifully mixed with the warm colors and abundant light from the windows. I personally think this is one of the most appealing restorations on a mid-century kitchen I have ever seen.
I guess you’ve figured out I love it, huh?