

 Reader Lynne emailed a while back asking for ideas about how to handle the room divider inside her 1959 Florida home. With her problem solved — and thanks to lots of suggestions from Retro Renovation readers — she’s back with pictures to share.
Lynne wrote:
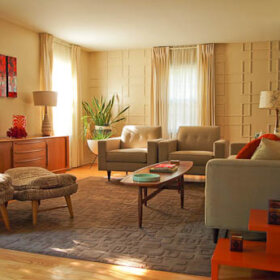
It’s been a long time coming but I wanted to send you some photos of the room divider that I had written to you about several months ago. There were so many excellent and thoughtful tips from your readers, and I really appreciated all the insight. Many people suggested that I live with the room divider (and any other features I may want to change) for a year or so, which turns out to be great advice – it’s so true that once you are in the house and living there day to day what might seem like an issue is not at all. I ended up painting the room divider a sky/turquoise blue, which is an accent color in my green and blue color scheme, and had a piece of MDF cut to fit over the planter portion. I painted the MDF shelf white to match the bricks below, and now I’m able to place a few decorative items on this and it’s very functional. I originally wanted to get white marble but frugality won out! As this is a vacation home, I did not want to put any plants in there at this time, but I can always do that at a later date. When I am in the living room or kitchen the room divider is not as much of a separator between the two rooms as I had originally thought. I have attached several photos of the house, before and after, and overall it’s coming along well and I’m pleased with the progress. Most of the work we did was outside, painting and landscaping, but we did have the carpets removed and the terrazzo floors refinished, and I have purchased a lot of furniture and household goods second hand from many sources – which has been huge fun staying with a 50’s -60’s vibe.


Above: Before.
Above: After.
Thanks,Lynne. It looks fantastic — and it’s so great to see you and Larry enjoying your vacation home…. respecting its original bones, yet still making it your own. 🙂


AtomicBowler-Dave says
Oh…that is just so NICE!
I really love the way that contrasting paint makes the divider ‘pop’, and how the newly-restored terrazo opens up the look and (photographically perceived) feel of the house!
Great job of clearing away the visual ‘brush’ inside and bringing out the original, airy, Populuxe-design feel.
Would love to see the kitchen (and any other) pics, too!
Thanks for such a nice preservation/restorative job on a lovely home!
Dave
wendy says
Fabulous! Please please pretty please, post photos of your kitchen! I think I see wood cabs with glass, and I’m very interested. I am redoing my kitchen, and want to look at options other than metal cabinets. Metal is my first choice, but I can see some fab wood cabs working well too.
Lynne Kansas says
Hi Wendy – If you send me an e-mail I can send you a photo of the kichen. lynnelendo@gmail.com. There are no glass cabinets, I had taken off the two end cabinet doors to see if I liked the effect of having an opening through to the kichen, but I have since put them back on. The cabinets are verticle strips of wood in a tongue and groove arrangement. No handles or knobs. The cabinets are original – Crazy thng – there is only one tiny drawer in the entire kitchen!
Marcela says
I love it!!! and I also love your floor.
Your house is lovely! I wish I could grow more palms but I’m right above the freeze line in FL 🙁
RetroSandie says
It looks beautiful! The grounds look very nice, too! I hope you’ll send more pix of your other rooms. Congrats!!! 🙂
Edwin Wilson, Jr. says
This is FANTASTIC! The essence of this entire conversation that occurred on this blog about this “dilemna” is inspiring to those of us who “get it”. I am thrilled you decided to keep them!!!! I think it looks fantastic and am so happy that you played up such a simple, cool, neat, feature of that home. Totally shows what can happen when you embrace architectural features as opposed to trying to disguise them / remove them. I also love the flexibility you have created to utilize the built-in planter box at a later date.
Heidi Swank says
Beautiful! I love the color. Nicely done.
Andrea says
I think you found the perfect solution—the room divider looks great! Painting it the accent color makes it look completely intentional (the previous all-one-color beige looked like someone was trying to “hide” it). The turquoise gives the divider a sculptural effect, and its presence provides a great sense of an “official entry” to the house. It’s also reminiscent of shutters, sending out a “cool” vibe—a welcome asset in Florida heat. I liked it before when I saw the original post, and I love it now!
Gavin Hastings says
This looks great.
Living in a home for a few months; to see how the house works, is always a good idea. I’ll be down in January!
Alicer says
Oh, I agree with Gavin!
BungalowBILL says
Looks great. A simple and effective solution to a problem. The floors look great as well. Congratulations!
Elizabeth Mary says
Oh, Lynne,
What a great solution you came up with. I am so glad to see the slats remain and you choose one of my favorite colors. Way to go!
Elizabeth