DIY painter uses new Rustoleum Cabinet Transformations on 2 bathrooms & kitchen — $240 for kits instead of $20,000 for new
pam kueber - Updated: November 3, 2020
Retro Renovation stopped publishing in 2021; these stories remain for historical information, as potential continued resources, and for archival purposes.
I recently wrote about my first press trip – to see and test-drive Rustoleum’s new “Cabinet Transformations” kitchen repainting kit. I was impressed with my experience – but there is nothing like a real-life testimonial from someone who has used the product on an entire kitchen. Did skeptical Connie like it? Yes. The minute she finished her first bathroom, she ran out for another kit to paint the second bathroom, then for more to repaint the kitchen. Here’s a snippet of her enthusiastic story:
What a great, great product. Tell Rustoleum they’re welcome to come over and shoot a commercial here if they want to. I wouldn’t want to be in it – I’m 59 years old and well past my expiration date. That’s what actressess and spokesmodels are for! I love the Rustoleum Cabinet Transformations – I swear I’m about ready to buy stock in the company.
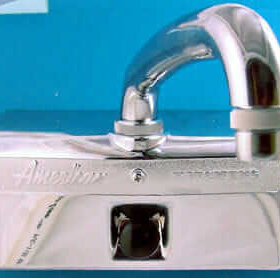
connie’s bathroom “before”
Actually, Connie first contacted me because there was a small problem. She wrote:
I started out my Cabinet Transformations project in our master bathroom, just in case it didn’t look as good as the pictures on the packaging, because nobody really sees it besides the two of us!
All of our cabinets were spray-painted with thick white latex before we bought the house. Naturally the guy sprayed right over the hinges and not only were they peeling, but so were the joints on the cabinets. Actually these cabinets were just about a deal-breaker for me, but I finally thought I’d just live with them for awhile and then have them ripped out and replaced. (For $30,000 or so!)
the same bathroom “after”
Anyway, the bathroom turned out fantastic. So then I did the guest bath, and finally the kitchen. My one and only complaint is that Rustoleum doesn’t provide NEARLY enough glaze. They’ve gotta be kidding with that teeny little can – no WAY would it cover 100 feet. I called their Customer … She directed me to just go buy another whole kit, and said Rustoleum would reimburse me. I’m on my last section of kitchen cabinets now and it’s clear that I’m going to run out of even THAT glaze before I get done. Does anybody know where to get that type of glaze?…This kit is the world’s greatest idea, but it is just proportioned SO WRONG!!! Can anybody help? Thanks!
By now I know all these people at Rustoleum. I emailed them, and they jumped right on it. Not only did they help Connie out with more glaze, at no additional cost. Cathy, a leading member of the Rustoleum brand team, responded quickly:
Connie – I am so sorry that you ran out! As with any new product there is always room for improvement and comments like yours help us deliver better products in the end. With that being said, at this time there is not and option to purchase the glaze on its own at a retailer, and we do not recommend any other product as a substitute. As a result to consumer demand we will be adding an additional 1/2 pint of glaze to our small Cabinet Transformations kit going forward. Rust-Oleum will also be offering additional glaze, in the near future, if someone happens to run out of the product. (Cathy then gave Connie some options to get more glaze.) We do apologize that you ran out of the product, and really appreciate the feedback. Thank you – Rust-Oleum Cathy
Isn’t that great customer service? Good on you, Rustoleum! Back to Connie… here’s her DIY painting story:
The cabinets in here were solid wood and well worth saving – none of those cheap crappy veneers that you usually see these days. I just didn’t think they were “salvageable”. Thus my willingness to spend $30,000 to rip them out and get new ones.
connie’s kitchen “before”
This is a “before” picture of the kitchen, but I didn’t specifically take it because I was going to re-do the cabinets. I just took those to send to some of my out-of-town buddies once we bought this house. Too bad I didn’t get close-ups of the awful peeling white paint on the hinges and joints!
Ugly white sprayed on paint, chipping and slopped over the hinges.
I deliberately took photos of the nice new finished cabinets (left side of pictures) while the awful chipped white cabinet doors were still in place on my last section of kitchen (right side of pictures).
As you can see, I went with the darker kit in my kitchen, due to the terra cotta colored floor tile.
In the bathrooms, my tile and grout is quite light. I used one “lighter” Cabinet Transformations kit, and that was enough for both bathrooms.
So I see all these kitchen and bathroom photos, and they don’t look particularly “retro” to me, so I ask Connie how she happened upon this blog. She answers — and we also get this funny back story about her Dear Husband (DH):
I think I got there because I was trying to find out how I could get more glaze, and you had just participated as one of ten designers who went to RustOleum to test the Cabinet Transformations product. Your blog just happened to be about Cabinet Transformations that week. It was definitely a roundabout approach! Our condo is about thirty years old, so not really retro. We have cathedral ceilings which we call “retro” because all the newer houses have 10-foot ceilings and crown molding!
Here’s a funny story: I was one of the first people in the Palm Springs area to buy a Cabinet Transformations kit. Lowe’s had just put their first 8 boxes on display that day. So when I brought it home and showed my husband, he kinda rolled his eyes and said: “What did you waste money on THAT for?” I told him that if the thing works like I THINK it’s gonna work, it’ll save him thousands and thousands of dollars.
He was pretty skeptical, though. I couldn’t even get him to make me some drying racks, so the master bath seemed to take forever, because I had to wait for each coat to dry before I could flip the doors over and do the other sides.
Anyway, by the time I put the glaze coat on, his eyes were about popping out of his head. He immediately made some drying racks for me and he had the doors off the guest bath cabinets even as we were waiting for the top coat to fully dry before re-hanging the doors in the master bath! So as soon as I got done with the guest bath, I bought two more kits, this time in the darker shades. I’m pretty sure he had the kitchen cabinet doors off by the time I got home.
I can’t see how anybody could NOT love this product. In my case, replacing the existing cabinets with ones of the same quality would probably have cost at least $20,000 because they’re solid wood – not those cheap veneers you so often see. Instead I bought a total of four Cabinet Transformations kits and was refunded for the fourth one because I only bought that one to get more glaze. So, about $240 total.
I thought you’d get a kick out of my husband’s initial skepticism followed by his Attitude Transformation! If I’m Cabinet Transformation’s biggest fan, I’d have to say he’s now Number Two.
Thanks for your interest…this has been fun… Later, Connie
Thank you, Connie — yes, this has been fun! Please do keep in touch — I especially want to hear how the new paint wears! And if I ever make it to Palm Springs, you and I will have to go thrifting. We’ll get you some great bit 1960s lamps for your Palm Springs groove pad!
I just finished doing my 1959 Kitchen cabinets with this product. 32 cabinets which took MUCH longer than I anticipated. I will post pictures and a full review soon. I must agree with some other here that the product is awesome but the kits are horribly miss proportioned.
I needed ONE more canister of base. And ended up having to buy an entire new kit. So now I am stuck with a ton of “Extras” I will most likely never need. I didnt use the antique technique so I have several cans of that. However, something I MIGHT suggest to help others…Thanks to a very friendly Home Depot associate, SHE suggested she tint only ONE can of the base. She said we could come back at any time and have the second can tinted. This allows us the extra can for other projects and to use a different color. It still kind of sucked having all this extra stuff, but that was a helpful suggestion. Over all the product can NOT be beat for a very inexpensive renovation. But it would be nice if they readjusted their kits or allowed consumers to buy “Extras” outside of a kit.
Judisays
I am looking for a can of the glaze. if you are not using it, I will buy it from you. I also could use the lint free rags and top coat.
Briansays
Hello,
I am curious about how to do the areas BETWEEN the cabinets? Obviously you cannot take those off the wall with ease like you can the cabinet doors. Is it safe to do the spaces in-between the actual cabinet doors as they hang (vertically), or will the all/ either of the bond coat, glaze, or top coat drip? Thank you in advance for your input
Paula Barlowesays
I am glad that some of you had success, but know that you MUST be sure about your color choice. Rustoleum will not sell you more of ANY parts of the kit. I bought the large kit in “Porcelain”. I painted the inside of one of my cabinet doors and it just wasn’t right with the rest of the kitchen (tile, wall color, etc.). I called Rustoleum and BEGGED them to sell me (SELL me, mind you, not give me for free) another can of the base and they WOULD NOT do it. They said I would have to buy an entire whole kit which costs $150.00. Further, the representative would not let me speak to anyone else or transfer me to anyone else in the company!!?? Sorry, but that is really poor customer service. The kit is very expensive in the first place, but their inflexibility to help you out is absurd. Even if I could afford another $150.00 kit (which I can’t) I would never buy anything from them again. “Satisfaction Guaranteed” my foot…..
Cindysays
I bought 3 large kits and want to try this on my paneling. Wish me luck.
pam kuebersays
Luck!!! Let me know how it turns out!
Cindysays
Pam, I used Cabinet Transformations on my livingroom paneling. I ended up using two large kits and had some trial and error on one wall. My room is 19×20. Although it said not to sand I had a very high gloss on my walls and after lots of elbow grease on one wall, I decided to degloss the other walls and follow up with some sanding. I just love my walls now. I would send pics…however, I am not for sure where I should download them.
J53M4T11says
Well, good for Connie. Rustoleum probably gladly furnished more glaze because it’s not their control product. I asked Rustoleum to SELL me more “bond coat” after the store told me that Rustoleum won’t sell bond coat outside of the kit. Rustoleum confirmed it: “The kit holds 100 sq. feet of bond coat; if you want more, you need to buy another kit.” That means, spend $160 for 130 square feet. The kit is priced at twice the shelf price of the components and then they control the main ingredient to FORCE YOU to buy more kits. It’s a ripoff and it’s outrageous. Never again.
Sandrasays
Hi!
After many weeks of researching this product, i just finished my bathroom and am very happy with the resukts so far. I didnt find it a particular easy poject but it is extremely difficult either. I am very crafty and used to painting, repairing and changing things around. It is a tedious job and i wouldnt consider it a weekend project if you’re doing a kitchen and want to be thorough, i know im pretty prefectionist and pay too much attention to small details, so perphaps that’s the reason why it took me longer then people have indicated. I took my time on every step and extended the drying period suggested. I found that it does peel extremely easy, even with the extra drying period and extreme caution used to handle each door/drawer. I am thinking of doing an extra top coat shall i see that it peels. I did read in one of the many reviews sites visited, someone had the same concern and there was a response that after the top coat that wasnt an issue AND that it needed time to “cure”. So, i shall wait and see but that is my only concern really, because the cabinets look absolutely beautiful and “professionally” done. Has anyone had their finished product “in use” long enough to comment on it’s durability? I chose the toasted almond with glaze to replace my “white wash” (which is more like a salmon pinkish thing) that was long over due in this house!
pam kuebersays
I would think that it’s extremely important to (1) ensure you deglaze the original finish well… and (2) to ensure you allow for very thorough drying between coats. These are just my personal thoughts, though… I am sure RustOleum can comment….
I am currently trying to purchase a rusteolum cabinet transformatios large kit and have not been able to. I went to home depot in ponce puerto rico and baymon, puerto rico and other plasses but they only have a coubter paint. THEY DON’T EVEN CARRY THAT KIT EITHER. can u help me find a plcae or even purchase one dir from you? I unstand the cost is $149.99. please let me know asap. I know you have a job but this is part of your job, getting potential customers your product. Thank you very much.
Jaclynsays
The cabinets do look amazing. I just bought a kit, but can you tell me which color you got for your kitchen?
Molly Morgansays
What color is this? Provincial, russett, gingerbread?
kasiasays
connie, could you please tell me what color you used in your bathrooms and kitchen. i just put buttercup on and have not glazed yet. i am freaking out because it looks entirely too yellow at this point.
Dwannasays
First on this blog. I’m strongly considering buttercup glazed. Curious how your cabinets turned ou last year. Thx


 I recently wrote about my first press trip – to see and test-drive Rustoleum’s new “Cabinet Transformations” kitchen repainting kit. I was impressed with my experience – but there is nothing like a real-life testimonial from someone who has used the product on an entire kitchen. Did skeptical Connie like it? Yes. The minute she finished her first bathroom, she ran out for another kit to paint the second bathroom, then for more to repaint the kitchen. Here’s a snippet of her enthusiastic story:

Ugly white sprayed on paint, chipping and slopped over the hinges.
As you can see, I went with the darker kit in my kitchen, due to the terra cotta colored floor tile.


Dawn says
I just finished doing my 1959 Kitchen cabinets with this product. 32 cabinets which took MUCH longer than I anticipated. I will post pictures and a full review soon. I must agree with some other here that the product is awesome but the kits are horribly miss proportioned.
I needed ONE more canister of base. And ended up having to buy an entire new kit. So now I am stuck with a ton of “Extras” I will most likely never need. I didnt use the antique technique so I have several cans of that. However, something I MIGHT suggest to help others…Thanks to a very friendly Home Depot associate, SHE suggested she tint only ONE can of the base. She said we could come back at any time and have the second can tinted. This allows us the extra can for other projects and to use a different color. It still kind of sucked having all this extra stuff, but that was a helpful suggestion. Over all the product can NOT be beat for a very inexpensive renovation. But it would be nice if they readjusted their kits or allowed consumers to buy “Extras” outside of a kit.
Judi says
I am looking for a can of the glaze. if you are not using it, I will buy it from you. I also could use the lint free rags and top coat.
Brian says
Hello,
I am curious about how to do the areas BETWEEN the cabinets? Obviously you cannot take those off the wall with ease like you can the cabinet doors. Is it safe to do the spaces in-between the actual cabinet doors as they hang (vertically), or will the all/ either of the bond coat, glaze, or top coat drip? Thank you in advance for your input
Paula Barlowe says
I am glad that some of you had success, but know that you MUST be sure about your color choice. Rustoleum will not sell you more of ANY parts of the kit. I bought the large kit in “Porcelain”. I painted the inside of one of my cabinet doors and it just wasn’t right with the rest of the kitchen (tile, wall color, etc.). I called Rustoleum and BEGGED them to sell me (SELL me, mind you, not give me for free) another can of the base and they WOULD NOT do it. They said I would have to buy an entire whole kit which costs $150.00. Further, the representative would not let me speak to anyone else or transfer me to anyone else in the company!!?? Sorry, but that is really poor customer service. The kit is very expensive in the first place, but their inflexibility to help you out is absurd. Even if I could afford another $150.00 kit (which I can’t) I would never buy anything from them again. “Satisfaction Guaranteed” my foot…..
Cindy says
I bought 3 large kits and want to try this on my paneling. Wish me luck.
pam kueber says
Luck!!! Let me know how it turns out!
Cindy says
Pam, I used Cabinet Transformations on my livingroom paneling. I ended up using two large kits and had some trial and error on one wall. My room is 19×20. Although it said not to sand I had a very high gloss on my walls and after lots of elbow grease on one wall, I decided to degloss the other walls and follow up with some sanding. I just love my walls now. I would send pics…however, I am not for sure where I should download them.
J53M4T11 says
Well, good for Connie. Rustoleum probably gladly furnished more glaze because it’s not their control product. I asked Rustoleum to SELL me more “bond coat” after the store told me that Rustoleum won’t sell bond coat outside of the kit. Rustoleum confirmed it: “The kit holds 100 sq. feet of bond coat; if you want more, you need to buy another kit.” That means, spend $160 for 130 square feet. The kit is priced at twice the shelf price of the components and then they control the main ingredient to FORCE YOU to buy more kits. It’s a ripoff and it’s outrageous. Never again.
Sandra says
Hi!
After many weeks of researching this product, i just finished my bathroom and am very happy with the resukts so far. I didnt find it a particular easy poject but it is extremely difficult either. I am very crafty and used to painting, repairing and changing things around. It is a tedious job and i wouldnt consider it a weekend project if you’re doing a kitchen and want to be thorough, i know im pretty prefectionist and pay too much attention to small details, so perphaps that’s the reason why it took me longer then people have indicated. I took my time on every step and extended the drying period suggested. I found that it does peel extremely easy, even with the extra drying period and extreme caution used to handle each door/drawer. I am thinking of doing an extra top coat shall i see that it peels. I did read in one of the many reviews sites visited, someone had the same concern and there was a response that after the top coat that wasnt an issue AND that it needed time to “cure”. So, i shall wait and see but that is my only concern really, because the cabinets look absolutely beautiful and “professionally” done. Has anyone had their finished product “in use” long enough to comment on it’s durability? I chose the toasted almond with glaze to replace my “white wash” (which is more like a salmon pinkish thing) that was long over due in this house!
pam kueber says
I would think that it’s extremely important to (1) ensure you deglaze the original finish well… and (2) to ensure you allow for very thorough drying between coats. These are just my personal thoughts, though… I am sure RustOleum can comment….
patria silvagnoli says
I am currently trying to purchase a rusteolum cabinet transformatios large kit and have not been able to. I went to home depot in ponce puerto rico and baymon, puerto rico and other plasses but they only have a coubter paint. THEY DON’T EVEN CARRY THAT KIT EITHER. can u help me find a plcae or even purchase one dir from you? I unstand the cost is $149.99. please let me know asap. I know you have a job but this is part of your job, getting potential customers your product. Thank you very much.
Jaclyn says
The cabinets do look amazing. I just bought a kit, but can you tell me which color you got for your kitchen?
Molly Morgan says
What color is this? Provincial, russett, gingerbread?
kasia says
connie, could you please tell me what color you used in your bathrooms and kitchen. i just put buttercup on and have not glazed yet. i am freaking out because it looks entirely too yellow at this point.
Dwanna says
First on this blog. I’m strongly considering buttercup glazed. Curious how your cabinets turned ou last year. Thx