


Remodeling my mom’s bathroom gave me a chance to put recent learnings into action. With some bathroom renovation experience already under my belt — and with the help of Aunt Mary Anne, who is a design whiz — I think we made some great decisions and the bathroom turned out really well. But, I also made some “mistakes.” Today, I spotlight 9 things that I was really happy with.
First up:
1. Install a timer for your bathroom exhaust fan. We added this to both bathrooms — and the love for this little feature is already huge. No more forgetting to turn off the bathroom fan and exhausting all your conditioned air into the environment for, like, eight hours (guilty!) Note: You need an entire switch area for this timer.

2. If you have a pretty bathroom floor — consider a vanity with legs so that you can see underneath. Of course, you will be forever fighting dust bunnies, but I think it is well worth it. Honestly, I would have preferred to show “more legs”, but this was the best we could do on short notice and considering other constraints. We found this vanity at Lowe’s and repainted it and changed the hardware to suit our black-and-white design.

3. Use forms to create recessed shelves in your shower or bath. We created tile-in shelves in two spots in the shower, using foam-forms that we bought from Louisville Tile. These are fabulous time-savers — no need to “build” shelves out of cement board.
4. $5 suction cup hooks. Also featured above, notice the very functional and ingenious (there’s a stick-then-lock mechanism) suction-cup triple-hook for the scrunchy scrubbies is from Bed Bath & Beyond, $4.99. When it comes to drilling things into tile I get very anxious. So, I gave these suction cups a try — this one looks like it will hold.

Here is what the recessed, tile-in shelf forms look like, going in. Hi, Kenny!

5. 30″ double-door recessed medicine cabinet. When I first wrote about the 30″, double-door medicine cabinet by Kohler ($98 from Lowe’s), I mentioned the negative reviews about the hinges that I had subsequently read online. Going in, the hinges looked fine and dandy to me!

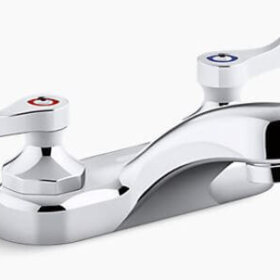
6. Matchy matchy toilet flushing lever — Again demonstrating that no detail is too small, we bought satin nickel toilet flushing levers. Note, however, that this is Moen Banbury, while the towel hooks and toilet paper are Baldwin Prestige (as I recall.) Baldwin Prestige did not make a matchy matchy toilet flushing lever. Marketing opportunity LOST, Baldwin! Moen’s design was Close Enough.

7. Towel hooks are the new towel bars — When we went to install the Baldwin Prestige towel bar, gosh, room was tight. Aunt Mary Anne convinced me that using robe hooks for towels was quite acceptable — preferable, even — especially in a small space. Thinking more about it — heck, yeah, I almost always drape my towel, first, over the shower curtain rod to dry. It could then easily go on a hook. And having a hook right outside the shower is great – it gives you a place to grab your towel the minute you get out. Lesson: Do we really need towel bars? MAYBE NOT!

8. Safety grab bars — We chose a 30″ shower grab bar in porcelain-enamel-on-metal for the shower, to blend in with the white subway tile. We also have the same grab bar, 18″ high”, right outside the shower. And, we’re going to add a third one, perpendicular to the one outside the shower / leading to the door. We have structure in the right places. As to location for grab bars — consult with professionals. Our contractor was familiar with ADA requirements, which was very helpful.

9. Carrera marble shower threshold — Oh my, this is lovely. As my sister Jenni said, “I never want to leave this bathroom.”


Michele says
Pam-when can you come do my bathroom? It’s absolutely wizard, fab and groovy(it was used in the 1940’s, believe it or not–) y’all out-did yourselves! Your Mama is verrry lucky!
Gavin Hastings says
One last comment on the exhaust fan switch dilemma:
The place for the timer switch is on the other side of the room in the area between shower and toilet.
pam kueber says
why do you say that?
Gavin Hastings says
Because an exhaust fan is needed only when taking a shower or actually using the toilet. Why create a “Mission Control” unit with confusing switches? You don’t need it to wash hands, brush teeth, look in the mirror, etc. Ever get ready for a shower and forget the fan….?….To late…it’s on the other side of the room!
If you are doing a bath redo “to the studs” I would not hesitate to break up the electrical locations. I dislike going to someone’s home and finding a wall o’ switches in the bath (I HAVE to try them ALL) Thank God the recessed Heat Lamp craze of the 70’s is over- one less switch!
pam kueber says
I understand your logic. Not sure I agree. “Wall of switches” vs. “Switches here and switches there”? I think: Toss up.
Sara in WA says
If you use the glossy, smooth tile like Pam did you can put up suction cup grab bars and they are extremely stable. So if you don’t want to drill into the tile, they are a great option. I also think it makes the case for using smooth tile so when/if grab bars are needed they are easy to add. Did this for my parents bathroom and they’ve been great.
Trina says
Pam, the bathroom looks great and your attention to detail did not go un-noticed. Love that all of the screws on the light switch are all vertical. If you’re going to do it – do it right! Thanks for sharing.
johnny dollar says
i worked for an electrician for a couple summers, and he insisted that the screws on any plate we installed be either all horizontal or all vertical.
Amy Hill says
What did you do for storage? When I bought the new vanity for my bath redo, I also purchased the matching shallow wall cabinet. I just wondered if there was a linen closet or something already in the bathroom.
Looks really pretty, btw! Great Job!
pam kueber says
Amy, there is a good-sized linen closet down the hall, and a separate door-height-and-width medicine/sundries closet, too. I did not want to hang any more storage on the walls of the bathroom, or it would feel too cramped. So, storage goes in the vanity or in the oversized (30″) medicine cabinet. In my experience, the more storage space we create, the more crappola we throw in there to immediately begin the trek beyond the expiration date.
TappanTrailerTami says
Love, love, love everything you did in your Mom’s throne room Pam! It turned out amazing!
Also, according to your logic on more space to fill with crappola – does this mean if I go to zero storage space, I’ll automatically just get rid of all my crappola? Does that come with a money back guarantee? LOL – I think I’m a candidate for Hoarders!
Tami
Amy Hill says
Pam’s right, Nature abhors a vacuum…Whatever space you have will be filled!
Marion Powell says
First time I’m commenting.
You made me feel so much better about my bath remodel. I used my old 6′ vanity but had it raised up on 6″ legs I cut from two pine end tables. I used robe hooks for the towels. Mine is right outside the shower door and my husband’ s is across from it. I also use two suction cup hooks for my wash cloth and hanging foot scrubber.
One comment made me realize how much I love my shower door. Yes, it does keep in the warmth. I also have something no one mentioned. I had a small 24″ ceiling fan installed between the shower and vanity. In the warm months, even with air conditioning, it gets so hot when you blow dry your hair. The ceiling fan is wonderful and not too much of a splurge.
pam kueber says
Welcome, Marion, I’m glad this bathroom renovation brought you out of “lurking” status. A small ceiling fan — sounds wonderful for a bathroom, especially in hot or humid climates and if there is space. Yay on you!
MCMeg says
I love the choices you made in this bathroom! It is gorgeous. I also love towel hooks in a small bathroom and suction cups in the shower. I have a suctioned cup shelf/bin for each person who uses the shower, a suction cupped soap dish and razor holder. You can arrange them any way you want and this is especially nice in a small shower. I have to recommend spritzing them with Clean Shower to keep them looking pretty. I also heartily agree with shower curtain over shower doors. I think doors also make the bathroom seem smaller as well as being a pain to keep clean (although I again would recommend the Clean Shower.) Yea, I don’t spend too much time thinking about my bathroom!
Clare says
I REALLY wish we had installed the exhaust fan timer in our recent bathroom renovation. What a simple, yet brilliant, solution to a common problem.
Jane / MulchMaid says
I do love our (1956 original?) timer switches controlling both main floor bath fans! Easily worth the cost if you don’t already have them.
And I’m in love with the shelf forms for the shower walls. What a great idea and one that goes immediately into my “bathroom rework” file.
Patrick Coffey says
Oh yeah we also installed dimmers in the downstairs hall and upstairs hall bathrooms at the same time we replaced the fan timers. the reason we did it was because neither of those bathrooms had a window so if you were in there for a while it could get kinda stuffy (the master bath had a window you could open) also it helped to dim the lights when using the facilities in the middle of the night so your eyes could adjust to the light with out it hurting them