


 Here is a recipe for a (relatively) cheap, cheerful and effective work bench or crafting work space: Take two of these Ikea Trofast children’s storage frames… butt them together low-end to low-end… fill them with the Ikea plastic bins… top with a ready-made laminate countertop, or order a design you like, or use a Ikea Numerar countertop (now discontinued, but there are other butcher block-style options)… and voila: A nifty work space with tons of handy storage. The Trofast frame stands 36″ high at its highest level, so with the countertop, it’s just a tad higher than a standard kitchen counter — a good working height, I think, if you are at least 5’6″ tall or so.
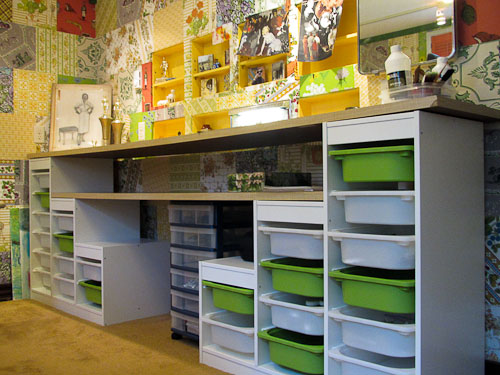
The idea in real life (mine):

Okay, so the photo above is not super pretty. This is my husband’s work area wedged into a small tool room in our basement. He is an absolute neatnik — I take blame for that mess in the middle; if I were a prouder blogger, I’d clean it up for this photo. Although, I guess you could say: This is real. The reason I even thought to do this story about our Ikea work bench hack is that, with ideas buzzing for my office makeover, I went and communed for a while with this whole set up to consider whether I just straight-out copy it into my office-turned-office/craft room. I dragged DH into the discussion, and he agrees: This tool room work bench — which uses two Trofast children’s toy storage units that we purchased from Ikea 13 years ago — is the best ever. His words.

The Trofast’s pine frame — at least the one we purchased circa 1998 — is impressively sturdy, indestructible, even. From the photos online today it looks the same — construction quality does not appear to have changed. The plastic bins are lightweight but strong. They slide in and out just like drawers, and you can take them all the way out, and tote them where you need to use them — this would be good in a craft room.
Ikea has a variety of other shapes and sizes of this Trofast storage units that use this same pine-frame-with-plastic-drawers design concept — lots of pieces to potentially combine into creative systems of stuff to hold your stuff ugh. However, I do wish that Ikea had a design as deep (18″) and high (36″) as the Trofast, but with drawers that went all the way to the top so that the big mess-in-the-middle, when used according to my design would not occur; alas they do not. If I actually do this in my craft room, I will have to hack the hack to fix the gap.
Will I replicate this world’s best workbench for my office craft area? Maybe, maybe not. I need to explore every goshdarn potential solution until my eyes bug out. I still may need to do the craft room all vintage, The Hard Way. Ideas still buzzing.
 Update: See how I used my Ikea hack but with a different spin — for craft storage in my office. Super happy!


Sarah says
Hello I’m very late to the party but I’ve seen the particale board trofast on sale where I live for $40 do you think it would hold something like this. It’s not the pine ones.
Pam Kueber says
Hi Sarah, I used the other material (which I suspect you are talking about in your question) for a similar set up in my craft room. That said, check with Ikea to see if they have weight recommendations. My other unit >> https://retrorenovation.com/2012/06/20/affordable-craft-room-ideas-kids-storage-and-used-countertops/
Michael says
Is there no worry of sag in the middle of the counter?
pam kueber says
Yes, it’s sagging. I have brackets to add support, but I have not really needed to use them yet.
Joe says
Have you tried/thought about putting doors on the front of these, or maybe real soft-close drawers in them? Also, I wonder what the best way to raise up the height of the countertop would be? I’m guessing either putting feet or a frame under it, or additional wood on top of it, under the counter. Thanks for the great idea!
Joe says
BTW – when the bins are inserted, do any part of them hang out in the front? (I’m thinking if they do, then doors wouldn’t work.)
pam kueber says
I am not 100% sure, but I think you could put full overlay euro-hinge doors on them. There is no back to the section that holds the rubber drawers — lots of wiggle room front and back. They already get you a countertop that sits at about 37″ high. Yes, various methods could be devised to raise that higher if you want. See what I did with the white Trofasts here: https://retrorenovation.com/2012/06/20/affordable-craft-room-ideas-kids-storage-and-used-countertops/
Selena says
AtomicHipster: I think it’d work upside down too, as the bins only slide into grooves made in the pine. There’s no actual hardware.
Zoe says
You could put a board over the first level of the “mess” in the middle, and then put short bins below the board, and tall bins above. Voila! Hack hacked.
Elaine says
Hmmm, we have this old shed that has a great workroom in it. I think the cabinets are from an old kitchen. The shed is going to have to go as it is in pretty bad shape and we want a place for the shed that is blocking our view. Hubby wants to move the workshop into the garage. I think this will work a lot better for him than the kitchen set with cupboard doors. I figure it will be less than $400, which is pretty darn reasonable. Going shopping!
Once again, thanks for the inspiration!