The 18 patterns of vintage wallpaper — cut into 277 squares — are no question the highlight of My Big Fat Retro Office Remodel. In this story, I’ll talk about how I acquired, edited, then arranged the wallpaper to create a harmonious — albeit — crazy design. I also want to underscore the message that: This is an affordable — and relatively easy — way to get vintage wallpaper into your house — you only need one or two rolls of each design and you can often find onesie twosie rolls at a dirt cheap price.
I think there are lots of folks want to use vintage wallpaper. But, it’s usually very expensive — up to $200 a roll — if you need to seek out multiple rolls of one design at one of the several places that sell vintage wallpaper. However, if — like me — you can pick up a roll here and there — and if you are not in a rush to collect — you can gather enough paper to do a crazy quilt vintage wallpaper room on a shoestring budget. I paid no more than $1 to about $7 per roll for the rolls I used in my office remodel.
 Another reason this use of squares is great: It is much easier to hang these small pieces than it is to hang long strips that require carefully matching the repeat. Mind you, it still takes a lot of time to hang 277 squares — which is how many I used in my 9′ x 14′ home office — but I found this vintage wallpaper-hanging project much less anxiety producing than my two previous vintage wallpaper-hanging projects — “normal” rooms that used one paper and which required matching the pattern along the seams.
Bottom line: Once I had the 18 patterns of wallpaper in hand, this was a technically easy DIY project — and a relatively affordable one. I know a lot of folks will want to know how Denise and I applied the wallpaper — I have written a separate story about my experience in how to wallpaper a wall with vintage wallpaper. This story focuses on: How I chose these 18 wallpapers and coordinated them into a harmonious yet crazy overall design. Oh. Nice photos above, huh? The first one, I call this one “Prell Girl” — the second, of me and Denise, is Love American Style Gothic — both shot by the fabulous Erica Berger xoxo.

Step One: Acquire lots of wallpaper
As I discussed above, the really cool thing about doing a crazy quilt of vintage wallpaper is that you need as little as one roll of a particular wallpaper that you are going to incorporate. I often hear from readers who found one or two rolls at an estate sale. Alas, this is not enough to do a complete room — even a small room will take five rolls or more of a single design, because of the repeats. So, step one is to get your hands on the wallpaper. This may take lots of time. In my case, I collected these papers over the course of about… nine years. See my story, 7 places to find vintage wallpaper from 80 cents to $200 a roll.
How much wallpaper do you need? This gets a bit tricky. It will depend on how wide and tall your room is… how many different designs of wallpaper you are going to combine… the size of the squares you will cut… and how wide the wallpaper rolls are. Another factor is how much waste there will be as you cut your shapes: Small patterns will likely have less waste because you will won’t need to position your template at long intervals to capture the best part(s) of the design; on the other hand, large patterns or novelty designs may have much more waste as you position your cutting template at more distant intervals to capture and position the best parts of the design. To plan on how many squares I would need, I measured my walls. I was using 12″ squares, so based on my calculation of the square feet of wall space I needed to cover, I knew I would need at most 320 squares. (I ended up with 277 because of doors, windows and built-in storage that were not wallpapered). With 18 designs, that 320 square calculation meant I needed a bit fewer than 20 squares per design. After I cut a few squares, I could see from working with the wallpaper that I would easily have at least 20 squares per roll; I was set. On this question, you’re just have to do the math and the triangulation…

Step Two: Sort through your wallpaper rolls to identify the pieces that can be combined harmoniously.
Even most crazy quilts have some color or intensity harmony. I sorted through all my wallpaper — initially finding about 16 designs that I considered using together.
Step Three: Paste squares onto something flat so you can really eyeball how the designs play together and so you can narrow your palette
Next, I cut a square from each of the designs and pasted each one onto a stiffer substrate. This enabled me to put the squares of wallpaper on a table or the floor to get an even better sense of how the colors and patterns worked together. I needed to adhere the wallpaper to something stiffer because the vintage wallpaper wanted to stay curled up after I cut it.
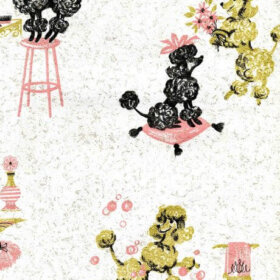
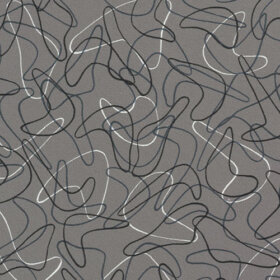
 When I laid out all my squares, I could see that the Retro Decorating Gods had delivered unto me a prevalence of acid yellows and greens as the core of my color palette. Some of the other papers in my collection did not play well with the core. For example, some lovely Mamie pinks clashed. And a bold vintage Peanuts design hogged all the attention when combined with the lighter yellows and greens. On the other hand, several other “contrasting” or “complementary” colors did make my cut (haha, that’s a wallpapering pun) because they worked well with the yellows and greens. For example: Purple always looks good with yellow… and I have some oranges and rusts in my mix. I also selected for strong and light, I wanted “the right mix” of color and pattern and complements and contrasts. This eyeballing process took me down to 10 papers. Finally, you can see how the actual designs on the wallpaper are pretty wide in their variety — in general, I found that combining wildly divergent patterns could “work”. Like I said: This is a big eyeballing process. The more experience you have had combining color and pattern and complements and contrasts, the easier you will find this process.
Step Four: Get more wallpaper if necessary
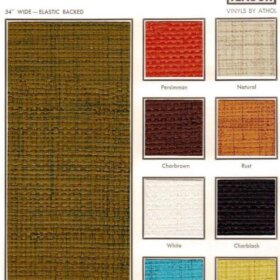
You would think that 10 different wallpaper designs would be “enough” for a crazy quilt. But when I reviewed the initial lineup of squares from my original stash of vintage, I still did not feel like the diversity of patterns and colors was enough. So, I ended up taking two more trips to Miller’s Art Supply in Pittsfield to look for more rolls. Miller’s is where I originally acquired much of my New Old Stock. I also had picked up some at estate sales (this is where I always get vintage wallpaper for $1 a roll — I got some just this weekend haha not funny it’s a problem), and I had purchased a few larger sets of cool designs from ebay over the years.
Actually, my first trip back to Miller’s had been to grab some painting supplies when I was in the neighborhood and just about to start preparing my walls. On that first trip I found two more wallpaper patterns I thought would work and snapped them up. But after the big cut-review, I went back to Miller’s specifically on a mission to acquire some more wallpaper. On this second trip, I ummm, I got all obnoxious tenacious — but in a super nice way — and asked the helpful folks at Miller (who know me by now) if there could possibly be any more vintage wallpaper in their basement stash. They played along and took me downstairs and — yup — I came upstairs with maybe another couple of rolls single rolls that I knew would work well with my 1960s-1970s yellow-green flower power palette. When I got them home and did a new review, I was up to 18 patterns and it all felt just right — yay!

Step Five: Cut your wallpaper into squares that you will paste on the walls
Here is the #1 key trick to cutting your wallpaper into squares: Go to a glass supply company — I went to Lenox Glass — and have them cut you a piece of clear glass that you will use as a template to cut the wallpaper. Why clear glass? Because you can put the glass over the printed side of the wallpaper and cut out the exact part of the design you want to see on the wall. Thank you, Denise, for giving me this tip. My glass square cost just $3. I should have had Carl make two in case I dropped one. But I didn’t and I didn’t, so it was fine.
For a cutting tool: I experimented with a few tools to cut and for me, the best was an Exacto knife with a very fine blade. Be sure that your glass template is sanded along the edge so that you don’t cut yourself. And it’s best to ensure the edges of the glass template are 100% smooth with no nicks — otherwise the Exacto will zig where the nicks are. There was one small nick in the edge of my glass template. I kept finding myself repositioning the template to work around it. That got to be a real pain, as I ultimately cut about 300 squares. This was a real zendeavor.


 Another important cutting tip: For this project, which aimed for the crazy, I did not cut out the designs straight and vertical (as you would normally hang any wallpaper). The patterns that were based on stripes were cut and hung with the stripes vertical sometimes, horizontal sometimes, perfectly diagonal sometimes, wacky diagonal sometimes. If the paper had a large design, or notably attractive parts of the pattern, I cut out the different pieces for a different effect thoughout the room; there was a lot of waste when I had to cut like this. Any untrimmed papers with writing on the edges — I often worked to capture those words — they are another terrific graphic element. On one paper, there was a label still stuck to the wallpaper — I was able to capture that and it’s still on the wall. I also had two wallpaper fragments with only enough yardage to cut four and eight squares each. I was very careful and strategic how I cut these — and we also put them in places on the wall that we knew would not later be covered by furniture or shelving or other decor.
I did not cut out all the paper at once. I cut out a goodly number of pieces at the start… then I cut out the paper we needed, as we went along. Tip — bring the cutting table into the center of the room you are working in, to save time.
Step Six: Lay all your final choices out on the floor and arrange your first rows
In terms of getting the design up onto the wall: We had 18 samples on our stiff substrate — we laid them onto the floor by the first wall we were going to work on — the back wall with no intrusion. We organized the pieces into two aesthetically pleasing rows, and up they went (after measuring walls and ensuring our lines were level).
Step Seven: Continue subsequent rows — using my “Sudoku” method
To continue the design, I used what I called the Sudoku Method. Remember Sudoku? Golly, how do I explain this? Suffice to say: I tried not to have the same wallpaper too near its mate. Play some Sudoku for a couple of days first and you will understand what I am talking about. Note, Denise thought that once we had one wall done, we should just have repeated the order on the adjacent wall. This may well have worked and speeded things along. However, I was opposed to the idea. I did not want the walls to match. I am that way, it’s all or nothing.
Also, I reiterate: Even though I had 18 patterns, in reality I had scores of patterns. That’s because we hung the pieces horizontally, vertically, askew, showing different portions of the wallpaper, etc.
And: As I was selecting the pieces to go on the wall, I was also very attentive to adjacencies for effect. I did not generally place three light greens in a row, for example. Again, this was a game of color-pattern-complements-and-contrasts arranged just so.
Special tips for your rows:
Special tip one: Figure out where to start you pattern
This part of the process is just like figuring out how to start and lay tiles in bathroom. Denise and I wanted to start on the “back wall”, which had no intrusions in terms of doors, windows or built-ins. It was “all wall”. We measured height and width — then found and marked dead center. We knew we were working with 12″ tiles and that we would have a little bit of overlap on each piece. We knew we had trim at the top and bottom yet to be installed and that, because of this, we did not need to wallpaper exactly to the top or bottom. But, we also wanted a substantial amount of our wallpaper squares to show at the top and bottom, and we also assessed how the wallper would “wrap” to the next walls. Based on these triangulations, Denise — who was a superstar in these calculations — identified where we could start. As you can see if you count squares top-to-bottom in my photos, my ceiling is just over 7′ tall. So we were kind of lucky in that our squares are pretty much centered vertically — although as I recall we nudged the square upward just a bit to account for the wider trim tile along the floor. I am sorry if you are confused by all this. Basically: How big are your squares? How big is your wall? Where do you start the squares in order to get a pleasing design/repeat on your walls, taking trim into account as well.
 Special tip two: Use a level to ensure each row is level

Denise was fantastic about constantly checking every row to ensure it was level. The room was crazy enough that if the rows were to get out of level, it would be bad. I wanted to be inspired — not seasick — in the room. That’s Bug, her mini schnauzer helping for a few minutes.
Special tip three: Get a friend to help
While the application of the squares was what I’d call technically easy, it was tedious. It took about 50 hours — and that does not include the time I spent priming and sizing. Get a friend to help! This also worked well because Denise and I split duties in a way that kept the job moving. I selected the order of the squares and prepared them with wallpaper paste. She put them on the wall and also kept an eye on ensuring everything was level. We worked so well together — it was a dream!

Special tip four: Complete your rows top-to-bottom like typing a typewriter page. Don’t skip around.
See the photo above? We were not finishing each row then moving down to the next. (This was my fault.) This ultimately caused problems, because even though I was using a template to cut the wallpaper, each piece was sized a teensy bit differently based on the angle of my exacto as I cut. In addition, we were not butting seams — we had a bit of overlap. This meant that if you did not complete a row, but instead went back to fill in an “interior space” you could end up with gaps. This meant I had to run out of the room to cut a square slightly bigger; it was a serious pain especially as the project dragged on.
One last thought: Squares turned out great, but you could use this idea with any number of shapes
I used 12″ squares, but I also could have used 6″ squares or even 4″ squares. Oh my word, these sizes would just have taken use four to twelve times longer to hang. You could also hang your squares on the diagonal, like diamonds. You could cut harlequin-style diamonds… rectangles like subway tile… even narrower strips. Really, you could make any type of quilt design — or mosaic design — with vintage wallpaper on your wall. It just depends on how epic you want to make it. 😉