

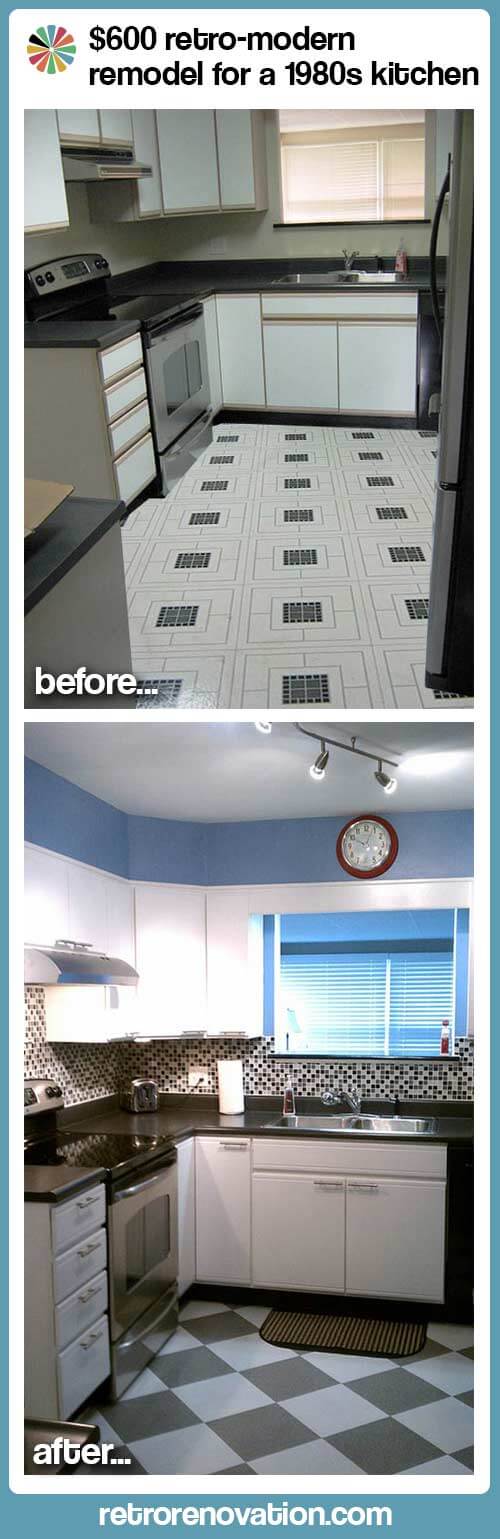
 What do you do when life hands you perfectly functional 1980s kitchen cabinets — in a 1952 house? Susan turned to the thrifty remodeler’s #1 weapon: Paint. Specifically, she used Rust-Oleum Cabinet Transformations to give her 1980s melamine kitchen cabinets a new, retro-modern vibe. Amazing how modern those 1980s kitchen cabinets look when painted out. And, yes, Susan tells us painting the melamine worked — the brush strokes even look like wood grain, she says. Susan used a similar DIY formula to freshen up the bathroom. Let’s take a look at both of her thrifty before-and-after remodels –>
 Susan — a long-time renter — recently finally found the house of her dreams in a 1952 red brick ranch in a great neighborhood. Isn’t it… perfect! The house was listed as a fixer upper — but that didn’t intimidate Susan, who had been a DIY apprentice to her dad.
Susan writes:
In 2010, after many years of renting, I was tired of never being able to make a place my own and decided to buy a house. I’ve always been a handy gal, having helped my dad with many basic carpentry, electrical, and plumbing projects, so I wasn’t afraid of fixers. When a two-bedroom, 1952 red brick ranch in a fantastic neighborhood came on the market, I jumped at the chance to take a look.
The house had belonged to a local family for nearly 50 years, but had been a rental for about half that time before sitting empty for two years. Neglected, it needed a lot of updating but had good bones: huge living room windows, gorgeous oak hardwoods, sunroom with 18 original awning windows and jalousie door, and a half bath with original yellow and maroon wall tile.
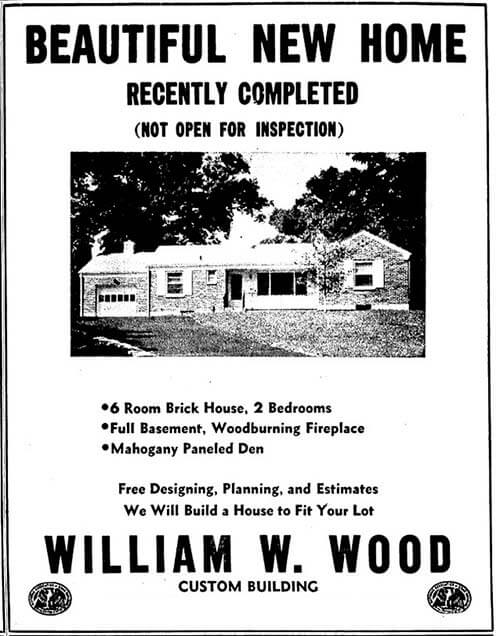
I was in love! Shortly after moving in, I found the original builder’s advertisement featuring my house in a local newspaper. Sixty years later, the outside is relatively unchanged, save for the loss of the charming garage cupola and the delicate little tree which is now a towering oak!
Inside, however, was a different story. The mahogany paneled den had been painted, and one bath and the kitchen had been remodeled in the 1980s, complete with white melamine and pickled wood cabinets and a peel and stick vinyl floor that had seen better days. The day I signed the papers, I started ripping out that tile! I knew I wanted to update the space, but I also wanted to keep some retro styling that fit with the age of the house, so I chose to go with a checkerboard pattern. I worried that traditional black and white would overwhelm the 10×10 room, so I went with gray and white instead. Working on a budget, I chose to put down inexpensive peel and stick I found on eBay as a temporary, but attractive choice; plus it was easy to trim pieces to fit with scissors.
I didn’t start renovating the rest of the kitchen until this past summer, when I had a large chunk of free time to tackle those cabinets! I was sure I wanted to go with white because light and bright would work better in the small space. Plus, the backsides of the cabinet doors already were white, so that would save me from having to paint both sides.
I had worked with Rustoleum’s Cabinet Transformations on my oak bathroom cabinet with great results, so I was confident it would work well in the kitchen. The boxes were pickled wood veneer but in great shape, so they took the treatment without trouble.
I was surprised, however, at how well the melamine doors turned out! I did the same prep and application as I had for the boxes, using Pure White and a regular bristled brush to cover the fronts and edges. I got lucky that the color matched the backside perfectly. After two coats each of bond and top coats (I chose not to use the glaze), the final result gave the door fronts a wood-grain-like texture that blends well with the boxes.
I added stainless steel bar pulls, choosing to install them on the horizontal to match the groove along the tops and bottoms of the doors, helping hide some of the ‘80s style that lies beneath. It took about two weeks to get the job done, but it was well worth the time and effort.
Not long after I moved in, I had hired an electrician to replace an old flourescent light with an IKEA, retro-styled fixture that resembles the rocket-inspired taillights on a 1959 Cadillac Eldorado. The old hood range, on the other hand, sounded like a 747 when started, so I swapped it with a clean-looking and quiet stainless model. Since it’s unvented, installation was a snap—just a couple of wires and screws to take down the old one and put up the new. I painted the walls with a medium blue from Eddie Bauer Home called “Gingham,” which helped the tiles and cabinets pop without being too dark.
I chose American Olean’s Legacy Glass mosaic tile for the backsplash, picking up the gray floor, black counters, and white cabinets with their Delfino Black Magic pattern. It was my first tile installation, so I did a lot of internet research beforehand and read the company’s guidelines before starting. I moved the stove out of the way and mounted a cleat to the wall to make certain the tile stayed square and level where there was no countertop to guide it. Luck was on my side and I was able to install full tiles along both walls. I had to use glass nippers, though, to cut pieces to fit under the hood and the window opening over the sink, but had some trouble getting clean cuts. Fortunately, the window sill hides most of my mistakes. Tiling and grouting took two days and really transformed the feel, adding some real pizazz to the room! I used thinset made specifically for glass tile and unsanded grout that wouldn’t scratch, making sure to clean off the grout before it dried, or else I would have been chipping and chiseling for hours!
A few red accent pieces—a Sterling & Noble retro-inspired clock from Target, coffee maker, and giant fork I spray painted—added some color, contrast, and whimsy. Thanks to some closeouts at Lowes, I was able to pick up a new refrigerator and stove for about $1100, keeping the existing dishwasher and black laminate countertops, both of which were in good condition. My next step is to leaf through several 1952 House & Garden issues I got from eBay for an advertisement or two I can frame and hang that will help tie everything together. All told, I spent three or four weeks’ time and approximately $600 (without appliances) transforming my kitchen from dated 1980s to retro-modern 2013!
Here’s the materials and cost breakdown:
- Rustoleum Cabinet Transformations in Pure White, Lowes: $79
- American Olean Glass Tile, Delfino Black Magic, Lowes: $144
- Valspar paint, Eddie Bauer Home “Gingham,” Lowes: $33
- Gray and White floor tile, eBay: $36
- Gatehouse satin nickel bar pulls, Lowes: $70
- Whirlpool under cabinet range hood, Lowes: $99
- Leding ceiling light, IKEA, $30
- Supplies (brushes, thinset, grout), Lowes: $125
- Grand total: $616
Susan also remodeled her bathroom using similar techniques on a similarly tiny budget. She writes:
I also made over the bathroom in a similar style and on a small budget ($500).
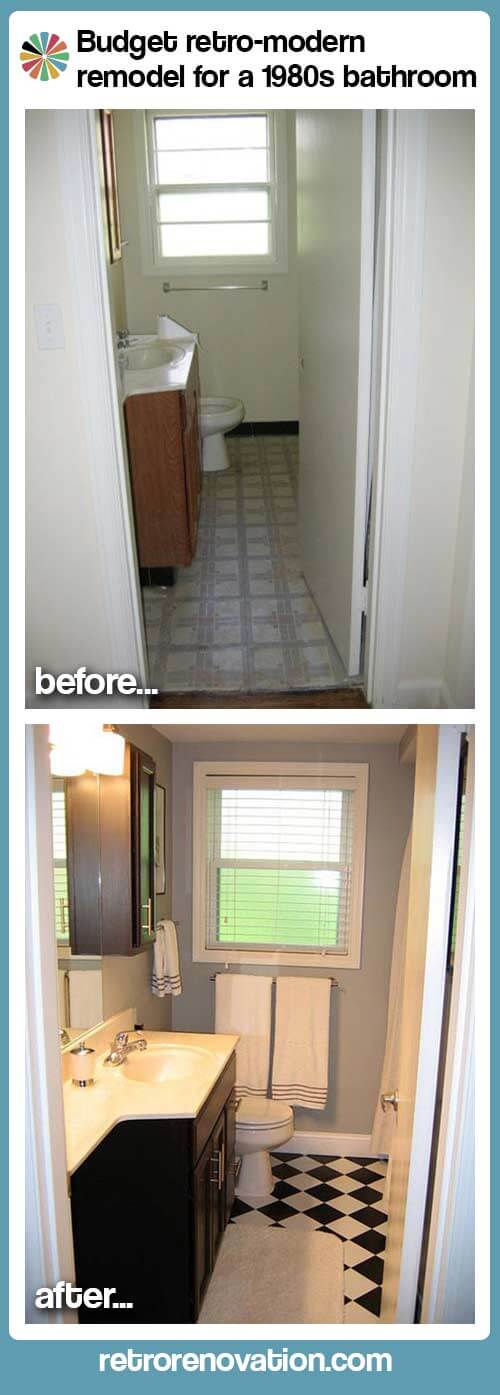
Above: Susan’s bathroom before … and after.
Susan — what an adorable home you have. The best part is that you used affordable resources and your know-how to transform both your kitchen and bathroom from the marred by abuse state they were in — to their present cheery and clean state. Congratulations on a job well done — and thanks so much for sharing your story and photos with all of us.


Greeney says
I love this, Susan! I wonder how you transformed the bathroom so beautifully, how you stained the wood to look so rich and beautiful. Our bathrooms are oak, as your original bathroom looked to be, and I would love to know how we can stain them darker.
Jamie says
Love it! Simple updates to get that hint of a vintage vibe without ripping out everything and going SUPER RETRO!
Angela Speiser says
Wonderful remodel that would make anyone excited to live in this house…I’d love to see the other rooms as you complete them too.
Congratulations on a marvelous job!
Jordanna says
Checker-board floors never fail to make me happy – easy to source, classic, cheerful, and not too plain and not too fussy.
That said, I haven’t seen too many grey-and-white and I must say – I love it!
I love the kitchen has some colour without being MARRIED to a particular colour – the blue is not expensive and permanent at all, and I think that sort of flexibility can be brilliant.
Diane in CO says
Very impressive, Susan! You have great taste and sense of style. I would love to see more of your home.
nina462 says
Sweet job!
tammyCA says
Such a charming house. I can’t imagine why it would sit empty for 2 yrs if it is in a great neighborhood? Guess it was waiting for the right person. I remember cabinets just like them in the ’80s apartment we lived in back then. That’s one decade I never want to see repeated in decor (ha, I was one of those who had country blue/mauve, geese things and cut out heart pine shelves & baskets of dried flowers).
Patty says
Likely it was part of an estate and the heirs couldn’t agree or decide how to proceed – or there was a paperwork issue.
Patty says
I don’t see the big grey fork?! Pictures, please.
Roberta Lee says
Thank you so much for posting this! We looked at (and did not buy) a 1940’s house that had those 80’s kitchen cabinets, and I researched how to use the same products to send them Back To The Past. We found a house we liked better, but it is wonderful to know I could have made a similar change to that other great old house. This is inspirational; kudos!
Randerson says
Wonderful job on a tight budget, we can so relate to that! The crowning kitchen touch would be a ’50s vintage White range – they’re on CL all the time, often in the free to $200 price range, we see real beauties on a regular basis. You can’t beat the cool look and the build quality of the ranges from the ’50s, and they are a delight to cook on everyday… we do!