Mary Elizabeth’s year-long, little-by-little 1959 pink bathroom restoration
Kate - Updated: June 5, 2021
Retro Renovation stopped publishing in 2021; these stories remain for historical information, as potential continued resources, and for archival purposes.
Reader Mary Elizabeth has been a frequent commenter here at Retro Renovation over the last year. We first discovered her through a comment she left on SaveThePinkBathrooms.com:
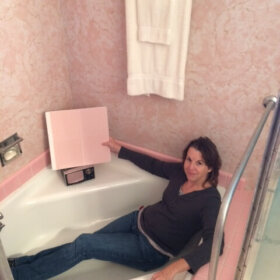
Mary Elizabeth being a bit camera shy with the help of some birds.
My husband and I did it backwards–we lived in a condominium for 30 years, then bought a 1959 ranch house for our retirement. We bought it from the daughter of the carpenter who built it for his family. We worked to save what was left of the gray and pink bathroom, complete with old pink tub, PLASTIC tile walls and ceramic tile floor. Unfortunately, the toilet and sink were gone. I spent many an hour peeling off the loose tiles around the tub, cleaning off the darkened mastic, and gluing them back with caulk. I found a pink striped shower curtain and shade at a curtain store and topped the shade with a flowery swag with lots of pink. At some point I’d like to replace the tub with a new one, but it’s hard finding pink tubs in new or like-new condition.
Its been about a year since Mary Elizabeth and her husband started down the long road of restoring their 1959 pink and grey tiled bathroom — and all along, Mary Elizabeth has been sending me updates about their progress, solutions and finds. Their pink and grey bathroom has evolved during this time — and while they originally wanted to get rid of their plastic wall tiles, they have now repaired and embraced them. How’s that for “Love the House You’re In?”
Step 1: Making the bathroom more user friendly
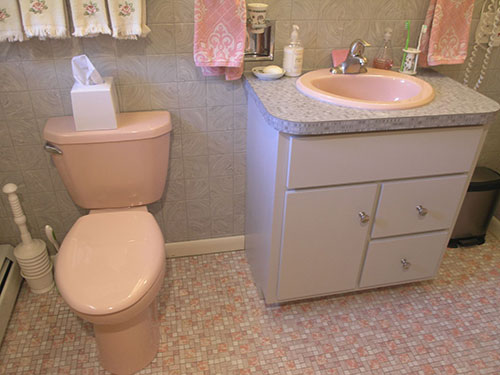
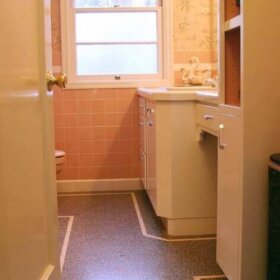
A shot of Mary Elizabeth’s bathroom about a year ago — with quick fix new vanity.
Shortly after Mary Elizabeth’s first comment, I contacted her to see if she would be interested in having her bathroom featured in a story. She happily agreed, but it seemed every few weeks, she would further tweak the bathroom. It wasn’t until just recently that she called the project “done” more or less. The biggest changes to the space over the last year have involved the vanity/sink and toilet. At first they had to quickly replace the sink and vanity to make their only bathroom usable. Mary Elizabeth wrote:
This bathroom is definitely a work in progress. Because the house had only one bath before we built an addition, we had to work quickly before we moved in to make the bath usable. The pink toilet and sink were long gone before we bought the house, although the original pink tub and pink and beige ceramic floor tile remained. The vanity that was there had water damage, so we had to replace it with something. (The bathroom is very narrow, so the vanity we installed is only 19 inches deep.)
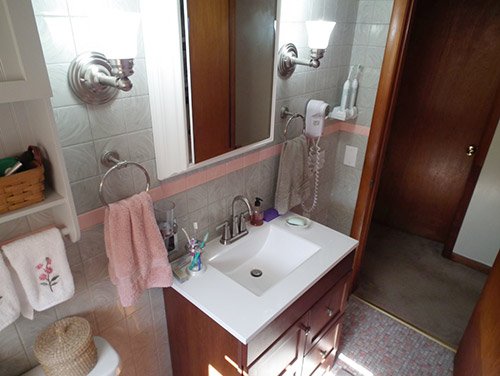
The older lighted mirrored medicine cabinet was in bad shape, was the only source of light in the bath, and had no electric outlet for a hair dryer or shaver. So we had to replace the cabinet with a new one and add the lights and a new electric outlet. The little hanging cabinet is was built for our bath in our old condo, so I just found a paint color similar to the wall tile and repainted it. I restored the plastic tile as best I could–and the original owners had left a nice stack of new leftover tile for us–but our future project is to replace it with ceramic tile, continuing the pink and gray theme. I think the floor is in good shape, but I’d like to clean up the grout a little more and have yet to find the perfect product for getting stains out.
Studying my books and old Crane and Kohler catalogs, some on this site, I have noticed that white fixtures were often mixed with the colored wall tile in many forties, fifties, and sixties bathrooms, so I think I will go with white. Because we prefer vanities to freestanding sinks, I am going to design a new mid-century-style vanity based on those in books and catalogs and have Bruce build it.
Step 2: More repairs, a pink toilet seat, and a pink painted vanity
A few months later, I heard from Mary Elizabeth again:
Hello, Kate!
I am attaching seven new photos of our updated pink-and-gray bathroom renovation. We were busy during Blizzard Nemo, as we had power most of the three days we were stuck inside.
This photo shows the 1959 Briggs Venetian Pink tub and gray and pink plastic tile that started it all. Now that I have polished up the tub with Kohler K-P1888-NA Cast Iron Cleaner 227 g/8 o.z.(*affiliate link) and Bruce has added a new faucet and shower controls, he is convinced that the tub will go another 50 years and he doesn’t have to rip it out. As our dads used to say, “If it ain’t broke, don’t fix it.” (Keeping the tub is a big deal for us, saving a bit of architectural history, saving him a lot of grief and saving us a bunch of money.) You will notice in the corner a simplehuman Adjustable Tension Shower Caddy, Stainless Steel (*affiliate link). That we got almost as soon as we moved in, June 2011, because the bath alcove doesn’t have a single cubby for soap, shampoo, etc. If you buy one of these vertical tension caddies in any brand, read all the reviews and wild stories on line. Some of the cheaper ones don’t stay put and collapse at inconvenient times. And if you are saving a pink bathroom instead of buying all new fixtures, you can afford a nice shower caddy.
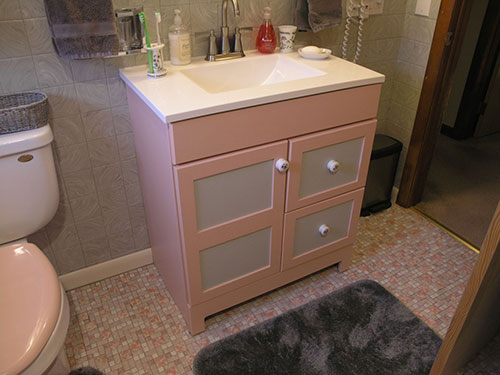
In an attempt to make the modern vanity fit into her retro bathroom, pink and grey paint and new knobs were added.
The wood vanity was put in as a stopgap measure, as the old one wasn’t original and wasn’t in good condition. Eventually, we will replace it with a mid-century modern style vanity we will design and build. But we are holding out for a salvaged sink in Venetian Pink (or Bahama Pink or Blossom Pink in other manufacturers’ palettes). The white toilet was new when we moved in, but we have ordered a custom color Bemis toilet seat to match the tub.
Here is where Bruce spent most of his time during the blizzard. Although I had taken off, cleaned, and replaced most of the tile around the tub, there were a few spots where corners were popping off. He started out by thinking the faucet and shower controls were putting too much pressure on the tile, but when he removed them and started taking off tile, he discovered about a 4 x 4 foot area where the sheetrock had got wet and mold was starting to grow. So he ripped out that square (and of course double wrapped it in plastic and went right to the trash can in the garage with it) Then he mended the wall with a piece of sheetrock (yes, salvaged from another project, as usual, and conveniently stored in the basement, so even though we couldn’t go out to the hardware store for anything, we had it all here). Bruce cleaned the glue off the tiles by soaking in mineral spirits, primed the piece of wall, made sure the edges were even, and replaced all the tile. I discovered that mineral spirits works to remove whatever brown glue someone used to replace loose tiles. We think it was Goop or rubber cement. We still have a stack of new tiles the former owner left us, so anytime we have broken a tile in our enthusiasm for renovation or cleanliness we have been able to replace it.
Another discovery, during the week just before the blizzard. Bruce was replacing baseboard, and when he pulled it off, he discovered that the ceramic tile floor we thought was the original 1959 one was actually newer and had been installed over another earlier vinyl floor. And all Retro Renovation fans take note–Home Depot still sells this mosaic tile, which can be used on floors, as a wall accent or on on your vanity top! It is called “Merola University Pink Mosaic,” and it sells for about $10 per square foot. It looks fantastic with a light gray grout. It will fit in with a number of your pink bathrooms where some tiles have been damaged. After I cleaned the whole floor again, Bruce regrouted in places and it looks as good as new.
Step 3: Mary Elizabeth finds a pink sink
And then a few months later — Mary Elizabeth scored the sink she had been waiting for:
My latest news is that we are on the way to building a brand new vanity later this year, because we scored the very last Gerber oval Venetian pink (also by other names) new old stock bathroom drop-in sink in our favorite plumbing supply place in Connecticut.
Step 4: Finally “finished”: NOS pink toilet and sink, new vanity and countertop
After another month or so — presumably while Mary Elizabeth was convincing her husband to build a new vanity and countertop to house her vintage pink sink — she wrote again with more updates. Mary Elizabeth writes:
We finished (sort of) today!
Finally Mary Elizabeth found her Bahama Pink Gerber Toilet, pink sink and had her husband build a retro modern vanity and new counter that fits with the look of the bathroom.
I am attaching photos of my new (2013) Bahama Pink Gerber Toilet from Decor Island, my new old stock (1983) Venetian Pink Gerber oval drop-in sink from White’s Plumbing in West Haven, Connecticut, and my new (2013) Moen Adler faucet from Lowe’s. All are made in the USA, which in the restoration of the pink bathroom was a high priority for us. Only the retro-style cabinet knobs and full-extension drawer slides are made abroad.
My husband Bruce and I installed the toilet, and he built the vanity from my design, loosely based on some 1950s vanities I saw in books on ranch houses but adapted to our particular Shaker/Mission aesthetic that dominates the cabinetry in the rest of the house. The vanity is plywood, painted in Benjamin Moore Historic Color Stonington Gray, and the Formica top he made is in the 1950s-retro Gray Ellipse pattern. The top is curved to give us a counter that is wider than the old one and still allow clearance for the door. Also, it prevents grandchildren from putting out their eyes on sharp corners and clumsy me from bruising my hip on the vanity. 🙂 The current project cost us just under $800 in materials. The most expensive item was the toilet, a little under $400 delivered.
(Note — Kate thinks Mary Elizabeth’s tile is very similar to Merola’s University Pink tile shown above, but not identical. Perhaps her floor tile is a last generation replica?)
The lighting, electrical update, new shower/tub fixtures, towel racks, shower curtain, swag curtain, shade, medicine cabinet, and Simple Human shower caddy were all part of the emergency stuff we had to do when we moved in in 2011, so we didn’t count them in the budget for this project. Sometime between moving in and this project, I bought the Ralph Lauren Chaps towels in Peony Seashell from Kohls. They look just like the kind of towels my mother gave me to go away to college in the mid 1960s. The aren’t super-fluffy, but they are very absorbent. The shower curtain, shade, and swag curtain, also made in the USA, are from Country Curtains. The wall tile is 1950s Homart from Sears Roebuck, in Dove Gray and Malibu Pink, original to the house. The floor tile is Merola’s University Pink. It was installed by the daughter and son-in-law of the original owners sometime before we bought the house.
Done? Well, not quite: Mary Elizabeth points to one more item still on her pink bathroom restoration “to do” list:
Next up on our retro-renovation pink bath project: We had to replace the original lighted medicine cabinet, which had a cracked mirror and unsafe wiring, with an inexpensive temporary fix out of MDF (ugh!). Either we will design and build our own wood medicine cabinet or we will find a 1950s one in good condition that fits the hole in the wall. Even if we just find a mirror the right size, we can design the wood cabinet around it. You know we mid-century DIY folks always have to be looking for something.
This story is proof that doing a Retro Renovation can take time and sometimes tweaking initial choices to make the space user friendly, or waiting to find just the right parts make all the difference. Kudos to you Mary Elizabeth for your patience and determination. Your bathroom looks great and you’ve managed to save not only rare original plastic tiles — but also another pink bathroom.
I think pink & gray always go together. But, on my screen the tub looks more fleshy-colored. Isn’t the floor tile the same one Kate used?
Mary Elizabethsays
The tub, sink, and toilet are all about the same color in natural light–Venetian pink or Bahama Pink, depending on the brand. The tub is in a recessed alcove, of course, and a couple of months after we moved in, Bruce added a recessed LED light fixture because the whole room was so dark. I might not have turned on the light over the tub for that particular photo, or it might have been an earlier shot taken before we installed the toilet, vanity and sink.
The tub almost exactly matches the pink splotches on the larger squares of the tile. I think it is the same tile as Kate’s–she thinks it might be an earlier version of hers. (I believe the company has been making this series of tile since the 1980s.) Remember how when she was putting hers down she was careful to follow the directional arrows on the backs of the tile sheets? Well, I think my tile was installed totally at random, because I can outline each grouping of one tile sheet, but can’t find an overall trend.
pam kuebersays
Since the 70s!
Lisa Composays
That bathroom is delightful. It is so lovely to look at, just the right shades of everything to make it soft on the eyes. I am so glad things turned out so well for you. I would have made every effort to save everything, too. I am just that way. Enjoy it, you have worked very hard and it shows.
BTW..I saw this vintage tile on a site yesterday. It might be hard to track down because the poster didn’t leave a contact number (bet they wonder why they haven’t gotten any interest) but if someone is a good detective it might be worth the effort as it’s original.
Excellent retro tiles from the original Mosiac Tile company in Zanesville, Ohio. Still in original boxes. TWO BOXES OF VINTAGE OLD/NEW STOCK GREY MULTI MOSAIC TILE http://www.yowcow.com/listing/33416854/
Pegsays
Lisa, I bought those Mosaic Tile Company tiles from the seller! They are pristine. I am saving them for a new retro second bathroom we’re adding to our 1950 Cape. They are a very close match to the tile in our existing gray amd maroon bath. I even scored a gray toilet on craigslist. I just need a cool gray sink.
Mary Elizabethsays
Peg,
What a great find! Good luck with your second bath, and let us see it when it’s done.
Many thanks to all for your supportive comments and ideas.
Correction: Bruce reminded me that the full-extension drawer slides, which we use on all our cabinet projects, are a European design (Austrian), but actually they are made here in the US in a factory in North Carolina.
I might have the exact same tile in my kitchen! Someone drywalled over it, so it’s been damaged beyond repair, but if it’s the same stuff that you have and you need any extras, I’d love to put them to good use instead of throwing them out or re-entombing them in the wall.
Mary Elizabethsays
Wow, thanks! It’s always a good idea to have extra. I have a few extras of the gray left, but there was none of the pink trim. I put a search on eBay for about a month, and up came the pink, which is Frosty Pink, not Malibu Pink, as I had thought. A man had been hired to clean out a house that was being torn down (so sad when it comes to that), and he found the tile in the basement. In the original box. With the installation instructions, no less! And, even nicer, he said if it didn’t match I could send it back. Sweet guy.
Unfortunately I don’t have any pink trim. My kitchen had grey with black trim. My vestibule had pink field tile with burgandy trim, also destroyed by poorly installed drywall being glued and nailed on top of it. You can see a picture of it in this post: http://chadscrookedhouse.wordpress.com/2013/03/05/demo-begins/ Obviously what’s on the exposed brick wall is gone forever, but I have another similarly sized wall still covered up, and could also try to salvage what’s intact of those for a good home, in the off chance that you could cut down the 4×4’s to patch your trim.
Mary Elizabethsays
Thanks, Chad, but the way the tiles are made, the half tiles are fully finished all around to make a completely flush connection with the other full tiles, preventing water from getting behind them. You can only make a cut at a corner or at the floor, not where tile meets tile, if that makes any sense to you. But maybe someone else could use the full pink tiles.
Loved your photos of the demo. It makes our job of patching one wall in the shower look like child’s play. (Did not include ugly photos of that stripped shower wall when I sent photos to Kate.) Hope you are wearing particle masks when you do this stuff. God knows what toxins we are inhaling. What are you going to do now that you are down to brick?
Suggestion for removing multiple layers of paint from woodwork: Use a heat gun designed for the purpose. You can spend anywhere from about $35 for a multii-purpose gun to $400 for a large heat paint stripping kit. You will have to scrape off the paint after it softens, and you should wear a mask in case of lead, but it is safer than the chemicals. You can also use a heat gun to remove vinyl and plastic tiles. I think that hand rail is going to look gorgeous refinished, and the balusters will look good painted by contrast.
pam kuebersays
Precautionary Pam reminds: Test for vintage nastiness like lead in that thar paint first….
Hey, I don’t think my grey tiles are a match to yours after all, but I just got a photo of them. I’d call them damaged beyond repair, but you can see ’em if you click on my name, and 4 different wallpapers that used to be paired with them!
Thanks for the painting advice. Actually I’m in luck with that railing because there’s nothing but latex on it, unprimed right over the original varnish. It’s coming off in sheets.
Mary Elizabethsays
Thanks anyway, Chad. I have plenty of extra gray tile and pink tile for now, and I’m sure I will find some more New In Box before I need it. Good luck with your house!
Dawnsays
Hi….I just came across this story. I believe we have the same pink bathtub with the scalloped front. I want to verify that it is made by Briggs? We also have a matching pedestal sink. By any chance do you know the actual name of the color?
The home was built by my husband’s grandparents and we plan to move there in the next year. I am very excited about the bathroom!
I am having difficulty finding an old Briggs catalog finding the exact design to reference. If you know any additional info I would greatly appreciate it. Thanks!
Wow, so elegant, especially the curved vanity counter. That part is a detail that totally finishes the bathroom, The curve is a feature that I would never have thought of myself. I wish i’d seen this before I did my bathroom. And of course that Merola tile. Sheer heaven!
Fantastic job! Glad you kept the plastic tiles — you’d be hard-pressed to find anything as stylish and MCM as them in ceramic. And saving materials and $$$ is always the best way to go!
Heidi Swanksays
Oh! Mary Elizabeth, if you are still looking for a medicine cabinet to put in your bathroom, feel free to send me the dimensions of your hole. I salvaged a couple vintage cabinets from a house in my neighborhood that got gutted. I’d be more than happy to pass one of them on to you.
Mary Elizabethsays
Wow, very nice offer, thanks. How do we do this?
Heidi Swanksays
Email me at heidiswank at yahoo with your measurements and I’ll check them against what I have.
Heidi Swanksays
Lovely lovely bathroom! In the next couple months, we will be putting the same pink floor tile in our pink and brown bathroom. And we will be putting the formica in our kitchen, though in the lighter grey.


 Reader Mary Elizabeth has been a frequent commenter here at Retro Renovation over the last year. We first discovered her through a comment she left on SaveThePinkBathrooms.com:
This bathroom is definitely a work in progress. Because the house had only one bath before we built an addition, we had to work quickly before we moved in to make the bath usable. The pink toilet and sink were long gone before we bought the house, although the original pink tub and pink and beige ceramic floor tile remained. The vanity that was there had water damage, so we had to replace it with something. (The bathroom is very narrow, so the vanity we installed is only 19 inches deep.)
The older lighted mirrored medicine cabinet was in bad shape, was the only source of light in the bath, and had no electric outlet for a hair dryer or shaver. So we had to replace the cabinet with a new one and add the lights and a new electric outlet. The little hanging cabinet is was built for our bath in our old condo, so I just found a paint color similar to the wall tile and repainted it. I restored the plastic tile as best I could–and the original owners had left a nice stack of new leftover tile for us–but our future project is to replace it with ceramic tile, continuing the pink and gray theme. I think the floor is in good shape, but I’d like to clean up the grout a little more and have yet to find the perfect product for getting stains out.
This photo shows the 1959 Briggs Venetian Pink tub and gray and pink plastic tile that started it all. Now that I have polished up the tub with Kohler K-P1888-NA Cast Iron Cleaner 227 g/8 o.z.(*affiliate link) and Bruce has added a new faucet and shower controls, he is convinced that the tub will go another 50 years and he doesn’t have to rip it out. As our dads used to say, “If it ain’t broke, don’t fix it.” (Keeping the tub is a big deal for us, saving a bit of architectural history, saving him a lot of grief and saving us a bunch of money.) You will notice in the corner a simplehuman Adjustable Tension Shower Caddy, Stainless Steel (*affiliate link). That we got almost as soon as we moved in, June 2011, because the bath alcove doesn’t have a single cubby for soap, shampoo, etc. If you buy one of these vertical tension caddies in any brand, read all the reviews and wild stories on line. Some of the cheaper ones don’t stay put and collapse at inconvenient times. And if you are saving a pink bathroom instead of buying all new fixtures, you can afford a nice shower caddy.
Here is where Bruce spent most of his time during the blizzard. Although I had taken off, cleaned, and replaced most of the tile around the tub, there were a few spots where corners were popping off. He started out by thinking the faucet and shower controls were putting too much pressure on the tile, but when he removed them and started taking off tile, he discovered about a 4 x 4 foot area where the sheetrock had got wet and mold was starting to grow. So he ripped out that square (and of course double wrapped it in plastic and went right to the trash can in the garage with it) Then he mended the wall with a piece of sheetrock (yes, salvaged from another project, as usual, and conveniently stored in the basement, so even though we couldn’t go out to the hardware store for anything, we had it all here). Bruce cleaned the glue off the tiles by soaking in mineral spirits, primed the piece of wall, made sure the edges were even, and replaced all the tile. I discovered that mineral spirits works to remove whatever brown glue someone used to replace loose tiles. We think it was Goop or rubber cement. We still have a stack of new tiles the former owner left us, so anytime we have broken a tile in our enthusiasm for renovation or cleanliness we have been able to replace it.

My latest news is that we are on the way to building a brand new vanity later this year, because we scored the very last Gerber oval Venetian pink (also by other names) new old stock bathroom drop-in sink in our favorite plumbing supply place in Connecticut.
My husband Bruce and I installed the toilet, and he built the vanity from my design, loosely based on some 1950s vanities I saw in books on ranch houses but adapted to our particular Shaker/Mission aesthetic that dominates the cabinetry in the rest of the house. The vanity is plywood, painted in Benjamin Moore Historic Color Stonington Gray, and the Formica top he made is in the 1950s-retro Gray Ellipse pattern. The top is curved to give us a counter that is wider than the old one and still allow clearance for the door. Also, it prevents grandchildren from putting out their eyes on sharp corners and clumsy me from bruising my hip on the vanity. 🙂 The current project cost us just under $800 in materials. The most expensive item was the toilet, a little under $400 delivered.


Joe Felice says
I think pink & gray always go together. But, on my screen the tub looks more fleshy-colored. Isn’t the floor tile the same one Kate used?
Mary Elizabeth says
The tub, sink, and toilet are all about the same color in natural light–Venetian pink or Bahama Pink, depending on the brand. The tub is in a recessed alcove, of course, and a couple of months after we moved in, Bruce added a recessed LED light fixture because the whole room was so dark. I might not have turned on the light over the tub for that particular photo, or it might have been an earlier shot taken before we installed the toilet, vanity and sink.
The tub almost exactly matches the pink splotches on the larger squares of the tile. I think it is the same tile as Kate’s–she thinks it might be an earlier version of hers. (I believe the company has been making this series of tile since the 1980s.) Remember how when she was putting hers down she was careful to follow the directional arrows on the backs of the tile sheets? Well, I think my tile was installed totally at random, because I can outline each grouping of one tile sheet, but can’t find an overall trend.
pam kueber says
Since the 70s!
Lisa Compo says
That bathroom is delightful. It is so lovely to look at, just the right shades of everything to make it soft on the eyes. I am so glad things turned out so well for you. I would have made every effort to save everything, too. I am just that way. Enjoy it, you have worked very hard and it shows.
BTW..I saw this vintage tile on a site yesterday. It might be hard to track down because the poster didn’t leave a contact number (bet they wonder why they haven’t gotten any interest) but if someone is a good detective it might be worth the effort as it’s original.
Excellent retro tiles from the original Mosiac Tile company in Zanesville, Ohio. Still in original boxes. TWO BOXES OF VINTAGE OLD/NEW STOCK GREY MULTI MOSAIC TILE
http://www.yowcow.com/listing/33416854/
Peg says
Lisa, I bought those Mosaic Tile Company tiles from the seller! They are pristine. I am saving them for a new retro second bathroom we’re adding to our 1950 Cape. They are a very close match to the tile in our existing gray amd maroon bath. I even scored a gray toilet on craigslist. I just need a cool gray sink.
Mary Elizabeth says
Peg,
What a great find! Good luck with your second bath, and let us see it when it’s done.
David says
Wow, that’s a lot of pink!
Mary Elizabeth says
Many thanks to all for your supportive comments and ideas.
Correction: Bruce reminded me that the full-extension drawer slides, which we use on all our cabinet projects, are a European design (Austrian), but actually they are made here in the US in a factory in North Carolina.
Chad says
I might have the exact same tile in my kitchen! Someone drywalled over it, so it’s been damaged beyond repair, but if it’s the same stuff that you have and you need any extras, I’d love to put them to good use instead of throwing them out or re-entombing them in the wall.
Mary Elizabeth says
Wow, thanks! It’s always a good idea to have extra. I have a few extras of the gray left, but there was none of the pink trim. I put a search on eBay for about a month, and up came the pink, which is Frosty Pink, not Malibu Pink, as I had thought. A man had been hired to clean out a house that was being torn down (so sad when it comes to that), and he found the tile in the basement. In the original box. With the installation instructions, no less! And, even nicer, he said if it didn’t match I could send it back. Sweet guy.
Chad says
Unfortunately I don’t have any pink trim. My kitchen had grey with black trim. My vestibule had pink field tile with burgandy trim, also destroyed by poorly installed drywall being glued and nailed on top of it. You can see a picture of it in this post: http://chadscrookedhouse.wordpress.com/2013/03/05/demo-begins/ Obviously what’s on the exposed brick wall is gone forever, but I have another similarly sized wall still covered up, and could also try to salvage what’s intact of those for a good home, in the off chance that you could cut down the 4×4’s to patch your trim.
Mary Elizabeth says
Thanks, Chad, but the way the tiles are made, the half tiles are fully finished all around to make a completely flush connection with the other full tiles, preventing water from getting behind them. You can only make a cut at a corner or at the floor, not where tile meets tile, if that makes any sense to you. But maybe someone else could use the full pink tiles.
Loved your photos of the demo. It makes our job of patching one wall in the shower look like child’s play. (Did not include ugly photos of that stripped shower wall when I sent photos to Kate.) Hope you are wearing particle masks when you do this stuff. God knows what toxins we are inhaling. What are you going to do now that you are down to brick?
Suggestion for removing multiple layers of paint from woodwork: Use a heat gun designed for the purpose. You can spend anywhere from about $35 for a multii-purpose gun to $400 for a large heat paint stripping kit. You will have to scrape off the paint after it softens, and you should wear a mask in case of lead, but it is safer than the chemicals. You can also use a heat gun to remove vinyl and plastic tiles. I think that hand rail is going to look gorgeous refinished, and the balusters will look good painted by contrast.
pam kueber says
Precautionary Pam reminds: Test for vintage nastiness like lead in that thar paint first….
Chad says
Hey, I don’t think my grey tiles are a match to yours after all, but I just got a photo of them. I’d call them damaged beyond repair, but you can see ’em if you click on my name, and 4 different wallpapers that used to be paired with them!
Thanks for the painting advice. Actually I’m in luck with that railing because there’s nothing but latex on it, unprimed right over the original varnish. It’s coming off in sheets.
Mary Elizabeth says
Thanks anyway, Chad. I have plenty of extra gray tile and pink tile for now, and I’m sure I will find some more New In Box before I need it. Good luck with your house!
Dawn says
Hi….I just came across this story. I believe we have the same pink bathtub with the scalloped front. I want to verify that it is made by Briggs? We also have a matching pedestal sink. By any chance do you know the actual name of the color?
The home was built by my husband’s grandparents and we plan to move there in the next year. I am very excited about the bathroom!
I am having difficulty finding an old Briggs catalog finding the exact design to reference. If you know any additional info I would greatly appreciate it. Thanks!
pam kueber says
Hi Dawn,
Here are some old catalogs that may help you identify what you have >> https://archive.org/details/buildingtechnologyheritagelibrary?and%5B%5D=briggs+plumbing&sin=
Good luck!
Karin Jeffrey says
Wow, so elegant, especially the curved vanity counter. That part is a detail that totally finishes the bathroom, The curve is a feature that I would never have thought of myself. I wish i’d seen this before I did my bathroom. And of course that Merola tile. Sheer heaven!
Cindy says
Nice work!
When you mentioned cleaning grout, I wanted to pass this hint along: http://www.aberrysweetlife.com/2013/05/cleaning-tile-grout-with-carpet-cleaner.html
Mary Elizabeth says
Thank you, Cindy, for that great hint.
oh Holland says
Fantastic job! Glad you kept the plastic tiles — you’d be hard-pressed to find anything as stylish and MCM as them in ceramic. And saving materials and $$$ is always the best way to go!
Heidi Swank says
Oh! Mary Elizabeth, if you are still looking for a medicine cabinet to put in your bathroom, feel free to send me the dimensions of your hole. I salvaged a couple vintage cabinets from a house in my neighborhood that got gutted. I’d be more than happy to pass one of them on to you.
Mary Elizabeth says
Wow, very nice offer, thanks. How do we do this?
Heidi Swank says
Email me at heidiswank at yahoo with your measurements and I’ll check them against what I have.
Heidi Swank says
Lovely lovely bathroom! In the next couple months, we will be putting the same pink floor tile in our pink and brown bathroom. And we will be putting the formica in our kitchen, though in the lighter grey.