Robert and Caroline’s mid century home with dreamy St. Charles kitchen cabinets
Kate - Updated: August 30, 2021
Retro Renovation stopped publishing in 2021; these stories remain for historical information, as potential continued resources, and for archival purposes.
Robert and Caroline
By now, most of us have seen the inspiring photos from Sarah’s Gilbert Spindel round house, but did you know: Sarah’s parents also became new owners of a marvelous 1953 mid century ranch house last year. The house boasts many of the original details, including furniture and decor left by the original owner. And, when the kitchen and bathroom needed some attention before Robert and Caroline could move in, Sarah was able to give them some great decor advice and also point them in the direction of the many resources available here on Retro Renovation. The result: Another retro remodel well done.
Sarah writes:
It all started last Christmas, when my parents and I were invited to a new friend’s house for a party. Immediately my Mom and I started drooling over the architecture and period details in the house. The house was exactly my parents’ style. We joked with the owners that whenever they plan to sell in the future to give us a call. Little did my parents know that three months later that very call would come. Even though it was sudden my parents jumped on the opportunity. My parents ‘refreshed’ the kitchen and one of the bathrooms last year before moving in.
Model of the home 1953.
[The house was ] built in 1953 by an heiress to a lumber fortune. She had the house built with the best quality lumber, but insisted on planting no trees. Trees were simply for making money not enjoying. She only lived in the house for a couple of years before moving. She left everything. She took her clothes and a few personal mementos and left everything else! That is why a few pieces have been left behind from all of the past owners.
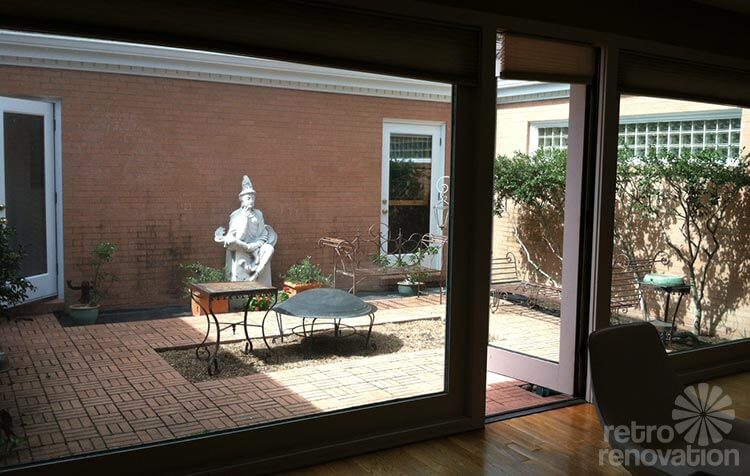
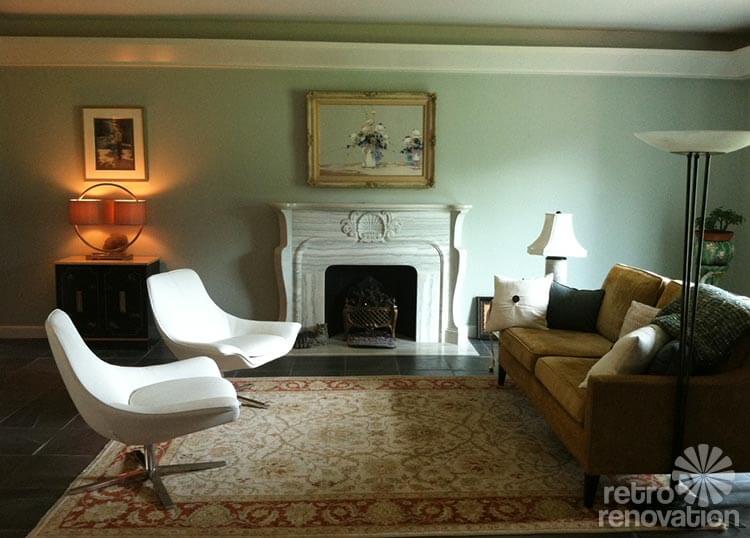
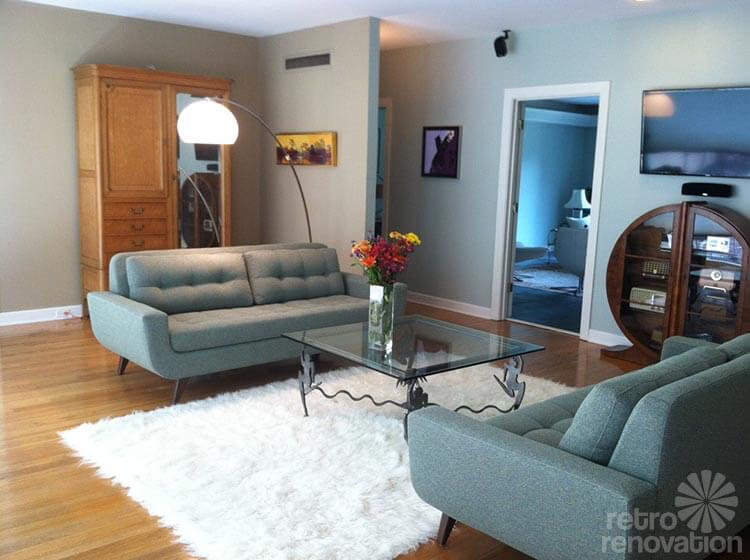
The house features a central courtyard with a beautiful marble statue of a ‘teaching Buddha’ that Mrs. McGehee may have bought or had commissioned along with the marble mantle in the formal living room.The shell motif on the mantle is also repeated on the original table and mirror sets in the entrance. The previous owners installed the slate flooring in the home, it was originally wall to wall carpeting in those rooms. According to those who remember, the house was originally mainly painted and decorated in green.
Although the paint colors have changed over the years, luckily for having had four or five previous owners, no major renovations were ever made to the house. The house was in overall great condition, it only needed a little bit of TLC.
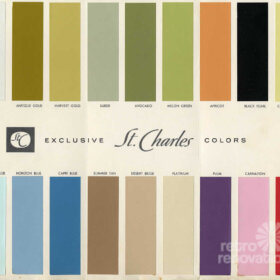
Kitchen freshening — original St. Charles steel kitchen cabinets
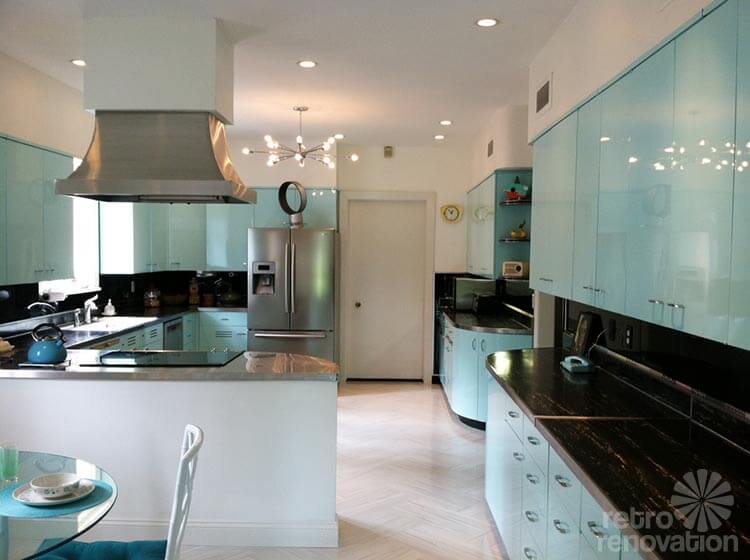
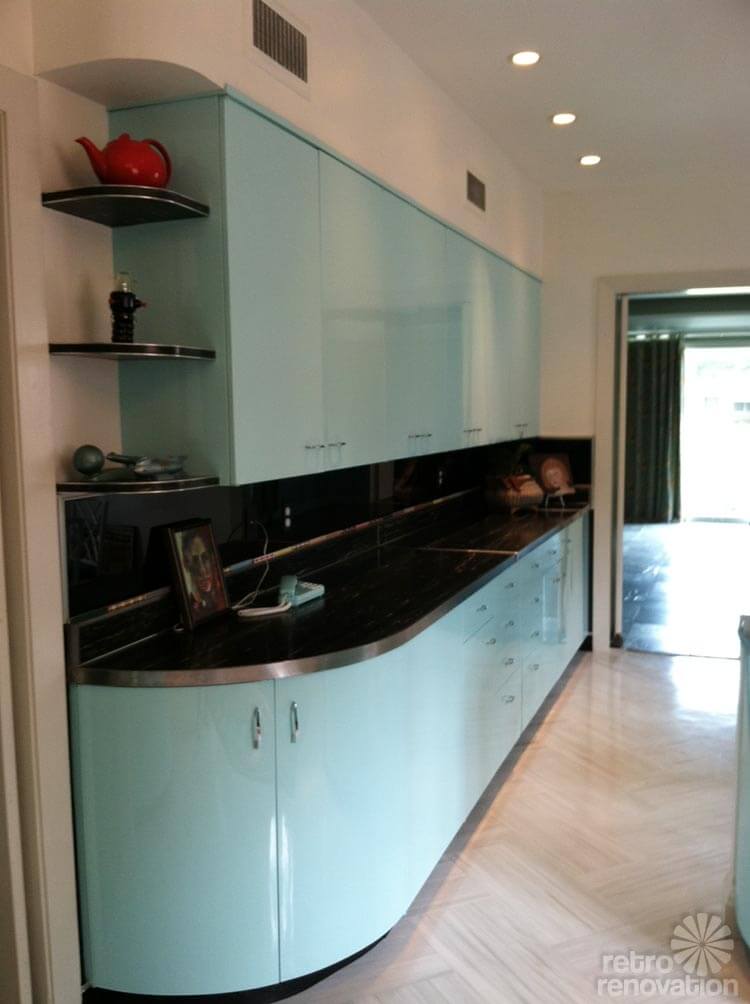
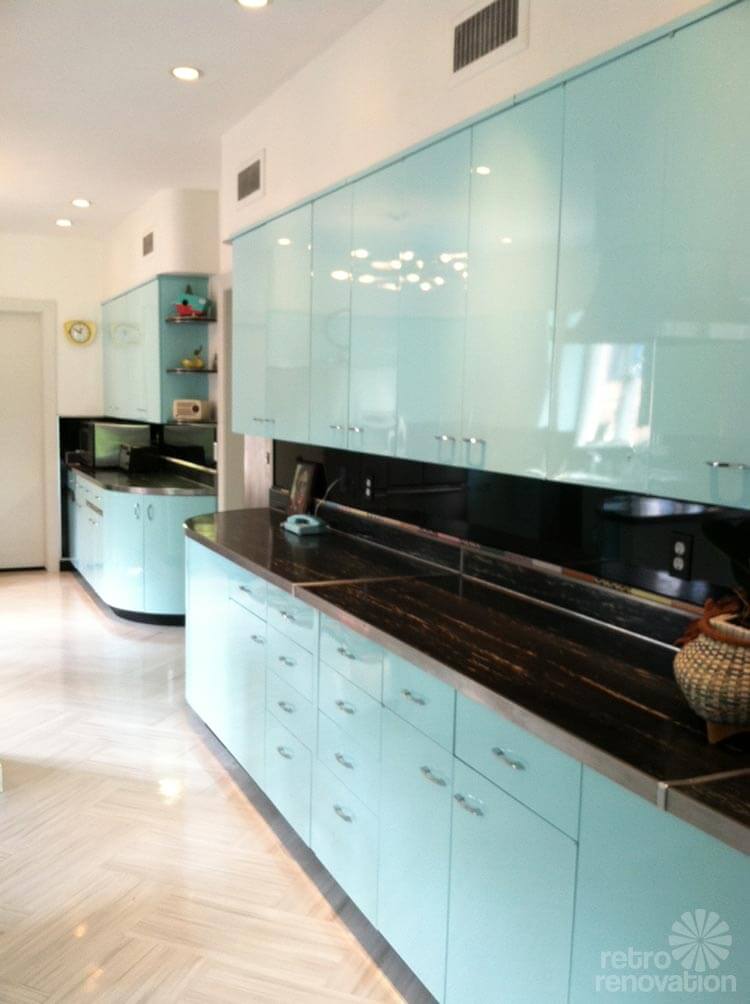
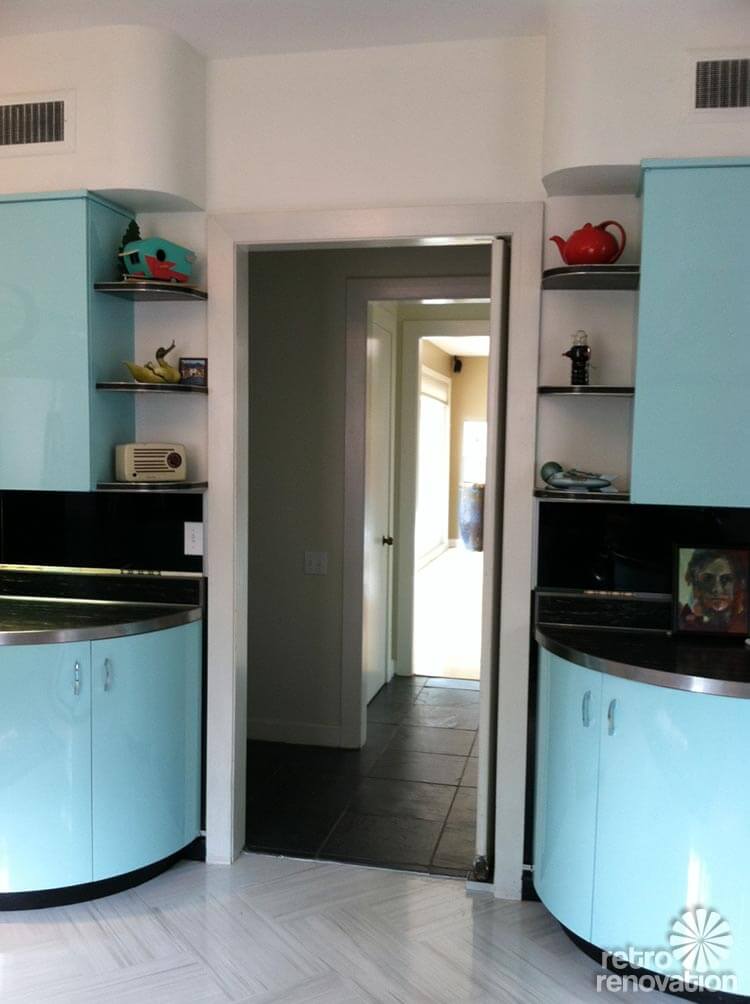
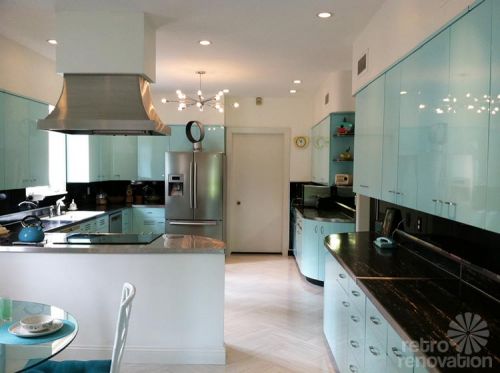
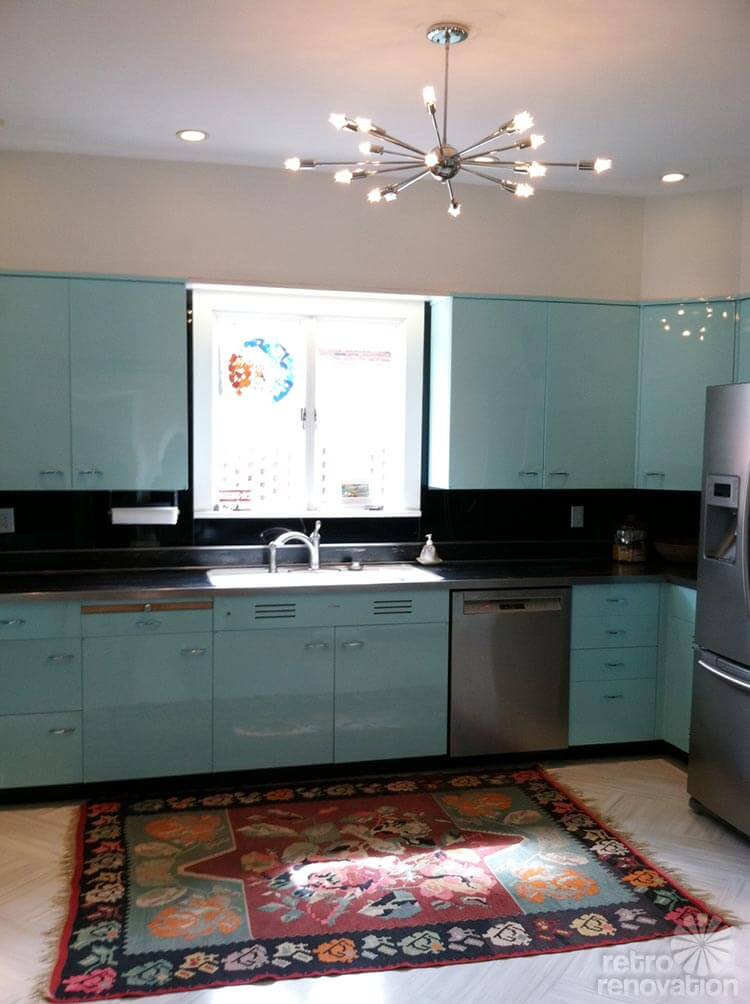
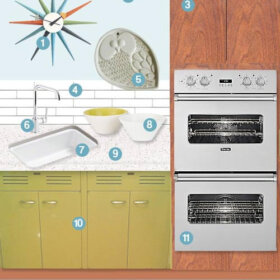
The kitchen is any Retro Renovation reader’s dream. 1953 St. Charles cabinets as far as the eye can see! This is a big kitchen by today’s standards, so I imagine that it must have been quite the show stopper in its day.
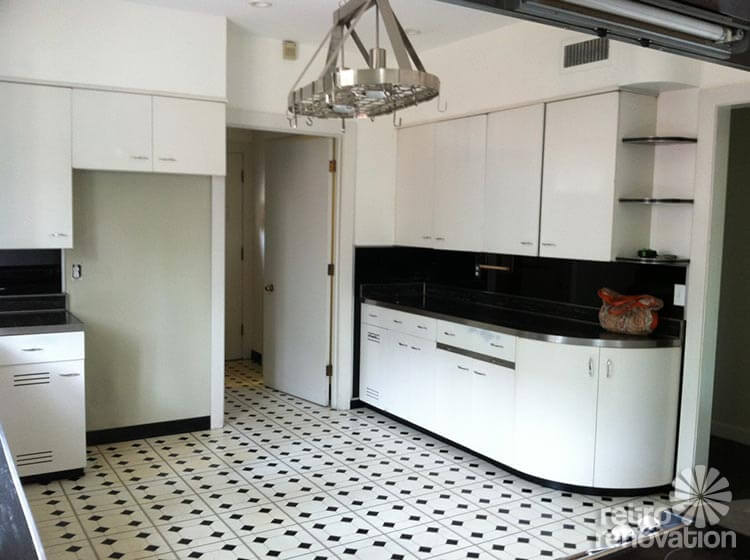
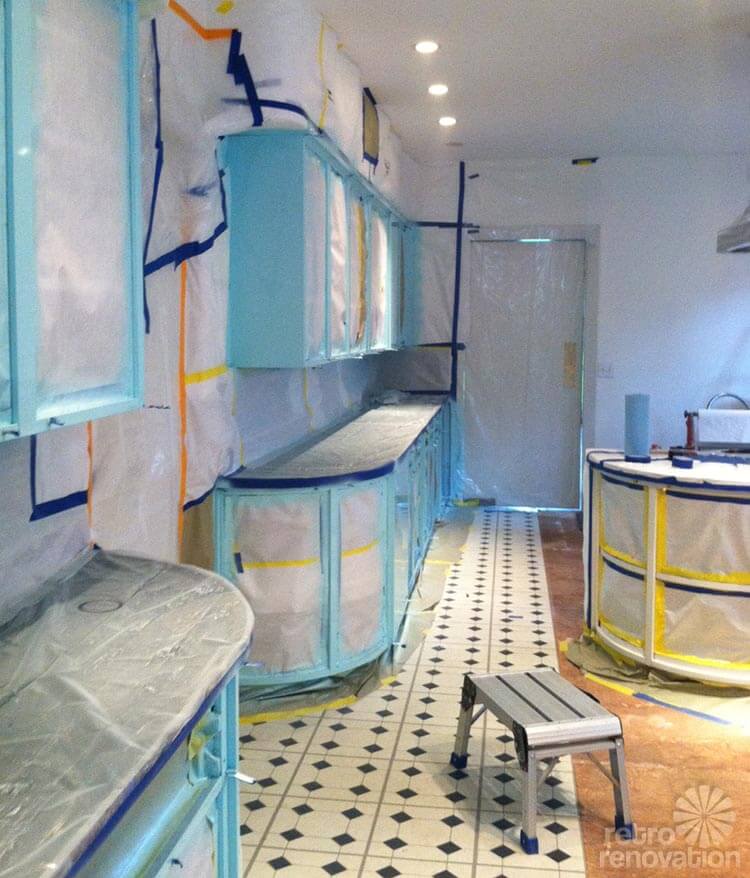
But after 60 years of daily use some of the original paint was worn down to the primer, especially around the handles. And the peel n stick vinyl floor was peeling up and needed to go.
Because I’m a regular Retro Renovation reader, I knew exactly what needed to be done. One of our friend’s husband is an auto body painter and was up for the job, even though he had never painted metal cabinets before. He and his friend worked on the project on the weekends. The doors and drawers were removed and painted at their booth. They also worked on any dents or warps. The cabinet boxes were painted on site. Everything was taped off and overall it didn’t create much of a mess. We used PPG auto paint and it really shines just like a new car off the assembly line.
Precautionary Pam pops in: Sarah and her parents used professionals; another reminder that when working with old materials, be sure to get with your own properly licensed professionals to determine what you are working with so that you can make informed decisions how to handle, become familiar with and use recommended best practices, and also learn about the proper disposal of debris, etc. Be Safe / Renovate Safe
We used Armstrong’s Striations line in the “atmosphere” color for the floor. It’s streaky like vintage VCT but comes in the modern 12″x24″ size. We experimented with about five different ways of laying out the floor tile and went with a herringbone pattern.
The floor was sealed and a matte coating applied.
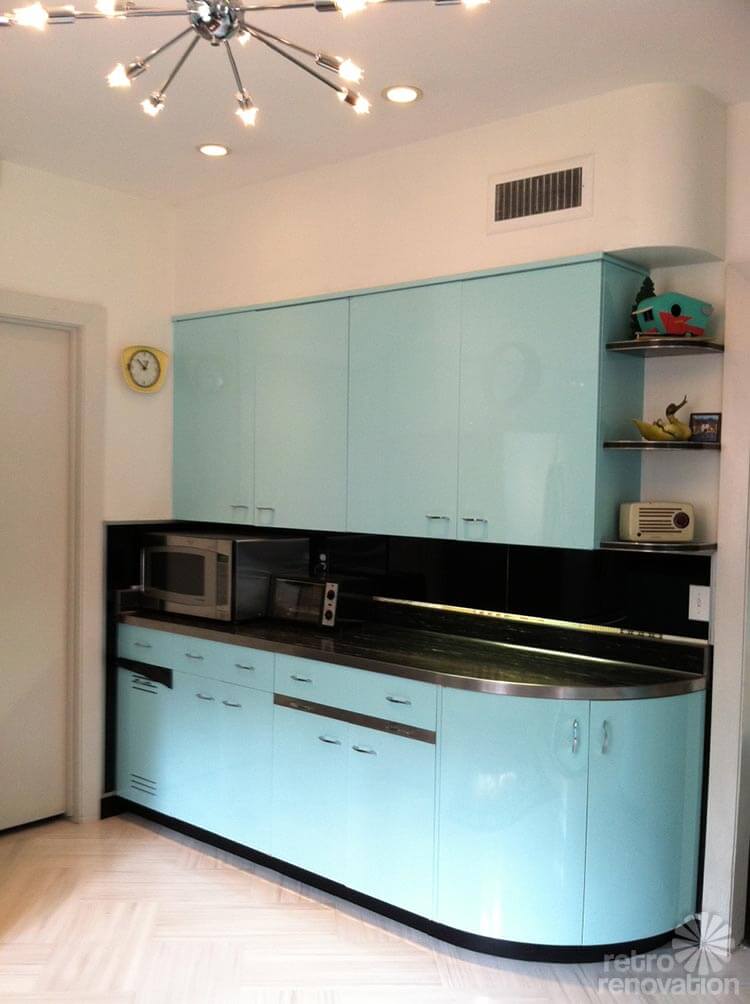
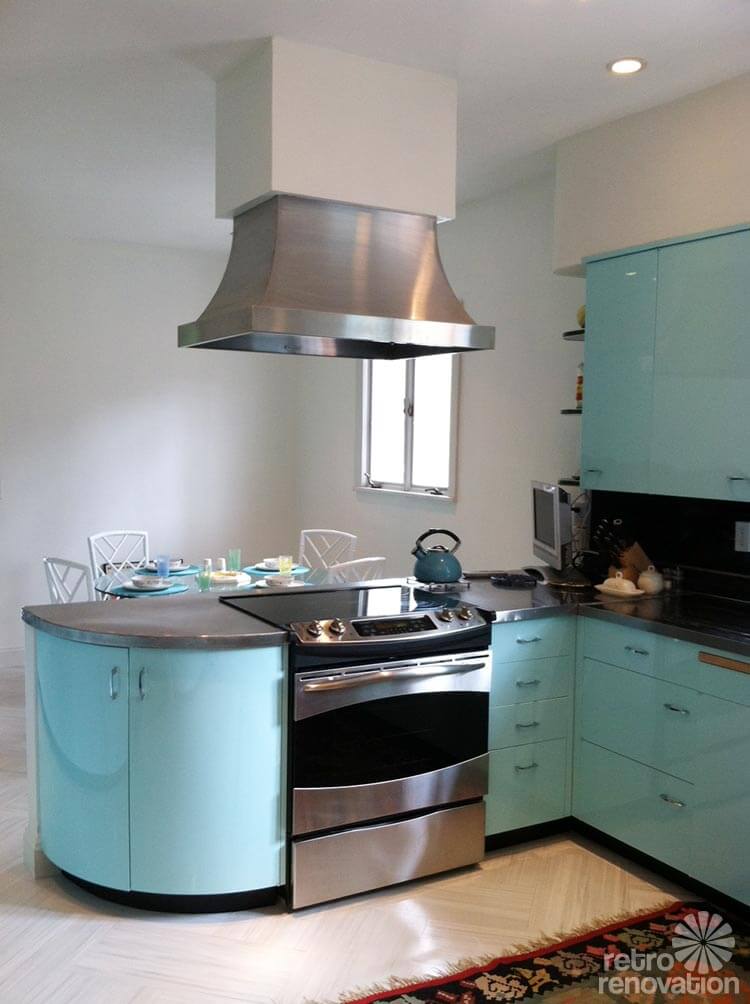
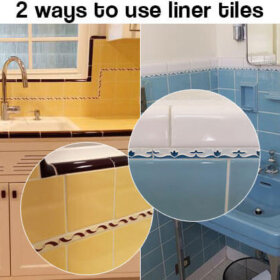
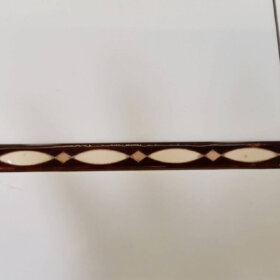
The countertop is the original laminate or maybe cusheen? Its a very thick laminate and it has a slight give, that’s why I think it may be cusheen but I have no basis of comparison. The stove area has a stainless steel countertop. The backsplash is the same material as the countertop, maybe 3 or 4 inches high, then edged in aluminum or stainless, then a solid black glass the rest of the way up. (all original) Mom placed the remaining liner tiles on that edge just for decoration, they aren’t secured.
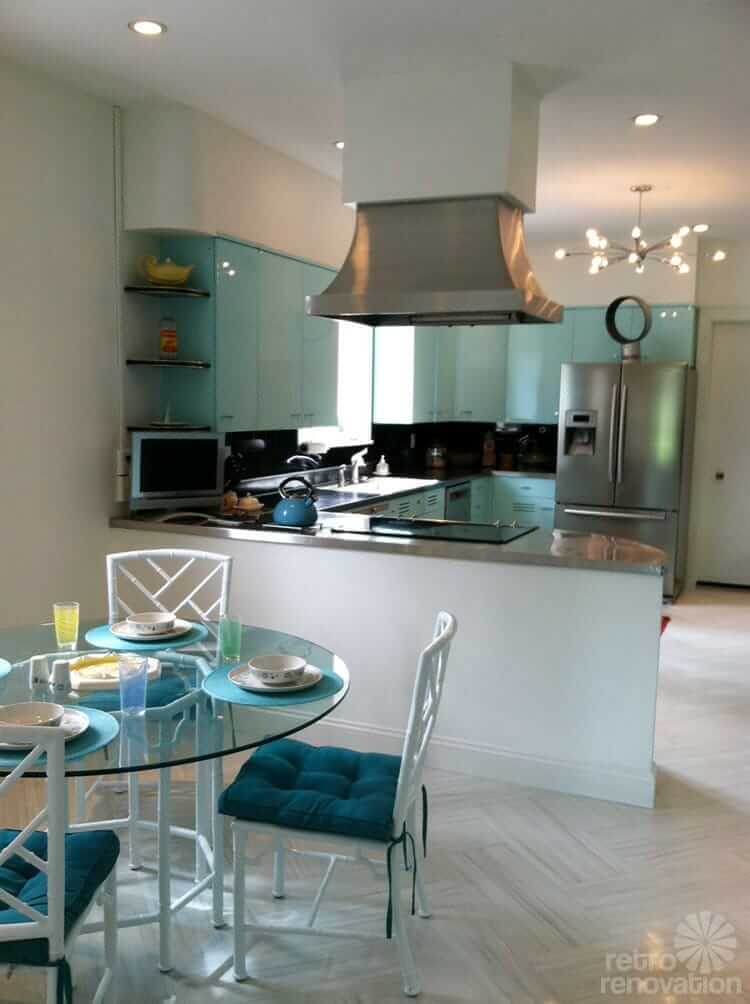
The vintage dining set is the same table and chair set that was in the kitchen on The Golden Girls.
The finishing detail was replacing the old light fixture for the new chrome Sputnik chandelier — which was purchased from Practical Props — a company I also found through Retro Renovation. The kitchen has endured 60 years of use and is now ready for 60 more!
Bathroom Remodel
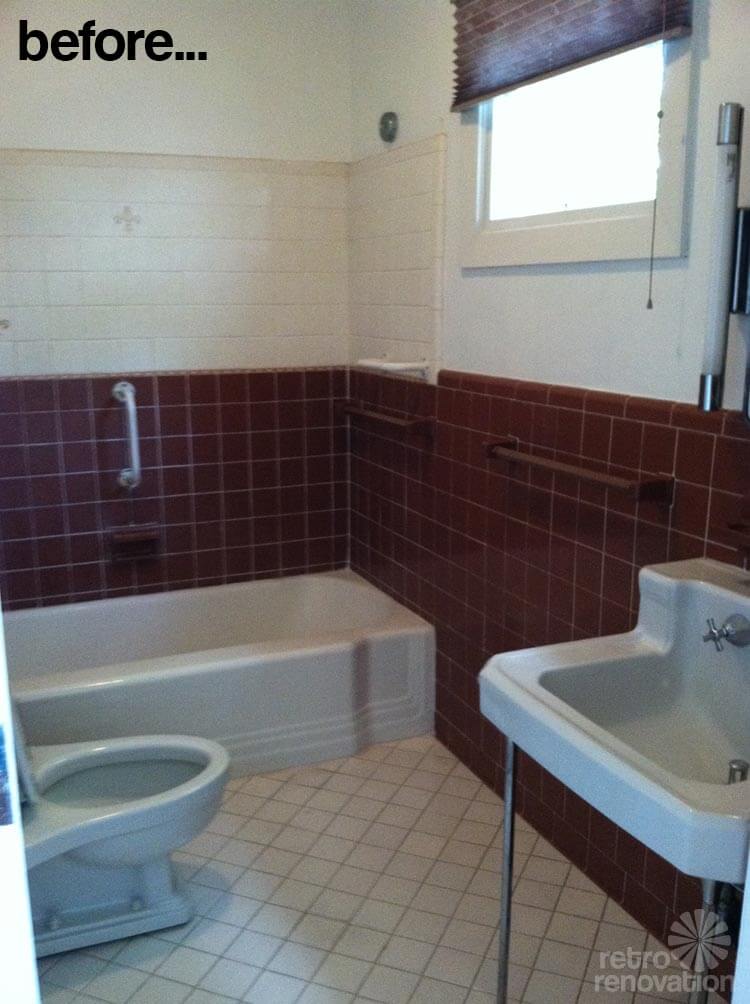
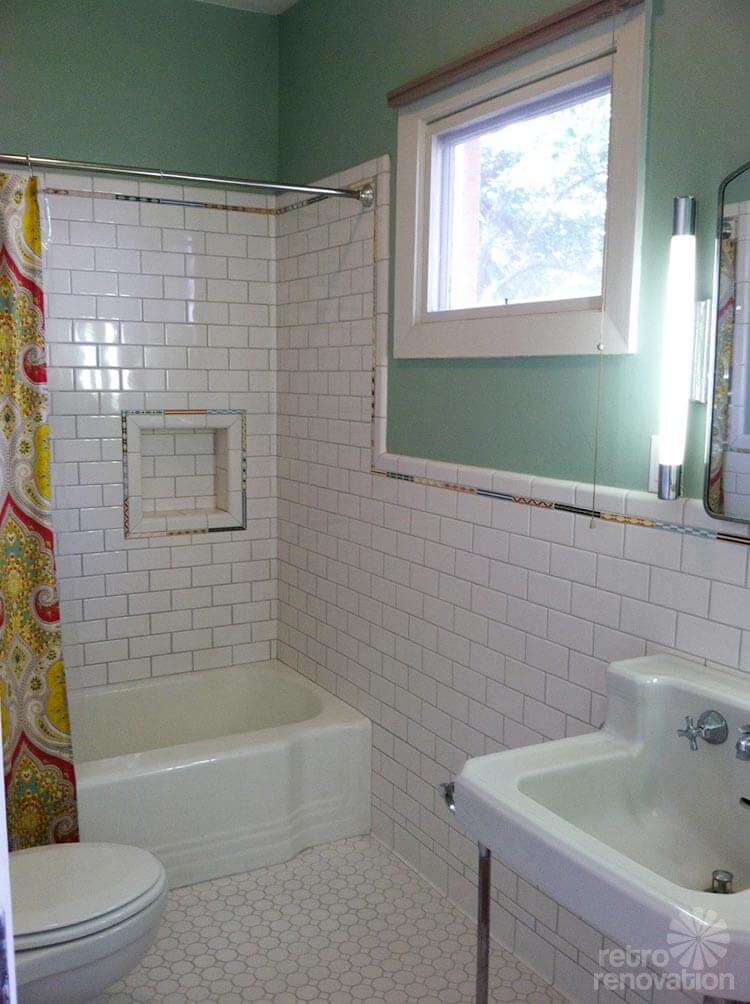
The house has 3 1/2 bathrooms. A bathroom for every bedroom, which must have been quite the luxury. All of the bathrooms were original and so unique but the brown and white bathroom left much to be desired. The brown tile seemed to have a permanent layer of hard water residue, some of the tiles were cracked and overall we weren’t fans of the color scheme.
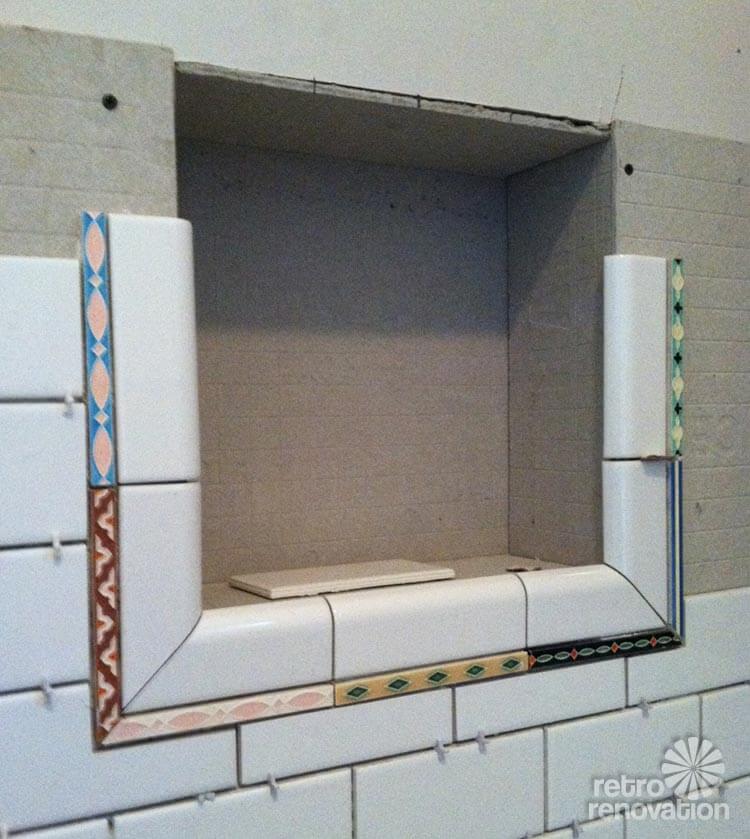
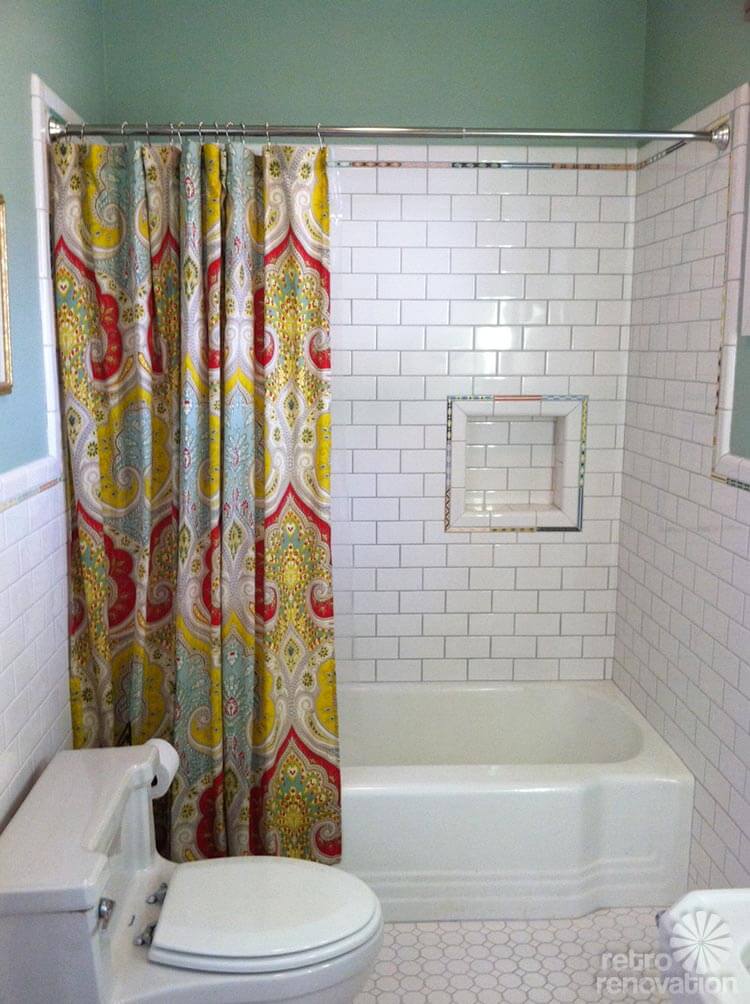
This is also the only bathroom with a standing shower, so it was going to be used the most. We decided to just redo the tile work and to keep the new look in style with the other bathrooms in the house. We kept the tub, toilet, sink and medicine cabinet as well as the layout. We tossed around several design ideas and shopped around town and the Internet for inspiration.
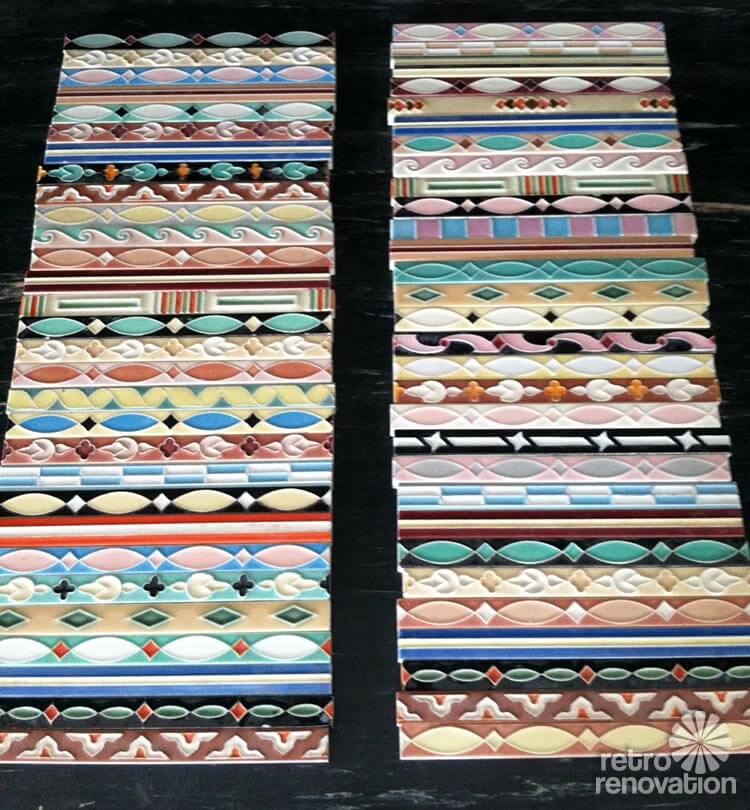
Sarah’s bird Basil also helped select the liner tile.
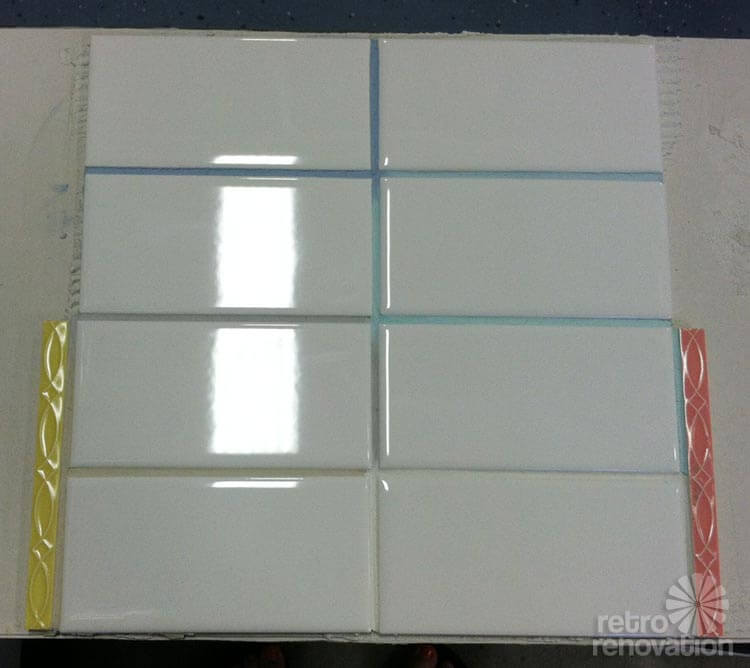
We sampled several colors of grout but went with light gray.
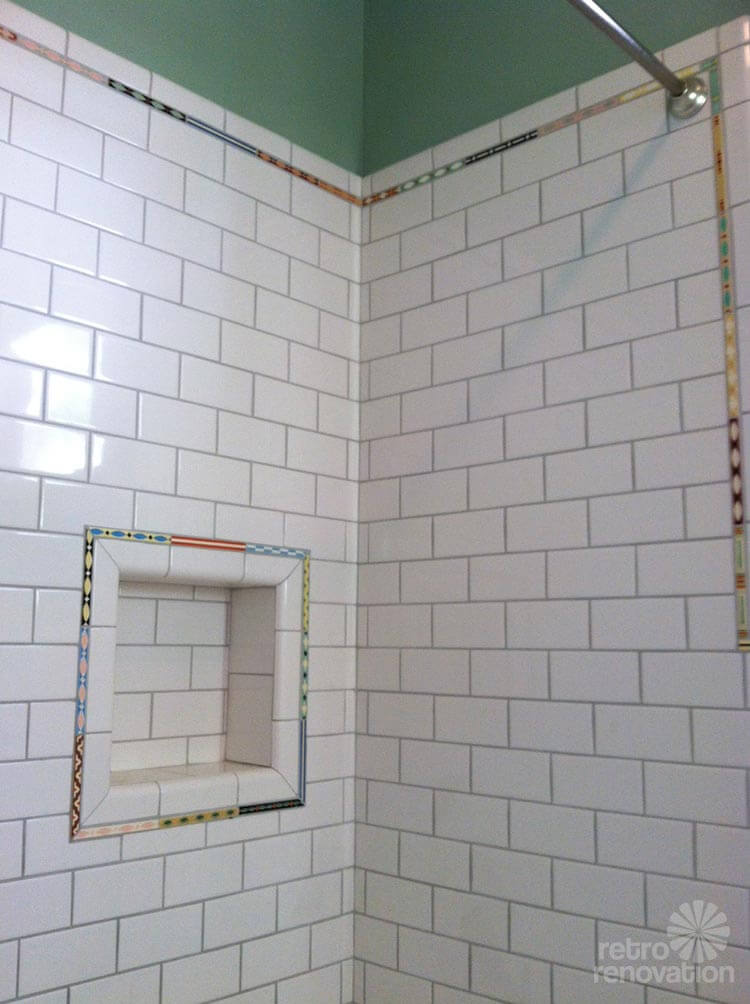
The advantage of using the white subway tile and bullnose is that it’s easy to find and relatively cheap. We pulled ours straight off the shelf at Lowe’s. Now the bathroom is very customizable. Just about any color can be pulled from the sizzle strips for wall and towel colors.
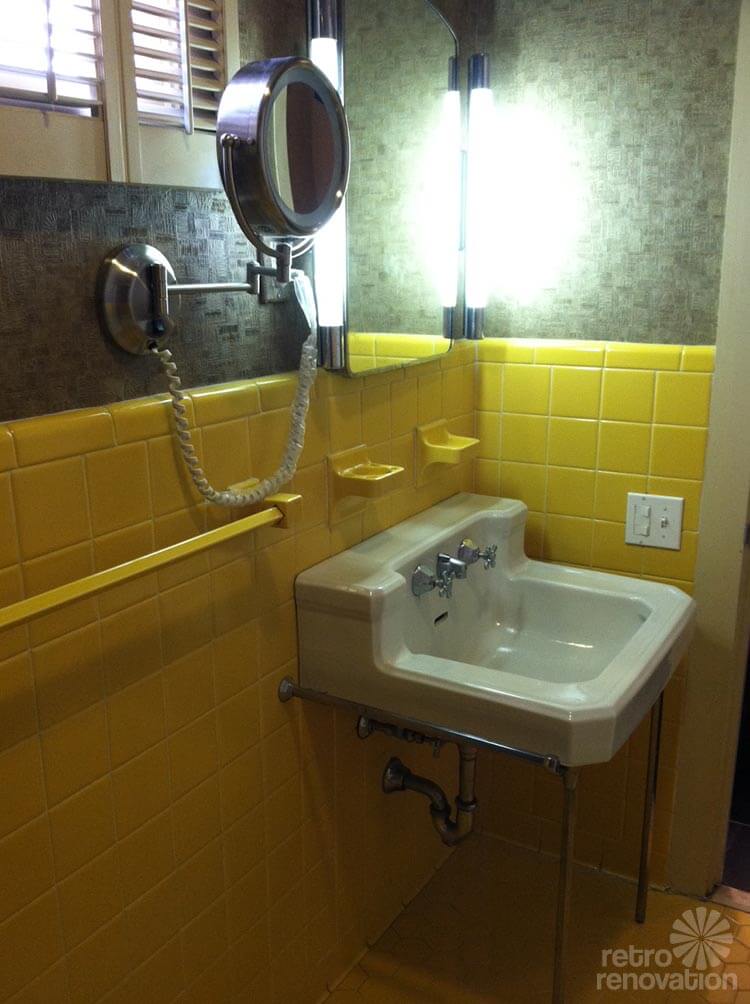
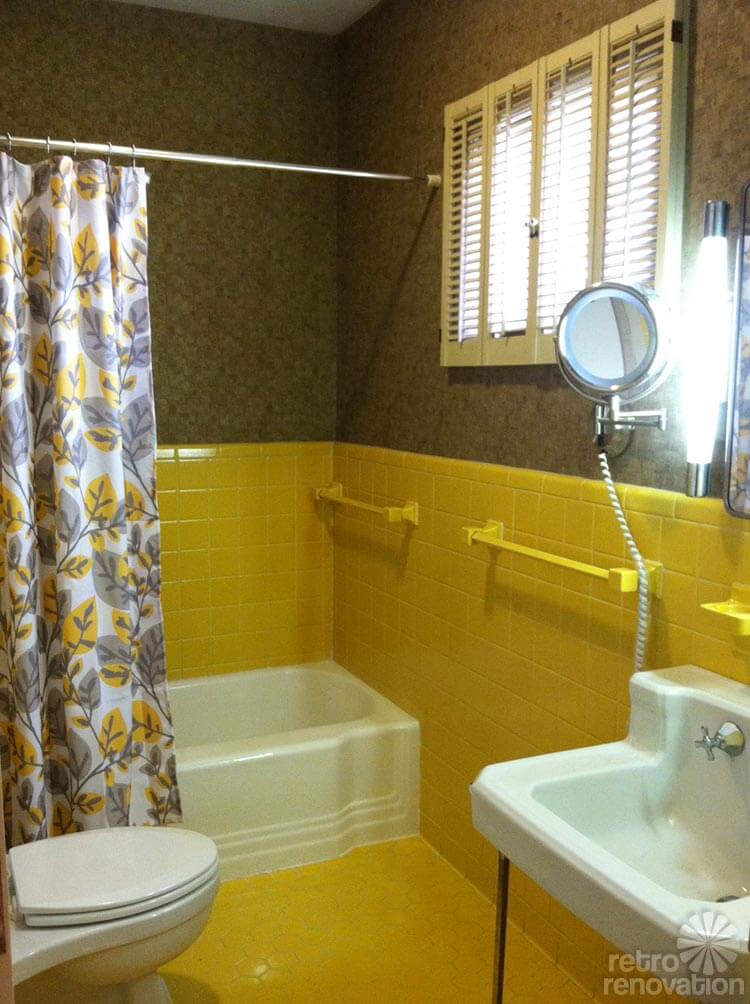
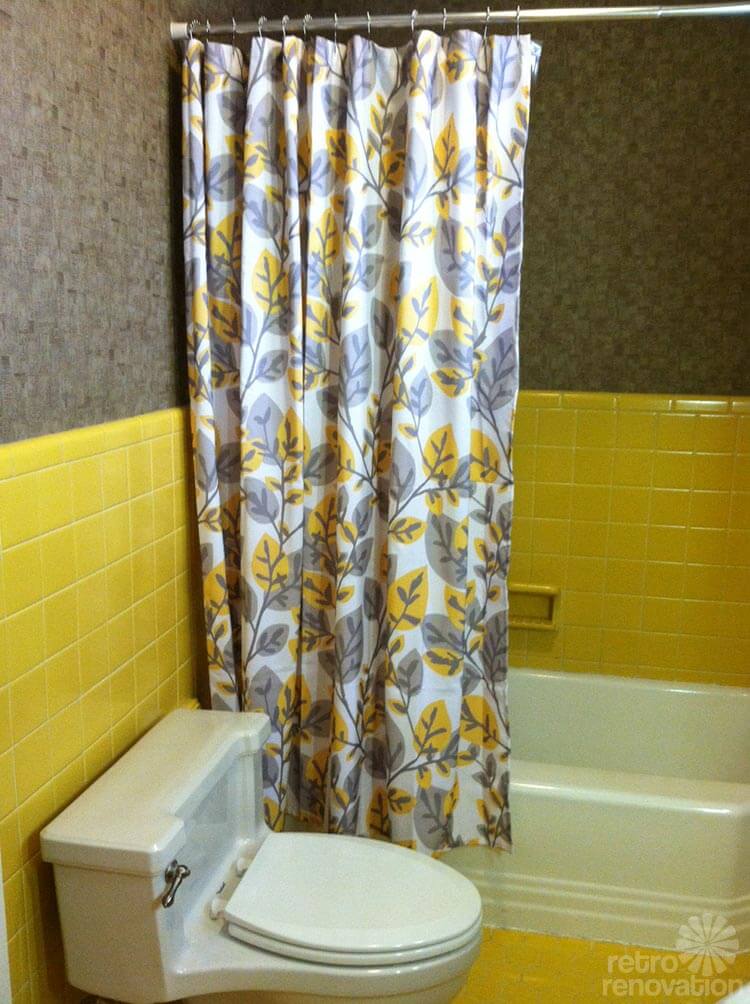
The bumble bee yellow bathroom is a twin of the redone bathroom, same size and layout. One can’t help but perk up in such a sunshiny space!
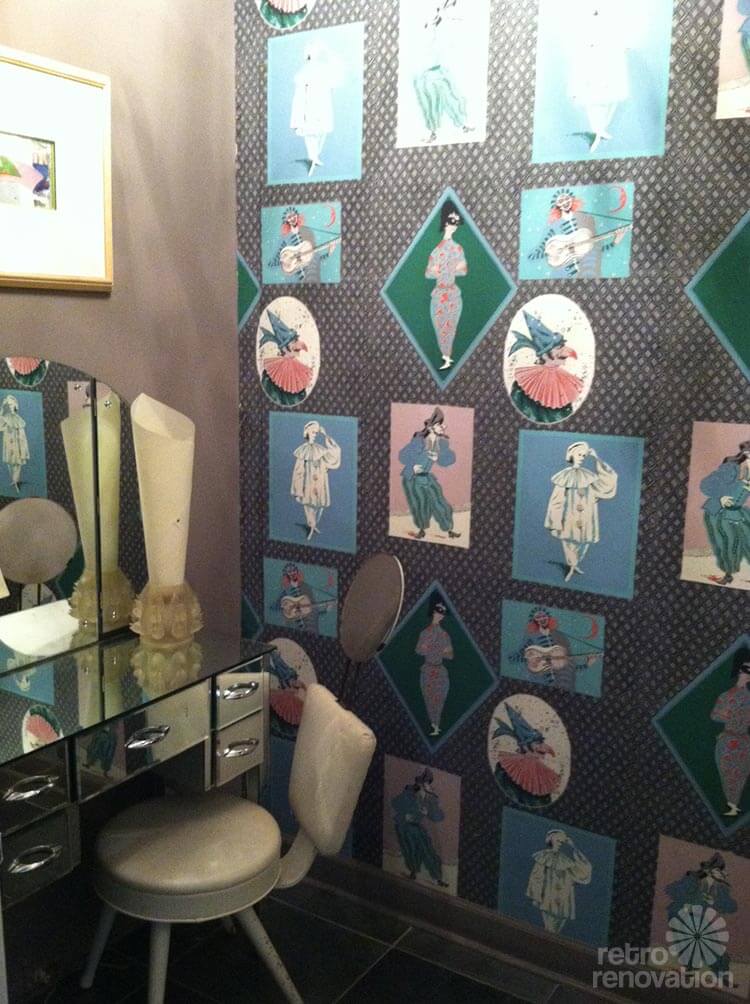
The master bathroom has the most amazing mirrored vanity. I’ve never seen anything quite like it.
And when you open one of the fabulous mirrored cabinets you will find a bottle of Windex because it is a daily necessity.
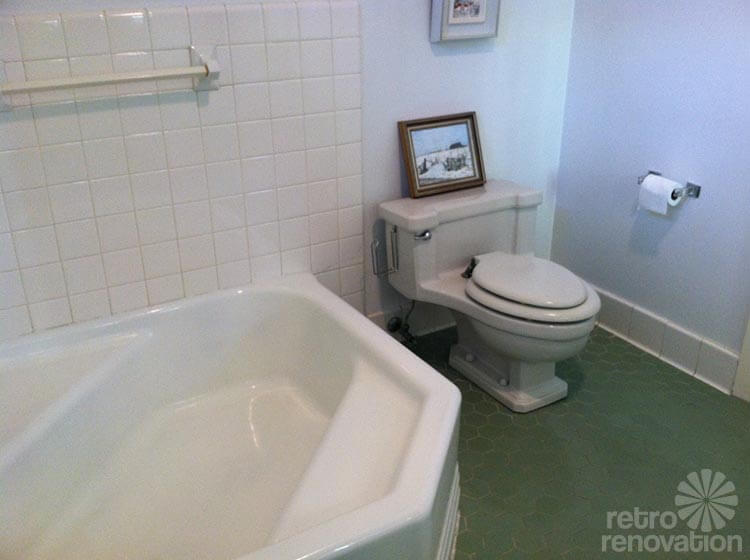
It also has a white princess tub and coke bottle green hex floor tiles.
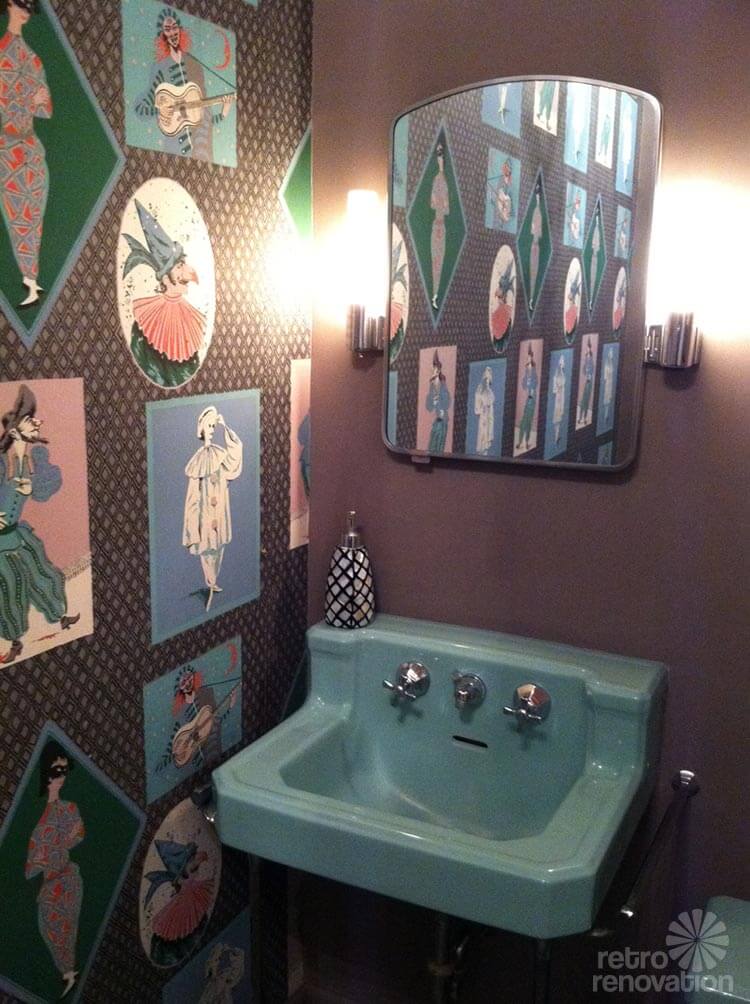
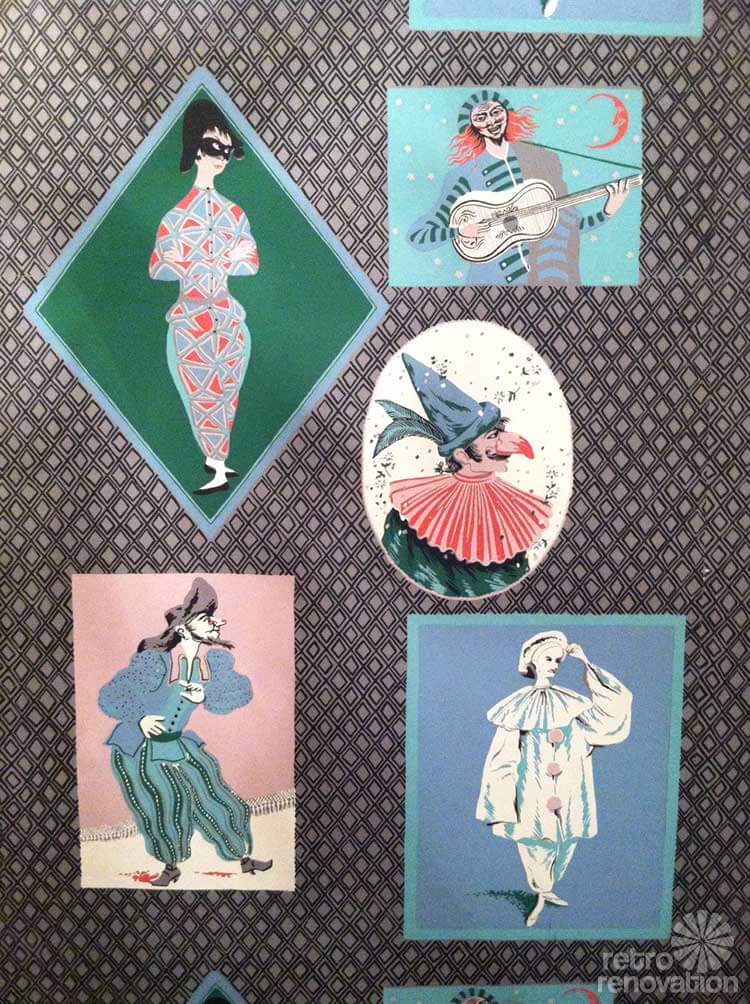
The half bath is a wild little nook with its harlequin wallpaper, blue fixtures and pearloid toilet seat. I love the one playing guitar! I’m not sure if the toilet seat changed color over time but it is a bit greener than the toilet.
Although my parents love their new house’s welcoming layout and abundance of natural light, they really appreciate their new neighbors and neighborhood. Their neighborhood boasts charming cottages, mid century modern gems and older southern style homes all under a canopy of large mature oaks. The neighbors switch off on hosting monthly block parties and are most often seen jogging and walking their dogs. It’s a retro neighborhood in the best way.
Mega thanks to Sarah, for taking all of the photos and sending in the back story of her parent’s lovely house. Robert and Caroline — what a gem you have. Your kitchen is just to die for — and the bathrooms are superb. Thank you so much for opening up your home to all of us for this spectacular tour. It is great to know that this special home has caretakers that appreciate and preserve the fabulous original details.
Resource list:
Kitchen cabinet paint — PPG Automotive paint — Boxes painted on-site, doors and drawer fronts painted offsite in professional spray booth
Kitchen flooring — Armstrong Striations flooring
Kitchen starburst light —
Bathroom wall tile — Subway tile off the shelf from Home Depot
Bathroom flooring — American Olean Chloe from Home Depot
Oh my. This house makes me so happy to see – and at the same time — sick to my stomach. Why? Because everything has been done “right” and I’m in the middle of a renovation that will be right “in the end” — but it may take a long time to get to the end.
Bravo on those cabinets. Man. I SOOO wish I’d taken mine to a body shop instead of the powder coaters. A powder coater has to take it all apart because those little plastic wheels on the drawer slides will melt. Consequently, I have drawers and shelves that I really don’t know how to put back together. I was so concerned with them looking great that I never considered that their function could very well be compromised. They do indeed look great but as of right now, I have Kelvinator drawers that nearly fall when they’re pulled out, St. Charles sliding drawers that stick . . .
Ugh. I’m going to have to post questions to the forums. This isn’t the appropriate place here. I need pictures of the insides of cabinets and drawers to know how they’re supposed to be fitted.
Anyway — the flooring here, incredible. I went with tile and got a bad lay. Sigh — when will I ever learn? This is the second home I’ve regretted my tile layer’s obliviousness to consistent thin-setting.
I’m starting to feel house envy! Sarah, I bet your parents are so thrilled. I think it’s so cool that they didn’t hesitate to get their own. How exciting! You always have a cool place to hang!
Thanks for sharing! it’s inspiration and more instruction . . . this is such an amazing site! Thanks, Pam!
Corypdsays
Wow. Just wow. Love the color of the cabinets, love the sleekness of the rounded end cabinets, love the bathrooms, love the randomness of the trim tile you used, love the light fixtures… wow. Thanks for sharing!
Josiesays
THAT GREEN HEX TILE. Welp, I think I have found a dream come true.
The coke bottle green color just made me incredibly happy.
The mirrored vanity is beautiful but I couldn’t do right by it – glad it lives with you. 🙂
The yellow-and-white bathroom was eye-popping (in a good way, yellow is my favourite colour…) but is it THAT yellow irl or is that the photo?
I never would have thought of herringbone VCT but I really like it laid out like that. Also I really admire the mix of special tiles in the redone bathroom with “normal” (i.e. tiles I might be able to afford in this life) tiles from a big box store. I have mad tile lust for all kinds of fancy stuff but I love when the bulk of the room is done with stuff that doesn’t have to be special ordered. I like subway tiles, too.
I had not ever thought twice about sizzle strips. Thanks for broadening my horizons.
Roundhouse Sarahsays
No need to adjust your computer screen, it really is THAT yellow ; )
erinsays
This house is perfect! Where is this neighborhood? I want to live there. I love the liner tiles, such a great idea. I think I will do this when we remodel our bathroom!
Roundhouse Sarahsays
Sorry, it’s not located in any known MCM neighborhood or anything. We live in southwest Louisiana, far far from Palm Springs lol.
Barb S.says
LOVE THIS HOUSE!!! Am I the only one drooling over the Golden Girls’ dinette? I recognized it right away as I am watching a Golden Girls marathon all this week! You actually purchased this from their set? I always watch them pull out the chairs for their cheesecake sessions and wonder if the chairs are heavy. They look so delicate but I can see how sturdy they are. They look heavy. Thanks Sarah, your parents are awesome!!!
Roundhouse Sarahsays
Oh goodness no, that’s not THE set from the golden girls. How amazing would that be?! I’m a huge fan of the show myself and it wasn’t until after a GG marathon that I even realized it was the same set. They were common enough, sold by meadowcraft out of magazines and stores.
Barb S.says
Darn, that would have been the coolest. I see on eBay they have dresses and earrings from the show, I would love to have a trinket from them! By the way, thanks for your info on sealing the floor. I don’t think I’ve ever heard of such a thing, and I wonder if that’s why my Armstrong tiles are starting to look so bad. I’m going to do a little research now. I sure appreciate your contributions to the site 🙂
Barb – You definitely should be sealing and polishing your VCT floors. Until they are sealed and waxed they are very susceptible to staining. There are a lot of products out there – I personally use a product from Zep that you can buy at the Home Depot. They make a sealer product and then a wax product in regular and high gloss.
I wrote about what we do on my house blog awhile back, but since then also have added a step to the mix – I start by getting whatever is on there off (Krud Kutter works well), then before sealing it I hit it with Armstrong S-485 Neutral No-Rinse Floor Cleaner. Then I put on 2-3 coats of Zep sealer and 4-5 of Zep high gloss wax using a microfiber mop. You can re-apply it in about 15-20 minutes between each coat so it goes pretty quick.
You can also do a full polish where you slather on the wax and run over it with a buffer, though I don’t elect to do that because I like the feel of the Zep products better. (Additionally, they are formulated to not turn your floor into a slippery skating rink, too.)
Barb S.says
Gosh, thanks! I will have to ask my husband exactly what we did, because the Zep sealer sounds familiar. And I do remember the buffer. But we have not maintained it well. We never did figure out how to wax it properly with regular ole floor wax. I would have made a terrible 50s wife!!
Luckily we don’t have any stains, but I think dirt has slowly pushed some tiles apart in the high traffic areas. That probably wouldn’t have happened if they were waxed. UGH. I think I see a new floor in my future. Maybe with the retro resources we have today, I can get a more accurate 50s kitchen than my “grocery store floor” tiles. haha, thanks for responding to my plight!!
Haha..you’re welcome! When I put down my kitchen floor I had the same general feeling – I didn’t want a floor that just looked like what you’d find in a grocery store. We ended up using Armstrong Striations tile just like Sarah did here above. We used a darker color (called Stardust), and Sarah above has used the color Atmosphere. I wrote about my experience choosing and picking the tiles here, if you wanted to peruse: http://www.houseonrynkushill.com/2013/05/13/adventures-in-mid-century-modern-kitchen-flooring/
(Our kitchen, while the original mid-century design and with a number of mid-century details, is not very mid-century currently. Though it will get back there…)
Pam has also run a story highlighting Striations as well, I believe, after several of us readers pointed out it’s availability awhile back.
Wow, what a fabulous home! Just amazing, and what a treat to find so many remaining original details! The kitchen looks just gorgeous, and the bathrooms are a lot of fun. It seems fitting that the half-bath (which I presume is used often by guests) is so festive and packed with personality. Pure eye candy!
Sarah – This project really turned out awesome! Practical Props is such a great place to get fixtures, too!
I have a question about your striations tile – you mentioned you had it sealed and then put a matte finish on it. I used Striations in my kitchen as well, and was curious what you mean by having a finish put on – was there a contractor who came in and did it? If so, what did they do?
Looks great. Your parents really stumbled on an awesome place.
Roundhouse Sarahsays
We went to a janitorial supply shop for our stuff. We sealed the floor ourselves then applied a gloss finish (but ours was the matte/satin finish) with a long rectangular mop that they loaned to us.
I did the same thing with my kitchen but I opted for the high gloss. You can reapply as you see fit, every year or so if it’s starting to get dull. I was told it was not a wax, perhaps some sort of polymer?
pam kuebersays
Recommendation: Go to Armstrong and ask them what the recommended maintenance is…
Sarah – I see, so you actually the did the same thing I did with mine. I just wasn’t sure based on how it was written. We used Zep for ours. (I wrote a post on my process on my house blog: http://www.houseonrynkushill.com/2013/05/24/vct-floor-care/ ) I just used a microfiber mop to apply mine, a square one would certainly be better. Maybe I’ll have to hit up a supply store and see what I can find.
Pam – Armstrong’s recommended care for the floor is to apply a sealer and then keep a polish or waxed top coat on it. Unsealed and unwaxed, the flooring is susceptible to staining by anything that lands on it. For Striations the instructions focus on commercial high traffic areas because that’s the target market of the product, so you have to adapt them slightly as the “high traffic” areas of your house are (generally) not even close to the the traffic levels they are referring to.
Carolyn Selfsays
WOW, WOW, WOW!!! This is fantastic! The cabinet color really is dreamy! But, it doesn’t end there! I don’t thick there is anything I DON’T like about this. I challenge the naysayers we all know to say this looks like grandma!
Carolsays
Sarah, I’m totally in love with your roundhouse! What you did with it is amazing. The hallway makes me want to pull up a chair and relax. The ceiling color is genius. Your parents are so lucky to have found that house. Their changes are sheer perfection. It’s clear to see that you and your parents will not be moving in the near future, if ever! Thank you for both the submissions. Eye candy for me!
Stephanie Radinsays
We have the exact same bathtub…but ours has a stain on top from the track because the former owner had an L-shaped glass door installed with her initial…which did not match our initial.
Mary Elizabethsays
Oh, Stephanie, that is so sad! Some people go crazy installing initials everywhere–some kind of status thing. I have seen them 4 feet high fastened to the brick siding of a house: “Oh, look! We are the ‘M’ Family! See our giant M on the house! See another in the screen door, and yet another on the door knocker! We have Ms on all our shutters and an M on our roof, too, so Santa can come and bring us lots of expensive toys!” Oops, sorry. Was that over the top, Pam?
Mary Elizabethsays
But, Stephanie, you can get that mark off. See stories on this site of people who removed shower doors and got the gunk off the tub and tiles.
Stephaniesays
Mary,
Thianks for the heads up about getting those stains off the top of our tub…much appreciated. My husband will get on that chore as soon as he finishes the moulding on our new front door which is now solid and air tight………one big side effect of our house is the fact that it was never well insulated….and the amount of oil we went through last year was obscene. We invested in a pellet stove this year and hope it will pay for itself within 2 years….I know that is not in keeping with being retro….but I would rather use the $$$$ that literally went out the window to be able to put those $$$$ to renovating our home…..we love our home!!!!! Many thanks.


 Sarah writes:
The house features a central courtyard with a beautiful marble statue of a ‘teaching Buddha’ that Mrs. McGehee may have bought or had commissioned along with the marble mantle in the formal living room.
The shell motif on the mantle is also repeated on the original table and mirror sets in the entrance. The previous owners installed the slate flooring in the home, it was originally wall to wall carpeting in those rooms. According to those who remember, the house was originally mainly painted and decorated in green.
The kitchen is any Retro Renovation reader’s dream. 1953 St. Charles cabinets as far as the eye can see! This is a big kitchen by today’s standards, so I imagine that it must have been quite the show stopper in its day.
But after 60 years of daily use some of the original paint was worn down to the primer, especially around the handles. And the peel n stick vinyl floor was peeling up and needed to go.
Because I’m a regular Retro Renovation reader, I knew exactly what needed to be done. One of our friend’s husband is an auto body painter and was up for the job, even though he had never painted metal cabinets before. He and his friend worked on the project on the weekends. The doors and drawers were removed and painted at their booth. They also worked on any dents or warps. The cabinet boxes were painted on site. Everything was taped off and overall it didn’t create much of a mess. We used PPG auto paint and it really shines just like a new car off the assembly line.

We used Armstrong’s Striations line in the “atmosphere” color for the floor. It’s streaky like vintage VCT but comes in the modern 12″x24″ size. We experimented with about five different ways of laying out the floor tile and went with a herringbone pattern.
The floor was sealed and a matte coating applied.
The vintage dining set is the same table and chair set that was in the kitchen on The Golden Girls.
The finishing detail was replacing the old light fixture for the new chrome Sputnik chandelier — which was purchased from Practical Props — a company I also found through Retro Renovation. The kitchen has endured 60 years of use and is now ready for 60 more!
The house has 3 1/2 bathrooms. A bathroom for every bedroom, which must have been quite the luxury. All of the bathrooms were original and so unique but the brown and white bathroom left much to be desired. The brown tile seemed to have a permanent layer of hard water residue, some of the tiles were cracked and overall we weren’t fans of the color scheme.
This is also the only bathroom with a standing shower, so it was going to be used the most. We decided to just redo the tile work and to keep the new look in style with the other bathrooms in the house. We kept the tub, toilet, sink and medicine cabinet as well as the layout. We tossed around several design ideas and shopped around town and the Internet for inspiration.
We sampled several colors of grout but went with light gray.
The advantage of using the white subway tile and bullnose is that it’s easy to find and relatively cheap. We pulled ours straight off the shelf at Lowe’s. Now the bathroom is very customizable. Just about any color can be pulled from the sizzle strips for wall and towel colors.
The bumble bee yellow bathroom is a twin of the redone bathroom, same size and layout. One can’t help but perk up in such a sunshiny space!
The master bathroom has the most amazing mirrored vanity. I’ve never seen anything quite like it.
And when you open one of the fabulous mirrored cabinets you will find a bottle of Windex because it is a daily necessity.
It also has a white princess tub and coke bottle green hex floor tiles.
The half bath is a wild little nook with its harlequin wallpaper, blue fixtures and pearloid toilet seat. I love the one playing guitar! I’m not sure if the toilet seat changed color over time but it is a bit greener than the toilet.
Although my parents love their new house’s welcoming layout and abundance of natural light, they really appreciate their new neighbors and neighborhood. Their neighborhood boasts charming cottages, mid century modern gems and older southern style homes all under a canopy of large mature oaks. The neighbors switch off on hosting monthly block parties and are most often seen jogging and walking their dogs. It’s a retro neighborhood in the best way.


 Mega thanks to Sarah, for taking all of the photos and sending in the back story of her parent’s lovely house. Robert and Caroline — what a gem you have. Your kitchen is just to die for — and the bathrooms are superb. Thank you so much for opening up your home to all of us for this spectacular tour. It is great to know that this special home has caretakers that appreciate and preserve the fabulous original details.


Molly says
Oh my. This house makes me so happy to see – and at the same time — sick to my stomach. Why? Because everything has been done “right” and I’m in the middle of a renovation that will be right “in the end” — but it may take a long time to get to the end.
Bravo on those cabinets. Man. I SOOO wish I’d taken mine to a body shop instead of the powder coaters. A powder coater has to take it all apart because those little plastic wheels on the drawer slides will melt. Consequently, I have drawers and shelves that I really don’t know how to put back together. I was so concerned with them looking great that I never considered that their function could very well be compromised. They do indeed look great but as of right now, I have Kelvinator drawers that nearly fall when they’re pulled out, St. Charles sliding drawers that stick . . .
Ugh. I’m going to have to post questions to the forums. This isn’t the appropriate place here. I need pictures of the insides of cabinets and drawers to know how they’re supposed to be fitted.
Anyway — the flooring here, incredible. I went with tile and got a bad lay. Sigh — when will I ever learn? This is the second home I’ve regretted my tile layer’s obliviousness to consistent thin-setting.
I’m starting to feel house envy! Sarah, I bet your parents are so thrilled. I think it’s so cool that they didn’t hesitate to get their own. How exciting! You always have a cool place to hang!
Thanks for sharing! it’s inspiration and more instruction . . . this is such an amazing site! Thanks, Pam!
Corypd says
Wow. Just wow. Love the color of the cabinets, love the sleekness of the rounded end cabinets, love the bathrooms, love the randomness of the trim tile you used, love the light fixtures… wow. Thanks for sharing!
Josie says
THAT GREEN HEX TILE. Welp, I think I have found a dream come true.
The coke bottle green color just made me incredibly happy.
The mirrored vanity is beautiful but I couldn’t do right by it – glad it lives with you. 🙂
The yellow-and-white bathroom was eye-popping (in a good way, yellow is my favourite colour…) but is it THAT yellow irl or is that the photo?
I never would have thought of herringbone VCT but I really like it laid out like that. Also I really admire the mix of special tiles in the redone bathroom with “normal” (i.e. tiles I might be able to afford in this life) tiles from a big box store. I have mad tile lust for all kinds of fancy stuff but I love when the bulk of the room is done with stuff that doesn’t have to be special ordered. I like subway tiles, too.
I had not ever thought twice about sizzle strips. Thanks for broadening my horizons.
Roundhouse Sarah says
No need to adjust your computer screen, it really is THAT yellow ; )
erin says
This house is perfect! Where is this neighborhood? I want to live there. I love the liner tiles, such a great idea. I think I will do this when we remodel our bathroom!
Roundhouse Sarah says
Sorry, it’s not located in any known MCM neighborhood or anything. We live in southwest Louisiana, far far from Palm Springs lol.
Barb S. says
LOVE THIS HOUSE!!! Am I the only one drooling over the Golden Girls’ dinette? I recognized it right away as I am watching a Golden Girls marathon all this week! You actually purchased this from their set? I always watch them pull out the chairs for their cheesecake sessions and wonder if the chairs are heavy. They look so delicate but I can see how sturdy they are. They look heavy. Thanks Sarah, your parents are awesome!!!
Roundhouse Sarah says
Oh goodness no, that’s not THE set from the golden girls. How amazing would that be?! I’m a huge fan of the show myself and it wasn’t until after a GG marathon that I even realized it was the same set. They were common enough, sold by meadowcraft out of magazines and stores.
Barb S. says
Darn, that would have been the coolest. I see on eBay they have dresses and earrings from the show, I would love to have a trinket from them! By the way, thanks for your info on sealing the floor. I don’t think I’ve ever heard of such a thing, and I wonder if that’s why my Armstrong tiles are starting to look so bad. I’m going to do a little research now. I sure appreciate your contributions to the site 🙂
pam kueber says
Yes, we polish our VCT floors….
Douglas Camin @ House on Rynkus Hill says
Barb – You definitely should be sealing and polishing your VCT floors. Until they are sealed and waxed they are very susceptible to staining. There are a lot of products out there – I personally use a product from Zep that you can buy at the Home Depot. They make a sealer product and then a wax product in regular and high gloss.
I wrote about what we do on my house blog awhile back, but since then also have added a step to the mix – I start by getting whatever is on there off (Krud Kutter works well), then before sealing it I hit it with Armstrong S-485 Neutral No-Rinse Floor Cleaner. Then I put on 2-3 coats of Zep sealer and 4-5 of Zep high gloss wax using a microfiber mop. You can re-apply it in about 15-20 minutes between each coat so it goes pretty quick.
You can also do a full polish where you slather on the wax and run over it with a buffer, though I don’t elect to do that because I like the feel of the Zep products better. (Additionally, they are formulated to not turn your floor into a slippery skating rink, too.)
Barb S. says
Gosh, thanks! I will have to ask my husband exactly what we did, because the Zep sealer sounds familiar. And I do remember the buffer. But we have not maintained it well. We never did figure out how to wax it properly with regular ole floor wax. I would have made a terrible 50s wife!!
Luckily we don’t have any stains, but I think dirt has slowly pushed some tiles apart in the high traffic areas. That probably wouldn’t have happened if they were waxed. UGH. I think I see a new floor in my future. Maybe with the retro resources we have today, I can get a more accurate 50s kitchen than my “grocery store floor” tiles. haha, thanks for responding to my plight!!
Douglas Camin @ House on Rynkus Hill says
Haha..you’re welcome! When I put down my kitchen floor I had the same general feeling – I didn’t want a floor that just looked like what you’d find in a grocery store. We ended up using Armstrong Striations tile just like Sarah did here above. We used a darker color (called Stardust), and Sarah above has used the color Atmosphere. I wrote about my experience choosing and picking the tiles here, if you wanted to peruse: http://www.houseonrynkushill.com/2013/05/13/adventures-in-mid-century-modern-kitchen-flooring/
(Our kitchen, while the original mid-century design and with a number of mid-century details, is not very mid-century currently. Though it will get back there…)
Pam has also run a story highlighting Striations as well, I believe, after several of us readers pointed out it’s availability awhile back.
Jen says
Wow, what a fabulous home! Just amazing, and what a treat to find so many remaining original details! The kitchen looks just gorgeous, and the bathrooms are a lot of fun. It seems fitting that the half-bath (which I presume is used often by guests) is so festive and packed with personality. Pure eye candy!
Douglas Camin @ House on Rynkus Hill says
Sarah – This project really turned out awesome! Practical Props is such a great place to get fixtures, too!
I have a question about your striations tile – you mentioned you had it sealed and then put a matte finish on it. I used Striations in my kitchen as well, and was curious what you mean by having a finish put on – was there a contractor who came in and did it? If so, what did they do?
Looks great. Your parents really stumbled on an awesome place.
Roundhouse Sarah says
We went to a janitorial supply shop for our stuff. We sealed the floor ourselves then applied a gloss finish (but ours was the matte/satin finish) with a long rectangular mop that they loaned to us.
I did the same thing with my kitchen but I opted for the high gloss. You can reapply as you see fit, every year or so if it’s starting to get dull. I was told it was not a wax, perhaps some sort of polymer?
pam kueber says
Recommendation: Go to Armstrong and ask them what the recommended maintenance is…
Douglas Camin @ House on Rynkus Hill says
Sarah – I see, so you actually the did the same thing I did with mine. I just wasn’t sure based on how it was written. We used Zep for ours. (I wrote a post on my process on my house blog: http://www.houseonrynkushill.com/2013/05/24/vct-floor-care/ ) I just used a microfiber mop to apply mine, a square one would certainly be better. Maybe I’ll have to hit up a supply store and see what I can find.
Pam – Armstrong’s recommended care for the floor is to apply a sealer and then keep a polish or waxed top coat on it. Unsealed and unwaxed, the flooring is susceptible to staining by anything that lands on it. For Striations the instructions focus on commercial high traffic areas because that’s the target market of the product, so you have to adapt them slightly as the “high traffic” areas of your house are (generally) not even close to the the traffic levels they are referring to.
Carolyn Self says
WOW, WOW, WOW!!! This is fantastic! The cabinet color really is dreamy! But, it doesn’t end there! I don’t thick there is anything I DON’T like about this. I challenge the naysayers we all know to say this looks like grandma!
Carol says
Sarah, I’m totally in love with your roundhouse! What you did with it is amazing. The hallway makes me want to pull up a chair and relax. The ceiling color is genius. Your parents are so lucky to have found that house. Their changes are sheer perfection. It’s clear to see that you and your parents will not be moving in the near future, if ever! Thank you for both the submissions. Eye candy for me!
Stephanie Radin says
We have the exact same bathtub…but ours has a stain on top from the track because the former owner had an L-shaped glass door installed with her initial…which did not match our initial.
Mary Elizabeth says
Oh, Stephanie, that is so sad! Some people go crazy installing initials everywhere–some kind of status thing. I have seen them 4 feet high fastened to the brick siding of a house: “Oh, look! We are the ‘M’ Family! See our giant M on the house! See another in the screen door, and yet another on the door knocker! We have Ms on all our shutters and an M on our roof, too, so Santa can come and bring us lots of expensive toys!” Oops, sorry. Was that over the top, Pam?
Mary Elizabeth says
But, Stephanie, you can get that mark off. See stories on this site of people who removed shower doors and got the gunk off the tub and tiles.
Stephanie says
Mary,
Thianks for the heads up about getting those stains off the top of our tub…much appreciated. My husband will get on that chore as soon as he finishes the moulding on our new front door which is now solid and air tight………one big side effect of our house is the fact that it was never well insulated….and the amount of oil we went through last year was obscene. We invested in a pellet stove this year and hope it will pay for itself within 2 years….I know that is not in keeping with being retro….but I would rather use the $$$$ that literally went out the window to be able to put those $$$$ to renovating our home…..we love our home!!!!! Many thanks.