

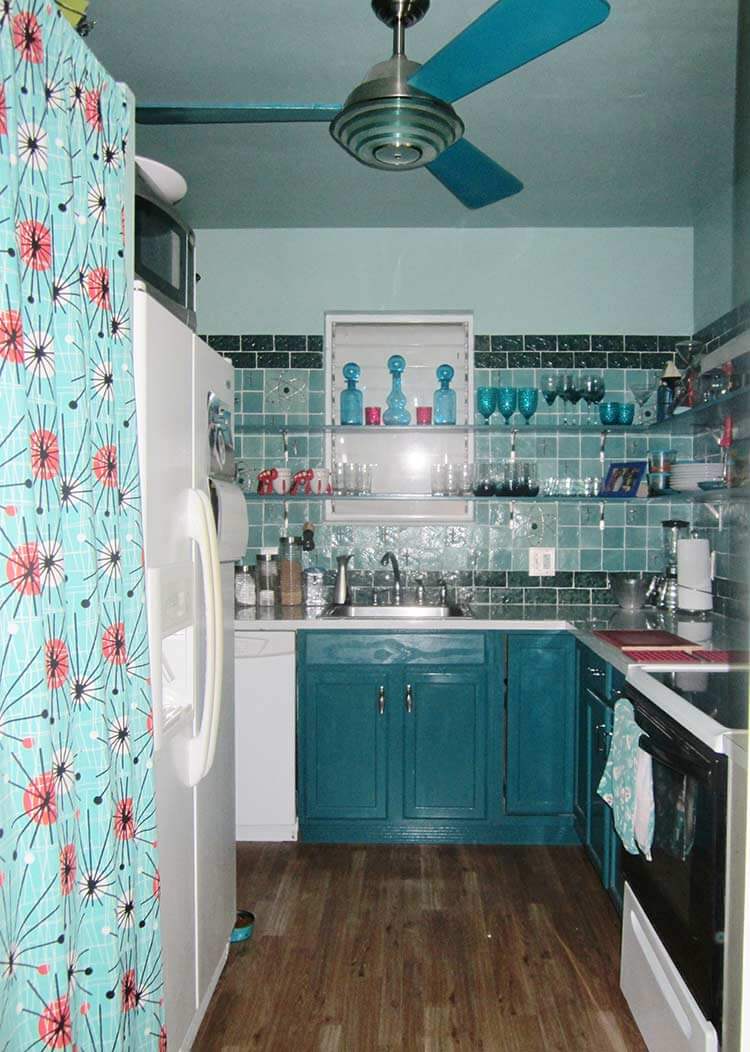
 Reader LuRu, a ceramic artist, has been a lontime a fan of midcentury design in its many forms — from tiki to atomic sci-fi. When it came time for her and her husband to remodel their tiny kitchen, LuRu knew she could use her creative talents to make a one-of-a-kind space. In addition to new flooring, cabinets and countertops, LuRu created, glazed and installed 64 square feet of custom ceramic tile on the walls of her kitchen — including a space themed ‘stovescape’ — transforming her kitchen into a true work of art.
 Q: How long have you been making ceramic tiles?
I have been focused on making ceramic tiles full time for the past four years. I earned my ceramics degree from Ohio State in 1995. Although I did a large tiled piece as part of my senior show, I predominantly focused on sculpture afterward and eventually went back to grad school and earned my degree in sculpture from Louisiana State University. I returned to tile and clay because it is a great vehicle for my creativity and it is more accessible to a larger audience.
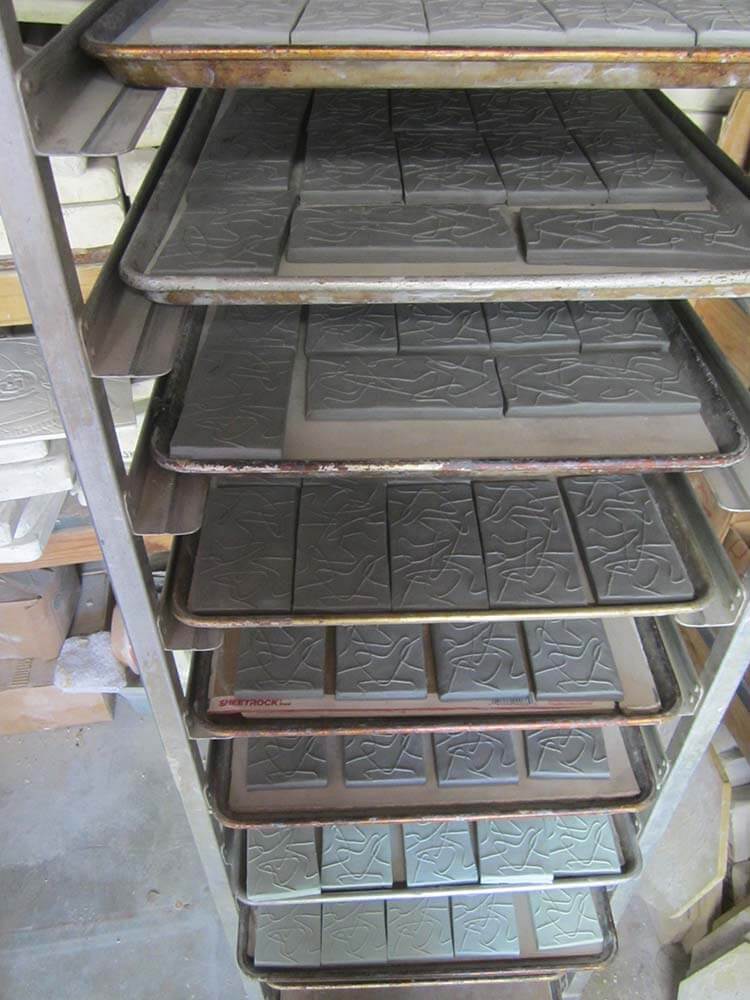
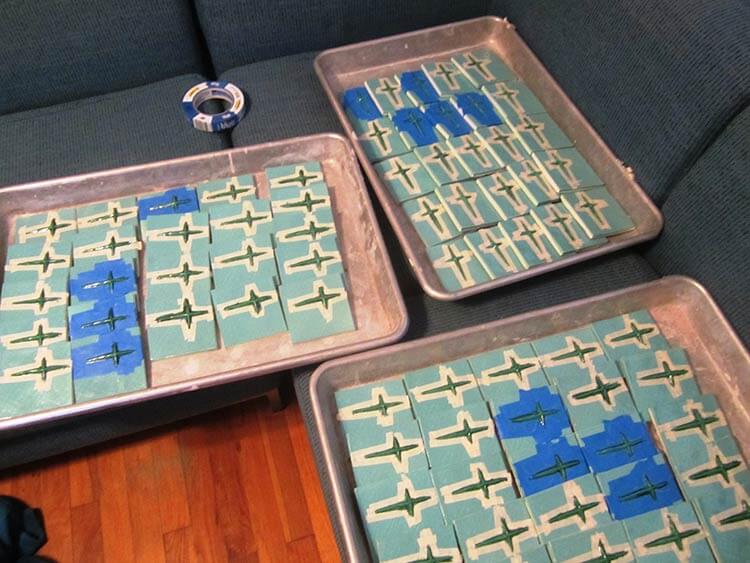
People are more likely to have tile in their house than a six foot tall sculpture. It also allows me to work through ideas fairly quickly and explore a variety of themes. Since starting Tortuga Tile Works four years ago, I have created approximately 400 molds and have produced thousands of tiles. Although most of my business is now custom, I have spent the past few years peddling my wares, tile by tile, at indie craft shows across the state of Florida.

Q: What made you decide to make your kitchen retro, and why did you decide to go with an atomic theme on your tiles?
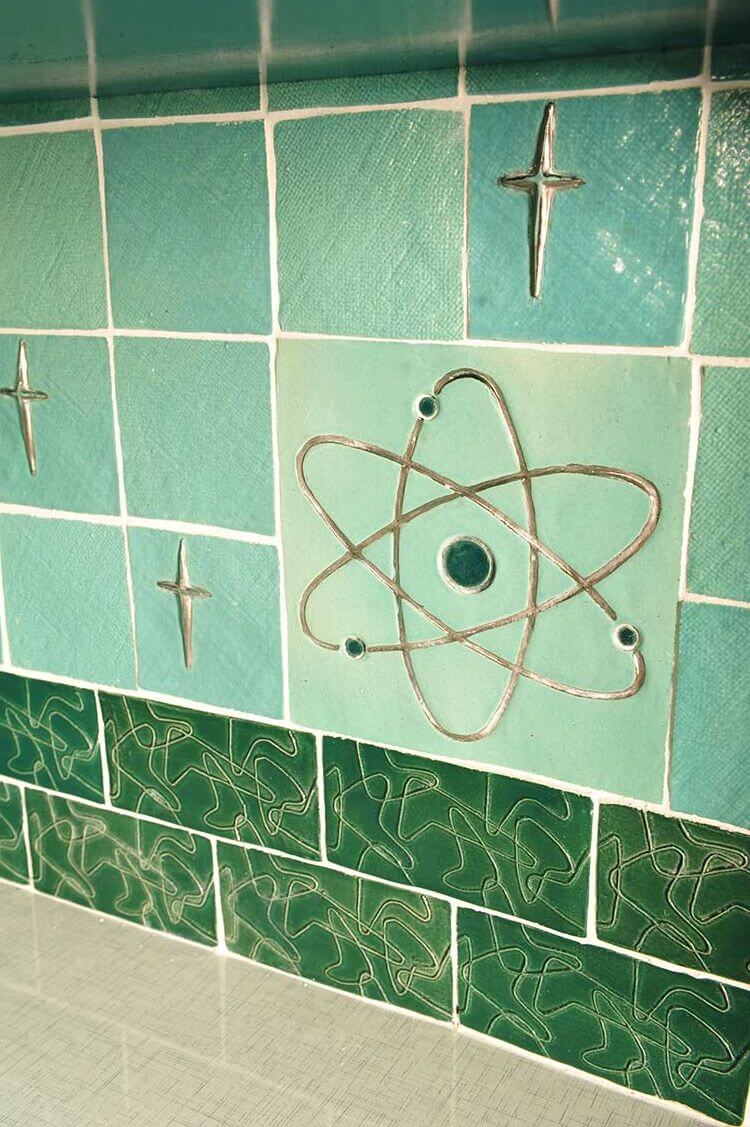
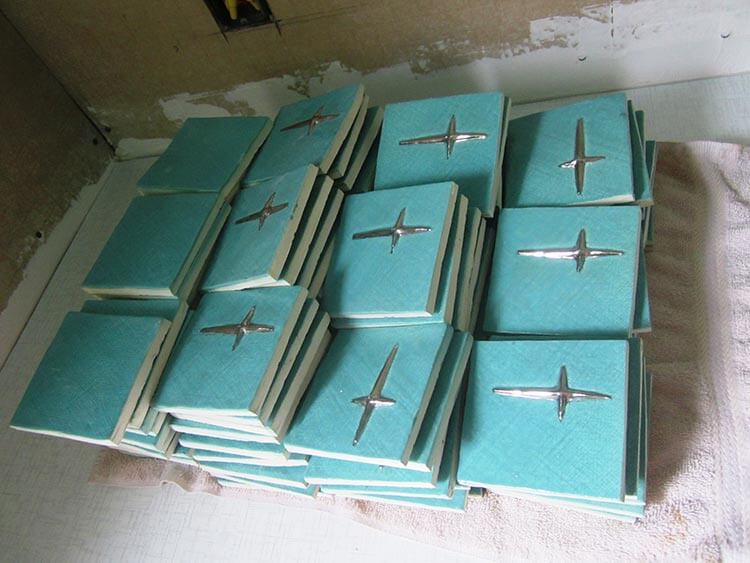
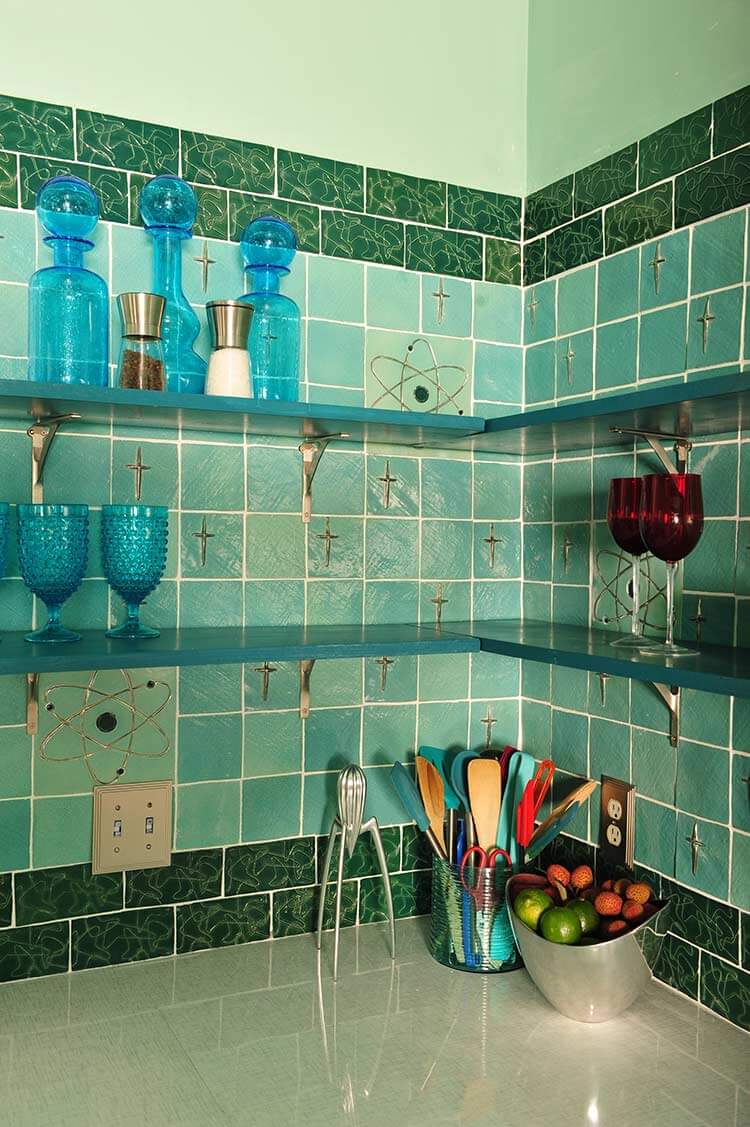
My husband and I have always been partial to vintage design, from mid-century modern to Tiki and everything in between. I have also always been a sci-fi junky, so when it came time to think about the kitchen of our house which was built in 1947, it seemed appropriate to make it a mid-century sci-fi dream. The “Atomic” tiles were the first line that I produced because I knew that is what I wanted for my kitchen.
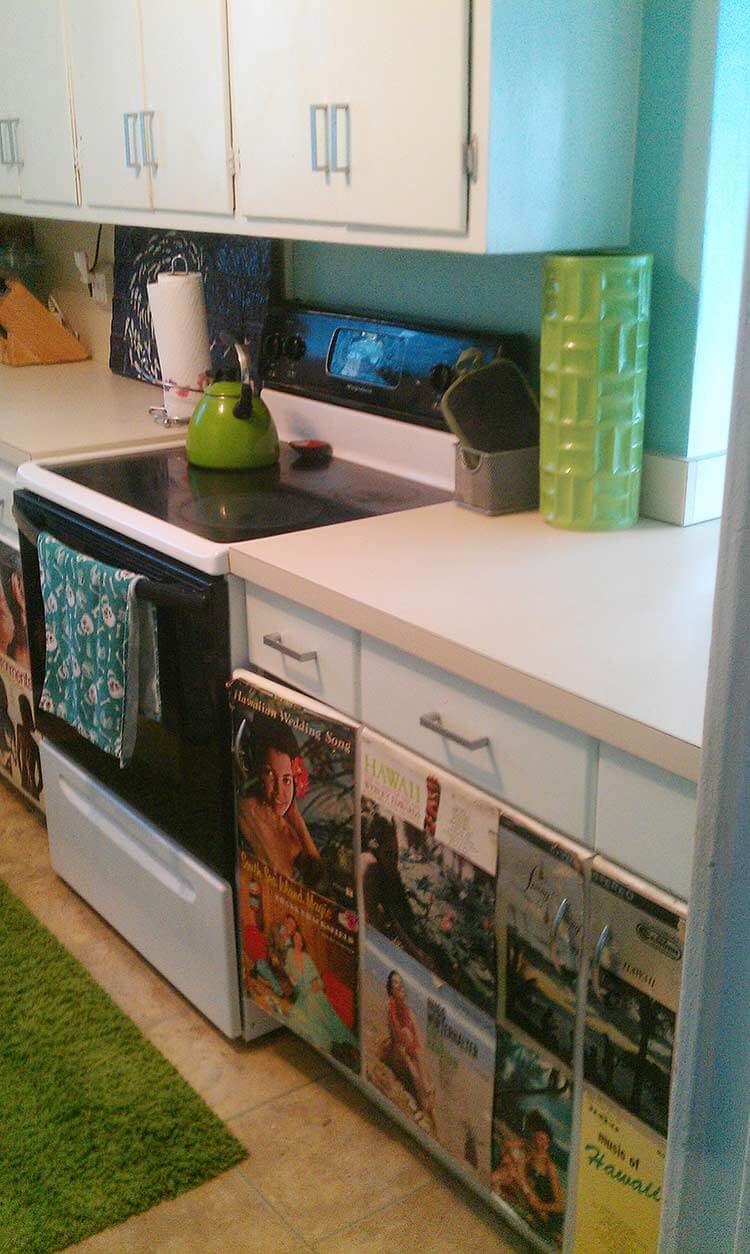
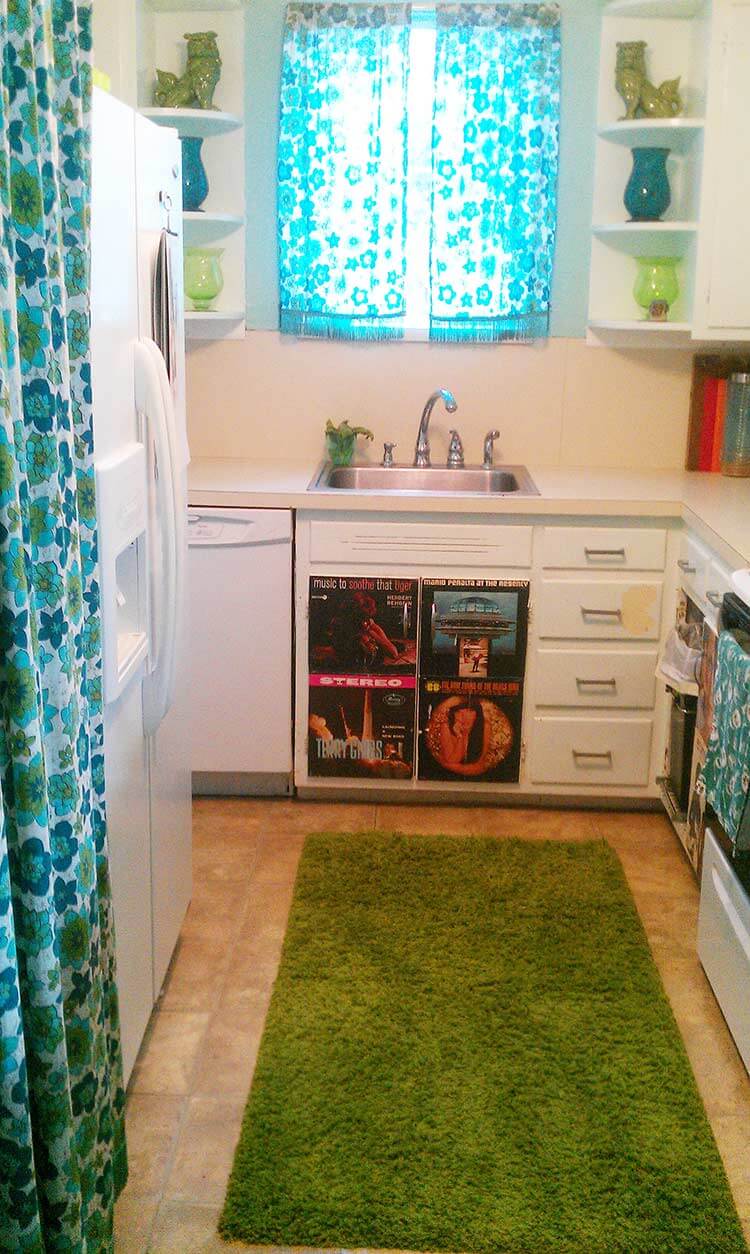
When it finally became time to do the kitchen (the cabinets were being held together with record album covers,) I took my favorite ideas from that initial collection and revamped them so that I could use my pneumatic hand press to aid in production. I reformulated new glazes to better match our cabinet and fabric colors and added a burlap texture to mimic old barkcloth fabrics. The boomerang design got reworked so that it would have a consistent repeat when stacked subway style. The final touch to the redesigned tiles was the addition of white gold on the starbursts and lithium atoms.
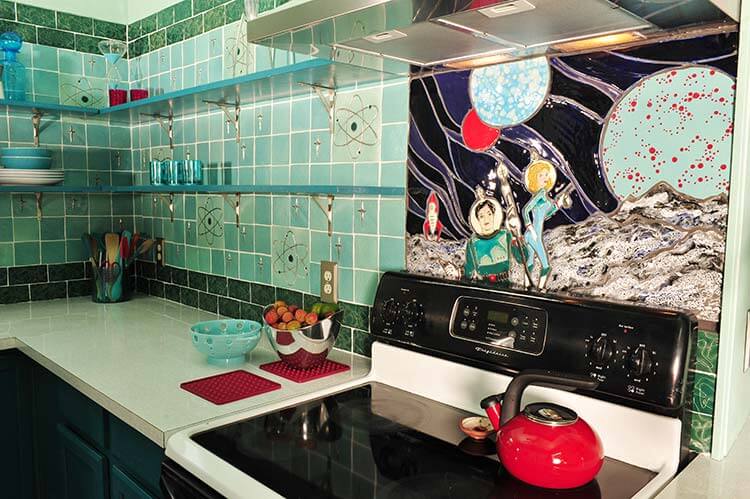
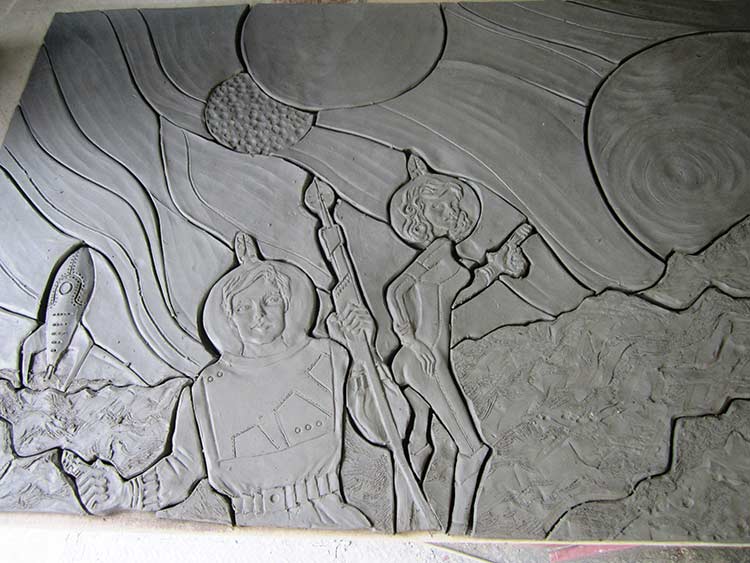
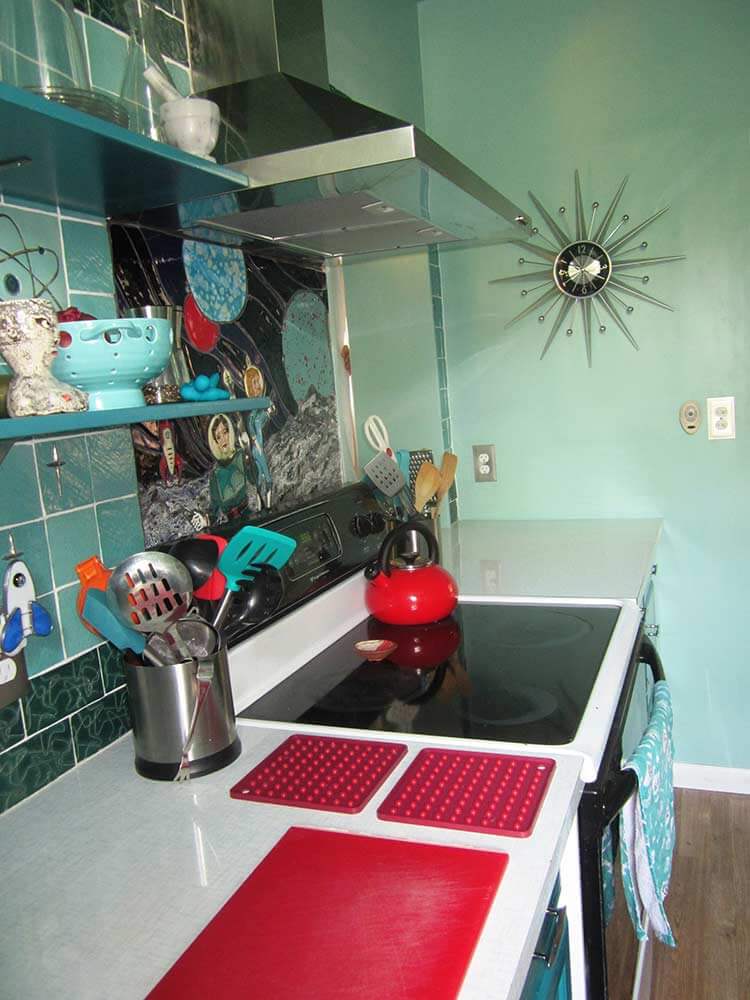
I wanted to have a focal point above the stove. I chose the intrepid astronauts on an alien planet scene because it is so iconic. A variety of pulp fiction covers served as inspiration to get my explorers to look just right. I wanted that wholesome, strapping, clean cut type that was so typical in the art of that era. The tile pieces are compositionally shaped so that I wouldn’t have square lines running through the design. For easy installation I glued the mosaic pieces to fiberglass mesh beforehand. The stovescape is really framed nicely under the stainless steel hood, which casts a soft glow on it in the evening.

Q. How long did it take you to make all of the tiles for your kitchen?
The tiles took about two months from initial mold making to installation.
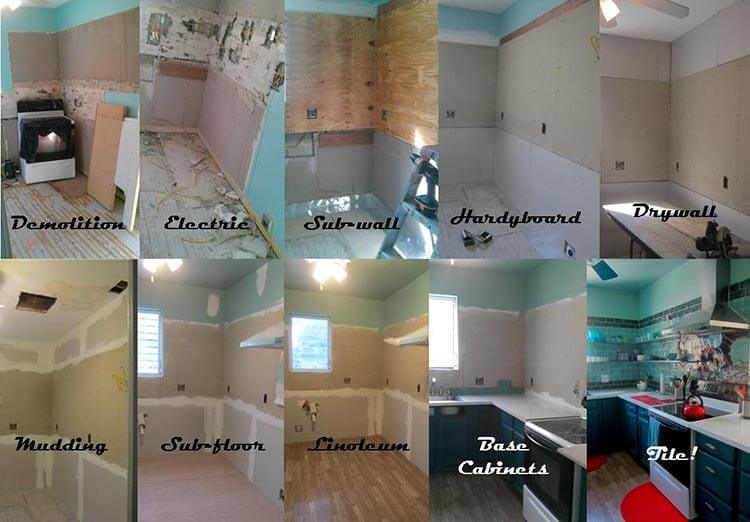
The entire remodel took six months. My husband, my parents and I worked weekends gutting it down to the studs and then rebuilding it. The house had been flipped sometime in the past 15 years, and they tore out the original tile and just put a laminated MDF surround on top of the mesh and rubble left behind by the tile. When we pulled that off we realized what a mess the walls were.
Also, whoever flipped it did not update the electric. It was so outdated we ended up getting seven new outlets just to bring it up to code. Apparently the one outlet that was fine in the 50’s just doesn’t cut it in the 21st century. What’s more sci-fi than plugging in all your small appliances at once anyway!
We wanted to do open shelving because our kitchen is small. It really gives the sense of openness now, and where there was once boring white cupboards there is now fun tile work.
The shelves and lower cupboards are painted a dark teal that helps ground the overall feel of the kitchen and complements the tile and wall color.
The countertops have a vintage feel with a silver cross hatched laminate that is also reminiscent of vintage fabric. For right now the floor is just vinyl. The hardwood floors that run through our entire house are safely waiting underneath sheets of luan to be refinished at a later date with the rest of the house.
The pantry is an IKEA unit to which I added Michael Miller vintage looking fabric.
All of my tiles are themes which you will not typically encounter. Most hand-made tiles are rooted in historical motifs or nature scenes. I wanted to make tiles with a bit more edge for those of us into vintage/underground culture. So Tortuga Tile Works specializes in things like robots, rayguns, Tikis, pin-up girls, sugar skulls, graffiti, and spirit bottles.
As for the laminate countertops we got Arctic Retro from Lab Design.
They are holding up just fine, but I am not sure I would recommend them to your readers as when the laminate arrived, it had a sticker saying it wasn’t meant for countertops. Due to the fact that we already had paid for it and gotten it and needed to stay on track with our already behind schedule, we went with it.
The link to the data sheet says it is for countertops:
“Basic Uses: Lab Designs Laminates are recommended for interior vertical and horizontal decorative applications. Possible uses are hotels, restaurants, cabinet
doors, store fixtures, exhibit manufacturing, office furniture, kitchen counter tops, columns, and slat wall. Not recommended for: Areas exposed to high temperatures, or exterior use”So who knows. Time will tell. Kool-aid and wine doesn’t stain them and they seem pretty durable thus far.
My dad, husband and I built the countertops out of MDF and laminated the Arctic white laminate onto them with contact cement. We made patterns for the MDF out of 1 x 3”s, and for the pass through we also used cardboard to get the shape just right. We used three pieces of the laminate, There is a seam in the L shaped countertop to the right of the sink. We glued the laminate down and then cut it to the shape using a router with the special countertop bit. We did not use the 45 degree bit for the edge. because the inside of the laminate is dark grey and it would have made a dark line around the edge. I just filed it with a hand file a bit so that it wasn’t sharp. The countertops took two weekends. Saturday to make the L pattern, Sunday to cut the MDF, glue the laminate, trim it and install the sink. The second weekend we made the pattern for the pass through and glued and trimmed that piece.


LuRu, your kitchen turned out great. The many handmade art tiles you created and installed in your kitchen really give the space a personality all its own. You also may have coined a new design term — I’ve never heard of a ‘stovescape’ before, but I like it. Kudos to you on a job well done and thanks so much for sharing your space-age space (!) with all of us.
Link love:
- LuRu’s Tortuga Tile Works.
- LuRu’s photographer friend, who took her portrait and some of the “after” photos of her kitchen: Kris Starry of Starry Night Photography


Laurie Louise says
Fab-u-lo-sa! There’s a lot of marching to the beat of a different drummer on this site, but oh my word! Love the vision, commitment, execution. Thanks for sharing this beauty and whimsy.
Jessica says
I love your remodel!
You are incredibly talented.
Now my thinking cap is on about how to go about making my own mosaic focal point….
Congrats!
linda h says
We had thought of doing a bamboo themed stovescape of lazercut granite when we redid our kitchen, but decided to just take our quartz countertop material all the way up between cooktop and microwave.
June Cahill says
Well, what a SURPRISE! This is the first ‘page’ that pops up on my computer in the morning when I sit down – and WOW! When I saw your tiles – with the gold ‘crosses’ and the darker green tiles with the ‘squiggly lines’ – It SO reminded me of my mom and her ceramic making in the mid-50s. I LOVE the tiles – and am well-aware of the work (time, energy, preciseness) it takes to make tiles, and work with clay. My Mom went to the Art Inst of Chicago she told me that one of her assignments as a student was to dig her own clay – and she made her own glazes (I have a 3 ring binder FULL of glaze recipes – much different than ‘today’ – but I’m noticing that the funky fun designs of the 50s have made a comeback! Job well done – and I LOVE the centerpiece over the stove. Wonderful to see a photo of that piece before the glaze goes on. Can’t wait to jump to your site to see what other designs you’ve got! KUDOS!
LuRu says
I would have loved to see your mother’s work, not to mention a peek at her glaze books. I am glad that I brought back good memories.
June Cahill says
One day I’ve promised myself to make a blog of my Mom’s work – not only ceramics, but enamels, copper, collages, oils, acrylics, pen & ink, watercolors – you name it! Her lamps and jewelry and especially wonderful! In grade school, I’d come home to teaching a basement full of women, the kiln fired up. It’s so wonderful to now have her work surrounding me. Thank you for your kind comment!
TappanTrailerTami says
LOVE the whole kitchen, but the tiles really “make” it! So impressive and creative! The only thing I could possibly suggest is to acquire a vintage Waring blender. I have one, they have the neatest Rocket Ship shape – totally in this kitchen’s vibe!
http://tinyurl.com/lzp6bmr
Off to go look at LuRu’s other tile creations!
LuRu says
Indeed we are in need of more appliances that fit, both large and small. Our large appliances were all fairly new, so we decided to wait on those for a few years. We are certainly keeping our eyes out for the small ones. Thanks for the suggestion.
Don says
We actually had a slightly different model of waring blender, but it was a casualty of one of our moves, or maybe the UK Tiki team. I can’t recall exactly. (I’m LuRu’s husband BTW)
Mary Elizabeth says
I’m sure there’s a great story behind what the UK Tiki Team did to your Waring blender. Hope you told them that there are no ties (old school or otherwise) in Mai Tais.
Sebastian says
Ooooh, I knew when I saw “Tortugas” this artist is based in Florida. Although I thought surely with that much style & artistry & the very name she was working & living in the Keys. So great to be reminded there are artists in the Fort Lauderdale/Hollywood region.
When we own our own home, I will certainly look her up! 😉
Jenny A. says
That is insanely awesome! The backsplash tile behind the stove is out of this world (pun intended)! Every day my mind is just blown on this site by what people are doing in their homes. It gives me lots of ideas and confidence with my own home. It’s one thing to tile your own kitchen. It’s quite another to create the tiles and then apply them. Absolutely amazing.
Indianatim7 says
The icy blue on the tiles is beautiful. I too have now decided I need to think about including a “stovescape” in my kitchen redesign.
LuRu says
Look me up when you do. 🙂
Roundhouse Sarah says
Amazing! The square tiles are the most lovely shades of aqua and I’m in love with the boomerang subway tiles. I ordered a sample of arctic retro a long time ago and it’s probably my favorite laminate on the market. I didn’t use it however bc of the ‘vertical only’ warning. I hope that it holds up for you!
LuRu says
Yes, the sample did not have the warning. I have just been keeping a cutting board on the primary work surface and I am also careful not to drag things across it so that out doesn’t scratch.
Anastasia says
Reminds me of the warning about hot objects being set down on marble. Doesn’t stop people from using it, they just find ways around it!
LOVE this kitchen! You did an amazing job! Thanks for sharing with us!!!!!!!!!
Chris says
What a happy and unique kitchen! LOVE it all! Right down to the way your glorious hair contrasts with the blue of your dress! 🙂