


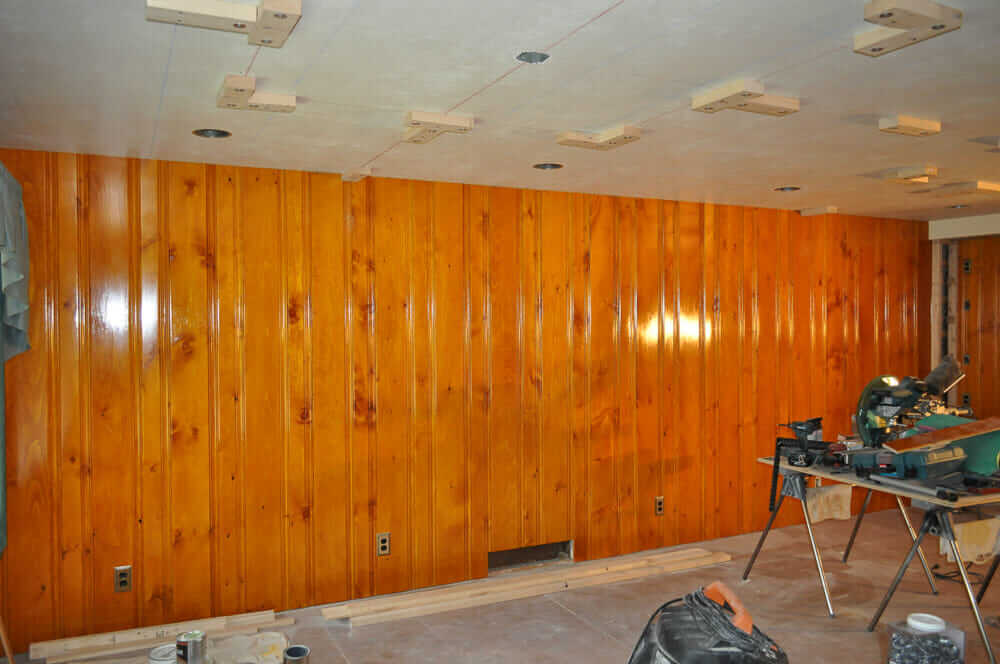
 Another doing-things-The-Hard-Way Retro Renovator here: Daniel discovered, searched, found, drove to get, stained and installed this beautiful wall of pickwick pine in the living room of the 1956 house he has been working on. He has great tips to share — like, how he got that classic knotty pine color just right — but he also has a question for us: Should the faux beams he’s adding be darker in color than the pine, or the same color?
From Daniel, edited a bit:
Hi Pam,
Hi! I just want to first let you know I love your site! I’m on it almost daily using it for reference material. I own a 1956 brick ranch and I’m in the process of bringing it back to the former glory that is mid-century. I love all things retro and vintage.
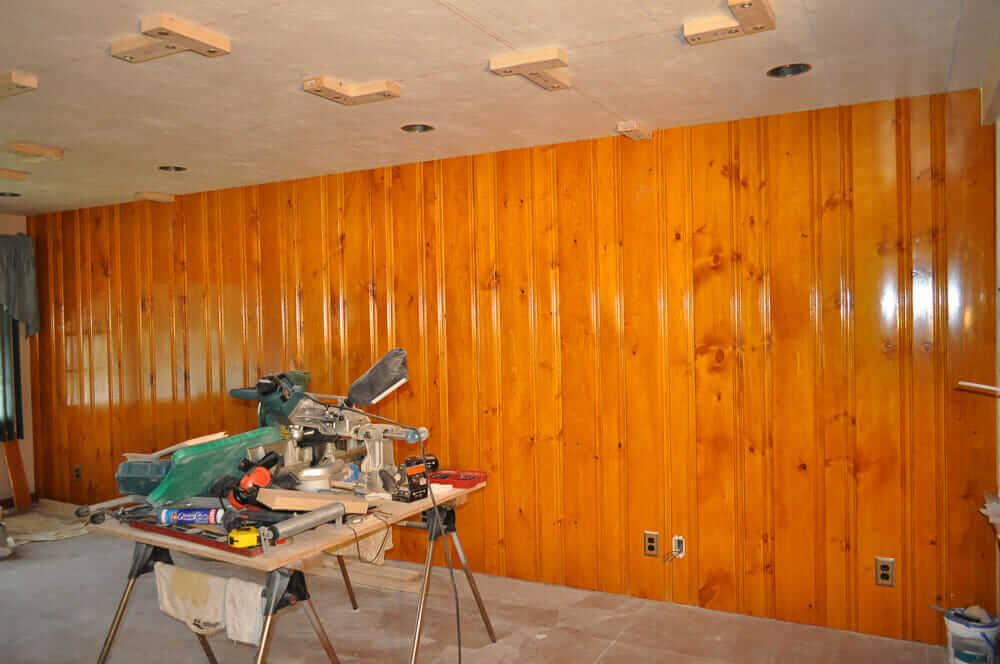
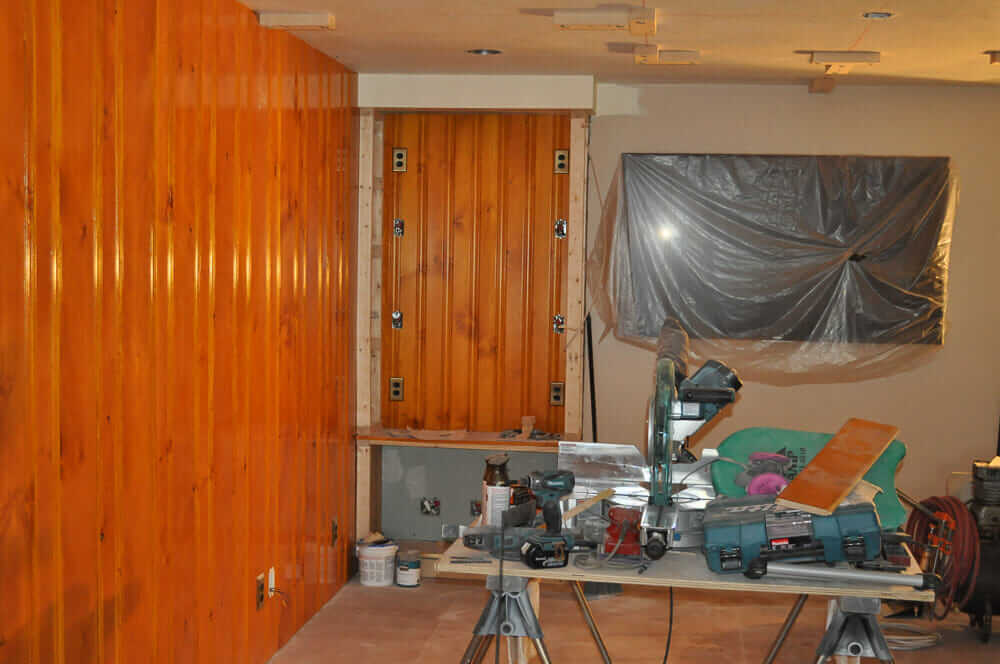
I’m currently working on the living room. I’ve done one accent wall with pickwick paneling and made a bookshelf that is somewhat built in. (it isn’t recessed but it is attached to the wall). I’m adding faux beams to the ceiling and this brings me to my question. The pickwick was finished with 2 coats of amber stain by General finishes, 2 coats of clear shellac and 3-4 coats of amber shellac (what a process, but results were fantastic!).
I’m wondering what to do for the beams though; do I finish to match the paneling or do I go darker to contrast the paneling. I wouldn’t want it to be dark, dark brown but I’m thinking maybe a shade or two darker (just a hint of brown) would be nice. Then again, maybe the same color as the paneling would be acceptable. The beams will be pine boards similar to what you would find at Home Depot. I’m not sure if it’s exactly considered knotty pine, but it is pine.
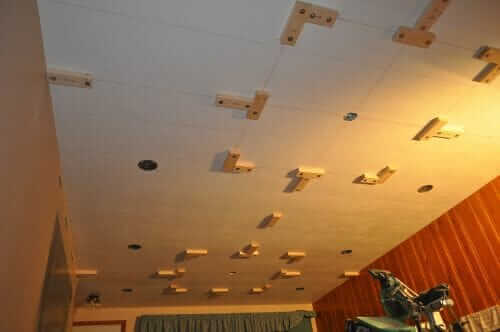
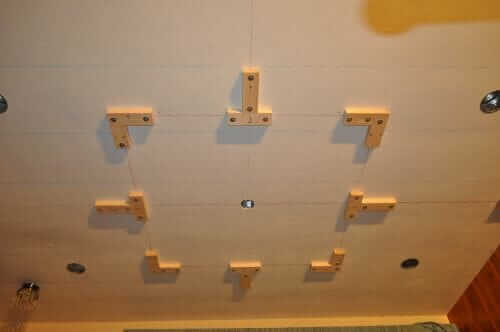
The room is literally a construction zone right now, so there is no decor, flooring (aside from sub-floor) or much else to base opinions on. [In the photos you can see] the wall with pickwick paneling and the frame work for the beams as well as the design I made illustrating the layout of the beams. Hopefully this will help and I sincerely appreciate any help and opinions from the readers! Thanks!
Very cool! That knotty pine indeed looks amazing! Of course, I asked Dan for some more info about the house and how he got into The Retro. Oh, and you’ll see I also nudged him suggesting that he might want to consider wallpaper on the ceiling — like in Brian and Keri’s den, dreamy!.
- Knotty is Nice: All our stories about Knotty Pine.
Dan wrote:
The house was built in 1956 and has (sort of) been in the family ever since. My Grandmother’s Godmother and her husband had the house built. Both my Grandmother and Grandfather acquired the house in 1997 and lived in it until they both passed. I’ll be purchasing the house in a couple of months but have done tons of work in it over the years. My Grandfather was a self taught carpenter (mostly finish carpentry) after he retired from the Fire Department in 1988. I took an interest in woodworking ever since I was old enough to work with him but unfortunately he gave it up by the time I was old enough to really delve into it. Pretty much everything I know I learned through trial and error and just doing.
I’m not quite sure when all this mid-century/vintage/retro stuff sparked an interest for me but for as long as I can remember, I always loved the somewhat simplistic and (sometimes) chaotic (think clashing, bright colors on carpets, furniture, etc) look that is mid-century. Recently, I’ve really come to appreciate the craftsmanship that went into building these old homes: the natural woodwork, solid wood cabinetry, chrome trim around counter-tops, top notch building materials, the list goes on. It’s clear they took pride in their work, and while there’s certainly still builders around who do, I think a lot of that has fallen by the wayside for faster and cheaper building methods.
As for this current project, I searched high and low for years as to what kind of paneling I’m putting up, and I finally stumbled upon your site and it cleared it up for me. I was so happy to figure out what it finally was. My parents have this paneling in the living room of their 1956 Cape Cod. Unfortunately, my Mom convinced my Dad to paint it years ago and that was before I had a real appreciation for this stuff. I now have a strict “no painting natural woodwork” policy. I do painting and wallpapering on the side and have turned down many jobs where people wanted to paint the natural woodwork in their homes. I just can’t bring myself to do it.I drove from Buffalo, NY, to Middletown, PA, with a pickup truck to get all the paneling I needed. I was going to buy enough to do a small wall in the dining room too but unfortunately, a lot of the paneling at the yard was damaged when it got shipped to them so I was only able to get enough to do the living room wall and the back wall of the book case with a couple boards left over.Staining and finishing was a huge undertaking, and I’ll likely never do a job again this large. I found a stain that nearly hits the nail on the head in matching the original woodwork in the house which is General Finishes Amber Dye. To cover that I did two coats of clear shellac and 3-4 coats of amber shellac. It was my first time working with shellac on such a large scale, and there is definitely a learning curve, but the results were phenomenal!I had to chuckle when you mentioned wallpapering the ceiling because that is exactly what I’m doing. I’ve already ordered the Anaglypta (style Turner Tile) and that goes up next, then painted, followed by the finished boards for the beams. I’ve been working steadily on this room since last October, and it’ll probably be two-three more months before it’s actually done. I’d like to do the dining room next, but I can’t think about that right now… too overwhelming! HAHAWhen the project is all done, I can send pictures of everything from start to finish if you’d like to update the story. If you have any other questions, let me know.
Thanks!!-Dan
Okay readers, time to o-pine (sorry, I had to!):
Should the ceiling beams be stained the same as the wall, or should they be darker?


Linda E says
I vote a smidge darker.
Here’s a hint I found a while back. I’ve used it with a lot of success. Add some iodine to the amber shellac – it darkens (adds more red) but looks really natural. I guess that’s what they did ‘back in the day’. And you can control how much, but a little goes a long way.
Can’t wait to see more pictures!
Virginia says
That is a beautiful job and that wall just glows. What an incredible addtion.
In light of the walls gorgeousness, I am doubtful about faux beams. Beams are structural, and adding faux ones just seems counter tot he honest spirit of these homes. Especially given the gorgeous example of a wallpaper ceiling and the wood. With textured lincrusta, and the faux beams, and the wall, I think you lose the impact of the wall and move into “too much” territory. That example of the wallpaper ceiling is so gorgeous because the colors really complement each other, and draw the eye to the beauties of both treatments. Three things going on, with one treatment bisecting the other treatment, seems to lessen the synergy.
Jayne LaFleur says
I think they’d look more authentic if they were the same color.
Kathi says
Dan, first off…WOW! You’re dedicated and very talented. Nicely done.
As for my vote, we have a wood-panelled family room that was added in 1963 to our 1954 ranch. The wood of the panelling remains a mystery (matte finished, less knotty and more orange than pine), but the spirit appears the same as most panelled rooms and they put dark, coffee-colored beams on the vaulted ceiling with cream ceiling. Pretty sure the color is original and it looks sharp. The contrast is nice and it breaks up the other wood color a bit and draws the eye upwards. Put me down in the “dark beams” category! 🙂
Mary W. says
I think I would do them the same color, but with a matter finish, which will make them look a slightly darker shade.
Dortha says
I’d go lighter, not darker. Ummm, I think darker can feel a bit claustrophobic.
Allison says
Voting for the same or just slightly darker on the beams.
For those of you who want to mellow and age your wood tones, consider using a darker and less refined shellac than the amber which is commonly available pre-mixed.
The darker shellacs gives a lovely honeyed hue to woods of all species, and shellac is the most forgiving of finishes; easy to apply, easy to remove.
Garnet shellac and seedlac is available on woodworking websites as flakes, which the homeowner then dissolves in denatured alcohol (warning; it may take several days and LOTS of shaking to get the flakes completely dissolved; that’s just the nature of unrefined shellac). The amount of shellac per pint of alcohol is referred to as “cut” . One pound cut, 2 pound cut, etc. The lighter the cut, the thinner the coat of shellac, the more coats needed and the fewer the possible drips or runs. 2 pound cut is a good all-purpose weight. The more coats you wipe on the deeper the color of your finish.
Shellac is removed readily with some more denatured alcohol; its easy to fix errors and scratches, non-toxic.
Tom says
Matching color would be nice but if it’s a little darker it will work too.
Very cool to see pine walls getting some attention.
Joe says
Hey, Dan! Nice job! I now own my parents’ home, and back in 1955 my mom had knotty pine paneling installed halfway up the walls of her kitchen. You did a terrific job applying finishes, because it took our knotty pine 60+ years of aging and 5 coats of amber shellac to create what you’ve achieved! I love late afternoon, when the western sun comes through the windows and washes the golden wood!
Anyway, if I were you, I strongly urge you to keep the beams the same color shade as the wall. You’ll have a harmonious look. When people enter the room, their first impression will be “what beautiful original knotty pine – I love how they installed beams to match the wall!”. If you don’t match, peoples’ reaction will be “nice original knotty pine on the wall – I see you’ve added beams to the ceiling!”. I speak from my experience, because my dad was legendary for spending his free moments constantly updating the house with new items from the improvement stores. He installed faux ceiling beams in the kitchen in the only shade available, which was darker, and the look did not age well. It was very messy taking those beams down during the 2015 retro remodel, and I ended up having to install new veneer sheetrock. If you look at pictures online of arts and crafts homes, they paneled walls and installed ceiling beams, and everything was a unified shade and finish.
BTW while you’re plotting the design of your beams, you might want to consider running electric wires into some of them. you can install recessed lighting and/or hanging fixture (as in pool table light)! And if you need to ever wash the knotty pine, use Murphy’s Oil Soap, because it cleans right down to the original shine and doesn’t leave residue.
Jay says
First off, that wall is beautiful and very appropriate to the age of your house. Keep up the great work!
So, keep it the same color if you want to be true to the era and give the impression it’s original to the house. All the knotty pine basements/rooms I was ever in, including my parent’s basement had matching stain. Any finished “beams’ in basement rooms were not structural and were either decorative or part of the fit out framing to conceal ducts and pipes where headroom permitted.