

We love pink kitchens, and we love stories of readers who take a big gulp and dive into their design projects “the hard way” — hunting down salvage, finding the hard-to-find, tackling DIY when standard just won’t do, and putting it all together in their own unique way. Bit bad by the mid mod bug, Monica (shown, right) sums up the journey that she — and many of us, I suspect — undertake with our Retro Renovations:
Our simple project that would easily have been completed in a few months and a trip to a big box store turned into over a year of hunting and gathering, repainting, refinishing and reupholstering.
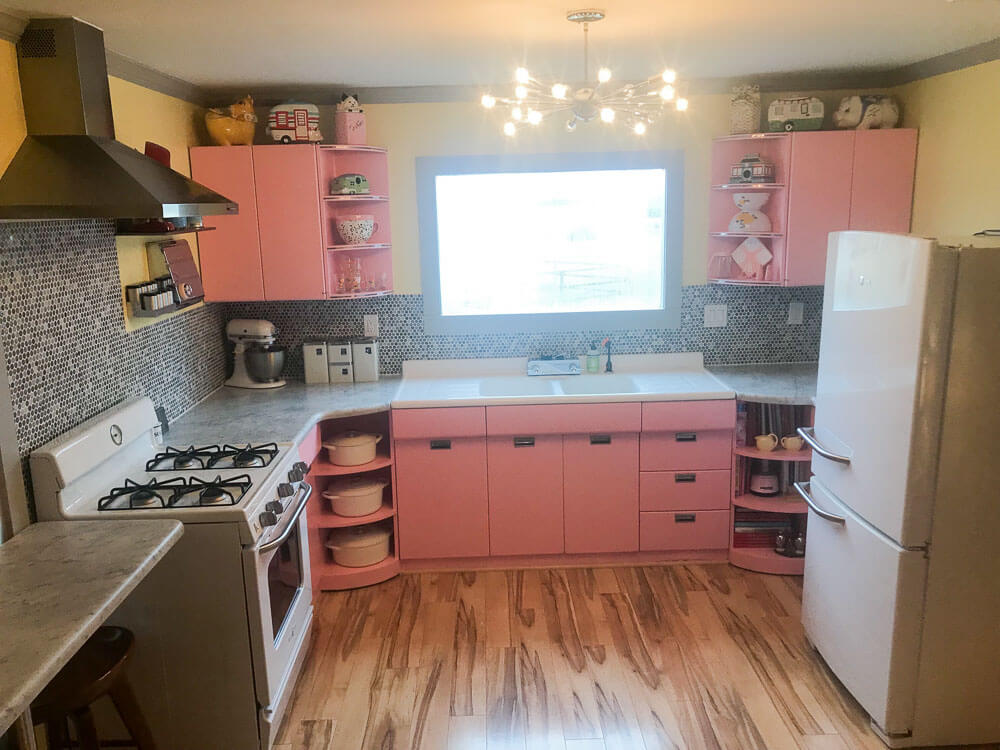
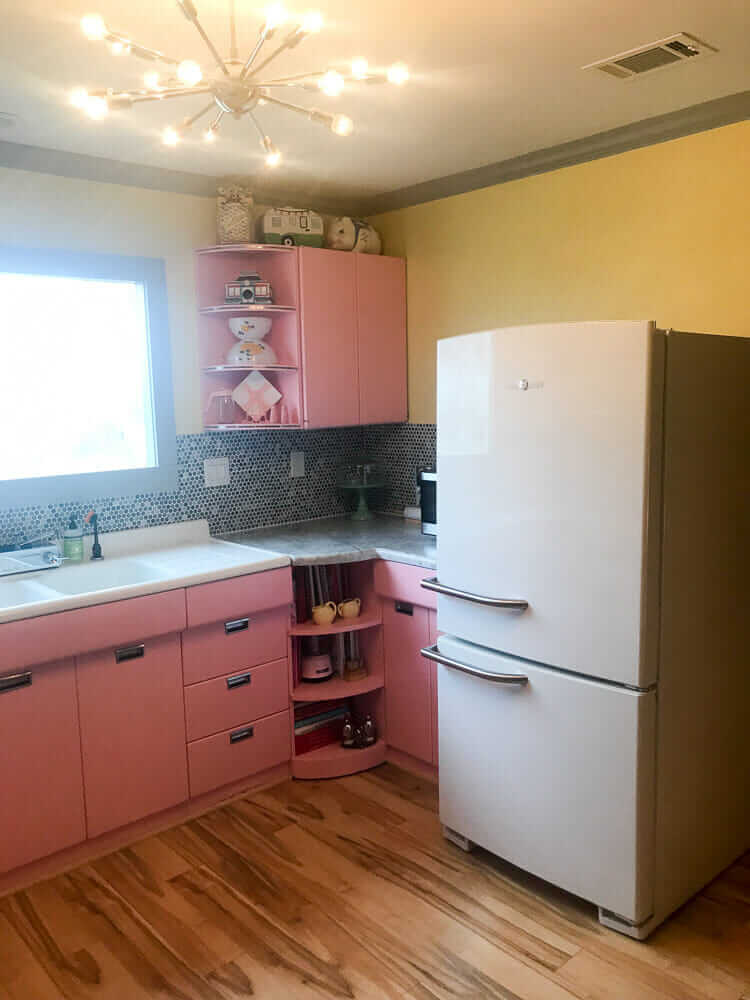
Indeed! Today, let’s take a look inside this pretty in pink retro kitchen inside the family’s weekend cabin:
Monica wrote (several emails edited together):
Hi Pam, We added onto my grandfather’s hunting cabin to make a very special weekend home. We refer to it as the cabin. It’s less than 900sq.ft., but it lives much bigger.
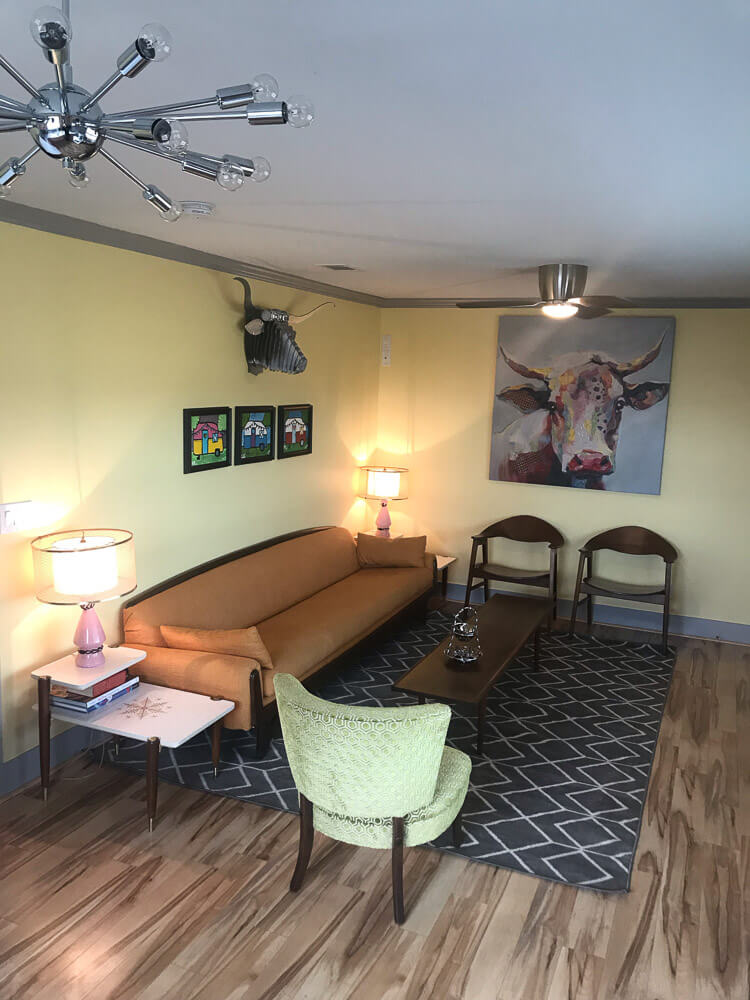
The kitchen is new construction. My grandpa built a little camp house, 12 x 24, it didn’t have electricity or running water. We moved it from the backside of our property to the hill where it sits now. We added an equal size room onto the front of it and another onto the backside of it. All the work from beginning to end was done by my family members. Only the bathroom tile, the cabinet paint, the sheetrock and the flooring were done by contractors. It has truly been a labor of love!The retro look started with finding an Adrian Pearsall sofa at the beginning of the project. While I was trying to gather information on the sofa I stumbled onto your blog and the rest, as they say, is history.
Our simple project that would easily have been completed in a few months and a trip to a big box store turned into over a year of hunting and gathering, repainting, refinishing and reupholstering. I poured over your blog, scoured e-bay, searched craigslist and basically lived on Pinterest to get the job done.
The only person who worked harder to make my dream of an honest to goodness mid century bungalow come true was my amazing husband. I love the result so much that we are in the process of designing our mid century ranch dream home right now. I already have the bathroom fixtures for all 3 and 1/2 bathrooms! Each one is a different pastel! I want to build a brand new home that could have been plucked right out of 1956. I tend to take a few liberties, everything isn’t vintage, but what isn’t definitely has a retro feel to it.
A little about me: I’m 39, married for 20 years to my high school sweetheart, have 3 kids, I homeschool, I love cooking, travel, architecture and decorating! We live on a ranch in Texas surrounded by family and friends. Life is grand! As you know doing it the hard way is a lot of work, but worth every penny and step.
Thanks again for taking the time to look at my “ baby”, and thank you for your blog, without it I never would have discovered my passion for the fabulous 50’s and 60’s. Thanks for all your inspiration and your dedication to the fabulous 40s, 50s and 60s!
Best Wishes, Monica
Resources for Monica’s pink kitchen remodel:
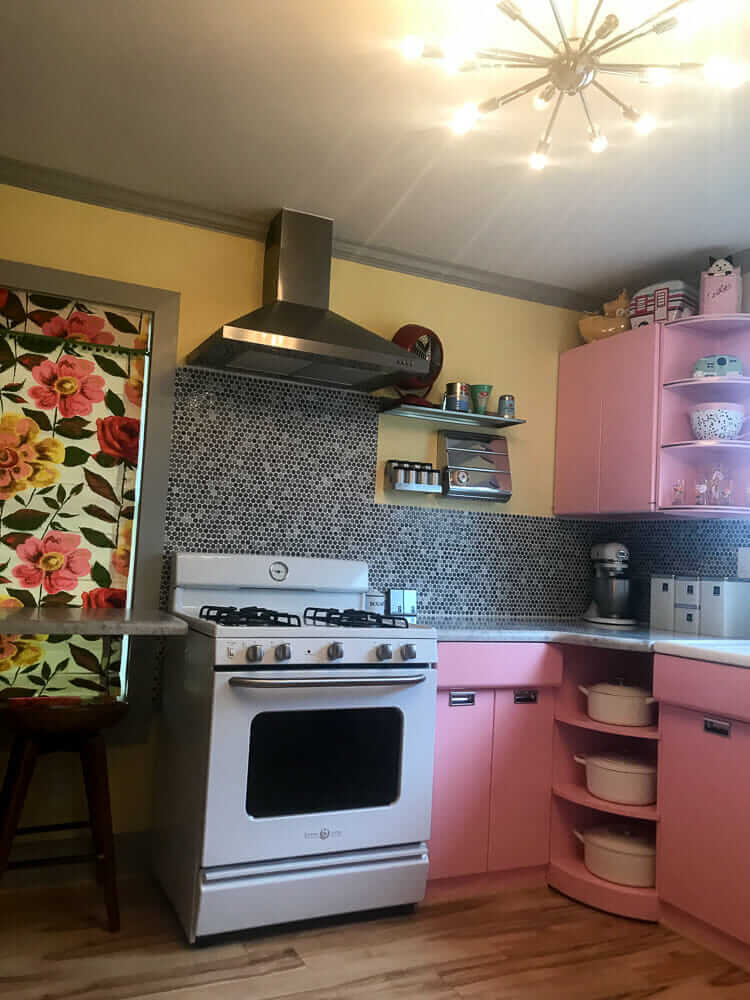
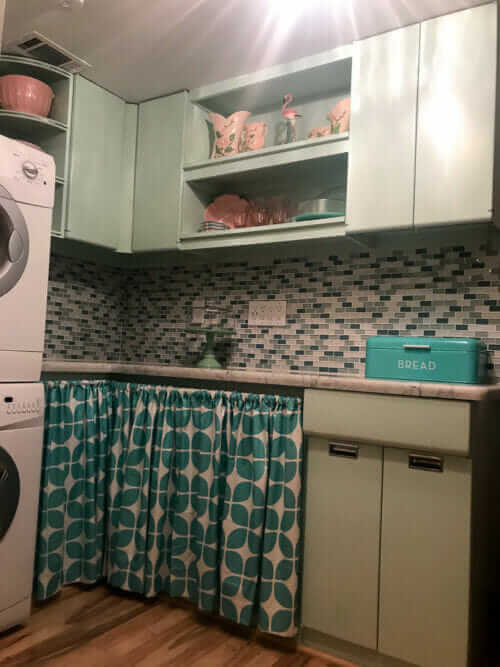 Kitchen cabinets — The kitchen and utility cabinets (shown right) are Sears and were dated 1953. I scored them off of Craigslist. We have, of course, repainted them in pink and mint. My husband and brother custom made the lower corner shelves to coordinate with the uppers.
 - Appliances: The appliances are GE Artistry (now discontinued).
- Kitchen faucet: Dishmaster
- Countertops: “Blanco Carrara marble. We chose to have it honed instead of polished. I like the softer look and I thought that it looked closer to the laminate tops of the past. I haven’t had a problem with staining but it is soft and scratches easily. I like to think that the scratches and other imperfections that develop over time just add character
“
- Ceiling light: The atomic light in the kitchen is the 24” midround in chrome made by Practical Props.
- Tile backsplash: Floor and Decor Festival Dark Gray II penny round tile.
- Accessories: The Lincoln Beautyware
(affiliate link) canisters and wall dispenser were EBay finds.
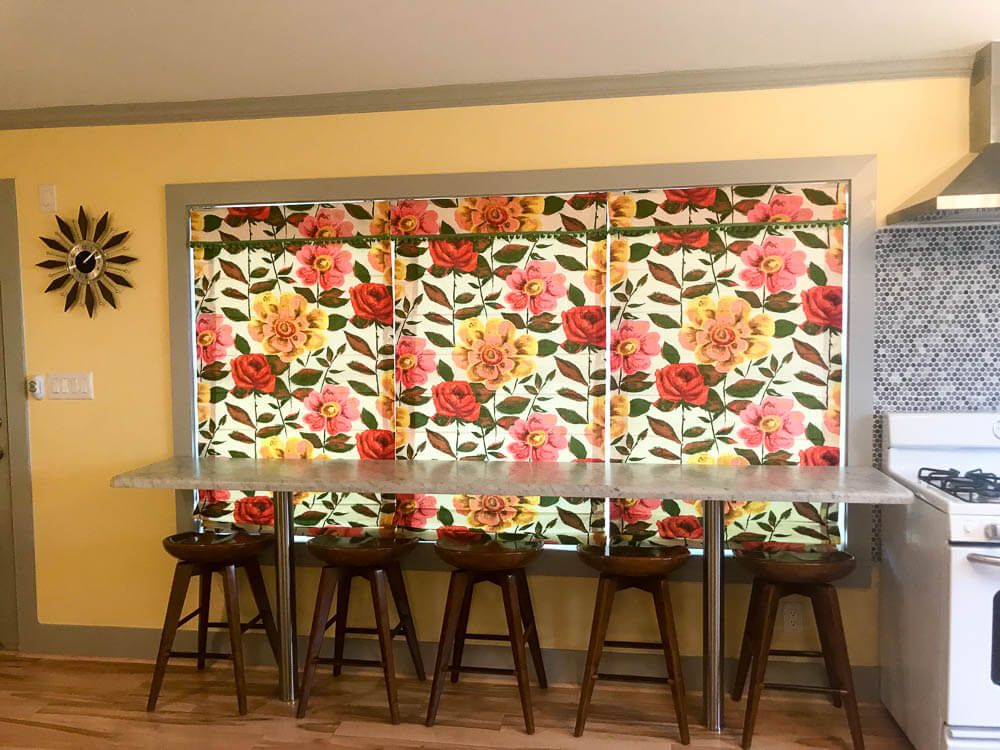
- The barstools and clock are not vintage, I purchased them from Amazon, but they have the right retro lines to fit right in!
- Paint colors:
-
Kitchen Cabinets- In The Pink 6583
-
Kitchen Walls- Optimistic Yellow 6900 — Pam notes: Yellows are the most difficult colors to get right, because the color becomes distorted as its reflects and bounces off itself. This one looks like a winner!
-
Utility Cabinets- Mint Condition 6743
-
“White” walls- Marshmallow 7001
-
Master Bedroom- Demure 6295
-
Trim- Gray Clouds 7658
-

 What a fun project, Monica, to get the opportunity to renovate an entire cabin. (We are going to take a look at your bathroom tomorrow.) The kitchen is just darling, and the story, just as great! And speaking from personal experience I will add: Your children will grow up … beaming about this kitchen (and their mother and father’s adventures to create it) even if they don’t totally appreciate it now. Thanks for sharing your story, the resources, your photos, and your inspiration with all of us!


Chelsea says
I adore this kitchen! Is that vintage or new fabric you used for the under counter curtain? This is exactly what I’ve been looking for for my windows in my retro red and teal kitchen.
Monica Cantrell says
Thank you! The fabric is from premade drapery panels that I bought from JC Penny, that way I only had to sew one the pocket for the rod to slide in!
Chelsea says
Great idea! Now I need to find those curtains 🙂
Cindy Dahlgren says
Now you need to find an early 50’s or late 40’s stove ! I LOOOOVE my 1949 Wedgewood gas stove.
Monica Cantrell says
How awesome, you lucky lady!!
Monica Wood says
Great renovation! I’m a pink fan too. Enjoy your beautiful cabin and thanks for sharing it to inspire the rest of us.
Monica Cantrell says
Thank you! Everyone has been so kind and encouraging!
Allison says
Thank you Monica, for the peek into your sweetheart of a kitchen! the pink cabs are so gorgeous, and your window shades are to die for.
And Pam, while your posts on materials and sources are super useful and important, the “fun” part of the blog for me is seeing what other RR devotees are doing with their own homes.
Ahh, for the gold old days of the uploader…
Monica Cantrell says
Thank you for your compliment. It has been delightful to hear from others who enjoy mid century style.
Crystal says
Any advice on painting the cabinets? We were going to have ours done at an auto shop, but will have to make two cabinets out of wood so we need the finish to match.
Monica Cantrell says
I would suggest talking to a local professional painter. Ours didn’t do a great job, though I think some could and would. Our main problem is that the painters didn’t fully sand the original paint off of the cabinets. While I’m not pleased with the quality of the painters work the paint itself has held up very well and you can’t tell a difference in the color/ finish of the metal cabinets and the wood corner pieces unless you are right next to them! The paint finish is satin or eggshell. We too were going to use an auto shop to paint the cabinets and ran into the same problem! We had a metal cabinet in our bathroom painted at the auto shop and it is a beautiful, shiny masterpiece but I adore the soft look of the cabinets in the kitchen. I hope this info helps, but a painter will have the smarts to really help you make the best decision. Good Luck!!
Crystal says
Thanks for your advice. What brand/type of paint did your painters use? Didn’t see that info on the source list.
Renée says
I am in the process of stripping these exact cabinets. Yes, any details on the process would be appreciated! I used appliance white spray paint by Rustoleum for the doors. It’s ok. In my bathroom I used a baby girl pink spray for a shelf unit (typewriter table).
Pam Kueber says
Renee and Monica, when it comes to this type of effort, I recommend that readers consult with professionals. Remember also, there can be hazards — such as lead in old paint — be sure renovate safely — again, consult with properly licensed professionals to assess what you are dealing with so that you can make informed decisions how to handle. For more info, see our Be Safe / Renovate Safe page –>> https://retrorenovation.com/renovate-safe/
Carolyn says
When you think of going to the cabin or cottage, there’s a certain expectation you have. Not anything specific but you know it will be completely different from your everyday life. Getting away from the stress and “noise” to the quiet of”‘away”. This renovation takes us back to our childhood even if we weren’t born or grew up in the retro eras. Your cabin looks like a place memories where were made even tho’ it’s pretty much all “new”.
In WI we have a saying of “going up nort'” – no geographical line, it’s the point you hit where your shoulders finally descend from up around your ears. It must be wonder full turning into your drive.
Monica Cantrell says
You said it perfectly! Our cabin represents a “soft place to land” in our busy lives. Thank you for pointing out what is the best part of “cabin” life.
Karin says
What a charming kitchen. You did a great renovation. The custom curved corner shelves are a brilliant idea. Thank you for the inspiration.
Monica Cantrell says
Thank you for you gracious comments! I do love working in such a colorful space. It makes doing dishes fun, if that’s possible?
Ranger Smith says
The furnishings, cabinets, colors and accessories really work to make this a great space. That sofa is really a great find! I used Sherwin Williams Optimistic Yellow in a small 1/2 bath and boy was it bright. It looks perfect with the grey trim in this larger space.
Monica Cantrell says
Thank you for the compliment! I agree, the yellow only works because of the open space and all the natural light from the windows. That said I have to use “natural” light bulbs in the lamps. If the bulb puts out too warm of a light the room turns way too gold at night.
melanie jean Beck says
I have metal cabinets in my kitchen also. Mine were built by RCA Whirlpool sometime in the mid 1950’s.
Kathryn Weller says
The pink cabinets are fabulous, and so is the floral window treatment! Way to go!
Monica Cantrell says
Thank you! I made the shades by covering basic white Roman shades (from JC Penny) with panels of vintage fabric! I used iron on fusible webbing to “glue” the vintage fabric onto the shades. Thanks again for your compliment?
Pam Kueber says
Very clever! You reminded me that I wrote about this once: https://retrorenovation.com/2012/02/28/make-your-own-fabric-covered-roller-shades-plus-i-do-research-to-cut-the-kit-price-30/
Sheila says
That’s a great idea. I have some Roman shades that are falling apart and was dreading sewing new ones. I’m going to follow your lead.