


ARE YOU LOOKING FOR an authentic midcentury window treatment that is “simpler” and/or less expensive than pinch-pleat draperies or horizontal blinds — especially when it comes to a smaller window? Roller shades are a great alternative to add to your stable of choices.
Here are three ways to recreate the style:
- Simple, “pull-down” shades are available at many local hardware stores, and the big-box hardware stores have them, too. In both places, they cut them to your size, on site. When you go in, be sure to know whether you want to install them inside the window frame, or outside, and be ready with your measurements for both height and width. Roller shades from the hardware store are generally very inexpensive, but the options can be quite limited – white or almond-colored vinyl only, with kind of cheesy trim (as I recall). You might also find these at estate sales — used or unused — and if you can be patient, you can find them for a song.
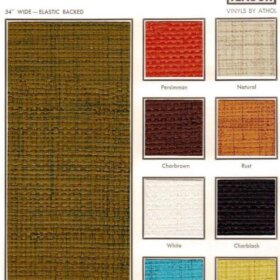
- Another alternative is a fabric shade custom made to your specs. I have these in my bedrooms, with a scalloped edge and tassel-y trim (called “gimp”). I also paid for the cassette upgrade – which allows me to lower and raise them with a pulley system. Fabric roller shades are available from a wide number of manufacturers. And, they can be ordered in all kinds of fabrics. In the main image above — from 1952 — you can see “oatmeal” and “shantung” fabrics — these kinds of fabrics are still very commonly available today… they’re what I used.
- If you are really handy – you can sew your own shade from fabric, or glue fabric straight onto an inexpensive shade cut to size from the hardware store or an estate sale. Watch tomorrow for a post on how to make your own fabric shades based on vintage 1959 instructions.
Notes:
- I ordered my bedroom shades, I labored over whether to buy the “black-out” design that totally blocks light, or the more translucent design. I decided on the translucent because we thought it would be nice to be awakened each day by the light slowing permeating the room. I think this choice is very personal… but it’s one more issue you will want to think about before making a final choice.
- And in my bedrooms, I ultimately added pinch pleats over the roller shades. This layered effect is wonderful. And, if you are new to your home…and need immediate privacy…but want to wait to find the perfect set of draperies…you can install the roller shades right away and then take the time you need to find draperies (thrifted, new or home-made.)


Marta Aberg says
Fusible shade backing is available at most fabric stores. All you do is cut it to size, iron your material on, make a casing on the bottom for the wood strip that makes the shade hang flat (does it have a name?), and attach it to your old shade roller or one you’ve ‘reclaimed’.
To make the wood strip casing, you just sew a 3/4″ hem at the bottom. For you scallop lovers, it’s only slightly more difficult. Decide how long you want your scallops or other fancies. We’ll say 4″. Add 1/2″ to make it easier to cut. Add 1-1/2″ for the casing (3/4″ up plus 3/4″ down). That’s 6″, so with shade fabric-side up, measure up 5-1/4″ from the bottom and draw a line (NO INK) the whole way across. Measure up 6″ from bottom and draw another line (NO INK) the whole way across. Fold the shade back to back along the 6″ line. DO NOT USE PINS to hold the shade. They will make holes in the backing. Sew the casing along the 5-1/4″ line. Fold the bottom of the shade back down. This will give you a shade with the scallops behind the wood casing and shade pull. If you want the scallops in front (wood casing and pull hidden), draw your lines with the shade fabric-side down. Either way, when you’ve finished cutting and trimming your scallops, and are ready attach the shade to the roller, slide the wood thing into casing. Attach whatever kind of shade pull you’re using. Now, you’re going to hot glue (preferably low-temp) the casing flap to the shade. Do this by folding the casing flap up from the seam and running an even thin line of hot glue across the shade about 1/2″ down from the seam. Avoid pull area. Immediately press flap down, making sure it’s even. Attach your shade to the roller and hang.
For attaching, I prefer packing or duck tape over staples or glue. Precision here is critical, unless you want to spend some quality time doing this step over and over trying to get the shade to hang straight. My trick is to clamp the roller to a table, lay a flat carpenter’s pencil on the tabletop, and draw a line from one side of the shade to the other. That gives you a dead certain reference line, so as long as your shade is square (as in exactly the same width along the entire length, and exactly the same length along the entire width), you just line it up and tape it on. Make sure the backing is against the roller, not the fabric.
About Measuring: The difference between easy and not as easy when making shades (or wallpapering, etc.) is having a rotary cutter, a large rotary cutting mat, and a long rectangular clear plastic grid thingy. These quilter’s tools make cutting straight edges, and cutting in general, a breeze. Using them and knowing your pattern repeat saves money and time when wallpapering. Cut paper and pictures exactly. I usually cut my fabric and backing an inch or so wider than my finished shade width, then trim to size after ironing them together. Having the backing fused to the fabric for the final cut keeps the edges from fraying.
About Sewing; It’s okay if you don’t or can’t. Heat-activated (iron-on) fusible web is sold in rolls like ribbon. Use it to make the casing, but remember it will take up more room than stitches, so measure accordingly.
About Pinning: Don’t. Just don’t. It makes holes. Instead, get a couple boxes of those black foldy-springy paper clip things in the small size. Use them to hold the backing and fabric along the fold. They’ll hold tight, and won’t warp the edge like a regular paper clip, and won’t get in the way like clothes pins. They’re also handy for a hundred other things.
About Shade Backing: Fusible shade backing makes heavier shades that block light and cold. If you want shades that are more light filtering, just use regular fusible interfacing. Make sure you get a size wide enough for your windows.
About Scallops: Decide what kind; shallow or deep, lots of little ones, fewer wide ones. An odd number looks better than an even one, as it positions the center of a scallop at the center of the shade. That also makes it easier if you’re overwhelmed by the math of figuring out exactly how wide the scallops need to be to fit the width of the shade; you can just make the center scallop a little bigger than the others to compensate. Everyone will think it’s a design statement.
Have fun!
pam kueber says
Thank you, Marta!!!!
Katie Wolverton says
I think I’m a different one. I’m married to Anthony. His family is from Montana, so we might be related. I don’t meet many Wolvertons.
Maria Stahl says
(I used to know a Katie Wolverton! Are you she? Married to Monte?)
Katie Wolverton says
I found some inexpensive roller shades at Ikea. The color selection isn’t the greatest, but they work great and they’re really cheap. I’ve got tupplur shades in my bedroom in black and on the weekends the only way I know the sun’s out is if one of my cats tries to get into the window. Ikea also used to have some awesome aluminum blinds, but they don’t seem to have them on they’re website.
http://www.ikea.com/us/en/catalog/categories/range/10374/10701/
D. Reisner says
Katie,
How do you mount the Ikea Tuppler roller blinds? They are no instructions and no hardware. I’m definitely at the level of guessing, and I don’t know if I’m a good guesser.
Thanks.
D.
Cheryl Lasiter says
I remember when I was a teenager my Mother and I used wallpaper paste to put matching wallpaper on my shades. Soooooo Cool
Julie Rogers says
I can’t swear what year these bad boys are from, but our 1955 had OLD roller shades on the windows that featured a scalloped bottom edge with a bit of fringe. The fringe was yellowed and horrifying.
But I sort of liked the roller shades even though I’d grown up thinking they were low-class in the 1980s.
So I took scissors to the scallops to create a straight edge and they look great and ready to survive a few more decades.
Maria Stahl says
A shade pull? :o)
sablemable says
I already have a roller shade on my picture window, but it’s looking a bit worn out from the sun hitting it. I wonder if I can still get a roller shade with that little pull-down thingy on the end? That’s how I remember these kind of shades.
Anybody know what the pulley thingy is called, LOL?
Maria Stahl says
I pull old roller shades out of the trash all the time. :o) The parts are good, just yank off the shade part, glue on some fabric and there you are. The only sewing required is the pocket at the bottom to hold the bottom rail.
The old shades are the best, the ones made from wood dowel. Please, nobody throw those away, I want ’em! LOL!
Elvis (aka) Jane says
We love our roller shades in the living and dining rooms. Ours came from Smith&Noble, and they work so well because they are inset and allow the nice mahogany window trim (about the only trim detail in our whole sleeked-down 50s house!) to show around all four sides. We had very limited fabric choices due to the width of our picture window, but found a neutral fabric that seems to enhance the mahogany color of the sills and trim. We also got the tubular metal bottom rail that’s a great upgrade for these simple shades. We have grasscloth roller shades in our kitchen and breakfast room, too. They provide privacy and a nice textural tone while still allowing some light through.